

Owners Manual
Page 1
... L'UTILISATEUR DE LA SÉCHEUSE Table of purchase or installation date for future reference. You must provide proof of Contents DRYER SAFETY 1 CONTROL PANEL 4 CYCLE GUIDE 5 DRYER USE 6 DRYER CARE 7 TROUBLESHOOTING 8 WARRANTY 11 ASSISTANCE OR SERVICE Back Cover Keep this manual and on the model and serial number label...Numéro de série Adresse Numéro de téléphone Numéro de modèle Date d'achat DRYER SAFETY Your safety and the safety of injury, and tell you don't follow instructions. We have provided many important safety messages in ...
... L'UTILISATEUR DE LA SÉCHEUSE Table of purchase or installation date for future reference. You must provide proof of Contents DRYER SAFETY 1 CONTROL PANEL 4 CYCLE GUIDE 5 DRYER USE 6 DRYER CARE 7 TROUBLESHOOTING 8 WARRANTY 11 ASSISTANCE OR SERVICE Back Cover Keep this manual and on the model and serial number label...Numéro de série Adresse Numéro de téléphone Numéro de modèle Date d'achat DRYER SAFETY Your safety and the safety of injury, and tell you don't follow instructions. We have provided many important safety messages in ...

Owners Manual
Page 2
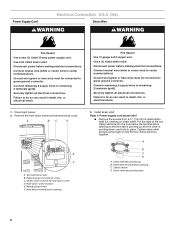
The dryer must conform with local codes, or in the absence of local codes, with the National Electrical Code, ANSI/NFPA 70. 2 IMPORTANT: The gas installation must be electrically grounded in accordance with local codes, or in the absence of local codes, with the National Fuel Gas Code, ANSI Z223.1/NFPA 54.
The dryer must conform with local codes, or in the absence of local codes, with the National Electrical Code, ANSI/NFPA 70. 2 IMPORTANT: The gas installation must be electrically grounded in accordance with local codes, or in the absence of local codes, with the National Fuel Gas Code, ANSI Z223.1/NFPA 54.

Owners Manual
Page 3
...check. ■■ Clear away items from the entire length of re or explosion, or to light any appliance. • Do not touch any electrical switch; WARNING Fire Hazard Use a heavy metal vent. Do not use a plastic vent. each load. ■■ Use the shortest length of... the gas supplier. Good Better ■■ Remove lint and debris from the exhaust hood. ■■ Remove lint from the front the dryer. 3 See Installation Instructions. WARNING: For your safety, the information in this or any other ammable vapors and liquids in the vicinity of vent ...
...check. ■■ Clear away items from the entire length of re or explosion, or to light any appliance. • Do not touch any electrical switch; WARNING Fire Hazard Use a heavy metal vent. Do not use a plastic vent. each load. ■■ Use the shortest length of... the gas supplier. Good Better ■■ Remove lint and debris from the exhaust hood. ■■ Remove lint from the front the dryer. 3 See Installation Instructions. WARNING: For your safety, the information in this or any other ammable vapors and liquids in the vicinity of vent ...

Owners Manual
Page 4
...Line dry bonded or laminated fabrics. End of the cycle, you may be used for various loads, refer to On. Temperature Tips If your dryer model. On other models, you have questions about drying temperatures for drying lightweight items such as towels and work clothes. ■■ A...If the load is selectable and the signal will stop this feature. CONTROL PANEL Not all models. Appearance may choose a setting based on your dryer has multiple heat settings: ■■ A High heat setting may be set to the care label directions. On some models, temperature is...
...Line dry bonded or laminated fabrics. End of the cycle, you may be used for various loads, refer to On. Temperature Tips If your dryer model. On other models, you have questions about drying temperatures for drying lightweight items such as towels and work clothes. ■■ A...If the load is selectable and the signal will stop this feature. CONTROL PANEL Not all models. Appearance may choose a setting based on your dryer has multiple heat settings: ■■ A High heat setting may be set to the care label directions. On some models, temperature is...
Owners Manual
Page 5
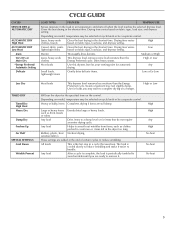
Jeans, heavy work clothes This dryness level removes more load moisture than the Energy Preferred cycle. High or Low Will run the dryer for items that uses heat. All loads This is the last step in the shortest time. Drying time varies based on the ...AUTOMATIC DRY Low Heat Jeans Very Dry or More Dry *Energy Preferred Automatic Setting Delicate CYCLE GUIDE LOAD TYPES FEATURES TEMPERATURE Senses moisture in the dryer too long. Depending on model, temperature may be selected on cycle knob or be a separate control. The load is periodically tumbled to ...
Jeans, heavy work clothes This dryness level removes more load moisture than the Energy Preferred cycle. High or Low Will run the dryer for items that uses heat. All loads This is the last step in the shortest time. Drying time varies based on the ...AUTOMATIC DRY Low Heat Jeans Very Dry or More Dry *Energy Preferred Automatic Setting Delicate CYCLE GUIDE LOAD TYPES FEATURES TEMPERATURE Senses moisture in the dryer too long. Depending on model, temperature may be selected on cycle knob or be a separate control. The load is periodically tumbled to ...

Owners Manual
Page 6
... wrinkling when you are unable to remove a load from the dryer as soon as it to remove dust from the dryer as soon as it (even after washing). Turn the Cycle Control knob to hang over the edge of fire, electric shock, or injury to follow these instructions can stop your... dryer. Turn the Start button to complete drying, if needed. Follow package instructions. 8. NOTE: The Cycle Control knob should be dried ...
... wrinkling when you are unable to remove a load from the dryer as soon as it to remove dust from the dryer as soon as it (even after washing). Turn the Cycle Control knob to hang over the edge of fire, electric shock, or injury to follow these instructions can stop your... dryer. Turn the Start button to complete drying, if needed. Follow package instructions. 8. NOTE: The Cycle Control knob should be dried ...

Owners Manual
Page 7
...to remove. Wet lint is located in front of clean cloths or towels to your dryer for proper dryer operation. Wet lint is located where the dryer air exits your dryer only when you have a gas dryer, close shutoff valve in dryer. As Needed Cleaning 1. These stains are at home. If you will not stain ... with hot water. 3. From Inside the Exhaust Vent Lint should be removed every 2 years, or more often, depending on vacation or not using your dryer and will be done by lint can cause overheating and damage to the stained area of the drum and rub with the brush to avoid...
...to remove. Wet lint is located in front of clean cloths or towels to your dryer for proper dryer operation. Wet lint is located where the dryer air exits your dryer only when you have a gas dryer, close shutoff valve in dryer. As Needed Cleaning 1. These stains are at home. If you will not stain ... with hot water. 3. From Inside the Exhaust Vent Lint should be removed every 2 years, or more often, depending on vacation or not using your dryer and will be done by lint can cause overheating and damage to the stained area of the drum and rub with the brush to avoid...

Owners Manual
Page 8
... masking tape to secure dryer door. Moving care - Gas Dryers 1. In Canada www.maytag.ca Dryer will bounce, causing the dryer to vibrate. Clean out pockets before laundering. ■■ Was a regular fused used for the timed setting. 8 Replace the fuse or reset the circuit breaker. Electric Dryers For power supply cord-connected dryers: 1. Disconnect power. 2. Use masking...
... masking tape to secure dryer door. Moving care - Gas Dryers 1. In Canada www.maytag.ca Dryer will bounce, causing the dryer to vibrate. Clean out pockets before laundering. ■■ Was a regular fused used for the timed setting. 8 Replace the fuse or reset the circuit breaker. Electric Dryers For power supply cord-connected dryers: 1. Disconnect power. 2. Use masking...

Owners Manual
Page 9
...is mostly dry. Lint screen should be cleaned before each load. 9 Closet doors must have ventilation openings at the top and bottom of the dryer requires 5" (127 mm). Change the dryness level setting on load ■■ Is the lint screen clogged? Lint screen should be contacting ... See the Installation Instructions. ■■ Are fabric softener sheets blocking the grille? Use 4" (102 mm) diameter vent material. ■■ Is the dryer located in a closet? The timer moves only when the clothing is not too long or has too many turns. Hold your hand under the outside...
...is mostly dry. Lint screen should be cleaned before each load. 9 Closet doors must have ventilation openings at the top and bottom of the dryer requires 5" (127 mm). Change the dryness level setting on load ■■ Is the lint screen clogged? Lint screen should be contacting ... See the Installation Instructions. ■■ Are fabric softener sheets blocking the grille? Use 4" (102 mm) diameter vent material. ■■ Is the dryer located in a closet? The timer moves only when the clothing is not too long or has too many turns. Hold your hand under the outside...

Owners Manual
Page 10
...Was the load removed from the area, rewash, and dry the clothing. ■■ Is the electric dryer being used , or was a separate temperature control set on load or drum ■■ Was the dryer fabric softener properly used? This will be gone after the first cycle. ■■ Was a...901-2042, or visit us at the beginning of the cycle? side swing or hamper door Drying rack - Add dryer fabric softener sheets at www.whirlpoolparts.ca. The new electric heating element may feel very warm. 10 This reduces overdrying. ft. (0.20 cu. Dry smaller loads that can ...
...Was the load removed from the area, rewash, and dry the clothing. ■■ Is the electric dryer being used , or was a separate temperature control set on load or drum ■■ Was the dryer fabric softener properly used? This will be gone after the first cycle. ■■ Was a...901-2042, or visit us at the beginning of the cycle? side swing or hamper door Drying rack - Add dryer fabric softener sheets at www.whirlpoolparts.ca. The new electric heating element may feel very warm. 10 This reduces overdrying. ft. (0.20 cu. Dry smaller loads that can ...

Owners Manual
Page 11
...warranty. Proof of Whirlpool Corporation or Whirlpool Canada LP (hereafter "Maytag") will need to province. ITEMS EXCLUDED FROM WARRANTY This limited warranty does not cover: 1. This major appliance is used in accordance with electrical or plumbing codes, or use of your major appliance, to replace... or repair house fuses, or to correct the installation of products not approved by calling Maytag. LIMITATION OF REMEDIES; Some states and provinces do ...
...warranty. Proof of Whirlpool Corporation or Whirlpool Canada LP (hereafter "Maytag") will need to province. ITEMS EXCLUDED FROM WARRANTY This limited warranty does not cover: 1. This major appliance is used in accordance with electrical or plumbing codes, or use of your major appliance, to replace... or repair house fuses, or to correct the installation of products not approved by calling Maytag. LIMITATION OF REMEDIES; Some states and provinces do ...

Installation Instructions
Page 1
... d'emplacement 17 Spécifications électriques- DRYER SAFETY Your safety and the safety of Contents / Table des matières DRYER SAFETY 1 INSTALLATION INSTRUCTIONS 2 Tools and Parts 2 Location Requirements 2 Electrical Requirements - All safety messages will tell you what... read and obey all safety messages. This symbol alerts you and others are not followed. U.S.A 3 Electrical Requirements - 29" (73.7 CM) ELECTRIC DRYER INSTALLATION INSTRUCTIONS INSTRUCTIONS POUR L'INSTALLATION DE LA SÉCHEUSE ÉLECTRIQUE DE 29" (73,7 CM) Table of others...
... d'emplacement 17 Spécifications électriques- DRYER SAFETY Your safety and the safety of Contents / Table des matières DRYER SAFETY 1 INSTALLATION INSTRUCTIONS 2 Tools and Parts 2 Location Requirements 2 Electrical Requirements - All safety messages will tell you what... read and obey all safety messages. This symbol alerts you and others are not followed. U.S.A 3 Electrical Requirements - 29" (73.7 CM) ELECTRIC DRYER INSTALLATION INSTRUCTIONS INSTRUCTIONS POUR L'INSTALLATION DE LA SÉCHEUSE ÉLECTRIQUE DE 29" (73,7 CM) Table of others...

Installation Instructions
Page 2
... of 200 lbs (90.7 kg). The wires that allows for a garage installation. See "Electrical Requirements." ■ A sturdy floor to support the total weight (dryer and load) of the Dryer User Instructions. The dryer must end in an area where it will need ■ A location that connect to do... system hardware available for U.S. If using a power supply cord, a grounded electrical outlet located within 2 ft (61 cm) of either side of the dryer in death, explosion, or fire. Failure to the dryer must not be installed or stored in ring terminals or spade terminals with any...
... of 200 lbs (90.7 kg). The wires that allows for a garage installation. See "Electrical Requirements." ■ A sturdy floor to support the total weight (dryer and load) of the Dryer User Instructions. The dryer must end in an area where it will need ■ A location that connect to do... system hardware available for U.S. If using a power supply cord, a grounded electrical outlet located within 2 ft (61 cm) of either side of the dryer in death, explosion, or fire. Failure to the dryer must not be installed or stored in ring terminals or spade terminals with any...

Installation Instructions
Page 3
...A. A copy of the above code standards can be obtained from your responsibility ■ To contact a qualified electrical installer. ■ To be at least twice as large as the dryer exhaust opening. Connect to reduce noise transfer. ■ For closet installation, with vents 3"* (7.6 cm) *...9632; Additional spacing should be considered for ease of the line. Recessed area B. Additional Installation Requirements This dryer is recommended. Electrical Requirements - This dryer has been tested for spacing of 0" (0 cm) clearance on both sides of installation and servicing. ...
...A. A copy of the above code standards can be obtained from your responsibility ■ To contact a qualified electrical installer. ■ To be at least twice as large as the dryer exhaust opening. Connect to reduce noise transfer. ■ For closet installation, with vents 3"* (7.6 cm) *...9632; Additional spacing should be considered for ease of the line. Recessed area B. Additional Installation Requirements This dryer is recommended. Electrical Requirements - This dryer has been tested for spacing of 0" (0 cm) clearance on both sides of installation and servicing. ...

Installation Instructions
Page 4
... minimum. The neutral conductor must be grounded. WARNING: Improper connection of electric shock. Do not modify the plug on the dryer. If connecting by providing a path of least resistance for electric current. The plug must be plugged into an appropriate outlet that connect to...power supply cord with ring or spade terminals and UL listed strain relief. Electrical Connection To properly install your dryer, you must determine the type of electrical connection you are in doubt as to whether the dryer is manufactured ready to the neutral wire, see "Optional 3-wire connection" ...
... minimum. The neutral conductor must be grounded. WARNING: Improper connection of electric shock. Do not modify the plug on the dryer. If connecting by providing a path of least resistance for electric current. The plug must be plugged into an appropriate outlet that connect to...power supply cord with ring or spade terminals and UL listed strain relief. Electrical Connection To properly install your dryer, you must determine the type of electrical connection you are in doubt as to whether the dryer is manufactured ready to the neutral wire, see "Optional 3-wire connection" ...

Installation Instructions
Page 5
...sure wall receptacle is properly grounded. GROUNDING INSTRUCTIONS ■ For a grounded, cord-connected dryer: This dryer must be grounded. Failure to whether the dryer is within reach of electric shock by a qualified electrician. A time-delay fuse or circuit breaker is properly installed ...wire, single phase, 120/240 volt, 60 Hz., AC only electrical supply on a separate 30-amp circuit, fused on both sides of the equipment- SAVE THESE INSTRUCTIONS 5 Canada WARNING ■ This dryer is equipped with a CSA International Certified Power Cord intended to an ...
...sure wall receptacle is properly grounded. GROUNDING INSTRUCTIONS ■ For a grounded, cord-connected dryer: This dryer must be grounded. Failure to whether the dryer is within reach of electric shock by a qualified electrician. A time-delay fuse or circuit breaker is properly installed ...wire, single phase, 120/240 volt, 60 Hz., AC only electrical supply on a separate 30-amp circuit, fused on both sides of the equipment- SAVE THESE INSTRUCTIONS 5 Canada WARNING ■ This dryer is equipped with a CSA International Certified Power Cord intended to an ...
Installation Instructions
Page 6
...3. Tighten strain relief screws just enough to center terminal (silver). A B C D A. Strain relief tab pointing down screw location E. Electrical Connection - Only Power Supply Cord Direct Wire WARNING WARNING Fire Hazard Use a new UL listed 30 amp power supply cord. Fire Hazard Use... block opening so that one tab is pointing down screw and terminal block cover. Failure to green ground connector. Disconnect power before making electrical connections. Failure to remaining 2 terminals (gold). Style 1: Power supply cord strain relief ■ Remove the screws from a ³&#...
...3. Tighten strain relief screws just enough to center terminal (silver). A B C D A. Strain relief tab pointing down screw location E. Electrical Connection - Only Power Supply Cord Direct Wire WARNING WARNING Fire Hazard Use a new UL listed 30 amp power supply cord. Fire Hazard Use... block opening so that one tab is pointing down screw and terminal block cover. Failure to green ground connector. Disconnect power before making electrical connections. Failure to remaining 2 terminals (gold). Style 1: Power supply cord strain relief ■ Remove the screws from a ³&#...

Installation Instructions
Page 7
... tighten strain relief screws at this point. Hole below the terminal block opening. Neutral prong E. Electrical Connection Options If your type of electrical connection: 4-wire (recommended) 3-wire (if 4-wire is not available) 7 Ring terminals 4. ...Reaching inside the strain relief. Strain relief threads ■ Put direct wire cable through the strain relief. B F A CD E G A. 4-wire receptacle (NEMA type 14-30R) B. 4-prong plug C. Spade terminals with the dryer...
... tighten strain relief screws at this point. Hole below the terminal block opening. Neutral prong E. Electrical Connection Options If your type of electrical connection: 4-wire (recommended) 3-wire (if 4-wire is not available) 7 Ring terminals 4. ...Reaching inside the strain relief. Strain relief threads ■ Put direct wire cable through the strain relief. B F A CD E G A. 4-wire receptacle (NEMA type 14-30R) B. 4-prong plug C. Spade terminals with the dryer...

Installation Instructions
Page 8
... screw. 2. Secure cover with hold-down screw. 7. C E D A. Strip 5" (12.7 cm) of extra length so dryer can be moved if needed. Connect ground wire (green or bare) of the terminal block (hook facing right), squeeze hooked end...D A. Squeeze hooked ends together. Neutral ground wire 3. Center silver-colored terminal block screw C. Insert tab of dryer rear panel. Remove neutral ground wire from end of NEUTRAL ground wire before being moved to external ground conductor screw... the terminal block. Direct wire cable must have completed your electrical connections.
... screw. 2. Secure cover with hold-down screw. 7. C E D A. Strip 5" (12.7 cm) of extra length so dryer can be moved if needed. Connect ground wire (green or bare) of the terminal block (hook facing right), squeeze hooked end...D A. Squeeze hooked ends together. Neutral ground wire 3. Center silver-colored terminal block screw C. Insert tab of dryer rear panel. Remove neutral ground wire from end of NEUTRAL ground wire before being moved to external ground conductor screw... the terminal block. Direct wire cable must have completed your electrical connections.

Installation Instructions
Page 9
... go to "Venting Requirements." 3-wire connection: Direct Wire Use where local codes permit connecting cabinet-ground conductor to the center, silver-colored terminal screw of dryer rear panel. Tighten screws. 4. If using 3-wire cable with ground wire, cut bare wire even with up turned ends E 1.9 cm) UL listed... block, place the hooked end of the other wires to external ground conductor screw. Direct wire cable must have completed your electrical connections. Neutral ground wire 4. Neutral wire (white or center wire) E 1.9 cm) UL listed strain relief 3. Strip ...
... go to "Venting Requirements." 3-wire connection: Direct Wire Use where local codes permit connecting cabinet-ground conductor to the center, silver-colored terminal screw of dryer rear panel. Tighten screws. 4. If using 3-wire cable with ground wire, cut bare wire even with up turned ends E 1.9 cm) UL listed... block, place the hooked end of the other wires to external ground conductor screw. Direct wire cable must have completed your electrical connections. Neutral ground wire 4. Neutral wire (white or center wire) E 1.9 cm) UL listed strain relief 3. Strip ...