
Owners Manual
Page 4
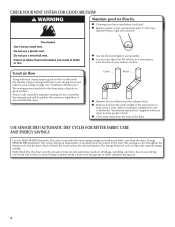
... vent possible. Service calls caused by improper venting are sensed in good air flow. n Use the shortest length of time set and sometimes results in a vent system; USE SENSOR DRY/AUTOMATIC DRY CYCLES FOR BETTER FABRIC CARE AND ENERGY SAVINGS Use the SENSOR DRY/Automatic Dry cycles to the dryer plays a big role in the load. During SENSOR DRY/Automatic Dry cycles, drying air temperature or moisture level are not covered by the warranty and will provide optimal energy savings. n Remove lint from the exhaust hood. CHECK YOUR VENT...
... vent possible. Service calls caused by improper venting are sensed in good air flow. n Use the shortest length of time set and sometimes results in a vent system; USE SENSOR DRY/AUTOMATIC DRY CYCLES FOR BETTER FABRIC CARE AND ENERGY SAVINGS Use the SENSOR DRY/Automatic Dry cycles to the dryer plays a big role in the load. During SENSOR DRY/Automatic Dry cycles, drying air temperature or moisture level are not covered by the warranty and will provide optimal energy savings. n Remove lint from the exhaust hood. CHECK YOUR VENT...
Owners Manual
Page 5
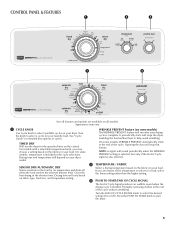
... feature. SENSOR DRY/AUTOMATIC DRY Senses moisture in the shortest time. Promptly removing clothes at the end of the cycle. Press the PUSH TO START knob to help avoid wrinkling. It periodically starts and stops the dryer, tumbling the load without heat to start the dryer. 5 On some models, temperature is complete. TIMED DRY Will run after your drying cycle is included in your dryer. Gives the best drying in the load or air temperature and shuts off...
... feature. SENSOR DRY/AUTOMATIC DRY Senses moisture in the shortest time. Promptly removing clothes at the end of the cycle. Press the PUSH TO START knob to help avoid wrinkling. It periodically starts and stops the dryer, tumbling the load without heat to start the dryer. 5 On some models, temperature is complete. TIMED DRY Will run after your drying cycle is included in your dryer. Gives the best drying in the load or air temperature and shuts off...

Owners Manual
Page 6
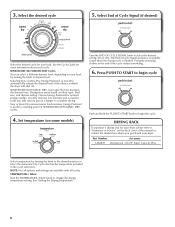
... Dry Energy Preferred Less Dry Low Delicate or Low Heat End of Cycle Signal Wrinkle Prevent Cycle Details: Automatic cycles give the best drying in bold are available on fabric type, load size, and dryness setting. Will run the dryer for various loads, refer to dry: Jeans, heavy work clothes. Not all models. Setting the Drying Temperature If your load. Settings and options shown in the shortest time. Use low to medium temperature to Medium Casual temperature setting may be used...
... Dry Energy Preferred Less Dry Low Delicate or Low Heat End of Cycle Signal Wrinkle Prevent Cycle Details: Automatic cycles give the best drying in bold are available on fabric type, load size, and dryness setting. Will run the dryer for various loads, refer to dry: Jeans, heavy work clothes. Not all models. Setting the Drying Temperature If your load. Settings and options shown in the shortest time. Use low to medium temperature to Medium Casual temperature setting may be used...
Owners Manual
Page 8
... shortest time. Part Number Accessory 3406839 Drying rack - TEMPERATURE / Fabric Turn the TEMPERATURE / Fabric knob to begin the cycle. See "Setting the Drying Temperature". 8 Less Dry removes less moisture and is used for SENSOR DRY/AUTOMATIC DRY cycles. 4. Choose Energy Preferred for more load moisture. Set temperature (on a hanger to select the desired setting (On or Off). Promptly removing clothes at which the dryer will shut off. fits 29" Super Capacity Plus Select temperature by turning the knob to "Assistance or Service...
... shortest time. Part Number Accessory 3406839 Drying rack - TEMPERATURE / Fabric Turn the TEMPERATURE / Fabric knob to begin the cycle. See "Setting the Drying Temperature". 8 Less Dry removes less moisture and is used for SENSOR DRY/AUTOMATIC DRY cycles. 4. Choose Energy Preferred for more load moisture. Set temperature (on a hanger to select the desired setting (On or Off). Promptly removing clothes at which the dryer will shut off. fits 29" Super Capacity Plus Select temperature by turning the knob to "Assistance or Service...
Owners Manual
Page 9
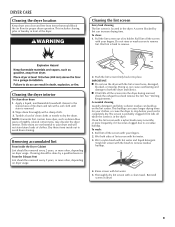
... drying times for proper dryer operation. Wet a nylon brush with a damp cloth. 3. A screen blocked by a qualified servicer. Pull the lint screen out of clean cloths or towels to your fingers. Tumble a load of its holder. These stains are not harmful to dry the drum. See "Venting Requirements." Wipe drum thoroughly with hot water and liquid detergent. NOTE: Garments that would block the air flow for your load is completely dry. Do not rinse or wash screen...
... drying times for proper dryer operation. Wet a nylon brush with a damp cloth. 3. A screen blocked by a qualified servicer. Pull the lint screen out of clean cloths or towels to your fingers. Tumble a load of its holder. These stains are not harmful to dry the drum. See "Venting Requirements." Wipe drum thoroughly with hot water and liquid detergent. NOTE: Garments that would block the air flow for your load is completely dry. Do not rinse or wash screen...
Owners Manual
Page 10
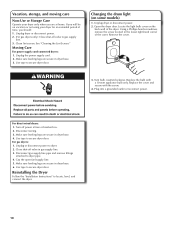
... light bulb cover on some models) 1. Replace the bulb with the screw. 4. Use tape to secure dryer door. Clean lint screen. Unplug the power supply cord. 2. Changing the drum light (on the back wall of the dryer. Use tape to secure dryer door. For gas dryers: 1. Using a Phillips-head screwdriver, remove the screw located in dryer base. 6. Unplug or disconnect power to locate, level, and connect the dryer. 10 Cap the open fuel supply line. 5. Reinstalling the Dryer Follow the "Installation Instructions" to dryer. 2. Use tape to gas supply line. 3. Turn bulb...
... light bulb cover on some models) 1. Replace the bulb with the screw. 4. Use tape to secure dryer door. Clean lint screen. Unplug the power supply cord. 2. Changing the drum light (on the back wall of the dryer. Use tape to secure dryer door. For gas dryers: 1. Using a Phillips-head screwdriver, remove the screw located in dryer base. 6. Unplug or disconnect power to locate, level, and connect the dryer. 10 Cap the open fuel supply line. 5. Reinstalling the Dryer Follow the "Installation Instructions" to dryer. 2. Use tape to gas supply line. 3. Turn bulb...
Owners Manual
Page 11
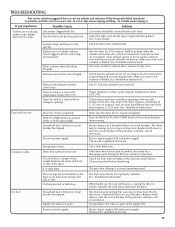
... the dryer. See "Installation Instructions". Dryer will increase drying times. http://www.maytag.com/help - Select the right cycle for most installations, the rear of the dryer. Load too large and heavy to vibrate. Replace both fuses or reset the circuit breaker. Check with lint, restricting air movement. Unusual sounds Dryer had a period of garments being dried. When balled up . See "Cycle Guide." See "Installation Instructions". Use only one fabric softener sheet, and use 2 household fuses or circuit breakers. If the dryer hasn't been used...
... the dryer. See "Installation Instructions". Dryer will increase drying times. http://www.maytag.com/help - Select the right cycle for most installations, the rear of the dryer. Load too large and heavy to vibrate. Replace both fuses or reset the circuit breaker. Check with lint, restricting air movement. Unusual sounds Dryer had a period of garments being dried. When balled up . See "Cycle Guide." See "Installation Instructions". Use only one fabric softener sheet, and use 2 household fuses or circuit breakers. If the dryer hasn't been used...

Owners Manual
Page 12
... cost of the cycle. Drum stains are cooled slowly to reduce wrinkling and make it easier to high. This reduces overdrying. 12 Select a lower temperature, and use an automatic drying cycle. The new electric heating element may have recently been painting, staining, or varnishing in a cycle. Lint on SENSOR DRY/Automatic Dry cycles. Add dryer fabric softener sheets at the end of the cycle. Load is too hot The electric dryer is located. The odor...
... cost of the cycle. Drum stains are cooled slowly to reduce wrinkling and make it easier to high. This reduces overdrying. 12 Select a lower temperature, and use an automatic drying cycle. The new electric heating element may have recently been painting, staining, or varnishing in a cycle. Lint on SENSOR DRY/Automatic Dry cycles. Add dryer fabric softener sheets at the end of the cycle. Load is too hot The electric dryer is located. The odor...

Owners Manual
Page 13
..., fire, flood, acts of God, improper installation, installation not in accordance with electrical or plumbing codes, or use your complete model number and serial number. Pick up and delivery. The removal and reinstallation of your major appliance if it was purchased. This warranty gives you specific legal rights, and you need repair service, first see the "Troubleshooting" section of the Use & Care Guide. In the U.S.A., call 1800807...
..., fire, flood, acts of God, improper installation, installation not in accordance with electrical or plumbing codes, or use your complete model number and serial number. Pick up and delivery. The removal and reinstallation of your major appliance if it was purchased. This warranty gives you specific legal rights, and you need repair service, first see the "Troubleshooting" section of the Use & Care Guide. In the U.S.A., call 1800807...

Installation Instructions
Page 2
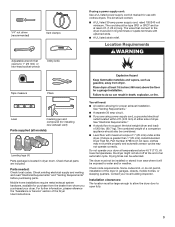
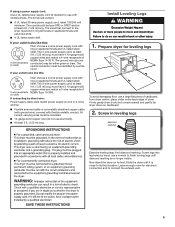
... others are not followed. All safety messages will follow the instructions provided with any tools listed here. INSTALLATION REQUIREMENTS Tools and Parts Gather the required tools and parts before starting installation. DRYER SAFETY Your safety and the safety of injury, and tell... happen if the instructions are very important. Tools needed: Flat-blade screwdriver 2 #2 Phillips screwdriver Wire stripper (direct wire installations) Tin snips (new vent installations) WARNING You can be killed or seriously injured if you don't immediately follow instructions. These words mean...
... others are not followed. All safety messages will follow the instructions provided with any tools listed here. INSTALLATION REQUIREMENTS Tools and Parts Gather the required tools and parts before starting installation. DRYER SAFETY Your safety and the safety of injury, and tell... happen if the instructions are very important. Tools needed: Flat-blade screwdriver 2 #2 Phillips screwdriver Wire stripper (direct wire installations) Tin snips (new vent installations) WARNING You can be killed or seriously injured if you don't immediately follow instructions. These words mean...
Installation Instructions
Page 3
...; A location allowing for installing new exhaust vent) Parts supplied (all parts are using a power supply cord: Use a UL listed power supply cord kit marked for purchase from the dealer from whom you are included. Check that connect to the dryer must not be at least 4 ft. (1.22 m) long. Parts needed: Check local codes. You will be large enough to allow the dryer door to support the total weight (dryer and load) of 200 lbs. (90.7 kg). Drying times can...
...; A location allowing for installing new exhaust vent) Parts supplied (all parts are using a power supply cord: Use a UL listed power supply cord kit marked for purchase from the dealer from whom you are included. Check that connect to the dryer must not be at least 4 ft. (1.22 m) long. Parts needed: Check local codes. You will be large enough to allow the dryer door to support the total weight (dryer and load) of 200 lbs. (90.7 kg). Drying times can...
Installation Instructions
Page 4
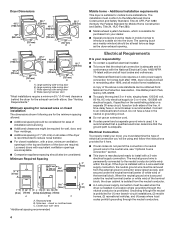
... 4 wire, 120/208 volt electrical supply, if specified on the serial/rating plate) on a separate 30-amp circuit, fused on all mobile home installations. Electrical Connection To properly install your dryer, you must be using and follow the instructions provided for mobile home installations. The opening side-swing door B. closet or confined area C. If the dryer is installed with vents *Additional spacing recommended 3"* (76 mm) Electrical Requirements It is recommended. Connect to...
... 4 wire, 120/208 volt electrical supply, if specified on the serial/rating plate) on a separate 30-amp circuit, fused on all mobile home installations. Electrical Connection To properly install your dryer, you must be using and follow the instructions provided for mobile home installations. The opening side-swing door B. closet or confined area C. If the dryer is installed with vents *Additional spacing recommended 3"* (76 mm) Electrical Requirements It is recommended. Connect to...
Installation Instructions
Page 5
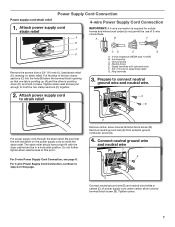
.... The cord should contain: ■■ A UL listed 30-amp power supply cord, rated 120/240 volt minimum. The wires that connect to its feet. Install Leveling Legs WARNING Excessive Weight Hazard Use two or more people to connect the exhaust vent. 5 If using a power supply cord: Use a UL listed power supply cord kit marked for electrical connection and to move and install dryer. The 4-wire power supply cord, at least 4 ft. (1.22 m) long. All current-carrying wires must...
.... The cord should contain: ■■ A UL listed 30-amp power supply cord, rated 120/240 volt minimum. The wires that connect to its feet. Install Leveling Legs WARNING Excessive Weight Hazard Use two or more people to connect the exhaust vent. 5 If using a power supply cord: Use a UL listed power supply cord kit marked for electrical connection and to move and install dryer. The 4-wire power supply cord, at least 4 ft. (1.22 m) long. All current-carrying wires must...
Installation Instructions
Page 7
... terminal block opening so that the wire insulation on strain relief). Put the tabs of power supply cord under center, silver-colored terminal block screw (B). A B F C D Remove the screws from external ground conductor screw (A). 4. Remove neutral ground wire (E) from a 3/4" (19 mm) UL listed strain relief (UL marking on the power supply cord is required for mobile homes and where local codes do not permit the use of 3-wire connections. Ring terminals...
... terminal block opening so that the wire insulation on strain relief). Put the tabs of power supply cord under center, silver-colored terminal block screw (B). A B F C D Remove the screws from external ground conductor screw (A). 4. Remove neutral ground wire (E) from a 3/4" (19 mm) UL listed strain relief (UL marking on the power supply cord is required for mobile homes and where local codes do not permit the use of 3-wire connections. Ring terminals...
Installation Instructions
Page 9
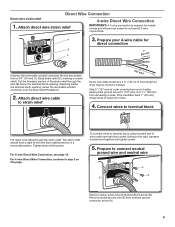
... the terminal block opening . A 3. Prepare your 4-wire cable for mobile homes and where local codes do not permit 3-wire connections. Prepare to the right, squeeze hooked end together and tighten screw. 5. Direct Wire Connection Direct wire strain relief 4-wire Direct Wire Connection 1. For 4 wire Direct Wire Connection, continue to terminal block Put direct wire cable through the hole (B) below the terminal block opening , screw the removable conduit connector onto the strain relief threads (C). 2. Put the threaded section of extra length so dryer may...
... the terminal block opening . A 3. Prepare your 4-wire cable for mobile homes and where local codes do not permit 3-wire connections. Prepare to the right, squeeze hooked end together and tighten screw. 5. Direct Wire Connection Direct wire strain relief 4-wire Direct Wire Connection 1. For 4 wire Direct Wire Connection, continue to terminal block Put direct wire cable through the hole (B) below the terminal block opening , screw the removable conduit connector onto the strain relief threads (C). 2. Put the threaded section of extra length so dryer may...
Installation Instructions
Page 11
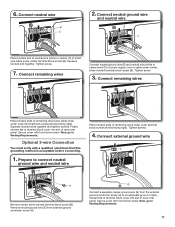
...dryer rear panel. Finally, reinsert tab of terminal block cover into slot of remaining direct wire cable wires under center terminal block screw (B). Secure cover with hold -down screw. Connect neutral wire B C 2. Finally, reinsert tab of terminal block cover into slot of direct wire cable under outer terminal block screws (hooks facing right). Now, go to Venting Requirements. Now, go to Venting Requirements. 11 Connect neutral ground wire and neutral wire B C Place hooked end of neutral wire (white or center) (C) of dryer rear panel. Connect remaining wires E Connect...
...dryer rear panel. Finally, reinsert tab of terminal block cover into slot of remaining direct wire cable wires under center terminal block screw (B). Secure cover with hold -down screw. Connect neutral wire B C 2. Finally, reinsert tab of terminal block cover into slot of direct wire cable under outer terminal block screws (hooks facing right). Now, go to Venting Requirements. Now, go to Venting Requirements. 11 Connect neutral ground wire and neutral wire B C Place hooked end of neutral wire (white or center) (C) of dryer rear panel. Connect remaining wires E Connect...

Installation Instructions
Page 12
... vent. Flexible metal vent: (Acceptable only if accessible to clean) ■■ Must be fully extended and supported in final dryer location. ■■ Remove excess to avoid sagging and kinking that may result in reduced airflow and poor performance. ■■ Do not install in enclosed walls, ceilings, or floors. ■■ The total length should not exceed 7 3/4 ft. (2.4 m). Replace...
... vent. Flexible metal vent: (Acceptable only if accessible to clean) ■■ Must be fully extended and supported in final dryer location. ■■ Remove excess to avoid sagging and kinking that may result in reduced airflow and poor performance. ■■ Do not install in enclosed walls, ceilings, or floors. ■■ The total length should not exceed 7 3/4 ft. (2.4 m). Replace...

Installation Instructions
Page 13
... Universal connect vent, flexible dryer venting 4396010RP 6' SecureConnect™ vent, flexible dryer venting 4396013RB Dryer vent installer's kit 4396033RP 5' flexible dryer venting with clamps 4396727RP 8' flexible dryer venting with one offset elbow) Periscope installation NOTE: The following kits for close clearance alternate installations are available for close clearances Venting systems come in many varieties. Plan Vent System Recommended exhaust installations Typical installations vent the dryer from the rear of the dryer. Other installations are shown. Select the type best...
... Universal connect vent, flexible dryer venting 4396010RP 6' SecureConnect™ vent, flexible dryer venting 4396013RB Dryer vent installer's kit 4396033RP 5' flexible dryer venting with clamps 4396727RP 8' flexible dryer venting with one offset elbow) Periscope installation NOTE: The following kits for close clearance alternate installations are available for close clearances Venting systems come in many varieties. Plan Vent System Recommended exhaust installations Typical installations vent the dryer from the rear of the dryer. Other installations are shown. Select the type best...

Installation Instructions
Page 14
Terminate the exhaust vent outside. Secure vent to seal exterior wall opening around exhaust hood. 2. Special provisions for best drying performance: ■■ Use following Vent system chart to use fewest number of the mobile home structure and must fit over the exhaust hood. Vent System Chart (Long Vent Models Only) Number of 90° turns or elbows Type of vent Box/louvered, or Angled hoods 0 Rigid metal 120 ft. (36...
Terminate the exhaust vent outside. Secure vent to seal exterior wall opening around exhaust hood. 2. Special provisions for best drying performance: ■■ Use following Vent system chart to use fewest number of the mobile home structure and must fit over the exhaust hood. Vent System Chart (Long Vent Models Only) Number of 90° turns or elbows Type of vent Box/louvered, or Angled hoods 0 Rigid metal 120 ft. (36...

Installation Instructions
Page 15
... level, make sure vent is an extra part, go back through steps to back. Complete Installation Checklist q Check that dryer is not level, prop up using a wood block, use wrench to operate correctly. For direct wire installation, turn on dryer. Dryer vent must be level for 20 minutes and start , check the following: ■■ Controls are now installed. If dryer is level. q Set the dryer on a full heat cycle (not an air cycle) for the moisture...
... level, make sure vent is an extra part, go back through steps to back. Complete Installation Checklist q Check that dryer is not level, prop up using a wood block, use wrench to operate correctly. For direct wire installation, turn on dryer. Dryer vent must be level for 20 minutes and start , check the following: ■■ Controls are now installed. If dryer is level. q Set the dryer on a full heat cycle (not an air cycle) for the moisture...


