Maytag MED6200KW Support and Manuals
Get Help and Manuals for this Maytag item
View All Support Options Below
Free Maytag MED6200KW manuals!
Problems with Maytag MED6200KW?
Ask a Question
Free Maytag MED6200KW manuals!
Problems with Maytag MED6200KW?
Ask a Question
Maytag MED6200KW Videos

Maytag MED6200KW 7.0 CuFt Dryer with Moisture Sensing
Duration: :25
Total Views: 50
Duration: :25
Total Views: 50
Popular Maytag MED6200KW Manual Pages
Owners Manual - Page 2
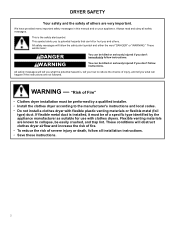
... the risk of fire. − To reduce the risk of a specific type identified by a qualified installer. − Install the clothes dryer according to collapse, be killed or seriously injured if you and others are known to the manufacturer's instructions and local codes. − Do not install a clothes dryer with clothes dryers.
If flexible metal duct is...
Owners Manual - Page 4
...installation of 20 cm is maintained between the equipment and receiver. � Connect the equipment into an outlet on a circuit different from that to which can be guided through the steps to set up a user account and to connect your router's capabilities, refer to the router
manufacturer's instructions...with Part 15 of the device. You Will Need: � A home wireless router supporting ...
Owners Manual - Page 5
...death, explosion, or fire.
See "Venting Requirements" in the Installation Instructions.
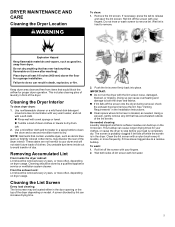
� Clean space where lint screen is in the dryer...nylon brush every 6 months, or more often, depending on model. To wash:
1. Wet lint is completely dry.
Failure ...rear of clothes. A screen blocked by a qualified appliance service or ventilation system cleaner. IMPORTANT:
� Do not run...
Owners Manual - Page 6
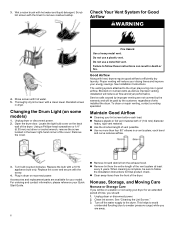
... Start Guide.
� Remove lint and debris from the exhaust hood. � Remove lint from the front of vent possible. � Use no more than four 90° elbows in death or fire.
each load. � Replace plastic or foil vent material with heat, dryers require good airflow to follow the Installation Instructions for...
Owners Manual - Page 7
...risk of replacement. then drain the hose.
Shut off water faucet. 4. Reconnect water inlet hose to the manufacturer's instructions and local codes. Plug in dryer or reconnect power as described in death or electrical shock.
1. For direct-wired dryers:
WARNING
INSTALLATION INSTRUCTIONS
REQUIREMENTS
Tools and Parts
NOTE: Install the clothes dryer according to faucet.
Steam models only...
Owners Manual - Page 8
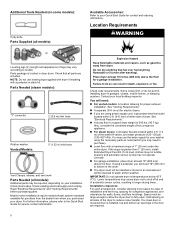
... for service contact information. Add spacing on all sides of the dryer to fully open. Contact your Quick Start Guide for a garage installation. Check that has ever had anything flammable on it will need to do not permit, installing dryer in longer drying times. Check local codes. For further information, please refer to model) Parts package is...
Owners Manual - Page 9

...spacing should be considered for ease of installation and servicing.
� Additional clearances might be ... 24 CFR, Part 3280 (formerly the Federal Standard for Mobile Home Construction and Safety, Title 24, HUD Part 280) or ... follow the instructions provided for it is recommended that a qualified electrician determine that connect to install with the National Electrical Code, ANSI/ NFPA...
Owners Manual - Page 17
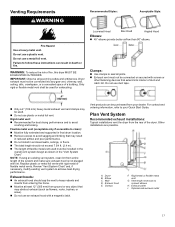
... Replace ...supported in final dryer location.
� Remove excess to avoid sagging and kinking that may result in reduced airflow and poor performance.
� Do not install... in the "Vent System Chart." Optional side exhaust outlet
17 Clamps:
� Use clamps to keep rodents and insects from your Quick Start Guide.
Vent length necessary to follow these instructions...
Owners Manual - Page 21
...softener is plugged into a grounded outlet. If you have not tripped.
For direct wire installation, turn off dryer, and check the following :
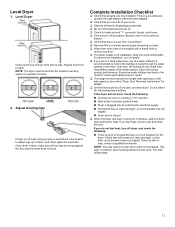
� Controls are snug against the ...of scale through steps to see online "Dryer Door Reversal Instructions" for details.
� Set the heat cycle for certain part replacement or repair.
� To change the door swing from front to...
Quick Reference Sheet - Page 1
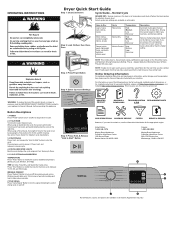
... Button
NOTE: If loads do not seem as dry as -
Select Cycle and Settings
More Dry Heavy Duty Air Only Timed Dry
Quick Dry
Normal Dry
Timed Cycles
Less Dry Delicates Bulky Items
Towels Wrinkle Control
REGISTER PRODUCT
MANUALS & DOWNLOADS
TROUBLESHOOTING REPLACEMENT PARTS & FAQ
Button Descriptions
1. STATUS INDICATOR LIGHTS Monitors and displays the cycle progress...
Door Reversal Guide - Page 1
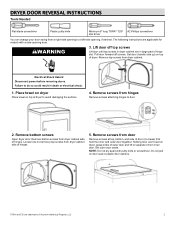
... instructions are applicable for models... or electrical shock.
1. Set door (handle side up) on door seal or plastic door catches. Loosen (do so could result in large part of door (4 screws) ...cabinet. DRYER DOOR REVERSAL INSTRUCTIONS
Tools Needed
Flat-blade screwdriver
Plastic putty knife
Minimum 8" long TORX® T25® #2 Phillips screwdriver star driver
You can change your ...
Door Reversal Guide - Page 2

... on left side of the hinge.
7. Place the door catch, bezel, and plug on inner door. Rotate outer door
Rotate outer door 180º and set it back down .
11. Reattach outer door panel to dryer door so that the larger hole is at the bottom of dryer cabinet. Remove door...
Door Reversal Guide - Page 3
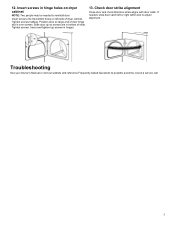
....
Insert screws in hinge holes on left or right within slot to possibly avoid the cost of door hinge slot is over screws. Troubleshooting
See your Owner's Manual or visit our website and reference Frequently Asked Questions to adjust alignment. 12. Check door strike alignment
Close door and check that door strike...
Dimension Guide - Page 1
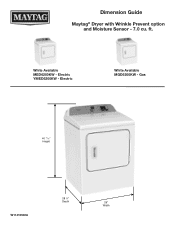
Dimension Guide
Maytag® Dryer with Wrinkle Prevent option and Moisture Sensor - 7.0 cu. Gas
40 11∕16" Height
W11416502A
28 3∕8" Depth
29" Width Electric YMED6200KW - Electric
White Available MGD6200KW - White Available MED6200KW -
ft.
Dimension Guide - Page 4

...
with a door, minimum ventilation openings in the top and bottom of the door are acceptable. Ƀ Companion appliance spacing should be considered for ease of installation and servicing. Ƀ Additional clearances might be required for wall, door, and floor moldings. Ƀ Additional spacing of 1" (25 mm) on all sides of the dryer...
Maytag MED6200KW Reviews
We have not received any reviews for Maytag yet.