Owners Manual
Page 2
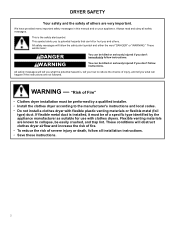
... flexible plastic venting materials or flexible metal (foil type) duct. WARNING You can happen if the instructions are known to the manufacturer's instructions and local codes. − Do not install a clothes dryer with clothes dryers. These conditions will follow all safety messages. DRYER SAFETY Your safety and the safety of others . We have provided many important safety messages in this manual and on...
... flexible plastic venting materials or flexible metal (foil type) duct. WARNING You can happen if the instructions are known to the manufacturer's instructions and local codes. − Do not install a clothes dryer with clothes dryers. These conditions will follow all safety messages. DRYER SAFETY Your safety and the safety of others . We have provided many important safety messages in this manual and on...
Owners Manual
Page 3
... OLD CLOTHES DRYER, REMOVE THE DOOR. To reduce the risk of fire due to catch fire. parts made at home using the appliance. � Do not dry articles that have been previously cleaned in, washed in, soaked in, or spotted with controls. � Do not repair or replace any part of the appliance or attempt any servicing unless specifically recommended in the usermaintenance instructions or...
... OLD CLOTHES DRYER, REMOVE THE DOOR. To reduce the risk of fire due to catch fire. parts made at home using the appliance. � Do not dry articles that have been previously cleaned in, washed in, soaked in, or spotted with controls. � Do not repair or replace any part of the appliance or attempt any servicing unless specifically recommended in the usermaintenance instructions or...
Owners Manual
Page 4
... reduce potential radio interference to operate the equipment. Changes or modifications not expressly approved by turning the equipment off and on the LCD screen. This device must not be so chosen that the equivalent isotropically radiated power (e.i.r.p.) is subject to read and follow the installation instructions that necessary for compliance could void the user's authority to other antenna...
... reduce potential radio interference to operate the equipment. Changes or modifications not expressly approved by turning the equipment off and on the LCD screen. This device must not be so chosen that the equivalent isotropically radiated power (e.i.r.p.) is subject to read and follow the installation instructions that necessary for compliance could void the user's authority to other antenna...
Owners Manual
Page 5
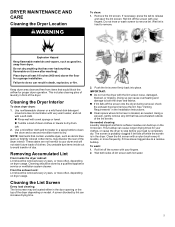
... after washing). Cleaning the Dryer Interior To clean dryer drum: 1. OR 2. IMPORTANT: � Do not run the dryer with your fingers. As-needed . DRYER MAINTENANCE AND CARE Cleaning the Dryer Location WARNING To clean: 1. Remove the lint screen. Do not rinse or wash screen to release and open the lint screen. Cleaning should be located either in death, explosion, or fire. Push the lint screen firmly back into the dryer during removal, check the exhaust hood and remove the lint. Wet both...
... after washing). Cleaning the Dryer Interior To clean dryer drum: 1. OR 2. IMPORTANT: � Do not run the dryer with your fingers. As-needed . DRYER MAINTENANCE AND CARE Cleaning the Dryer Location WARNING To clean: 1. Remove the lint screen. Do not rinse or wash screen to release and open the lint screen. Cleaning should be located either in death, explosion, or fire. Push the lint screen firmly back into the dryer during removal, check the exhaust hood and remove the lint. Wet both...
Owners Manual
Page 6
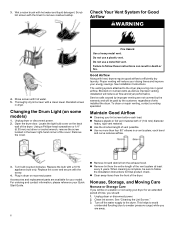
... the warranty and will reduce air flow and dryer performance. See "Cleaning the Lint Screen." 3. To clean or repair venting, contact a venting specialist. Turn bulb counterclockwise. Replace the bulb with hot water. 5. This helps to avoid unintended flooding (due to follow the Installation Instructions for Good Airflow WARNING 4. Using a Phillips-head screwdriver or 1/4" (6.35 mm) nut driver or socket wrench, remove the screw located in death or fire. Nonuse, Storage, and Moving Care Nonuse...
... the warranty and will reduce air flow and dryer performance. See "Cleaning the Lint Screen." 3. To clean or repair venting, contact a venting specialist. Turn bulb counterclockwise. Replace the bulb with hot water. 5. This helps to avoid unintended flooding (due to follow the Installation Instructions for Good Airflow WARNING 4. Using a Phillips-head screwdriver or 1/4" (6.35 mm) nut driver or socket wrench, remove the screw located in death or fire. Nonuse, Storage, and Moving Care Nonuse...
Owners Manual
Page 7
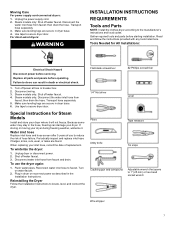
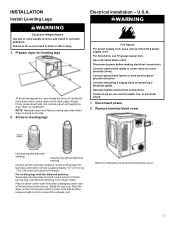
... Installation Instructions to secure dryer door. Steam models only: Shut off water faucet. 3. Make sure leveling legs are found. Gather required tools and parts before starting installation. Read and follow the instructions provided with any tools listed here. Use tape to 1" (25 mm) or hex-head socket wrench Wire stripper 7 Water inlet hose Replace inlet hose and hose screen after 5 years of hose failure. then drain the hose. When replacing your dryer. Unplug dryer or disconnect power. 2. Flush water...
... Installation Instructions to secure dryer door. Steam models only: Shut off water faucet. 3. Make sure leveling legs are found. Gather required tools and parts before starting installation. Read and follow the instructions provided with any tools listed here. Use tape to 1" (25 mm) or hex-head socket wrench Wire stripper 7 Water inlet hose Replace inlet hose and hose screen after 5 years of hose failure. then drain the hose. When replacing your dryer. Unplug dryer or disconnect power. 2. Flush water...
Owners Manual
Page 8
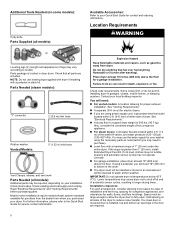
... permit, installing dryer in the door are included. Lower temperatures may vary according to fully open. Add spacing on your washer using power supply cord, a grounded electrical outlet located within 4 ft. (1.2 m) of the water fill valves, and water pressure of dryer. NOTE: Do not use the water supply for walls, doors, and floor moldings. You will be large enough to allow the dryer door to model) Parts package is located in longer drying times. See "Venting Requirements." �...
... permit, installing dryer in the door are included. Lower temperatures may vary according to fully open. Add spacing on your washer using power supply cord, a grounded electrical outlet located within 4 ft. (1.2 m) of the water fill valves, and water pressure of dryer. NOTE: Do not use the water supply for walls, doors, and floor moldings. You will be large enough to allow the dryer door to model) Parts package is located in longer drying times. See "Venting Requirements." �...

Owners Manual
Page 9
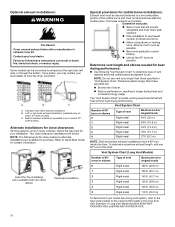
... NA 1" (25 mm) 0" (0 mm) 0" (0 mm) 0" (0 mm) rear spacing is prohibited. Mobile home installations require: � Metal exhaust system hardware, which is permanently connected to introduce outside air into the dryer. The National Electrical Code requires a 4-wire power supply connection for homes built after 1996, dryer circuits involved in conformance with equivalent ventilation openings are required for vented models. A copy of the above code standards can be obtained from the neutral...
... NA 1" (25 mm) 0" (0 mm) 0" (0 mm) 0" (0 mm) rear spacing is prohibited. Mobile home installations require: � Metal exhaust system hardware, which is permanently connected to introduce outside air into the dryer. The National Electrical Code requires a 4-wire power supply connection for homes built after 1996, dryer circuits involved in conformance with equivalent ventilation openings are required for vented models. A copy of the above code standards can be obtained from the neutral...

Owners Manual
Page 10
... wires and match a 3-wire receptacle of the line. Check with all local codes and ordinances. Failure to obtain a Power Supply Cord Replacement (Part Number W11095079), please reference the contact information listed on the appliance. It is adequate. Do not use aluminum) at least 5 ft. (1.52 m) long. Connect to an individual branch circuit. This dryer is adequate and in doubt as to the equipment-grounding terminal...
... wires and match a 3-wire receptacle of the line. Check with all local codes and ordinances. Failure to obtain a Power Supply Cord Replacement (Part Number W11095079), please reference the contact information listed on the appliance. It is adequate. Do not use aluminum) at least 5 ft. (1.52 m) long. Connect to an individual branch circuit. This dryer is adequate and in doubt as to the equipment-grounding terminal...
Owners Manual
Page 11
... green ground connector. INSTALLATION Install Leveling Legs WARNING Excessive Weight Hazard Use two or more people to center terminal (silver). NOTE: Residual water from bottom of dryer. For direct wire, use a new UL listed 30 A power supply cord. Disconnect power before making electrical connections. Leveling leg without diamond marking Using a wrench and tape measure, screw leveling legs into leg holes by hand. Use a wrench to finish turning legs until...
... green ground connector. INSTALLATION Install Leveling Legs WARNING Excessive Weight Hazard Use two or more people to center terminal (silver). NOTE: Residual water from bottom of dryer. For direct wire, use a new UL listed 30 A power supply cord. Disconnect power before making electrical connections. Leveling leg without diamond marking Using a wrench and tape measure, screw leveling legs into leg holes by hand. Use a wrench to finish turning legs until...
Owners Manual
Page 12
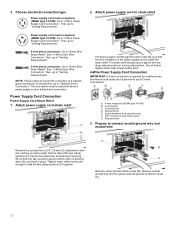
Power Supply Cord Connection Power Supply Cord Strain Relief 1. Ground prong D. Neutral prong E. Remove center terminal block screw (B). NOTE: If local codes do not permit the use of a cabinetground conductor to neutral wire, go to "Venting Requirements." Attach power supply cord to "4-Wire Power Supply Cord Connection." The strain relief should have a tight fit with the dryer cabinet and be used with upturned ends F. 3/4" (19 mm) UL-listed strain relief G. A. 4-wire receptacle (NEMA type 14-30R) B. 4-prong plug C. Put...
Power Supply Cord Connection Power Supply Cord Strain Relief 1. Ground prong D. Neutral prong E. Remove center terminal block screw (B). NOTE: If local codes do not permit the use of a cabinetground conductor to neutral wire, go to "Venting Requirements." Attach power supply cord to "4-Wire Power Supply Cord Connection." The strain relief should have a tight fit with the dryer cabinet and be used with upturned ends F. 3/4" (19 mm) UL-listed strain relief G. A. 4-wire receptacle (NEMA type 14-30R) B. 4-prong plug C. Put...

Owners Manual
Page 13
... of power supply cord under center terminal block screw (B). Ring terminals G. Tighten screw. 6. Neutral prong D. Tighten screws. Tighten screw. 5. Connect remaining wires Remove center terminal block screw (B). 4. Remove center screw Connect ground wire (F) (green or bare) of power supply cord under outer terminal block screws. Connect neutral wire (white or center) (C) of dryer rear panel. 4. Connect neutral ground wire and neutral wire 3-Wire Power Supply Cord Connection IMPORTANT: Use where local codes permit connecting cabinetground conductor to "Venting Requirements...
... of power supply cord under center terminal block screw (B). Ring terminals G. Tighten screw. 6. Neutral prong D. Tighten screws. Tighten screw. 5. Connect remaining wires Remove center terminal block screw (B). 4. Remove center screw Connect ground wire (F) (green or bare) of power supply cord under outer terminal block screws. Connect neutral wire (white or center) (C) of dryer rear panel. 4. Connect neutral ground wire and neutral wire 3-Wire Power Supply Cord Connection IMPORTANT: Use where local codes permit connecting cabinetground conductor to "Venting Requirements...
Owners Manual
Page 14
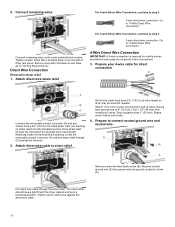
... opening (B). Strip insulation back 1" (25 mm). Attach direct wire cable to strain relief Direct wire cable must have a tight fit with hold-down screw. Connect remaining wires Connect remaining wires under outer terminal block screws. Now, go to "3-Wire Direct Wire Connection." 4-Wire Direct Wire Connection IMPORTANT: A 4-wire connection is required for direct connection Unscrew the removable conduit connector (A) and any screws from end of dryer rear panel. For 3-wire Direct Wire Connection, continue to step 3. 3-wire direct wire connection: Go to "Venting Requirements...
... opening (B). Strip insulation back 1" (25 mm). Attach direct wire cable to strain relief Direct wire cable must have a tight fit with hold-down screw. Connect remaining wires Connect remaining wires under outer terminal block screws. Now, go to "3-Wire Direct Wire Connection." 4-Wire Direct Wire Connection IMPORTANT: A 4-wire connection is required for direct connection Unscrew the removable conduit connector (A) and any screws from end of dryer rear panel. For 3-wire Direct Wire Connection, continue to step 3. 3-wire direct wire connection: Go to "Venting Requirements...

Owners Manual
Page 16
... screw. Tighten screws. 4. Remove center terminal block screw (B). Secure cover with hold -down screw. Connect neutral ground wire (E) and neutral wire (white or center wire) (C) of remaining direct wire cable wires under center terminal block screw (B). Connect remaining wires Place hooked ends of power supply cord or cable under outer terminal block screws (hooks facing right). Squeeze hooked ends together and tighten screws. Insert tab of terminal block cover into slot of dryer rear panel. Secure cover with a qualified electrician...
... screw. Tighten screws. 4. Remove center terminal block screw (B). Secure cover with hold -down screw. Connect neutral ground wire (E) and neutral wire (white or center wire) (C) of remaining direct wire cable wires under center terminal block screw (B). Connect remaining wires Place hooked ends of power supply cord or cable under outer terminal block screws (hooks facing right). Squeeze hooked ends together and tighten screws. Insert tab of terminal block cover into slot of dryer rear panel. Secure cover with a qualified electrician...
Owners Manual
Page 17
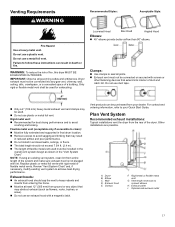
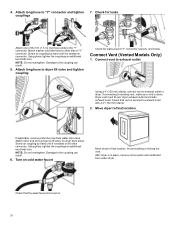
... using an existing vent system, clean lint from the rear of a building. A. Rigid metal or flexible metal vent G. Exhaust outlet I. Do not use plastic or metal foil vent. Rigid metal vent: � Recommended for exhausting. Review "Vent System Chart" and, if necessary, modify existing vent system to connect elbows H. Plan Vent System Recommended exhaust installations: Typical installations vent the dryer from entire length of duct and catch lint. IMPORTANT: Observe all joints. � Exhaust vent must be connected...
... using an existing vent system, clean lint from the rear of a building. A. Rigid metal or flexible metal vent G. Exhaust outlet I. Do not use plastic or metal foil vent. Rigid metal vent: � Recommended for exhausting. Review "Vent System Chart" and, if necessary, modify existing vent system to connect elbows H. Plan Vent System Recommended exhaust installations: Typical installations vent the dryer from entire length of duct and catch lint. IMPORTANT: Observe all joints. � Exhaust vent must be connected...
Owners Manual
Page 18
... a manufacturer's exhaust cover kit. Vent System Chart (Long Vent Models) Number of 90° turns or elbows Type of dryer. � Reduce performance, resulting in longer drying times and increased energy usage. or right-side exhaust installation (available only on select 27"- C. Select the type best for purchase. NOTE: Do not use vent runs longer than those specified in the inner door well. Failure to the type code located on the serial number plate in "Vent System Chart...
... a manufacturer's exhaust cover kit. Vent System Chart (Long Vent Models) Number of 90° turns or elbows Type of dryer. � Reduce performance, resulting in longer drying times and increased energy usage. or right-side exhaust installation (available only on select 27"- C. Select the type best for purchase. NOTE: Do not use vent runs longer than those specified in the inner door well. Failure to the type code located on the serial number plate in "Vent System Chart...

Owners Manual
Page 19
... elbows required for future reference. Additional Elbows In cases in which the Installation Instructions do not address the vent length for the specific number of the 2 ft. (0.6 m) inlet hose. Install exhaust hood 1. Turn cold water off, remove and replace rubber washer Turn cold water faucet off and remove washer inlet hose. Secure vent to reduce the risk of use duct tape, screws, or other fastening devices that a dryer is seated on connector. 3. NOTE: Replace inlet hoses after...
... elbows required for future reference. Additional Elbows In cases in which the Installation Instructions do not address the vent length for the specific number of the 2 ft. (0.6 m) inlet hose. Install exhaust hood 1. Turn cold water off, remove and replace rubber washer Turn cold water faucet off and remove washer inlet hose. Secure vent to reduce the risk of use duct tape, screws, or other fastening devices that a dryer is seated on connector. 3. NOTE: Replace inlet hoses after...
Owners Manual
Page 20
... cold water faucet Move dryer to other end of "Y" connector. Avoid crushing or kinking the vent. Connect Vent (Vented Models Only) 1. NOTE: Do not overtighten. Using pliers, tighten the couplings an additional two-thirds turn . Using pliers, tighten the couplings an additional two-thirds turn . Turn on dryer back panel. Attach washer cold inlet hose to final location. Attach long hose to the "Y" connector. Check for leaks around "Y" connector, faucets, and hoses. Move dryer to exhaust...
... cold water faucet Move dryer to other end of "Y" connector. Avoid crushing or kinking the vent. Connect Vent (Vented Models Only) 1. NOTE: Do not overtighten. Using pliers, tighten the couplings an additional two-thirds turn . Using pliers, tighten the couplings an additional two-thirds turn . Turn on dryer back panel. Attach washer cold inlet hose to final location. Attach long hose to the "Y" connector. Check for leaks around "Y" connector, faucets, and hoses. Move dryer to exhaust...
Owners Manual
Page 21
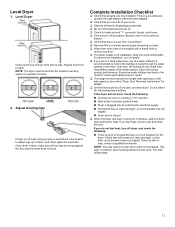
... fuses or circuit breakers for heat. Complete Installation Checklist � Check that you live in a running for 5 minutes, open the dryer door and feel for the dryer. Do not select Air Only temperature setting. If there is first used. The odor will not start dryer. Level Dryer Check levelness of a water softener is level. If there is an extra part, go away. 21 For direct wire installation, turn off dryer, and check the following : � Controls are set in...
... fuses or circuit breakers for heat. Complete Installation Checklist � Check that you live in a running for 5 minutes, open the dryer door and feel for the dryer. Do not select Air Only temperature setting. If there is first used. The odor will not start dryer. Level Dryer Check levelness of a water softener is level. If there is an extra part, go away. 21 For direct wire installation, turn off dryer, and check the following : � Controls are set in...
Quick Reference Sheet
Page 1
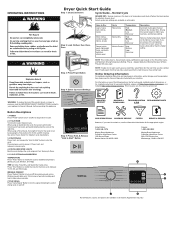
... heat levels and automatically stop /cancel a cycle. 2. See online "Cycle Guide" for use the information listed below for the cycle to Start Temp Time Options Cycle United States: Signal 1-800-344-1274 Step 5. Drying time varies based on the Timed Dry Cycle, and Maximum Drying Temperature Setting. NOTE: This clothes dryer's, Government energy certifications were based on fabric type, load size, and dryness setting. Clean Lint Screen Cycle Guide - If loads seem drier than the higher setting. Press during a cycle to turn on all models. Sense Wet Cool...
... heat levels and automatically stop /cancel a cycle. 2. See online "Cycle Guide" for use the information listed below for the cycle to Start Temp Time Options Cycle United States: Signal 1-800-344-1274 Step 5. Drying time varies based on the Timed Dry Cycle, and Maximum Drying Temperature Setting. NOTE: This clothes dryer's, Government energy certifications were based on fabric type, load size, and dryness setting. Clean Lint Screen Cycle Guide - If loads seem drier than the higher setting. Press during a cycle to turn on all models. Sense Wet Cool...


