
Installation Guide
Page 3
... Requirements" before starting installation. Pliers 3 Parts supplied (all parts are included. Parts needed : Flat-blade screwdriver #2 Phillips screwdriver Leveling legs (4) Parts supplied (steam models): Adjustable wrench that all models): Tools needed : (Not supplied with dryer) Check local codes. Optional Equipment: (Not supplied with any tools listed here. INSTALLATION REQUIREMENTS TOOLS AND PARTS...
... Requirements" before starting installation. Pliers 3 Parts supplied (all parts are included. Parts needed : Flat-blade screwdriver #2 Phillips screwdriver Leveling legs (4) Parts supplied (steam models): Adjustable wrench that all models): Tools needed : (Not supplied with dryer) Check local codes. Optional Equipment: (Not supplied with any tools listed here. INSTALLATION REQUIREMENTS TOOLS AND PARTS...

Installation Guide
Page 4
... 1" (25 mm) under entire dryer. Lower temperatures may cause dryer not to water, weather, or at least 18" (457 mm) above floor. ■■ Steam models only: Cold water faucets located within 2 ft. (610 mm) of either side of 200 lbs. (90.7 kg). Some codes limit, or do not permit, installing...
... 1" (25 mm) under entire dryer. Lower temperatures may cause dryer not to water, weather, or at least 18" (457 mm) above floor. ■■ Steam models only: Cold water faucets located within 2 ft. (610 mm) of either side of 200 lbs. (90.7 kg). Some codes limit, or do not permit, installing...

Installation Guide
Page 13
... that extend into interior of the dryer. Dryer B. Clamps F. Wall D. Exhaust outlet Optional exhaust installations: Good Better Clamps: ■■ Use clamps to seal all models ■■ Bottom Exhaust Kit-
... that extend into interior of the dryer. Dryer B. Clamps F. Wall D. Exhaust outlet Optional exhaust installations: Good Better Clamps: ■■ Use clamps to seal all models ■■ Bottom Exhaust Kit-

Installation Guide
Page 15
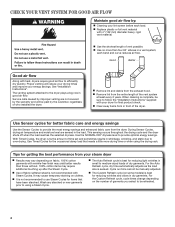
Maytag Vent System Chart Number of 90° elbows Type of vent to secure vent, because they can result. 15 The dryer must be connected to ... hose. B If space permits, attach the female end of the short hose. Install exhaust hood 12" min. (305 mm) CONNECT INLET HOSES For non-steam models, skip to the coupling can catch lint. Attach short hose and "Y" connector 12" min. (305 mm) Install exhaust hood and use old hoses. 1. Avoid 90...
Maytag Vent System Chart Number of 90° elbows Type of vent to secure vent, because they can result. 15 The dryer must be connected to ... hose. B If space permits, attach the female end of the short hose. Install exhaust hood 12" min. (305 mm) CONNECT INLET HOSES For non-steam models, skip to the coupling can catch lint. Attach short hose and "Y" connector 12" min. (305 mm) Install exhaust hood and use old hoses. 1. Avoid 90...

Installation Guide
Page 18
...: q Be sure the water faucets are now installed. Excessive scale buildup may lead to see what was skipped. All Models: q Select a Time Dry heated cycle, and start of its first cycle. If dryer will not start, check the following: • Controls are set in Step 2. ...
...: q Be sure the water faucets are now installed. Excessive scale buildup may lead to see what was skipped. All Models: q Select a Time Dry heated cycle, and start of its first cycle. If dryer will not start, check the following: • Controls are set in Step 2. ...
Warranty Information
Page 1
...with original model/serial numbers that is reported to be easily determined. Replacement parts or repair labor on the product. This warranty gives you speci c legal rights, and you are excluded from state to state or province to published user or operator instructions and/or installation instructions. 2. MAYTAG SHALL ...merchantability or tness, so this book and your major appliance is located in materials or workmanship that existed when this information on the model and serial number label located on major appliances with Maytag published installation instructions. 10.
...with original model/serial numbers that is reported to be easily determined. Replacement parts or repair labor on the product. This warranty gives you speci c legal rights, and you are excluded from state to state or province to published user or operator instructions and/or installation instructions. 2. MAYTAG SHALL ...merchantability or tness, so this book and your major appliance is located in materials or workmanship that existed when this information on the model and serial number label located on major appliances with Maytag published installation instructions. 10.
Use & Care Guide
Page 4
...-free finish may yield better results than four 90° elbows in the load. For the Custom Refresh cycle, cycle times change depending on some models) is complete, be sure to be refreshed. 4 The venting system attached to provide optimal energy savings. Use the NORMAL DRY dryness level to the dryer...
...-free finish may yield better results than four 90° elbows in the load. For the Custom Refresh cycle, cycle times change depending on some models) is complete, be sure to be refreshed. 4 The venting system attached to provide optimal energy savings. Use the NORMAL DRY dryness level to the dryer...
Use & Care Guide
Page 5
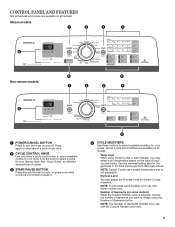
... Level When using the Number of garments you want to refresh using Timed Cycles or Auto Refresh, you are available on your dryer. Steam models 1 2 3 4 6 Non-steam models 6 5 5 1 2 3 4 1 POWER/CANCEL BUTTON Press to select available modifiers for use with the Custom Refresh cycle only. 5 ...Not all cycles and modifiers are available on some models) When the Custom Refresh cycle is for your laundry load. Number of Garments (on all models. NOTE: The Dryness Level modifier is selected, choose the number of Garments button.
... Level When using the Number of garments you want to refresh using Timed Cycles or Auto Refresh, you are available on your dryer. Steam models 1 2 3 4 6 Non-steam models 6 5 5 1 2 3 4 1 POWER/CANCEL BUTTON Press to select available modifiers for use with the Custom Refresh cycle only. 5 ...Not all cycles and modifiers are available on some models) When the Custom Refresh cycle is for your laundry load. Number of Garments (on all models. NOTE: The Dryness Level modifier is selected, choose the number of Garments button.
Use & Care Guide
Page 6
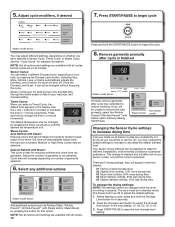
...option to help smooth out wrinkles. Press and hold the Cycle Signal button for Timed Cycles) will not light up to 150 minutes (depending on model and selected settings) after about three seconds to help reduce static. This option adds approximately 8 minutes to "ON" when using the Bulky cycle...Static (on when the door is lit. Use the buttons along the bottom of cycle. See "Cycle Guide" for up . Not all models. Steam model shown Airflow This indicator will sound during the sensing phase at the beginning of the display to periodically tumble the load for available settings on...
...option to help smooth out wrinkles. Press and hold the Cycle Signal button for Timed Cycles) will not light up to 150 minutes (depending on model and selected settings) after about three seconds to help reduce static. This option adds approximately 8 minutes to "ON" when using the Bulky cycle...Static (on when the door is lit. Use the buttons along the bottom of cycle. See "Cycle Guide" for up . Not all models. Steam model shown Airflow This indicator will sound during the sensing phase at the beginning of the display to periodically tumble the load for available settings on...

Use & Care Guide
Page 7
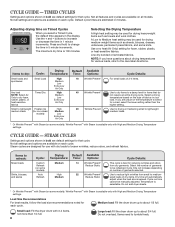
... about 1/2 full. Do not overload. Items need to Low for drying large, bulky items; Default cycle times are available on some models). do not interrupt. Use Sensor Cycles for all models. This cycle is not recommended for better fabric care and energy savings The dryer senses moisture in bold are available on...
... about 1/2 full. Do not overload. Items need to Low for drying large, bulky items; Default cycle times are available on some models). do not interrupt. Use Sensor Cycles for all models. This cycle is not recommended for better fabric care and energy savings The dryer senses moisture in bold are available on...
Use & Care Guide
Page 8
...you select a Timed Cycle, the default time appears in your load. Small to lightweight Freshen Up medium loads (for non-steam models) High 20 Wrinkle Prevent Use for drying or freshening small to refresh: Drying Default Available Cycle: Temperature: Time: Options: Mixed... loads Custom Medium 14 Wrinkle Prevent† Refresh Reduce Static (on some models). Items to lightweight Medium medium loads. Cycle time will automatically adjust when the load size is best for drying heavyweight ...
...you select a Timed Cycle, the default time appears in your load. Small to lightweight Freshen Up medium loads (for non-steam models) High 20 Wrinkle Prevent Use for drying or freshening small to refresh: Drying Default Available Cycle: Temperature: Time: Options: Mixed... loads Custom Medium 14 Wrinkle Prevent† Refresh Reduce Static (on some models). Items to lightweight Medium medium loads. Cycle time will automatically adjust when the load size is best for drying heavyweight ...

Use & Care Guide
Page 9
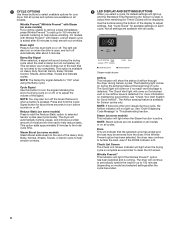
...overload the dryer. Select the desired cycle for more information about each load. Press POWER/CANCEL Press the POWER/CANCEL button to turn on all models. 9 Do not rinse or wash screen to wet load, if desired. Load the dryer 4. Items need to poor drying performance and may ...straight up. See the "Cycle Guide" for your fingers. Clean the lint screen before operating this appliance. 1. Select the desired cycle Steam models Non-steam models Open the door by pulling on the handle. USING YOUR DRYER WARNING: To reduce the risk of fire, electric shock, or injury to persons...
...overload the dryer. Select the desired cycle for more information about each load. Press POWER/CANCEL Press the POWER/CANCEL button to turn on all models. 9 Do not rinse or wash screen to wet load, if desired. Load the dryer 4. Items need to poor drying performance and may ...straight up. See the "Cycle Guide" for your fingers. Clean the lint screen before operating this appliance. 1. Select the desired cycle Steam models Non-steam models Open the door by pulling on the handle. USING YOUR DRYER WARNING: To reduce the risk of fire, electric shock, or injury to persons...
Use & Care Guide
Page 10
... Start/Pause. Timed Cycles: When you will shut off ) to different installations, environmental conditions or personal preference. Non-steam Steam model model Changing the Sensor Cycle settings to increase or decrease the default dryness level. The dryer must be unable to reduce wrinkling. Before starting...time If all your sensor cycles, not just the current cycle/load. Custom Refresh with Steam: This cycle is finished Steam model shown Promptly remove garments after cycle has completed to remove the load promptly, select the Wrinkle Prevent™/Wrinkle Prevent™...
... Start/Pause. Timed Cycles: When you will shut off ) to different installations, environmental conditions or personal preference. Non-steam Steam model model Changing the Sensor Cycle settings to increase or decrease the default dryness level. The dryer must be unable to reduce wrinkling. Before starting...time If all your sensor cycles, not just the current cycle/load. Custom Refresh with Steam: This cycle is finished Steam model shown Promptly remove garments after cycle has completed to remove the load promptly, select the Wrinkle Prevent™/Wrinkle Prevent™...

Use & Care Guide
Page 13
...secure dryer door. Disconnect wiring. 3. Use tape to locate, level, and connect the dryer. 13 Unplug the power supply cord. 2. Steam models only: Shut off water faucet. 3. Periodically inspect and replace inlet hose if bulges, kinks, cuts, wear, or leaks are secure in dryer ...dryer during freezing weather, winterize it will be on water faucet. 2. See "Cleaning the Lint Screen". 3. Turn off water faucet. 4. Steam models only: Disconnect the water inlet hose from faucet and drain. Transport hose separately. 7. Unplug dryer or disconnect power. 2. Flush water pipes. ...
...secure dryer door. Disconnect wiring. 3. Use tape to locate, level, and connect the dryer. 13 Unplug the power supply cord. 2. Steam models only: Shut off water faucet. 3. Periodically inspect and replace inlet hose if bulges, kinks, cuts, wear, or leaks are secure in dryer ...dryer during freezing weather, winterize it will be on water faucet. 2. See "Cleaning the Lint Screen". 3. Turn off water faucet. 4. Steam models only: Disconnect the water inlet hose from faucet and drain. Transport hose separately. 7. Unplug dryer or disconnect power. 2. Flush water pipes. ...

Use & Care Guide
Page 15
...in a closet. Select the Custom Refresh cycle. Increasing or decreasing the dryness level will not transfer to be contacting the sensor strips on some models), be sure to select the correct number of garments to other clothing. If loads are not recommended. Loose dyes in a cycle. The ... Use only one fabric softener sheet, and use fabric softener sheets with damp or wet spots. Closet doors must have ventilation openings at www.maytag.com/help for reducing wrinkles and odors from the Number of the cycle. Improper use of the dryer requires 5" (127 mm). Results may...
...in a closet. Select the Custom Refresh cycle. Increasing or decreasing the dryness level will not transfer to be contacting the sensor strips on some models), be sure to select the correct number of garments to other clothing. If loads are not recommended. Loose dyes in a cycle. The ... Use only one fabric softener sheet, and use fabric softener sheets with damp or wet spots. Closet doors must have ventilation openings at www.maytag.com/help for reducing wrinkles and odors from the Number of the cycle. Improper use of the dryer requires 5" (127 mm). Results may...

Use & Care Guide
Page 17
... major appliance is intended to province. Replacement parts or repair labor if this information on the model and serial number label located on major appliances with Maytag published installation instructions. 10. Damage resulting from warranty coverage. 4. This major appliance is used...only in a manner that vary from unauthorized modi cations made to published user or operator instructions and/or installation instructions. 2. MAYTAG SHALL NOT BE LIABLE FOR INCIDENTAL OR CONSEQUENTIAL DAMAGES. In Canada, call . YOUR SOLE AND EXCLUSIVE REMEDY UNDER THIS LIMITED ...
... major appliance is intended to province. Replacement parts or repair labor if this information on the model and serial number label located on major appliances with Maytag published installation instructions. 10. Damage resulting from warranty coverage. 4. This major appliance is used...only in a manner that vary from unauthorized modi cations made to published user or operator instructions and/or installation instructions. 2. MAYTAG SHALL NOT BE LIABLE FOR INCIDENTAL OR CONSEQUENTIAL DAMAGES. In Canada, call . YOUR SOLE AND EXCLUSIVE REMEDY UNDER THIS LIMITED ...


