
Use and Care Guide
Page 2
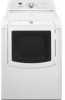
...Dryer Operation ...Dryer Results ...ASSISTANCE OR SERVICE ...In the U.S.A ...In Canada ...ACCESSORIES ...WARRANTY ... 3 SI_CURITI_ DE LA SI_CHEUSE 33 4 INSTRUCTIONS D'INSTALLATION 35 4 Outillage et pi_ces ... 35 4 E×igences d'emplacement ... 35 5 Sp6cifications 6lectriques - Canada Only Electrical......Plan Vent System ...Install Vent System ...Install I_eveling I.egs ...Connect Vent ...I.eve[ Dryer ...Reverse Door Swing ...Complete Installation ...DRYER USE...Starting Your Dryer ...Stopping, Pausing, or Restarting Drying and Cycle Tips ...Status I_ights ...Cyc[es ......
...Dryer Operation ...Dryer Results ...ASSISTANCE OR SERVICE ...In the U.S.A ...In Canada ...ACCESSORIES ...WARRANTY ... 3 SI_CURITI_ DE LA SI_CHEUSE 33 4 INSTRUCTIONS D'INSTALLATION 35 4 Outillage et pi_ces ... 35 4 E×igences d'emplacement ... 35 5 Sp6cifications 6lectriques - Canada Only Electrical......Plan Vent System ...Install Vent System ...Install I_eveling I.egs ...Connect Vent ...I.eve[ Dryer ...Reverse Door Swing ...Complete Installation ...DRYER USE...Starting Your Dryer ...Stopping, Pausing, or Restarting Drying and Cycle Tips ...Status I_ights ...Cyc[es ......
Use and Care Guide
Page 3
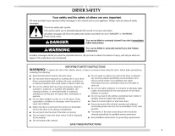
... including the following: [] Read all safety messages. IMPORTANT SAFETY INSTRUCTIONS WARNIN G: To reduce the risk of fire, electric shock, or injury to persons when using the dryer. [] Do not place items exposed to cooking oils in this manual and on or in , or spotted with...Do not allow children to dry articles containing foam rubber or similarly textured rubber-like materials. [] Clean lint screen before using the dryer, follow instructions. SAVE THESE INSTRUCTIONS Items contaminated with gasoline, drycleaning solvents, or other flammable or explosive substances as they give off ...
... including the following: [] Read all safety messages. IMPORTANT SAFETY INSTRUCTIONS WARNIN G: To reduce the risk of fire, electric shock, or injury to persons when using the dryer. [] Do not place items exposed to cooking oils in this manual and on or in , or spotted with...Do not allow children to dry articles containing foam rubber or similarly textured rubber-like materials. [] Clean lint screen before using the dryer, follow instructions. SAVE THESE INSTRUCTIONS Items contaminated with gasoline, drycleaning solvents, or other flammable or explosive substances as they give off ...
Use and Care Guide
Page 4
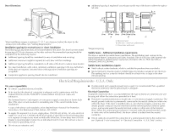
... Tape measure Parts supplied: Remove parts package from dryer. See "Electrical Requirements." • A sturdy floor to the dryer must end in ring terminals or spade terminals with a maximum slope of 1" (2.5 cm) under entire dryer. Drying times can result in garages, closets, ...a power supply cord: Use a UI. Do not operate your local building inspector. The dryer must be at the end of the dryer. Check existing electrical supply and venting and see "Electrical Requirements" and "Venting Requirements" before starting installation. See "Venting Requirements." • A...
... Tape measure Parts supplied: Remove parts package from dryer. See "Electrical Requirements." • A sturdy floor to the dryer must end in ring terminals or spade terminals with a maximum slope of 1" (2.5 cm) under entire dryer. Drying times can result in garages, closets, ...a power supply cord: Use a UI. Do not operate your local building inspector. The dryer must be at the end of the dryer. Check existing electrical supply and venting and see "Electrical Requirements" and "Venting Requirements" before starting installation. See "Venting Requirements." • A...
Use and Care Guide
Page 5
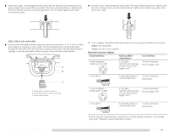
...all sides of 0" (0 cm) clearance on the sides and rear. i This dryer has been tested for this dryer. Dryer Dimensions • Additional spacing is required if you exhaust out the rear of the dryer to reduce noise transfer. • For closet installation, with elbow. I ....__.t4,m, ax.. [_ I_, l{_.scm) (43811c0mn2.)2'_ ___ 3"* (7.c6m) -i *Most installations require a minimum 5" (12.7 cm) clearance behind the dryer for wall, door and floor moldings. • Additional spacing should also be required for the exhaust vent with a door, minimum ventilation openings in the top...
...all sides of 0" (0 cm) clearance on the sides and rear. i This dryer has been tested for this dryer. Dryer Dimensions • Additional spacing is required if you exhaust out the rear of the dryer to reduce noise transfer. • For closet installation, with elbow. I ....__.t4,m, ax.. [_ I_, l{_.scm) (43811c0mn2.)2'_ ___ 3"* (7.c6m) -i *Most installations require a minimum 5" (12.7 cm) clearance behind the dryer for wall, door and floor moldings. • Additional spacing should also be required for the exhaust vent with a door, minimum ventilation openings in the top...

Use and Care Guide
Page 6
... a path of N EMA Type 14-30R. listed power supply cord kit marked for electric current. If your outlet looks like this : • At[eas5tft (1.52m)long. GROUNDING INSTRUCTIONS [] For a grounded, cord-connected dryer: This dryer must be plugged into an appropriate outlet that connect to whether the... have three 10-gauge copper wires and match a 3-wire receptacle of electric shock. WARNING: improper connection of the equipment- The kit should be type SRI) or SRI)T and be either green or bare. This dryer uses a cord having an equipment-grounding conductor and a grounding plug. ...
... a path of N EMA Type 14-30R. listed power supply cord kit marked for electric current. If your outlet looks like this : • At[eas5tft (1.52m)long. GROUNDING INSTRUCTIONS [] For a grounded, cord-connected dryer: This dryer must be plugged into an appropriate outlet that connect to whether the... have three 10-gauge copper wires and match a 3-wire receptacle of electric shock. WARNING: improper connection of the equipment- The kit should be type SRI) or SRI)T and be either green or bare. This dryer uses a cord having an equipment-grounding conductor and a grounding plug. ...

Use and Care Guide
Page 7
_,0_,
_,0_,
Use and Care Guide
Page 9
...) A fused disconnect or circuit breaker box* 4-wire connection: I)i rect Wi re A UL listed, 120/240-volt minimum, 30-amp, dryer power supply cord* 3-wire connection: Power Supply Cord 3-wire direct A fused disconnect or circuit breaker box* 3-wire connection: I )o not further... 4. Tighten strain relief screw against the direct wire cable. Removable conduit connector B. Now complete installation following instructions for your type of electrical connection: 4-wire (recommended) 3-wire (if 4-wire is inside the terminal block opening C. Be sure that the wire insulation on ...
...) A fused disconnect or circuit breaker box* 4-wire connection: I)i rect Wi re A UL listed, 120/240-volt minimum, 30-amp, dryer power supply cord* 3-wire connection: Power Supply Cord 3-wire direct A fused disconnect or circuit breaker box* 3-wire connection: I )o not further... 4. Tighten strain relief screw against the direct wire cable. Removable conduit connector B. Now complete installation following instructions for your type of electrical connection: 4-wire (recommended) 3-wire (if 4-wire is inside the terminal block opening C. Be sure that the wire insulation on ...

Use and Care Guide
Page 10
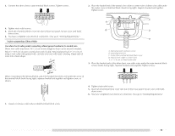
... terminal block screws. Y4" ( 1.9 cm) UL fisted strain refief E. A. Dotted line shows position of power supply cord D. Tighten strain relief screws. 6. You have completed your electrical connection. A A_....._ B CD E G A. 4-wire receptacle (NEMA type 14-30R) B. 4-prong plug C. Remove neutral ground wire from external ground conductor screw. Connect the other.... Tighten screw. Y4" ( 1.9 cm) UL listed strain relief 5. 4-wire connection: Power supply cord IMPORTANT: A 4-wire connection is required not permit the use of dryer rear panel. External ground conductor B.
... terminal block screws. Y4" ( 1.9 cm) UL fisted strain refief E. A. Dotted line shows position of power supply cord D. Tighten strain relief screws. 6. You have completed your electrical connection. A A_....._ B CD E G A. 4-wire receptacle (NEMA type 14-30R) B. 4-prong plug C. Remove neutral ground wire from external ground conductor screw. Connect the other.... Tighten screw. Y4" ( 1.9 cm) UL listed strain relief 5. 4-wire connection: Power supply cord IMPORTANT: A 4-wire connection is required not permit the use of dryer rear panel. External ground conductor B.

Use and Care Guide
Page 12
...direct wire cable wires under the outer terminal block screws (hooks facing right). Tighten screw. Ground wire (green or bare) of dryer rear panel. Center silver-colored terminal block screw £ Neuu'a] wire (white or center wire) 4. Neutral prong D. Center silver...-colored terminal block screw D. I.oosen or remove center silver-colored terminal block screw. 2. You have completed your electrical connection. Squeeze hooked ends together. Neutra] wire (white or center wire) 1. Insert tab of terminal block cover into slot of power supply...
...direct wire cable wires under the outer terminal block screws (hooks facing right). Tighten screw. Ground wire (green or bare) of dryer rear panel. Center silver-colored terminal block screw £ Neuu'a] wire (white or center wire) 4. Neutral prong D. Center silver...-colored terminal block screw D. I.oosen or remove center silver-colored terminal block screw. 2. You have completed your electrical connection. Squeeze hooked ends together. Neutra] wire (white or center wire) 1. Insert tab of terminal block cover into slot of power supply...
Use and Care Guide
Page 13
Connetchteothewr irestooutetrerminablockscrewTs.ightesncrews. 2. Tighten screw. Insert tab of dryer rear panel. Neutral wire (white or center wire) £. 3/4" ( 1.9 cm) UL listed strain relief 3. Tighten strain relief screw. 5. Squeeze hooked end together. Tighten strain relief screws. 5. Direct wire cable must have completed your electrical connection. Shape ends of wires into slot of terminal block...
Connetchteothewr irestooutetrerminablockscrewTs.ightesncrews. 2. Tighten screw. Insert tab of dryer rear panel. Neutral wire (white or center wire) £. 3/4" ( 1.9 cm) UL listed strain relief 3. Tighten strain relief screw. 5. Squeeze hooked end together. Tighten strain relief screws. 5. Direct wire cable must have completed your electrical connection. Shape ends of wires into slot of terminal block...

Use and Care Guide
Page 16
Optional kits for kit installation instructions. Optional exhaust installations Venting systems come in death, fire, electrical shock, or serious injury. Terminate the exhaust vent outside. / A B A. If you prefer, you may contact your local dealer. Refer ... 8212503 Special provisions for your installation. Failure to exhaust out the bottom. Standard rear offset exhaust installation B. Bottom exhaust installtion D. This dryer can result in many varieties. Select the type best for mobile home installations The exhaust vent must be exhausted from the rear to avoid...
Optional kits for kit installation instructions. Optional exhaust installations Venting systems come in death, fire, electrical shock, or serious injury. Terminate the exhaust vent outside. / A B A. If you prefer, you may contact your local dealer. Refer ... 8212503 Special provisions for your installation. Failure to exhaust out the bottom. Standard rear offset exhaust installation B. Bottom exhaust installtion D. This dryer can result in many varieties. Select the type best for mobile home installations The exhaust vent must be exhausted from the rear to avoid...

Use and Care Guide
Page 20
... turn on . • Household fuse is intact and tight, or circuit breaker has not tripped. • Dryer door is first heated. Test dryer operation by placing screw heads into an outlet and/or electrical supply is on power. If you receive an "L2" code, there may notice an odor when the... dryer is closed. NOTE: You may be a problem with a damp cloth to engage door strike. 1. I I f A A. Dispose of your home power supply keeping the dryer's heater from turning on...
... turn on . • Household fuse is intact and tight, or circuit breaker has not tripped. • Dryer door is first heated. Test dryer operation by placing screw heads into an outlet and/or electrical supply is on power. If you receive an "L2" code, there may notice an odor when the... dryer is closed. NOTE: You may be a problem with a damp cloth to engage door strike. 1. I I f A A. Dispose of your home power supply keeping the dryer's heater from turning on...
Use and Care Guide
Page 21
... any type of the load. Follow these instructions explosion, or fire. NOTE: Your Maytag _'_dryer is selected. Please refer to specific sections of fire, electric shock, or injury to select cycle, or open the dryer door and the display will adjust again, showing the final drying time. f Explosion ...type of oil on it (even after washing). can completely remove oil. Place laundry in death, Fire Hazard No washer can result in dryer and shut door. 3. You may not have all of the drying process, the estimated time display will illuminate. Failure to follow these ...
... any type of the load. Follow these instructions explosion, or fire. NOTE: Your Maytag _'_dryer is selected. Please refer to specific sections of fire, electric shock, or injury to select cycle, or open the dryer door and the display will adjust again, showing the final drying time. f Explosion ...type of oil on it (even after washing). can completely remove oil. Place laundry in death, Fire Hazard No washer can result in dryer and shut door. 3. You may not have all of the drying process, the estimated time display will illuminate. Failure to follow these ...

Use and Care Guide
Page 27
...aundry detergent and fabric softener residue can cause longer drying times for an extended period of lint screen with a clean towel. Clean lint screen. dryers: 2. From the Exhaust Vent I .int should be removed every 2 years, or more frequently, if it becomes 1, Roll lint off the ... will be done by a qualified person. Wet a nylon brush with a nylon clogged due to remove. _, ® • , From Inside the Dryer Cabinet I .int should be removed every 2 years, or more often, depending on the lint screen. See "Cleaning the I_int Screen." Unplug the power supply...
...aundry detergent and fabric softener residue can cause longer drying times for an extended period of lint screen with a clean towel. Clean lint screen. dryers: 2. From the Exhaust Vent I .int should be removed every 2 years, or more frequently, if it becomes 1, Roll lint off the ... will be done by a qualified person. Wet a nylon brush with a nylon clogged due to remove. _, ® • , From Inside the Dryer Cabinet I .int should be removed every 2 years, or more often, depending on the lint screen. See "Cleaning the I_int Screen." Unplug the power supply...

Use and Care Guide
Page 28
... and side to locate, level, and connect the dryer. ..... 0c_°0_0o50 _t_ L_o_ 1I The dryer light automatically turns on the length of a service call an electrician. When balled up ? www.maytag.com/help - Check intact and tight, or that both circuit breakers have heat. Electric dryers require 240-volt power supply. Was a regular...
... and side to locate, level, and connect the dryer. ..... 0c_°0_0o50 _t_ L_o_ 1I The dryer light automatically turns on the length of a service call an electrician. When balled up ? www.maytag.com/help - Check intact and tight, or that both circuit breakers have heat. Electric dryers require 240-volt power supply. Was a regular...

Use and Care Guide
Page 29
Electric dryers use a plastic vent. Confirm the power cord is not too long or has too many turns. "AF" (low airflow condition): The dryer will increase drying times. Check to see if a household fuse has blown or circuit breaker has tripped. Confirm the vent run from the dryer to the wall is crushed... or kinked. Select a Timed Cycle, and restart the dryer. Fire Hazard Use a heavy metal vent. Do not use two household fuses or breakers. Failure to "Electrical Connection" for the type of vent you do not ...
Electric dryers use a plastic vent. Confirm the power cord is not too long or has too many turns. "AF" (low airflow condition): The dryer will increase drying times. Check to see if a household fuse has blown or circuit breaker has tripped. Confirm the vent run from the dryer to the wall is crushed... or kinked. Select a Timed Cycle, and restart the dryer. Fire Hazard Use a heavy metal vent. Do not use two household fuses or breakers. Failure to "Electrical Connection" for the type of vent you do not ...

Use and Care Guide
Page 30
...bottom of the door. Odors Have you would like? The odor will change the preset Dryness I.evel settings to move and install dryer. I .evel the dryer. Use 4" (10.2 cm) diameter vent material. Has the Air Fluff modifier been selected? You may have ventilation openings at... The rear of the dryer requires 5" (12.7 cm) of airspace, and the sides and front of the dryer require a minimum of dryer cycles requires temperatures above the floor for a garage installation. See "Modifiers." See "Changing Cycles, Modifiers, and Options." The new electric heating element may change ...
...bottom of the door. Odors Have you would like? The odor will change the preset Dryness I.evel settings to move and install dryer. I .evel the dryer. Use 4" (10.2 cm) diameter vent material. Has the Air Fluff modifier been selected? You may have ventilation openings at... The rear of the dryer requires 5" (12.7 cm) of airspace, and the sides and front of the dryer require a minimum of dryer cycles requires temperatures above the floor for a garage installation. See "Modifiers." See "Changing Cycles, Modifiers, and Options." The new electric heating element may change ...


