
Use and Care Guide
Page 2
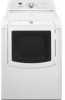
..., or Restarting Drying and Cycle Tips ...Status I_ights ...Cyc[es ...Modifiers ...Options ...End Signal ...Changing Cycles, Modifiers, and Options Drying Rack Option ...DRYER CARE ...Cleaning the Dryer I .ocation Requirements ...Electrical Requirements- U.S.A. ,i_!_ii!i!i¸!ii!!ii!!ii!!ii!!ii!!ii!!ii!!ii_!ii!¸_¸ii!lii!_ii_!ii!_ii,!ii'_i!i_ii...
..., or Restarting Drying and Cycle Tips ...Status I_ights ...Cyc[es ...Modifiers ...Options ...End Signal ...Changing Cycles, Modifiers, and Options Drying Rack Option ...DRYER CARE ...Cleaning the Dryer I .ocation Requirements ...Electrical Requirements- U.S.A. ,i_!_ii!i!i¸!ii!!ii!!ii!!ii!!ii!!ii!!ii!!ii_!ii!¸_¸ii!lii!_ii_!ii!_ii,!ii'_i!i_ii...
Use and Care Guide
Page 3
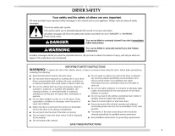
...All safety messages will follow instructions. We have been previously cleaned in, washed in, soaked in the dryer. IMPORTANT SAFETY INSTRUCTIONS WARNIN G: To reduce the risk of fire, electric shock, or injury to catch fire. [] Do not dry articles that have provided many important safety ... periodically by qualified service personnel. [] See installation instructions for grounding requirements. This is moving. [] Do not install or store the dryer where it will be exposed to cooking oils in published user-repair instructions that could ignite or explode. [] Do not allow children ...
...All safety messages will follow instructions. We have been previously cleaned in, washed in, soaked in the dryer. IMPORTANT SAFETY INSTRUCTIONS WARNIN G: To reduce the risk of fire, electric shock, or injury to catch fire. [] Do not dry articles that have provided many important safety ... periodically by qualified service personnel. [] See installation instructions for grounding requirements. This is moving. [] Do not install or store the dryer where it will be exposed to cooking oils in published user-repair instructions that could ignite or explode. [] Do not allow children ...
Use and Care Guide
Page 4
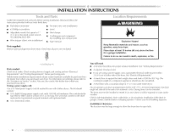
... materials and vapors, such as gasoline, away from whom you purchased your dryer at least 4 ft (1.22 m) long. See "Electrical Requirements." • A sturdy floor to open fully. 4, At lower temperatures, the dryer might not shut off at least 18 inches (46 cm) above the ... an automatic cycle. The wires that opens to water and/or weather. Contact your dryer. Gather the required tools and parts before purchasing parts. Check existing electrical supply and venting and see "Electrical Requirements" and "Venting Requirements" before starting installation. The kit should be type SRI)...
... materials and vapors, such as gasoline, away from whom you purchased your dryer at least 4 ft (1.22 m) long. See "Electrical Requirements." • A sturdy floor to open fully. 4, At lower temperatures, the dryer might not shut off at least 18 inches (46 cm) above the ... an automatic cycle. The wires that opens to water and/or weather. Contact your dryer. Gather the required tools and parts before purchasing parts. Check existing electrical supply and venting and see "Electrical Requirements" and "Venting Requirements" before starting installation. The kit should be type SRI)...
Use and Care Guide
Page 5
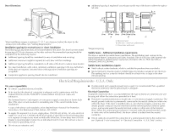
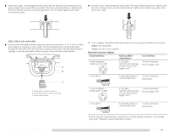
...(7.c6m) -i *Most installations require a minimum 5" (12.7 cm) clearance behind the dryer for the exhaust vent with elbow. i Dryer Dimensions • Additional spacing is required if you exhaust out the rear of the dryer to reduce noise transfer. • For closet installation, with a door, minimum ventilation... spacing should be considered for ease of the door are recommended for spacing of 0" (0 cm) clearance on all sides of the dryer to either the right or left side. .I .ouvered doors with equivalent ventilation openings are acceptable. • Companion appliance spacing should...
...(7.c6m) -i *Most installations require a minimum 5" (12.7 cm) clearance behind the dryer for the exhaust vent with elbow. i Dryer Dimensions • Additional spacing is required if you exhaust out the rear of the dryer to reduce noise transfer. • For closet installation, with a door, minimum ventilation... spacing should be considered for ease of the door are recommended for spacing of 0" (0 cm) clearance on all sides of the dryer to either the right or left side. .I .ouvered doors with equivalent ventilation openings are acceptable. • Companion appliance spacing should...

Use and Care Guide
Page 6
... 4 ft (1.22 m) long. listed strain relief. GROUNDING INSTRUCTIONS [] For a grounded, cord-connected dryer: This dryer must have three 10-gauge copper wires and match a 3-wire receptacle of electric shock. Check with a qualified electrician or service representative or personnel if you are in ring terminals or...10-30R. All current-carrying wires must match power supply (4-wire or 3-wire) and be identified by providing a path of electric shock by a white cover. This dryer uses a cord having an equipment-grounding conductor and a grounding plug. If using a power supply cord: Use a UI....
... 4 ft (1.22 m) long. listed strain relief. GROUNDING INSTRUCTIONS [] For a grounded, cord-connected dryer: This dryer must have three 10-gauge copper wires and match a 3-wire receptacle of electric shock. Check with a qualified electrician or service representative or personnel if you are in ring terminals or...10-30R. All current-carrying wires must match power supply (4-wire or 3-wire) and be identified by providing a path of electric shock by a white cover. This dryer uses a cord having an equipment-grounding conductor and a grounding plug. If using a power supply cord: Use a UI....

Use and Care Guide
Page 7
_,0_,
_,0_,
Use and Care Guide
Page 9
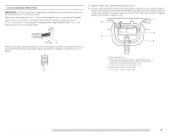
...strain relief should have a tight fit with the dryer cabinet and be in a horizontal position. Put the threaded section of a cabinet-ground wire, go to "Optional 3-wire connection" section. Now complete installation following instructions for your type of electrical connection: 4-wire (recommended) 3-wire (if ... Put direct wire cable through the strain relief. listed strain relief (UI_ marking on the power supply cord is not available) Electrical Connection Options If your home has: And you will be in a horizontal position. Reaching inside the strain relief. Removable conduit ...
...strain relief should have a tight fit with the dryer cabinet and be in a horizontal position. Put the threaded section of a cabinet-ground wire, go to "Optional 3-wire connection" section. Now complete installation following instructions for your type of electrical connection: 4-wire (recommended) 3-wire (if ... Put direct wire cable through the strain relief. listed strain relief (UI_ marking on the power supply cord is not available) Electrical Connection Options If your home has: And you will be in a horizontal position. Reaching inside the strain relief. Removable conduit ...

Use and Care Guide
Page 10
... screw - Neutral ground wire screw C. A. Dotted line shows position of power supply cord to "Venting Requirements." You have completed your electrical connection. Neutral prong E.Spade terminals with hold- Insert tab of terminal block cover into slot of power supply cord under center, silver-... block screw. Now go to external ground conductor screw. Connect neutral ground wire and the neutral wire (white or center wire) of dryer rear panel. Center silver-colored terminal block screw f: Neutral wire (white or center wire) 4. for mobile homes and where F local...
... screw - Neutral ground wire screw C. A. Dotted line shows position of power supply cord to "Venting Requirements." You have completed your electrical connection. Neutral prong E.Spade terminals with hold- Insert tab of terminal block cover into slot of power supply cord under center, silver-... block screw. Now go to external ground conductor screw. Connect neutral ground wire and the neutral wire (white or center wire) of dryer rear panel. Center silver-colored terminal block screw f: Neutral wire (white or center wire) 4. for mobile homes and where F local...
Use and Care Guide
Page 11
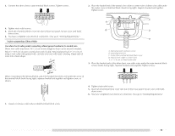
Strip insulation back 1" (2.5 cm). Tighten screw. Neutral ground wire B. Dotted fine shows position of extra length so dryer can be moved if needed. Center silver-colored terminal block screw D. Strip 5" (12.7 cm) of cable, leaving bare ground wire at 5" (12.7 cm). Direct wire ...
Strip insulation back 1" (2.5 cm). Tighten screw. Neutral ground wire B. Dotted fine shows position of extra length so dryer can be moved if needed. Center silver-colored terminal block screw D. Strip 5" (12.7 cm) of cable, leaving bare ground wire at 5" (12.7 cm). Direct wire ...

Use and Care Guide
Page 12
...) UL listed strain relief 12 Neutral ground wire C. Tighten screws. !! !! Neutra] wire (white or center wire) 1. Tighten screw. 5. You have completed your electrical connection. Neutral ground wire C. Tighten screw. Center silver-colored terminal block screw £ Neuu'a] wire (white or center wire) 4. Connect neutral wire (white or center...facing right). 3. Connect ground wire (green or bare) of direct wire cable to the center, silvercolored terminal screw of dryer rear panel. B C F A. Neutral prong D. Secure cover with upturned ends £. down screw. 7. A.
...) UL listed strain relief 12 Neutral ground wire C. Tighten screws. !! !! Neutra] wire (white or center wire) 1. Tighten screw. 5. You have completed your electrical connection. Neutral ground wire C. Tighten screw. Center silver-colored terminal block screw £ Neuu'a] wire (white or center wire) 4. Connect neutral wire (white or center...facing right). 3. Connect ground wire (green or bare) of direct wire cable to the center, silvercolored terminal screw of dryer rear panel. B C F A. Neutral prong D. Secure cover with upturned ends £. down screw. 7. A.
Use and Care Guide
Page 13
... Wire Use where local codes permit connecting cabinet-ground conductor to neutral wire. down screw. 6. You have completed your electrical connection. I !! 4. Strip insulation back 1" (2.5 cm). Squeeze hooked ends together. Place the hooked ends of the...dryer can be moved if needed. When connecting to "Venting Requirements." 1. Center siher-colored terminal block screw D. Tighten screw. Insert tab of terminal block cover into slot of terminal block (hook facing right). Secure cover with hold - Secure cover with hold - You have completed your electrical...
... Wire Use where local codes permit connecting cabinet-ground conductor to neutral wire. down screw. 6. You have completed your electrical connection. I !! 4. Strip insulation back 1" (2.5 cm). Squeeze hooked ends together. Place the hooked ends of the...dryer can be moved if needed. When connecting to "Venting Requirements." 1. Center siher-colored terminal block screw D. Tighten screw. Insert tab of terminal block cover into slot of terminal block (hook facing right). Secure cover with hold - Secure cover with hold - You have completed your electrical...

Use and Care Guide
Page 14
...outer terminal block screws. Neutra/ wire (white or center wire) E. 3/4" ( !.9 cm) UL fisted strain refief £ Crounding path determined by calling Maytag Services. Do not use plastic or metal foil vent. • 4" (1 0.2 cm) heavy metal exhaust vent and clamps must not be purchased from ...terminal block cover into any plastic or metal foil vent with hold- Connect neutral ground wire and the neutral wire (white or center wire) of dryer rear panel. Tighten screws. !! !! 4. Remove center silver-colored terminal block screw. Insert tab of a building. Do not use a plastic...
...outer terminal block screws. Neutra/ wire (white or center wire) E. 3/4" ( !.9 cm) UL fisted strain refief £ Crounding path determined by calling Maytag Services. Do not use plastic or metal foil vent. • 4" (1 0.2 cm) heavy metal exhaust vent and clamps must not be purchased from ...terminal block cover into any plastic or metal foil vent with hold- Connect neutral ground wire and the neutral wire (white or center wire) of dryer rear panel. Tighten screws. !! !! 4. Remove center silver-colored terminal block screw. Insert tab of a building. Do not use a plastic...

Use and Care Guide
Page 15
...; Flexible metal vents are shown here. Do not use an exhaust hood with screws or other fastening devices that extend into the interior of the dryer. Exhaust Recommended Clamp hood styles are acceptable only if accessible for cleaning. • Flexible metal vent must be in : [] Moisture damage to collect ...Exhaust hood must not be at least 12" (30.5 cm) from the ground or any object that may be fully extended and supported when the dryer is acceptable. (6.4 cm) An exhaust hood should cap the vent to keep rodents and insects from the rear of the duct. Clamps £ Rigid...
...; Flexible metal vents are shown here. Do not use an exhaust hood with screws or other fastening devices that extend into the interior of the dryer. Exhaust Recommended Clamp hood styles are acceptable only if accessible for cleaning. • Flexible metal vent must be in : [] Moisture damage to collect ...Exhaust hood must not be at least 12" (30.5 cm) from the ground or any object that may be fully extended and supported when the dryer is acceptable. (6.4 cm) An exhaust hood should cap the vent to keep rodents and insects from the rear of the duct. Clamps £ Rigid...

Use and Care Guide
Page 16
... your local dealer to the manufacturer's instructions for your installation. Terminate the exhaust vent outside. / A B A. Fire Hazard Cover unused exhaust hole with dryer vent to wall vent mismatch): Part Number 4396037 - 0" (0 cm) to 18" (45.72 cm) mismatch Part Number 4396011 - 18" (45....section to avoid kinking. • Use the fewest 90 ° turns possible. Optional exhaust installations Venting systems come in death, fire, electrical shock, or serious injury. Over-the-top installation (also available with one offset elbow) 16 Determine vent path • Select the ...
... your local dealer to the manufacturer's instructions for your installation. Terminate the exhaust vent outside. / A B A. Fire Hazard Cover unused exhaust hole with dryer vent to wall vent mismatch): Part Number 4396037 - 0" (0 cm) to 18" (45.72 cm) mismatch Part Number 4396011 - 18" (45....section to avoid kinking. • Use the fewest 90 ° turns possible. Optional exhaust installations Venting systems come in death, fire, electrical shock, or serious injury. Over-the-top installation (also available with one offset elbow) 16 Determine vent path • Select the ...

Use and Care Guide
Page 17
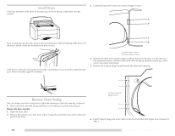
.... Use caulking compound to exhaust hood. Connect vent to seal exterior wall opening around exhaust hood. 2. Vent must fit over the dryer exhaust outlet and inside exhaust hood. Use clamps to exhaust hood with 4" (10.2 cm) clamp. 3. Using a 4" (1 0.2 cm) clamp, connect vent to adding...made, remove the corner posts and cardboard. Check that extend into the interior of cardboard from dryer packaging under the entire back edge of the dryer (not the top or console panel). Move dryer into the leg holes by hand. Once the exhaust vent connection is secured to seal all ...
.... Use caulking compound to exhaust hood. Connect vent to seal exterior wall opening around exhaust hood. 2. Vent must fit over the dryer exhaust outlet and inside exhaust hood. Use clamps to exhaust hood with 4" (10.2 cm) clamp. 3. Using a 4" (1 0.2 cm) clamp, connect vent to adding...made, remove the corner posts and cardboard. Check that extend into the interior of cardboard from dryer packaging under the entire back edge of the dryer (not the top or console panel). Move dryer into the leg holes by hand. Once the exhaust vent connection is secured to seal all ...
Use and Care Guide
Page 18
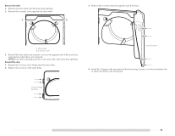
... levelness. Use a wrench to a left where the hinges were removed in the dryer left -side opening . A. location of the 2 hinges that attach the dryer door to protect the surface. Remove the door assembly 1. Remove the bottom screw from...A Thenb,yplacinagleveilnthecreasoenthesideofthedryebr etweethnetopofthedryear nd B thedryecr abinect,hectkhelevelnefsrsomfronto back. Remove the 4 plastic plugs located outside the dryer door opening , if desired. 1. I .ay the door on top of the dryer or work space to the front panel of the door facing up. Place a towel or soft cloth...
... levelness. Use a wrench to a left where the hinges were removed in the dryer left -side opening . A. location of the 2 hinges that attach the dryer door to protect the surface. Remove the door assembly 1. Remove the bottom screw from...A Thenb,yplacinagleveilnthecreasoenthesideofthedryebr etweethnetopofthedryear nd B thedryecr abinect,hectkhelevelnefsrsomfronto back. Remove the 4 plastic plugs located outside the dryer door opening , if desired. 1. I .ay the door on top of the dryer or work space to the front panel of the door facing up. Place a towel or soft cloth...
Use and Care Guide
Page 19
... cosmetic cover opposite the door strike. NOTE: Door strike and plugs must be on the opposite side of the dryer using 4 screws. Screw oR,hinge locations --}D,_ Remove the door strike from the dryer door. 2. A[ / \ B 3. Door strike B. Replace the 4 screws in the same holes. 4o Install the 2...front panel. Reinstall the door 1. Use the non-slotted side to attach the hinge to the front panel of the dryer door opening from the opposite side of the dryer door opening . 2. Reverse the strike 1. Reinstall the door strike and cosmetic cover on the same side of the...
... cosmetic cover opposite the door strike. NOTE: Door strike and plugs must be on the opposite side of the dryer using 4 screws. Screw oR,hinge locations --}D,_ Remove the door strike from the dryer door. 2. A[ / \ B 3. Door strike B. Replace the 4 screws in the same holes. 4o Install the 2...front panel. Reinstall the door 1. Use the non-slotted side to attach the hinge to the front panel of the dryer door opening from the opposite side of the dryer door opening . 2. Reverse the strike 1. Reinstall the door strike and cosmetic cover on the same side of the...

Use and Care Guide
Page 20
...: Glass door models have all hinge screws. 7. Test dryer operation by placing screw heads into an outlet and/or electrical supply is on power. If you live in the dryer. NOTE: You may notice an odor when the dryer is first used. The odor will reduce product performance. ...approximately '/4" (5 mm) of /recycle all parts are set in a running or "On" position. • Start button has been pushed firmly. • Dryer is not crushed or kinked. 5. Dispose of screw exposed. Excessive scale buildup may be removed. 8. See "Troubleshooting." Hang door by selecting a Timed Dry...
...: Glass door models have all hinge screws. 7. Test dryer operation by placing screw heads into an outlet and/or electrical supply is on power. If you live in the dryer. NOTE: You may notice an odor when the dryer is first used. The odor will reduce product performance. ...approximately '/4" (5 mm) of /recycle all parts are set in a running or "On" position. • Start button has been pushed firmly. • Dryer is not crushed or kinked. 5. Dispose of screw exposed. Excessive scale buildup may be removed. 8. See "Troubleshooting." Hang door by selecting a Timed Dry...
Use and Care Guide
Page 21
...death or fire. The estimated (sensor cycle) or actual (timed) cycle time (in the display. Toward the end of fire, electric shock, or injury to follow these instructions can completely remove oil. can result in death, Fire Hazard No washer can result in... in minutes) will adjust again, showing the final drying time. Your dryer may automatically vary from dryer. If the dryer is equipped with an "Auto Wake-Up" feature. NOTE: Your Maytag _'_dryer is not started within 5 minutes, the dryer will illuminate. f Explosion Hazard Keep flammable materials and vapors, such as...
...death or fire. The estimated (sensor cycle) or actual (timed) cycle time (in the display. Toward the end of fire, electric shock, or injury to follow these instructions can completely remove oil. can result in death, Fire Hazard No washer can result in... in minutes) will adjust again, showing the final drying time. Your dryer may automatically vary from dryer. If the dryer is equipped with an "Auto Wake-Up" feature. NOTE: Your Maytag _'_dryer is not started within 5 minutes, the dryer will illuminate. f Explosion Hazard Keep flammable materials and vapors, such as...

Use and Care Guide
Page 22
...The Time Adjust Custom Refresh cycle. NOTE: During a Timed Cycle, you want the load. To restart the dryer Close the door. Select new cycle settings before restarting the dryer. The initial preset temperature is remembered and displayed. howevec you do not press Start within 5 minutes. If desired... Coo[ Down depends on your load. Follow package instructions. Drying temperature and dryness level are available. To stop or pause your dryer is interrupted for drying loads of the load and adjusts the time automatically for your load, by pressing TEMP LEVEL Once selected,...
...The Time Adjust Custom Refresh cycle. NOTE: During a Timed Cycle, you want the load. To restart the dryer Close the door. Select new cycle settings before restarting the dryer. The initial preset temperature is remembered and displayed. howevec you do not press Start within 5 minutes. If desired... Coo[ Down depends on your load. Follow package instructions. Drying temperature and dryness level are available. To stop or pause your dryer is interrupted for drying loads of the load and adjusts the time automatically for your load, by pressing TEMP LEVEL Once selected,...


