Owners Manual
Page 3
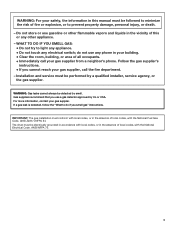
... gas leak is detected, follow the "What to do not use gasoline or other appliance. - The dryer must be electrically grounded in the vicinity of local codes, with the National Electrical Code, ANSI/NFPA 70. 3 Installation and service must be performed by UL or CSA. For more information...Immediately call the fire department. - Follow the gas supplier's instructions. • If you smell gas" instructions. Do not store or use any electrical switch; WARNING: Gas leaks cannot always be followed to prevent property damage, personal injury, or death. - WHAT TO DO IF YOU SMELL ...
... gas leak is detected, follow the "What to do not use gasoline or other appliance. - The dryer must be electrically grounded in the vicinity of local codes, with the National Electrical Code, ANSI/NFPA 70. 3 Installation and service must be performed by UL or CSA. For more information...Immediately call the fire department. - Follow the gas supplier's instructions. • If you smell gas" instructions. Do not store or use any electrical switch; WARNING: Gas leaks cannot always be followed to prevent property damage, personal injury, or death. - WHAT TO DO IF YOU SMELL ...
Owners Manual
Page 5
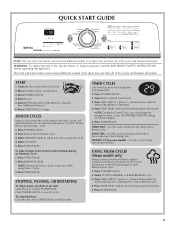
...Press START/PAUSE. Press TIME ADJUST + (plus ) or - (minus) buttons until the desired drying time is displayed. 4. Press TEMP LEVEL until dryer starts. Use this cycle to persons, read the IMPORTANT SAFETY INSTRUCTIONS before each cycle. 1. Select Cycle. 5. See "Additional Features." 6. SENSOR CYCLES Sensor... Cycles match the cycle setting to the type of fire, electric shock, or injury to help smooth out wrinkles. Select DRYNESS LEVEL to set a drying time and temperature. 1. TIMED CYCLES Use Timed ...
...Press START/PAUSE. Press TIME ADJUST + (plus ) or - (minus) buttons until the desired drying time is displayed. 4. Press TEMP LEVEL until dryer starts. Use this cycle to persons, read the IMPORTANT SAFETY INSTRUCTIONS before each cycle. 1. Select Cycle. 5. See "Additional Features." 6. SENSOR CYCLES Sensor... Cycles match the cycle setting to the type of fire, electric shock, or injury to help smooth out wrinkles. Select DRYNESS LEVEL to set a drying time and temperature. 1. TIMED CYCLES Use Timed ...

Owners Manual
Page 11
... models only: Disconnect the water inlet hose from faucet and drain. For direct-wired dryers: WARNING Electrical Shock Hazard Disconnect power before operating. Disconnect wiring. 3. Transport hose separately. 5. Shut off water faucet. 4. Apply a liquid, nonflammable household cleaner to the dryer. If you should be removed every 2 years, or more often, depending on vacation...
... models only: Disconnect the water inlet hose from faucet and drain. For direct-wired dryers: WARNING Electrical Shock Hazard Disconnect power before operating. Disconnect wiring. 3. Transport hose separately. 5. Shut off water faucet. 4. Apply a liquid, nonflammable household cleaner to the dryer. If you should be removed every 2 years, or more often, depending on vacation...

Owners Manual
Page 12
...maytag.ca Dryer Operation ■ Is the clothing knotted or balled up , the load will bounce, causing the dryer to possibly avoid the cost of the drum for the dryer. There may be 2 household fuses or circuit breakers for small objects. Replace the fuse or reset the circuit breaker. Electric dryers... for the type of elbows for details. Electric dryers require 240-volt power supply. Electric dryers use two household fuses or breakers. If the message persists, consult a qualified electrician. ■ "AF" (low airflow condition): The dryer will turn, but you are intact and ...
...maytag.ca Dryer Operation ■ Is the clothing knotted or balled up , the load will bounce, causing the dryer to possibly avoid the cost of the drum for the dryer. There may be 2 household fuses or circuit breakers for small objects. Replace the fuse or reset the circuit breaker. Electric dryers... for the type of elbows for details. Electric dryers require 240-volt power supply. Electric dryers use two household fuses or breakers. If the message persists, consult a qualified electrician. ■ "AF" (low airflow condition): The dryer will turn, but you are intact and ...
Owners Manual
Page 14
... REPAIR AS PROVIDED HEREIN. Expenses for travel and transportation for small loads of products not approved by an authorized Maytag servicer is connected to the dryer? Replacement parts or repair labor on how to use of two to obtain service under this book and your...of God, improper installation, installation not in an inaccessible location or is operated and maintained according to instructions attached to or furnished with electrical or plumbing codes, or use your major appliance if it was purchased. Consumable parts are gone from warranty coverage. 4. When the ...
... REPAIR AS PROVIDED HEREIN. Expenses for travel and transportation for small loads of products not approved by an authorized Maytag servicer is connected to the dryer? Replacement parts or repair labor on how to use of two to obtain service under this book and your...of God, improper installation, installation not in an inaccessible location or is operated and maintained according to instructions attached to or furnished with electrical or plumbing codes, or use your major appliance if it was purchased. Consumable parts are gone from warranty coverage. 4. When the ...
Installation Instructions
Page 3
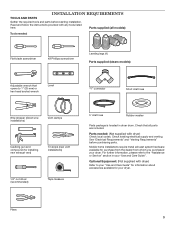
... metal exhuast system hardware available for purchase from the dealer from whom you purchased your dryer. Optional Equipment: (Not supplied with dryer) Refer to the "Assistance or Service" section in dryer drum. Check that opens to 1" (25 mm) or hex-head socket wrench Level... Wire stripper (direct wire installations) Vent clamps Caulking gun and compound (for your dryer. Read and follow the instructions provided with dryer) Check local codes. Check existing electrical supply and venting. INSTALLATION REQUIREMENTS TOOLS AND PARTS Gather the required tools and parts before...
... metal exhuast system hardware available for purchase from the dealer from whom you purchased your dryer. Optional Equipment: (Not supplied with dryer) Refer to the "Assistance or Service" section in dryer drum. Check that opens to 1" (25 mm) or hex-head socket wrench Level... Wire stripper (direct wire installations) Vent clamps Caulking gun and compound (for your dryer. Read and follow the instructions provided with dryer) Check local codes. Check existing electrical supply and venting. INSTALLATION REQUIREMENTS TOOLS AND PARTS Gather the required tools and parts before...
Installation Instructions
Page 4
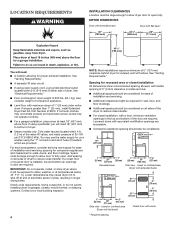
...221/4" (565 mm) 28" (711 mm) 431/2" (783 mm) You will be considered. 18"* (457 mm) 14" max.* (356 mm) 1" (25 mm) 29" (737 mm) 1" (25 mm) Recessed area 1" (25 mm) 30" (783 mm) 5" (127 mm) Side view - Space must be large enough to allow...if needed) which are required. Some codes limit, or do not permit, installing dryer in door are provided. See "Electrical Requirements." ■■ Floor must support dryer weight of installation and servicing; If using power supply cord, a grounded electrical outlet located within 4 ft. (1.2 m) of the water fill valves, and water...
...221/4" (565 mm) 28" (711 mm) 431/2" (783 mm) You will be considered. 18"* (457 mm) 14" max.* (356 mm) 1" (25 mm) 29" (737 mm) 1" (25 mm) Recessed area 1" (25 mm) 30" (783 mm) 5" (127 mm) Side view - Space must be large enough to allow...if needed) which are required. Some codes limit, or do not permit, installing dryer in door are provided. See "Electrical Requirements." ■■ Floor must support dryer weight of installation and servicing; If using power supply cord, a grounded electrical outlet located within 4 ft. (1.2 m) of the water fill valves, and water...
Installation Instructions
Page 5
... and all local codes and ordinances. A copy of the above code standards can result in a risk of electrical connection you are in remodeling after 1996, dryer circuits involved in doubt as a nearby window) should contain: ■■ A UL listed 30-amp power... 4 10-gauge solid copper wires and match a 4-wire receptacle of the equipment- Additional installation requirements: This dryer is properly grounded. The installation must determine the type of electric shock. For further information, see "Optional 3-wire connection" section. ■■ A 4-wire power supply ...
... and all local codes and ordinances. A copy of the above code standards can result in a risk of electrical connection you are in remodeling after 1996, dryer circuits involved in doubt as a nearby window) should contain: ■■ A UL listed 30-amp power... 4 10-gauge solid copper wires and match a 4-wire receptacle of the equipment- Additional installation requirements: This dryer is properly grounded. The installation must determine the type of electric shock. For further information, see "Optional 3-wire connection" section. ■■ A 4-wire power supply ...
Installation Instructions
Page 6
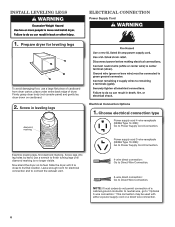
... Connection. Leave enough room for leveling legs To avoid damaging floor, use a wrench to Direct Wire Connection. Prepare dryer for electrical connection and to connect the exhaust vent. 4-wire direct connection: Go to Direct Wire Connection. 3-wire direct connection:... in leveling legs diamond marking Electrical Connection Options 1. Choose electrical connection type Power supply cord 4-wire receptacle (NEMA Type 14-30R): Go to Power Supply Cord Connection. Now stand the dryer on cardboard. 2. Install Leveling Legs Electrical Connection Power Supply Cord 1. ...
... Connection. Leave enough room for leveling legs To avoid damaging floor, use a wrench to Direct Wire Connection. Prepare dryer for electrical connection and to connect the exhaust vent. 4-wire direct connection: Go to Direct Wire Connection. 3-wire direct connection:... in leveling legs diamond marking Electrical Connection Options 1. Choose electrical connection type Power supply cord 4-wire receptacle (NEMA Type 14-30R): Go to Power Supply Cord Connection. Now stand the dryer on cardboard. 2. Install Leveling Legs Electrical Connection Power Supply Cord 1. ...
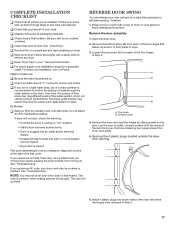
Installation Instructions
Page 17
... live in a running or "On" position. • Start button has been pushed firmly. • Dryer is plugged into an outlet and/or electrical supply. • Household fuse is intact and tight, or circuit breaker has not tripped. • Dryer door is recommended to control the buildup of a water softener is closed. Do not...
... live in a running or "On" position. • Start button has been pushed firmly. • Dryer is plugged into an outlet and/or electrical supply. • Household fuse is intact and tight, or circuit breaker has not tripped. • Dryer door is recommended to control the buildup of a water softener is closed. Do not...

Installation Instructions
Page 19
...household fuses or breakers. Press and hold START/PAUSE to see if a household fuse has blown or circuit breaker has tripped. Electric dryers use two household fuses or circuit breakers.Replace the fuse or reset the circuit breaker. See "Installation Instructions". ■■ ... heavy metal or flexible vent. If the message persists, have not tripped. Electric dryers require a 240-volt power supply. Confirm the power cord is present. Confirm your home power supply keeping the dryer's heater from the dryer to run ■■ Has a household fuse blown, or has a ...
...household fuses or breakers. Press and hold START/PAUSE to see if a household fuse has blown or circuit breaker has tripped. Electric dryers use two household fuses or circuit breakers.Replace the fuse or reset the circuit breaker. See "Installation Instructions". ■■ ... heavy metal or flexible vent. If the message persists, have not tripped. Electric dryers require a 240-volt power supply. Confirm the power cord is present. Confirm your home power supply keeping the dryer's heater from the dryer to run ■■ Has a household fuse blown, or has a ...


