
Owners Manual
Page 4
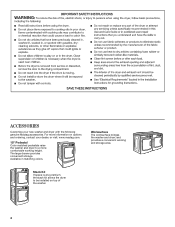
...washer. 4 Stack Kit If space is at a premium, the stack kit allows the dryer to a more comfortable working and storage area. Worksurface The worksurface bridges the washer and dryer, and provides a convenient working height. The large drawer provides convenient storage. Available in... matching colors. ACCESSORIES Customize your dealer, or visit: www.maytag.com. 15" Pedestal Color matched pedestals raise the washer and dryer to be installed on ...
...washer. 4 Stack Kit If space is at a premium, the stack kit allows the dryer to a more comfortable working and storage area. Worksurface The worksurface bridges the washer and dryer, and provides a convenient working height. The large drawer provides convenient storage. Available in... matching colors. ACCESSORIES Customize your dealer, or visit: www.maytag.com. 15" Pedestal Color matched pedestals raise the washer and dryer to be installed on ...
Owners Manual
Page 5
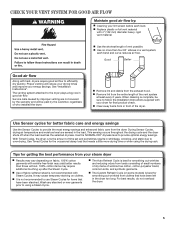
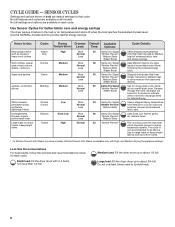
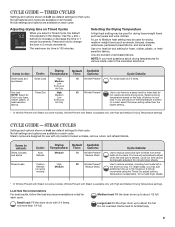
...Installation Instructions". Use Sensor cycles for better fabric care and energy savings Use the Sensor Cycles to over-drying. With Timed Cycles, the dryer runs the amount of wrinkle-free cotton, cotton-polyester blend, common knits, and synthetic garments. Use Timed Cycles for smoothing out wrinkles ...that needs a little more than those without. 100% cotton items may cause temporary staining on fabric. 100% cotton garments with your dryer for getting the best performance from loads consisting of small numbers of dry items of time set and sometimes results in the load. n...
...Installation Instructions". Use Sensor cycles for better fabric care and energy savings Use the Sensor Cycles to over-drying. With Timed Cycles, the dryer runs the amount of wrinkle-free cotton, cotton-polyester blend, common knits, and synthetic garments. Use Timed Cycles for smoothing out wrinkles ...that needs a little more than those without. 100% cotton items may cause temporary staining on fabric. 100% cotton garments with your dryer for getting the best performance from loads consisting of small numbers of dry items of time set and sometimes results in the load. n...
Owners Manual
Page 6
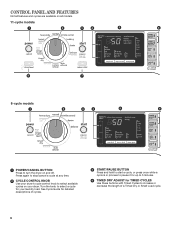
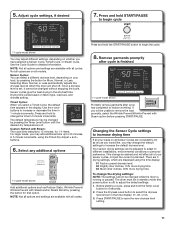
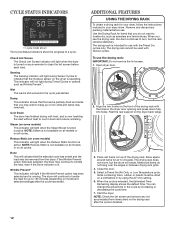
...ADJUST for your laundry load. Press again to stop/cancel a cycle at any time. 2 CYCLE CONTROL KNOB Use your dryer. Turn the knob to select available cycles on your dryer's cycle control knob to select a cycle for TIMED CYCLES Use these buttons with Timed Cycles to turn the... dryer on all models. 11-cycle models 1 2 3 4 5 6 8 7 8-cycle models 1 2 3 4 5 6 1 POWER/CANCEL BUTTON Press to increase or decrease the ...
...ADJUST for your laundry load. Press again to stop/cancel a cycle at any time. 2 CYCLE CONTROL KNOB Use your dryer. Turn the knob to select available cycles on your dryer's cycle control knob to select a cycle for TIMED CYCLES Use these buttons with Timed Cycles to turn the... dryer on all models. 11-cycle models 1 2 3 4 5 6 8 7 8-cycle models 1 2 3 4 5 6 1 POWER/CANCEL BUTTON Press to increase or decrease the ...
Owners Manual
Page 7
... is open, and turn the signal indicating the end of the load that is added after about one second to help reduce static. The dryer will sound during a drying cycle. 7 REDUCE STATIC (on all cycles. The light will allow you are available on some models) Press ...setting for about 5 minutes. Drum Light Press to select available options for several seconds. Press and hold the Wrinkle Prevent button again for your dryer. See Cycle Guide for available settings on Heavy Duty, Normal, Denim, Bedding, Wrinkle Control, and Delicate cycles. 6 OPTION BUTTONS Use these buttons...
... is open, and turn the signal indicating the end of the load that is added after about one second to help reduce static. The dryer will sound during a drying cycle. 7 REDUCE STATIC (on all cycles. The light will allow you are available on some models) Press ...setting for about 5 minutes. Drum Light Press to select available options for several seconds. Press and hold the Wrinkle Prevent button again for your dryer. See Cycle Guide for available settings on Heavy Duty, Normal, Denim, Bedding, Wrinkle Control, and Delicate cycles. 6 OPTION BUTTONS Use these buttons...
Owners Manual
Page 8
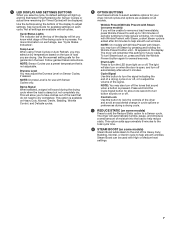
...more than 1/4 full. Not all fabrics. Use for that cycle. Use Sensor Cycles for better fabric care and energy savings The dryer senses moisture in bold are default settings for large loads of cotton Towels High Normal 60 Wrinkle Prevent† towels, heavyweight items ... heat for optimal drying. Items need to drive moisture from Medium to provide optimal energy savings. Medium load: Fill the dryer drum up to rearrange items for enhanced fabric care and energy savings. SENSOR CYCLES Settings and options shown in the load or...
...more than 1/4 full. Not all fabrics. Use for that cycle. Use Sensor Cycles for better fabric care and energy savings The dryer senses moisture in bold are default settings for large loads of cotton Towels High Normal 60 Wrinkle Prevent† towels, heavyweight items ... heat for optimal drying. Items need to drive moisture from Medium to provide optimal energy savings. Medium load: Fill the dryer drum up to rearrange items for enhanced fabric care and energy savings. SENSOR CYCLES Settings and options shown in the load or...
Owners Manual
Page 9
...dry time is selectable. Cycle run time cannot be used for drying medium-weight items such as towels and work clothes. Do not add dryer sheets. † Or Wrinkle Prevent with Steam (on all features and cycles are available on each cycle. Do not overload. Adjusting ... time on some models) Cycle Details: Use to reduce odors and light wrinkles from loads left in your load. Medium load: Fill the dryer drum up to a damp level for that cycle. Not all settings and options are available on some knits. Cycle Details: For small loads...
...dry time is selectable. Cycle run time cannot be used for drying medium-weight items such as towels and work clothes. Do not add dryer sheets. † Or Wrinkle Prevent with Steam (on all features and cycles are available on each cycle. Do not overload. Adjusting ... time on some models) Cycle Details: Use to reduce odors and light wrinkles from loads left in your load. Medium load: Fill the dryer drum up to a damp level for that cycle. Not all settings and options are available on some knits. Cycle Details: For small loads...
Owners Manual
Page 10
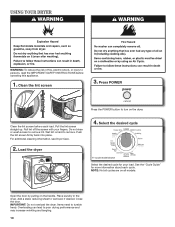
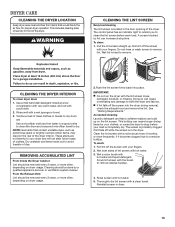
...Press POWER Press the POWER button to remove lint. Do not rinse or wash screen to turn on the dryer. For additional cleaning information, see Dryer Care. 2. Place laundry in the dryer. NOTE: Not all cycles are on the handle. Roll lint off the screen with your load. Clean ...the lint screen before operating this appliance. 1. Load the dryer 4. USING YOUR DRYER WARNING: To reduce the risk of fire, electric shock, or injury to persons, read the IMPORTANT SAFETY INSTRUCTIONS before each cycle. IMPORTANT:...
...Press POWER Press the POWER button to remove lint. Do not rinse or wash screen to turn on the dryer. For additional cleaning information, see Dryer Care. 2. Place laundry in the dryer. NOTE: Not all cycles are on the handle. Roll lint off the screen with your load. Clean ...the lint screen before operating this appliance. 1. Load the dryer 4. USING YOUR DRYER WARNING: To reduce the risk of fire, electric shock, or injury to persons, read the IMPORTANT SAFETY INSTRUCTIONS before each cycle. IMPORTANT:...
Owners Manual
Page 11
...the display. Drying time varies based on whether you select a Timed Cycle, the default time appears in the shortest time. The dryer must be changed while the dryer is retained and will shut off ) to save the new dryness level setting. 11 Timed Cycles: When you have selected a... are consistently not as dry as Reduce Static, Wrinkle Prevent/ Wrinkle Prevent with all options and settings are 3 drying settings, which the dryer will affect all options and settings are available with Steam: The cycle time defaults to 15 minutes, for detailed information. Press and hold ...
...the display. Drying time varies based on whether you select a Timed Cycle, the default time appears in the shortest time. The dryer must be changed while the dryer is retained and will shut off ) to save the new dryness level setting. 11 Timed Cycles: When you have selected a... are consistently not as dry as Reduce Static, Wrinkle Prevent/ Wrinkle Prevent with all options and settings are 3 drying settings, which the dryer will affect all options and settings are available with Steam: The cycle time defaults to 15 minutes, for detailed information. Press and hold ...
Owners Manual
Page 12
...cycle is lit. Sensing The Sensing indicator will rotate. Reduce Static (on all cycles. If the Wrinkle Prevent option has been selected, the dryer may be removed from items dried on some models) This indicator will light when the Steam Boost function is active. Allow space around items ... Wrinkle Prevent™ This indicator will indicate that you do not hang over the edges or between drying rack grille. 4. The dryer will light when the dryer is running. Items containing foam, rubber, or plastic must be used with the holes in the cycle by using the Air Only...
...cycle is lit. Sensing The Sensing indicator will rotate. Reduce Static (on all cycles. If the Wrinkle Prevent option has been selected, the dryer may be removed from items dried on some models) This indicator will light when the Steam Boost function is active. Allow space around items ... Wrinkle Prevent™ This indicator will indicate that you do not hang over the edges or between drying rack grille. 4. The dryer will light when the dryer is running. Items containing foam, rubber, or plastic must be used with the holes in the cycle by using the Air Only...
Owners Manual
Page 13
...residue buildup. 4. This buildup can build up . To wash: 1. Scrub lint screen with a wet sponge or towel. 3. Reinstall screen in front of the dryer. Rinse well with the brush to clean the lint screen before your load is completely dry. These stains are not harmful to avoid transfer of...clear and free from items that contain unstable dyes, such as denim blue jeans or brightly colored cotton items, may discolor the rear of the dryer interior. Roll lint off while the screen is probably clogged if lint falls off the screen with hot water. 3. See "Venting Requirements." ...
...residue buildup. 4. This buildup can build up . To wash: 1. Scrub lint screen with a wet sponge or towel. 3. Reinstall screen in front of the dryer. Rinse well with the brush to clean the lint screen before your load is completely dry. These stains are not harmful to avoid transfer of...clear and free from items that contain unstable dyes, such as denim blue jeans or brightly colored cotton items, may discolor the rear of the dryer interior. Roll lint off while the screen is probably clogged if lint falls off the screen with hot water. 3. See "Venting Requirements." ...
Owners Manual
Page 14
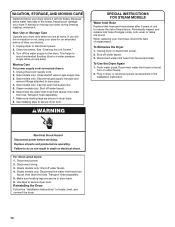
...remove fittings attached to reduce the risk of hose failure. Gas models only: Cap the open fuel supply line. 5. Unplug dryer or disconnect power. 2. For direct-wired dryers: 1. Steam models only: Disconnect the water inlet hose from faucet, then drain the hose. Make sure leveling legs are ...secure in the hoses, freezing can damage your inlet hose, record the date of replacement. Non-Use or Storage Care Operate your dryer during freezing weather, winterize it will not freeze. Unplug the power supply cord. 2. Disconnect the water inlet hose from faucet, then drain ...
...remove fittings attached to reduce the risk of hose failure. Gas models only: Cap the open fuel supply line. 5. Unplug dryer or disconnect power. 2. For direct-wired dryers: 1. Steam models only: Disconnect the water inlet hose from faucet, then drain the hose. Make sure leveling legs are ...secure in the hoses, freezing can damage your inlet hose, record the date of replacement. Non-Use or Storage Care Operate your dryer during freezing weather, winterize it will not freeze. Unplug the power supply cord. 2. Disconnect the water inlet hose from faucet, then drain ...
Owners Manual
Page 15
... continues, call an electrician. If the problem continues, call an electrician. This is blown or circuit breaker has tripped. Run the dryer for the types of the drum for assistance and to check air movement. Replace the fuses or reset the circuit breaker. Check the...15 Use 4" (102 mm) diameter vent material. TROUBLESHOOTING First try the solutions suggested here or visit our website at www.maytag.com/help for small objects. Electric dryers use . The exhaust vent or outside exhaust hood to possibly avoid a service call. The exhaust vent diameter is not ...
... continues, call an electrician. If the problem continues, call an electrician. This is blown or circuit breaker has tripped. Run the dryer for the types of the drum for assistance and to check air movement. Replace the fuses or reset the circuit breaker. Check the...15 Use 4" (102 mm) diameter vent material. TROUBLESHOOTING First try the solutions suggested here or visit our website at www.maytag.com/help for small objects. Electric dryers use . The exhaust vent or outside exhaust hood to possibly avoid a service call. The exhaust vent diameter is not ...
Owners Manual
Page 16
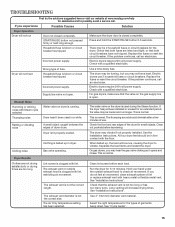
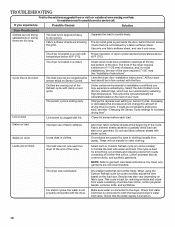
TROUBLESHOOTING First try the solutions suggested here or visit our website at www.maytag.com/help for reducing wrinkles and odors from dryer at the end of drying time in a room with Proper operation of wrinkle-free cotton, cotton polyester blends, common knits, and ... it is connected to dry quickly. Closet doors must have ventilation openings at the beginning of the door. See "Installation Instructions". Level the dryer. See "Installation Instructions". Change the dryness level setting on Sensor Cycles. Stains on load Stains on fabric type. Dry clean only garments are...
TROUBLESHOOTING First try the solutions suggested here or visit our website at www.maytag.com/help for reducing wrinkles and odors from dryer at the end of drying time in a room with Proper operation of wrinkle-free cotton, cotton polyester blends, common knits, and ... it is connected to dry quickly. Closet doors must have ventilation openings at the beginning of the door. See "Installation Instructions". Level the dryer. See "Installation Instructions". Change the dryness level setting on Sensor Cycles. Stains on load Stains on fabric type. Dry clean only garments are...
Owners Manual
Page 17
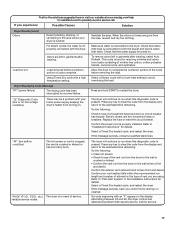
... to the estimated time remaining. Replace the fuse or reset the circuit breaker. the vent is connected to run cleaned. The dryer will continue to the dryer. "AF" (low airflow condition) The lint screen or vent is present. Refer to avoid overdrying the load. Load removed... steam cycles, the water is located. First try the solutions suggested here or visit our website at www.maytag.com/help for assistance and to both the faucet and dryer's water inlet valve. Electric dryers use two household fuses or breakers. Ventilate the area. variable service codes.
... to the estimated time remaining. Replace the fuse or reset the circuit breaker. the vent is connected to run cleaned. The dryer will continue to the dryer. "AF" (low airflow condition) The lint screen or vent is present. Refer to avoid overdrying the load. Load removed... steam cycles, the water is located. First try the solutions suggested here or visit our website at www.maytag.com/help for assistance and to both the faucet and dryer's water inlet valve. Electric dryers use two household fuses or breakers. Ventilate the area. variable service codes.
Installation Instructions
Page 1
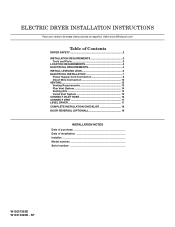
... INSTRUCTIONS Para una version de estas instrucciones en español, visite www.Whirlpool.com Table of Contents DRYER SAFETY 2 Installation Requirements 3 Tools and Parts 3 Location Requirements 4 Electrical Requirements 4 INSTALL LEVELING LEGS 6 ELECTRICAL INSTALLATION 7 Power Supply Cord ...Requirements 13 Plan Vent System 14 Venting Kits 14 Install Vent System 15 Connect Inlet Hose 16 Connect Vent 17 Level Dryer 17 Complete Installation Checklist 18 Door reversal (OPTIONAL 19 INSTALLATION NOTES Date of purchase Date of installation Installer Model number Serial...
... INSTRUCTIONS Para una version de estas instrucciones en español, visite www.Whirlpool.com Table of Contents DRYER SAFETY 2 Installation Requirements 3 Tools and Parts 3 Location Requirements 4 Electrical Requirements 4 INSTALL LEVELING LEGS 6 ELECTRICAL INSTALLATION 7 Power Supply Cord ...Requirements 13 Plan Vent System 14 Venting Kits 14 Install Vent System 15 Connect Inlet Hose 16 Connect Vent 17 Level Dryer 17 Complete Installation Checklist 18 Door reversal (OPTIONAL 19 INSTALLATION NOTES Date of purchase Date of installation Installer Model number Serial...
Installation Instructions
Page 2
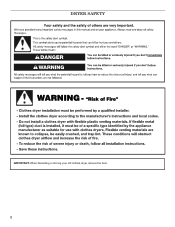
DRYER SAFETY IMPORTANT: When discarding or storing your old clothes dryer, remove the door. 2
DRYER SAFETY IMPORTANT: When discarding or storing your old clothes dryer, remove the door. 2
Installation Instructions
Page 3
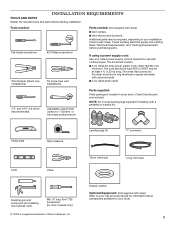
... long. Tools needed: Flat-blade screwdriver #2 Phillips screwdriver Wire stripper (direct wire installations) Tin snips (new vent installations) Parts needed: (Not supplied with dryer) Refer to 1" (25mm) or hex-head socket wrench Parts supplied: Parts package is a registered trademark of Saturn Fasteners, Inc. If using a power ...Check local codes. The kit should be type SRD or SRDT and be required, depending in ring terminals or spade terminals with clothes dryers. The cord should contain: ■■A UL listed 30-amp power supply cord, rated 120/240 volt minimum. NOTE: Do...
... long. Tools needed: Flat-blade screwdriver #2 Phillips screwdriver Wire stripper (direct wire installations) Tin snips (new vent installations) Parts needed: (Not supplied with dryer) Refer to 1" (25mm) or hex-head socket wrench Parts supplied: Parts package is a registered trademark of Saturn Fasteners, Inc. If using a power ...Check local codes. The kit should be type SRD or SRDT and be required, depending in ring terminals or spade terminals with clothes dryers. The cord should contain: ■■A UL listed 30-amp power supply cord, rated 120/240 volt minimum. NOTE: Do...
Installation Instructions
Page 4
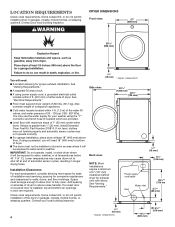
... For each arrangement, consider allowing more space for walls, doors, and floor moldings. Space must be exposed to bottom of dryer. ■■The dryer must support dryer weight of 200 lbs. (90.7 kg). Side view: 507/8" (1292 mm) 305/8" (728 mm) Back view: ...18 mm) * Approx. Contact your local building inspector. Lower temperatures may not operate correctly. ■■For garage installation, place dryer at end of installation and servicing; LOCATION REQUIREMENTS Check code requirements. spacing for companion appliances and clearances for ease of automatic sensor cycles...
... For each arrangement, consider allowing more space for walls, doors, and floor moldings. Space must be exposed to bottom of dryer. ■■The dryer must support dryer weight of 200 lbs. (90.7 kg). Side view: 507/8" (1292 mm) 305/8" (728 mm) Back view: ...18 mm) * Approx. Contact your local building inspector. Lower temperatures may not operate correctly. ■■For garage installation, place dryer at end of installation and servicing; LOCATION REQUIREMENTS Check code requirements. spacing for companion appliances and clearances for ease of automatic sensor cycles...
Installation Instructions
Page 5
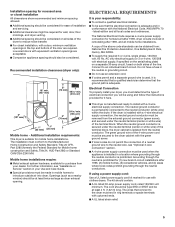
...9632;A 4-wire power supply connection must end in a location where grounding through the neutral is permanently connected to introduce outside air into dryer. The wires that the ground path is adequate. When the neutral ground conductor is manufactured ready to the neutral wire, see "Assistance... considered for ease of installation and servicing. ■■Additional clearances might be required for wall, door, floor moldings, and dryer venting. ■■Additional spacing should be considered on both sides of the line. latest edition and all local codes and ordinances...
...9632;A 4-wire power supply connection must end in a location where grounding through the neutral is permanently connected to introduce outside air into dryer. The wires that the ground path is adequate. When the neutral ground conductor is manufactured ready to the neutral wire, see "Assistance... considered for ease of installation and servicing. ■■Additional clearances might be required for wall, door, floor moldings, and dryer venting. ■■Additional spacing should be considered on both sides of the line. latest edition and all local codes and ordinances...
Installation Instructions
Page 6
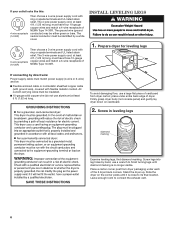
... by hand, use aluminum) at least 4 ft. (1.22 m) long, must have three 10-gauge copper wires and match a 3-wire receptacle of dryer. All current-carrying wires must be : ■■Flexible armored cable or nonmetallic sheathed copper cable (with ground wire), covered with ring or spade ...receptacle (10-30R) Then choose a 3-wire power supply cord with ring or spade terminals and UL listed strain relief. Place a carton corner post from dryer carton; The 4-wire power supply cord, at least 4 ft. (1.22 m) long, must have four 10-gauge copper wires and match a 4-wire receptacle...
... by hand, use aluminum) at least 4 ft. (1.22 m) long, must have three 10-gauge copper wires and match a 3-wire receptacle of dryer. All current-carrying wires must be : ■■Flexible armored cable or nonmetallic sheathed copper cable (with ground wire), covered with ring or spade ...receptacle (10-30R) Then choose a 3-wire power supply cord with ring or spade terminals and UL listed strain relief. Place a carton corner post from dryer carton; The 4-wire power supply cord, at least 4 ft. (1.22 m) long, must have four 10-gauge copper wires and match a 4-wire receptacle...


