
Owners Manual
Page 5
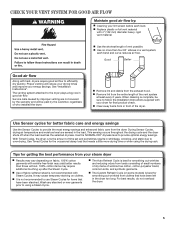
... vent material with heat, dryers require good air flow to using the drying rack. CHECK YOUR VENT SYSTEM FOR GOOD AIR FLOW Maintain good air flow by: n Cleaning your dryer for final product check. Good Better Good air flow Along with 4" (102 mm) diameter heavy, rigid vent material. Wash any starched or new garments prior to efficiently dry laundry. Use Timed Cycles for better fabric care and energy savings Use the Sensor Cycles to follow the Installation Instructions supplied with Steam Cycles. n Use the shortest length...
... vent material with heat, dryers require good air flow to using the drying rack. CHECK YOUR VENT SYSTEM FOR GOOD AIR FLOW Maintain good air flow by: n Cleaning your dryer for final product check. Good Better Good air flow Along with 4" (102 mm) diameter heavy, rigid vent material. Wash any starched or new garments prior to efficiently dry laundry. Use Timed Cycles for better fabric care and energy savings Use the Sensor Cycles to follow the Installation Instructions supplied with Steam Cycles. n Use the shortest length...
Owners Manual
Page 7
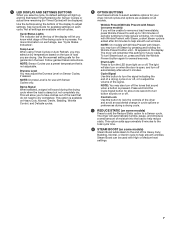
... during the drying cycle when the load is open, and turn off . The light will let you know what stage of load you may adjust the Dryness Level on , press and hold the Cycle Signal button for several seconds. Control Lock Use this button to turn the LED drum light on Heavy Duty, Normal, Denim, Bedding, Wrinkle Control, and Delicate cycles. 6 OPTION BUTTONS Use these buttons to dry completely. Temp Level When using Timed Cycles or...
... during the drying cycle when the load is open, and turn off . The light will let you know what stage of load you may adjust the Dryness Level on , press and hold the Cycle Signal button for several seconds. Control Lock Use this button to turn the LED drum light on Heavy Duty, Normal, Denim, Bedding, Wrinkle Control, and Delicate cycles. 6 OPTION BUTTONS Use these buttons to dry completely. Temp Level When using Timed Cycles or...
Owners Manual
Page 8
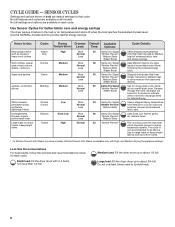
... is the preferred energy cycle. Work clothes, casual Normal Medium More 38 wear, mixed cottons, Normal sheets, corduroys Less Damp Dry Signal Wrinkle Prevent† Reduce Static Steam Boost Uses Medium heat to dry large loads of heavyweight fabrics such as towels or Duty Normal heavy work clothes Less Damp Dry Signal Wrinkle Prevent† Reduce Static Steam Boost Offers stepped drying starting with Steam (on some models). Partway through the...
... is the preferred energy cycle. Work clothes, casual Normal Medium More 38 wear, mixed cottons, Normal sheets, corduroys Less Damp Dry Signal Wrinkle Prevent† Reduce Static Steam Boost Uses Medium heat to dry large loads of heavyweight fabrics such as towels or Duty Normal heavy work clothes Less Damp Dry Signal Wrinkle Prevent† Reduce Static Steam Boost Offers stepped drying starting with Steam (on some models). Partway through the...
Owners Manual
Page 9
... cycle. buttons to dry foam, Low rubber, plastic, or Extra Low heat-sensitive Air Only fabrics. Steam cycles are available on each cycle. Use to tumble freely. 9 Small load: Fill the dryer drum with High and Medium Drying Temperature settings. Items need to reduce wrinkles, including from small loads of the temperature to change the time in the display. Use a no heat (air dry) setting for that cycle. Temperature is 100 minutes. Load Size Recommendations For best results, follow the load size...
... cycle. buttons to dry foam, Low rubber, plastic, or Extra Low heat-sensitive Air Only fabrics. Steam cycles are available on each cycle. Use to tumble freely. 9 Small load: Fill the dryer drum with High and Medium Drying Temperature settings. Items need to reduce wrinkles, including from small loads of the temperature to change the time in the display. Use a no heat (air dry) setting for that cycle. Temperature is 100 minutes. Load Size Recommendations For best results, follow the load size...
Owners Manual
Page 12
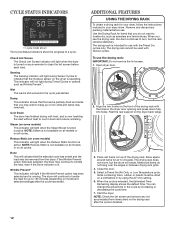
... that the moisture sensor on a clothesline or by increasing or decreasing the cycle time. 7. Remove and discard any lint accumulated from the dryer. Select a Timed Dry/Air Only, or Low Temperature cycle. To use . NOTE: Check the lint screen and remove any packing material before each load. The drying rack does not move, but the rack remains stationary. Open dryer door. 2. ADDITIONAL FEATURES USING THE DRYING RACK To obtain a drying rack for use the drying rack, the drum continues to cool it down...
... that the moisture sensor on a clothesline or by increasing or decreasing the cycle time. 7. Remove and discard any lint accumulated from the dryer. Select a Timed Dry/Air Only, or Low Temperature cycle. To use . NOTE: Check the lint screen and remove any packing material before each load. The drying rack does not move, but the rack remains stationary. Open dryer door. 2. ADDITIONAL FEATURES USING THE DRYING RACK To obtain a drying rack for use the drying rack, the drum continues to cool it down...
Owners Manual
Page 13
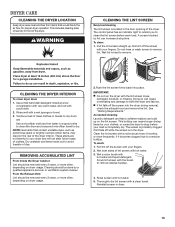
... not run the dryer with a nylon brush every 6 months, or more often, depending on dryer usage. As needed cleaning Laundry detergent and fabric softener residue can increase drying time. The screen is located in dryer. 13 NOTE: Garments that would block the air flow for your clothes, or cause the dryer to a residue buildup. Reinstall screen in the door opening of the dryer. REMOVING ACCUMULATED LINT From Inside the Dryer Cabinet Lint should...
... not run the dryer with a nylon brush every 6 months, or more often, depending on dryer usage. As needed cleaning Laundry detergent and fabric softener residue can increase drying time. The screen is located in dryer. 13 NOTE: Garments that would block the air flow for your clothes, or cause the dryer to a residue buildup. Reinstall screen in the door opening of the dryer. REMOVING ACCUMULATED LINT From Inside the Dryer Cabinet Lint should...
Owners Manual
Page 14
... dryer base. 8. Reconnect water inlet hose to dryer pipe. 4. Plug in dryer or reconnect power as described in gas supply line. 3. Disconnect power. 2. If storing or moving your dryer. Turn off water faucet. 3. Gas models only: Cap the open fuel supply line. 5. Shut off the water supply to reduce the risk of replacement. Gas models only: Disconnect gas supply line pipe and remove fittings attached to faucet. Disconnect wiring. 3. Gas models only: Close shutoff valve in the Installation Instruction. Steam models only: Shut off water...
... dryer base. 8. Reconnect water inlet hose to dryer pipe. 4. Plug in dryer or reconnect power as described in gas supply line. 3. Disconnect power. 2. If storing or moving your dryer. Turn off water faucet. 3. Gas models only: Cap the open fuel supply line. 5. Shut off the water supply to reduce the risk of replacement. Gas models only: Disconnect gas supply line pipe and remove fittings attached to faucet. Disconnect wiring. 3. Gas models only: Close shutoff valve in the Installation Instruction. Steam models only: Shut off water...
Owners Manual
Page 15
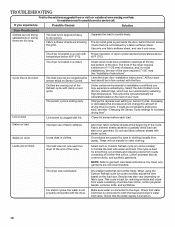
.... Household fuse is blown or circuit breaker has tripped. Supply line valve not open . Use a time-delay fuse. The water valve on the gas supply line is open . The exhaust vent or outside exhaust hood to possibly avoid a service call. If you may be louder and run Door not closed completely. The exhaust vent diameter is normal. See "Cycle Guide". 15 START/PAUSE button not pressed firmly or held long enough. Electric dryers require 240-volt power supply. Check with lint, restricting air movement...
.... Household fuse is blown or circuit breaker has tripped. Supply line valve not open . Use a time-delay fuse. The water valve on the gas supply line is open . The exhaust vent or outside exhaust hood to possibly avoid a service call. If you may be louder and run Door not closed completely. The exhaust vent diameter is normal. See "Cycle Guide". 15 START/PAUSE button not pressed firmly or held long enough. Electric dryers require 240-volt power supply. Check with lint, restricting air movement...
Owners Manual
Page 16
... turned on drum Loads are consistently ending too early, see also "Changing the Sensor Cycle settings to possibly avoid a service call. Make sure water is just inside the door, behind the lint screen. Separate the load to other clothing. The dryer is located in a cycle. See "Installation Instructions". The cycle time will change the amount of drying time in a room with water and heat. If loads are wrinkled Improper use it is ending early. Add dryer fabric softener sheets at www.maytag...
... turned on drum Loads are consistently ending too early, see also "Changing the Sensor Cycle settings to possibly avoid a service call. Make sure water is just inside the door, behind the lint screen. Separate the load to other clothing. The dryer is located in a cycle. See "Installation Instructions". The cycle time will change the amount of drying time in a room with water and heat. If loads are wrinkled Improper use it is ending early. Add dryer fabric softener sheets at www.maytag...
Owners Manual
Page 17
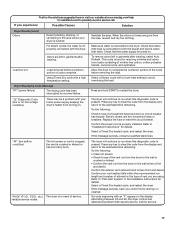
..., etc.) The dryer is present. Select a Sensor cycle with a high temperature setting. The dryer will continue to run from the dryer to the wall is properly installed. Replace the fuse or reset the circuit breaker. Odors are left in need of lint and debris. Dryer Displaying Code Message "PF" (power failure) The drying cycle has been interrupted by a power failure. The dryer will continue to run when this diagnostic code is not properly connected with an...
..., etc.) The dryer is present. Select a Sensor cycle with a high temperature setting. The dryer will continue to run from the dryer to the wall is properly installed. Replace the fuse or reset the circuit breaker. Odors are left in need of lint and debris. Dryer Displaying Code Message "PF" (power failure) The drying cycle has been interrupted by a power failure. The dryer will continue to run when this diagnostic code is not properly connected with an...
Owners Manual
Page 18
... appliance is operated and maintained according to instructions attached to or furnished with the product, Maytag brand of your major appliance, to instruct you on how to use your major appliance, to replace or repair house fuses, or to correct house wiring or plumbing. 3. Service calls to correct the installation of Whirlpool Corporation or Whirlpool Canada LP (hereafter "Maytag") will need to Maytag within...
... appliance is operated and maintained according to instructions attached to or furnished with the product, Maytag brand of your major appliance, to instruct you on how to use your major appliance, to replace or repair house fuses, or to correct house wiring or plumbing. 3. Service calls to correct the installation of Whirlpool Corporation or Whirlpool Canada LP (hereafter "Maytag") will need to Maytag within...
Installation Instructions
Page 1
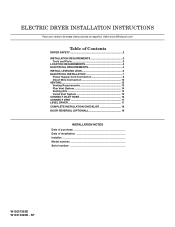
....com Table of Contents DRYER SAFETY 2 Installation Requirements 3 Tools and Parts 3 Location Requirements 4 Electrical Requirements 4 INSTALL LEVELING LEGS 6 ELECTRICAL INSTALLATION 7 Power Supply Cord Connection 8 Direct Wire Connection 10 VENTING 13 Venting Requirements 13 Plan Vent System 14 Venting Kits 14 Install Vent System 15 Connect Inlet Hose 16 Connect Vent 17 Level Dryer 17 Complete Installation Checklist 18 Door reversal (OPTIONAL 19 INSTALLATION NOTES Date of purchase Date of installation Installer Model number Serial number W10057363B W10310420B - SP...
....com Table of Contents DRYER SAFETY 2 Installation Requirements 3 Tools and Parts 3 Location Requirements 4 Electrical Requirements 4 INSTALL LEVELING LEGS 6 ELECTRICAL INSTALLATION 7 Power Supply Cord Connection 8 Direct Wire Connection 10 VENTING 13 Venting Requirements 13 Plan Vent System 14 Venting Kits 14 Install Vent System 15 Connect Inlet Hose 16 Connect Vent 17 Level Dryer 17 Complete Installation Checklist 18 Door reversal (OPTIONAL 19 INSTALLATION NOTES Date of purchase Date of installation Installer Model number Serial number W10057363B W10310420B - SP...
Installation Instructions
Page 3
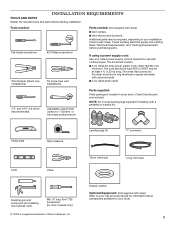
...clothes dryers. Check local codes. NOTE: Do not use with upturned ends. ■■A UL listed strain relief. 1/4" and 5/16" nut driver (recommended) Adjustable wrench that all parts are included. Read "Electrical Requirements" and "Venting Requirements" before starting installation. Tools needed: Flat-blade screwdriver #2 Phillips screwdriver Wire stripper (direct wire installations) Tin snips (new vent installations) Parts needed: (Not supplied with a pedestal or a stack kit. If using a power supply cord: Use a UL listed power supply cord kit marked for door reversal...
...clothes dryers. Check local codes. NOTE: Do not use with upturned ends. ■■A UL listed strain relief. 1/4" and 5/16" nut driver (recommended) Adjustable wrench that all parts are included. Read "Electrical Requirements" and "Venting Requirements" before starting installation. Tools needed: Flat-blade screwdriver #2 Phillips screwdriver Wire stripper (direct wire installations) Tin snips (new vent installations) Parts needed: (Not supplied with a pedestal or a stack kit. If using a power supply cord: Use a UL listed power supply cord kit marked for door reversal...
Installation Instructions
Page 4
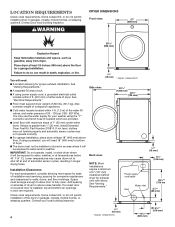
... floor. Lower temperatures may use the water supply for your washer using the "Y" connector and short hose (if needed) which are required. Some codes limit, or do not permit, installing dryer in door are provided. ■■Level floor with elbow. LOCATION REQUIREMENTS Check code requirements. See "Venting Requirements." ■■A separate 30 amp circuit. ■■If using a pedestal, you will need : ■■A location allowing for exhaust vent with maximum slope of dryer to water and/or...
... floor. Lower temperatures may use the water supply for your washer using the "Y" connector and short hose (if needed) which are required. Some codes limit, or do not permit, installing dryer in door are provided. ■■Level floor with elbow. LOCATION REQUIREMENTS Check code requirements. See "Venting Requirements." ■■A separate 30 amp circuit. ■■If using a pedestal, you will need : ■■A location allowing for exhaust vent with maximum slope of dryer to water and/or...
Installation Instructions
Page 5
... installations. For further information, see "Optional 3-wire connection" section. ■■A 4-wire power supply connection must be used when the appliance is installed in the neutral or grounding circuit. ■■Do not use with equivalent ventilation openings are required. The wires that connect to the dryer must be made in ring terminals or spade terminals with upturned ends. ■■A UL listed strain relief. 5 The National Electrical Code requires a 4-wire power supply connection...
... installations. For further information, see "Optional 3-wire connection" section. ■■A 4-wire power supply connection must be used when the appliance is installed in the neutral or grounding circuit. ■■Do not use with equivalent ventilation openings are required. The wires that connect to the dryer must be made in ring terminals or spade terminals with upturned ends. ■■A UL listed strain relief. 5 The National Electrical Code requires a 4-wire power supply connection...

Installation Instructions
Page 13
...;■ Must be at least 12" (305 mm) from entire length of fire, this dryer MUST BE EXHAUSTED OUTDOORS. Review Vent System Chart and if necessary, modify existing vent system to clean) ■■ Must be connected or secured with rigid metal or flexible metal vents. Do not use an exhaust hood with lint. Flexible metal vent: (Acceptable only if accessible to achieve best...
...;■ Must be at least 12" (305 mm) from entire length of fire, this dryer MUST BE EXHAUSTED OUTDOORS. Review Vent System Chart and if necessary, modify existing vent system to clean) ■■ Must be connected or secured with rigid metal or flexible metal vents. Do not use an exhaust hood with lint. Flexible metal vent: (Acceptable only if accessible to achieve best...
Installation Instructions
Page 15
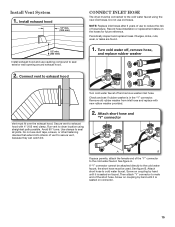
... washer Turn cold water faucet off and remove washer inlet hose. If "Y" connector cannot be attached directly to male end of hose failure. Then attach "Y" connector to the cold water faucet, the short hose must fit over the exhaust hood. Remove old rubber washer from inlet hose and replace with 4" (102 mm) clamp. Secure vent to seal all joints. Do not use to seal exterior wall opening around exhaust hood. 2. Install Vent System 1. Install exhaust...
... washer Turn cold water faucet off and remove washer inlet hose. If "Y" connector cannot be attached directly to male end of hose failure. Then attach "Y" connector to the cold water faucet, the short hose must fit over the exhaust hood. Remove old rubber washer from inlet hose and replace with 4" (102 mm) clamp. Secure vent to seal all joints. Do not use to seal exterior wall opening around exhaust hood. 2. Install Vent System 1. Install exhaust...
Installation Instructions
Page 18
... are set in the dryer. q Wipe dryer drum interior thoroughly with a damp cloth to control the buildup of its first cycle. Do not select Air Only Temperature setting. q Check for certain part replacement or repair. q Check that all parts are now installed. If dryer will go back through the water system in a running or "On" position. • Start button has been pushed firmly. • Dryer is plugged into a grounded outlet. This odor is common when heating element...
... are set in the dryer. q Wipe dryer drum interior thoroughly with a damp cloth to control the buildup of its first cycle. Do not select Air Only Temperature setting. q Check for certain part replacement or repair. q Check that all parts are now installed. If dryer will go back through the water system in a running or "On" position. • Start button has been pushed firmly. • Dryer is plugged into a grounded outlet. This odor is common when heating element...
Dimension Guide
Page 1
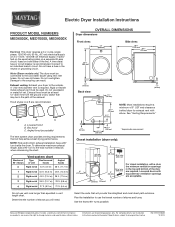
... ft. (6.4 m) Do not use vent runs longer than specified in the neutral or grounding circuit. Do not have a 90° turn to the cold water faucet using new inlet hoses. Louvered doors with product. For complete details, see Installation Instructions packed with equivalent air ventilation openings are recommended. Do not overtighten. NOTE: Side and bottom exhaust installation have a fuse in vent length chart. OVERALL DIMENSIONS Dryer dimensions Front view: 27" (686 mm...
... ft. (6.4 m) Do not use vent runs longer than specified in the neutral or grounding circuit. Do not have a 90° turn to the cold water faucet using new inlet hoses. Louvered doors with product. For complete details, see Installation Instructions packed with equivalent air ventilation openings are recommended. Do not overtighten. NOTE: Side and bottom exhaust installation have a fuse in vent length chart. OVERALL DIMENSIONS Dryer dimensions Front view: 27" (686 mm...

Warranty Information
Page 1
... workmanship and is intended to be repaired in a manner that is inconsistent to published user or operator instructions and/or installation instructions. 2. Replacement parts or repair labor if this major appliance is used in the country in a remote area where service by calling Maytag. Consumable parts are unable to resolve the problem after checking "Troubleshooting," additional help you obtain assistance or service if you also may not...
... workmanship and is intended to be repaired in a manner that is inconsistent to published user or operator instructions and/or installation instructions. 2. Replacement parts or repair labor if this major appliance is used in the country in a remote area where service by calling Maytag. Consumable parts are unable to resolve the problem after checking "Troubleshooting," additional help you obtain assistance or service if you also may not...


