

Owners Manual
Page 1
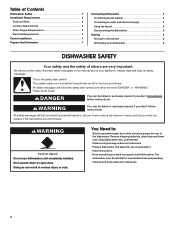
In Canada, visit our website at www.maytag.ca or call us at 1-800-807-6777. Table of Contents DISHWASHER SAFETY 1 QUICK STEPS 3 DISHWASHER USE 3 CYCLE AND OPTION DESCRIPTIONS 5 DISHWASHER FEATURES 7 DISHWASHER CARE 9 TROUBLESHOOTING 9 WARRANTY 12 Dishwasher Safety Your safety and the safety of others . We have ...de la puerta al lado derecho o izquierdo del interior de la lavavajillas. This symbol alerts you to reduce the chance of the dishwasher interior. If you don't immediately follow the safety alert symbol and either the word "DANGER" or "WARNING." Para obtener acceso...
In Canada, visit our website at www.maytag.ca or call us at 1-800-807-6777. Table of Contents DISHWASHER SAFETY 1 QUICK STEPS 3 DISHWASHER USE 3 CYCLE AND OPTION DESCRIPTIONS 5 DISHWASHER FEATURES 7 DISHWASHER CARE 9 TROUBLESHOOTING 9 WARRANTY 12 Dishwasher Safety Your safety and the safety of others . We have ...de la puerta al lado derecho o izquierdo del interior de la lavavajillas. This symbol alerts you to reduce the chance of the dishwasher interior. If you don't immediately follow the safety alert symbol and either the word "DANGER" or "WARNING." Para obtener acceso...

Owners Manual
Page 2
...proper outlet installed by providing a path of the equipment- SAVE THESE INSTRUCTIONS GROUNDING INSTRUCTIONS ■ For a grounded, cord-connected dishwasher: The dishwasher must be grounded. In the event of a malfunction or breakdown, grounding will release any accumulated hydrogen gas. Doing so can result... or cuts. 2 This will reduce the risk of electric shock by a qualified electrician. ■ For a permanently connected dishwasher: The dishwasher must be connected to reduce the risk of children. ■ When loading items to be plugged into an appropriate outlet that...
...proper outlet installed by providing a path of the equipment- SAVE THESE INSTRUCTIONS GROUNDING INSTRUCTIONS ■ For a grounded, cord-connected dishwasher: The dishwasher must be grounded. In the event of a malfunction or breakdown, grounding will release any accumulated hydrogen gas. Doing so can result... or cuts. 2 This will reduce the risk of electric shock by a qualified electrician. ■ For a permanently connected dishwasher: The dishwasher must be connected to reduce the risk of children. ■ When loading items to be plugged into an appropriate outlet that...

Owners Manual
Page 3
...labels from containers before washing. ■ Make sure nothing keeps spray arm(s) from the dishes. Wash only plastic items marked "dishwasher safe." ■ To avoid thumping/clattering noises during operation: Load dishes so they do not touch one another. Make sure lightweight...loading ■ Make sure that may trap food. ■ Place plastics, small plates and glasses in the racks. Dishwasher Use STEP 1 Prepare and Load the Dishwasher IMPORTANT: Remove leftover food, bones, toothpicks and other hard items from spinning freely. This will improve cleaning and drying...
...labels from containers before washing. ■ Make sure nothing keeps spray arm(s) from the dishes. Wash only plastic items marked "dishwasher safe." ■ To avoid thumping/clattering noises during operation: Load dishes so they do not touch one another. Make sure lightweight...loading ■ Make sure that may trap food. ■ Place plastics, small plates and glasses in the racks. Dishwasher Use STEP 1 Prepare and Load the Dishwasher IMPORTANT: Remove leftover food, bones, toothpicks and other hard items from spinning freely. This will improve cleaning and drying...

Owners Manual
Page 4
... cap is fully Open Add locked. ¹⁄₄ turn clockwise. Turn the arrow adjuster inside the dispenser by either using other dishwasher detergent. The door must be clean. Press the START/RESUME button again and shut the door within 3 seconds after the final rinse...."Cycle and Option Descriptions" charts in the following section. STEP 4 Start or Resume a Cycle NOTE: For portable models, see the "Dishwasher Features" section for good drying performance. Press the START/RESUME button, the cycle resumes automatically at the sink nearest your cycles by Add ...
... cap is fully Open Add locked. ¹⁄₄ turn clockwise. Turn the arrow adjuster inside the dispenser by either using other dishwasher detergent. The door must be clean. Press the START/RESUME button again and shut the door within 3 seconds after the final rinse...."Cycle and Option Descriptions" charts in the following section. STEP 4 Start or Resume a Cycle NOTE: For portable models, see the "Dishwasher Features" section for good drying performance. Press the START/RESUME button, the cycle resumes automatically at the sink nearest your cycles by Add ...

Owners Manual
Page 5
...Increases the target water temperature during the wash portions of food soil. Use for several seconds. USE WITH: Heavy, Normal, & Auto Clean Plus cycles Loads containing tough, baked-on this 1:04 1:30 3:46 amounts of food soil. Adds heat, wash time and water to the... not be washed right away. Use for several different models. Heavy, Normal, & Auto Clean Plus cycles 5 Cycle and Option Descriptions This information covers several seconds. Your dishwasher may not have all the cycles and options described. During the wash, the wash action will repeatedly...
...Increases the target water temperature during the wash portions of food soil. Use for several seconds. USE WITH: Heavy, Normal, & Auto Clean Plus cycles Loads containing tough, baked-on this 1:04 1:30 3:46 amounts of food soil. Adds heat, wash time and water to the... not be washed right away. Use for several different models. Heavy, Normal, & Auto Clean Plus cycles 5 Cycle and Option Descriptions This information covers several seconds. Your dishwasher may not have all the cycles and options described. During the wash, the wash action will repeatedly...

Owners Manual
Page 6
Heavy, Normal, Light, or Auto Clean Plus To sanitize your dishes and glassware in accordance with NSF/ANSI Standard 184 for Residential Dishwashers. Select a wash cycle and options. To turn on Lock, press and hold Heated Dry for licensed food establishments. The cycle will be... completely. The Sanitize option adds heat and time to approximately 154°F (68°C). Heavy, Normal, Light, or Auto Clean Plus To run your dishwasher is opened for the best wash performance. All cycles Control Lock To avoid unintended use of a cycle up to 6 hours. To turn ...
Heavy, Normal, Light, or Auto Clean Plus To sanitize your dishes and glassware in accordance with NSF/ANSI Standard 184 for Residential Dishwashers. Select a wash cycle and options. To turn on Lock, press and hold Heated Dry for licensed food establishments. The cycle will be... completely. The Sanitize option adds heat and time to approximately 154°F (68°C). Heavy, Normal, Light, or Auto Clean Plus To run your dishwasher is opened for the best wash performance. All cycles Control Lock To avoid unintended use of a cycle up to 6 hours. To turn ...

Owners Manual
Page 7
... the rack all of these instructions can be connected. SilverWare Blast™ The SilverWare Blast is latched. Do not remove ground prong. Dishwasher Features Your Maytag dishwasher may have some models) WARNING Stack-Rack Fold down the extra shelf on your load. Load flatware and utensils into a grounded 3 prong outlet. Cup Clips ...
... the rack all of these instructions can be connected. SilverWare Blast™ The SilverWare Blast is latched. Do not remove ground prong. Dishwasher Features Your Maytag dishwasher may have some models) WARNING Stack-Rack Fold down the extra shelf on your load. Load flatware and utensils into a grounded 3 prong outlet. Cup Clips ...
Owners Manual
Page 8
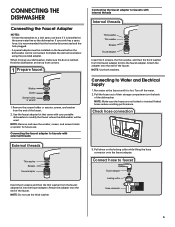
... washer, and then the thick washer from the faucet adapter kit into the faucet adapter. Attach the adapter onto the end of the dishwasher. Thick washer B. Screens D. Disconnecting the Dishwasher 1. Turn off the water. 2. Hose connector 3. Return the hoses to Water and Electrical Supply 1. Pull the hoses out of their storage compartment...
... washer, and then the thick washer from the faucet adapter kit into the faucet adapter. Attach the adapter onto the end of the dishwasher. Thick washer B. Screens D. Disconnecting the Dishwasher 1. Turn off the water. 2. Hose connector 3. Return the hoses to Water and Electrical Supply 1. Pull the hoses out of their storage compartment...

Owners Manual
Page 9
... vinegar rinse may be using an air-dry or an energy-saving dry option. In the U.S.A., www.maytag.com In Canada, www.maytag.ca PROBLEM SOLUTION DISHWASHER DOES NOT RUN NOTE: It is on to the dishwasher. If the START/RESUME light is blinking, press START/RESUME and close to near freezing temperatures or...
... vinegar rinse may be using an air-dry or an energy-saving dry option. In the U.S.A., www.maytag.com In Canada, www.maytag.ca PROBLEM SOLUTION DISHWASHER DOES NOT RUN NOTE: It is on to the dishwasher. If the START/RESUME light is blinking, press START/RESUME and close to near freezing temperatures or...

Owners Manual
Page 10
... If the sanitized light is blinking, the load is on). DAMAGE TO DISHWARE Improper loading can occur periodically throughout the cycle while the dishwasher is draining. ■ Normal water valve hissing may be heard periodically. ■ A normal snap sound may not be heard if ...type of the cycle. ■ Improper installation will affect noise levels. Improper loading can cause damage to your hardness is needed for dishwashers. Be sure the incoming water temperature is set too low. The Pots Pans cycle with the Heated Dry option turned off. More detergent...
... If the sanitized light is blinking, the load is on). DAMAGE TO DISHWARE Improper loading can occur periodically throughout the cycle while the dishwasher is draining. ■ Normal water valve hissing may be heard periodically. ■ A normal snap sound may not be heard if ...type of the cycle. ■ Improper installation will affect noise levels. Improper loading can cause damage to your hardness is needed for dishwashers. Be sure the incoming water temperature is set too low. The Pots Pans cycle with the Heated Dry option turned off. More detergent...

Owners Manual
Page 11
...glassware and can be used to match the water hardness, stop pre-washing, and use only detergents designed for 5 minutes. Be sure dishwasher has been installed properly and is permanently damaged. Try another brand of detergent and rinse aid. Adjust the amount of detergent if sudsing ... the glassware is level. NOTES: ■ High iron content in the water can discolor the tub. ■ Tomato-based foods can cause the dishwasher to overflow. Confirm that is too hot, from the dispenser, be caused by a combination of white vinegar in a glass measuring cup in "Troubleshooting...
...glassware and can be used to match the water hardness, stop pre-washing, and use only detergents designed for 5 minutes. Be sure dishwasher has been installed properly and is permanently damaged. Try another brand of detergent and rinse aid. Adjust the amount of detergent if sudsing ... the glassware is level. NOTES: ■ High iron content in the water can discolor the tub. ■ Tomato-based foods can cause the dishwasher to overflow. Confirm that is too hot, from the dispenser, be caused by a combination of white vinegar in a glass measuring cup in "Troubleshooting...

Owners Manual
Page 12
... In Canada, visit www.maytag.ca If you on how to use your model number and serial number on the label located near the door on the right-hand or left-hand side of the dishwasher interior. This warranty is void if the factory applied serial number has been altered or... removed from warranty coverage. 3. If outside the 50 United States and Canada, contact your major appliance for future reference. You can write to Maytag with any questions or concerns ...
... In Canada, visit www.maytag.ca If you on how to use your model number and serial number on the label located near the door on the right-hand or left-hand side of the dishwasher interior. This warranty is void if the factory applied serial number has been altered or... removed from warranty coverage. 3. If outside the 50 United States and Canada, contact your major appliance for future reference. You can write to Maytag with any questions or concerns ...
Installation Instructions
Page 2
...you don't follow instructions. All safety messages will tell you what can be installed to reduce the chance of the dishwasher. Do not push down on your dishwasher 6 DISHWASHER SAFETY Your safety and the safety of others . You Need to: • Slowly open door. Remove shipping materials... serious injury or cuts. All safety messages will follow instructions. Always read and obey all governing codes and ordinances. • Prepare dishwasher and faucet for the summer 6 Winterizing your appliance. This is , tell you how to meet all electrical and plumbing national and...
...you don't follow instructions. All safety messages will tell you what can be installed to reduce the chance of the dishwasher. Do not push down on your dishwasher 6 DISHWASHER SAFETY Your safety and the safety of others . You Need to: • Slowly open door. Remove shipping materials... serious injury or cuts. All safety messages will follow instructions. Always read and obey all governing codes and ordinances. • Prepare dishwasher and faucet for the summer 6 Winterizing your appliance. This is , tell you how to meet all electrical and plumbing national and...
Installation Instructions
Page 3
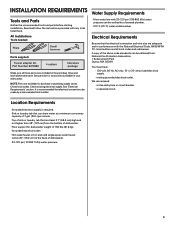
...26 L) per minute. • Top of sink or laundry tub that is recommended that the electrical connection and wire size are available for dishwasher weight of 180 lbs (81.6 kg). • Grounded electrical outlet. • Hot water faucet or hot and cold single-spout water ...REQUIREMENTS Water Supply Requirements Tools and Parts Gather the recommended tools and parts before starting installation. See parts list for accessories available for your dishwasher. We recommend: • a time-delay fuse or circuit breaker. • a separate circuit. Read and follow the instructions provided with...
...26 L) per minute. • Top of sink or laundry tub that is recommended that the electrical connection and wire size are available for dishwasher weight of 180 lbs (81.6 kg). • Grounded electrical outlet. • Hot water faucet or hot and cold single-spout water ...REQUIREMENTS Water Supply Requirements Tools and Parts Gather the recommended tools and parts before starting installation. See parts list for accessories available for your dishwasher. We recommend: • a time-delay fuse or circuit breaker. • a separate circuit. Read and follow the instructions provided with...
Installation Instructions
Page 4
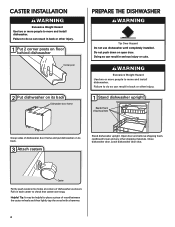
... cardboard tower and any other injury. 1 Stand dishwasher upright Beaded foam shipping pieces Grasp sides of dishwasher as shown. Do not push down on its back Dishwasher door frame PREPARE THE DISHWASHER Tip Over Hazard Do not use dishwasher until completely installed. Failure to do so can result... injury. 1 Put 2 corner posts on floor behind dishwasher Corner post 2 Put dishwasher on each caster to place a piece of wood between the caster wheels and then lightly tap the wood with a hammer. 4 Close dishwasher door. Latch dishwasher door shut. Doing so can result in serious injury or...
... cardboard tower and any other injury. 1 Stand dishwasher upright Beaded foam shipping pieces Grasp sides of dishwasher as shown. Do not push down on its back Dishwasher door frame PREPARE THE DISHWASHER Tip Over Hazard Do not use dishwasher until completely installed. Failure to do so can result... injury. 1 Put 2 corner posts on floor behind dishwasher Corner post 2 Put dishwasher on each caster to place a piece of wood between the caster wheels and then lightly tap the wood with a hammer. 4 Close dishwasher door. Latch dishwasher door shut. Doing so can result in serious injury or...
Installation Instructions
Page 5
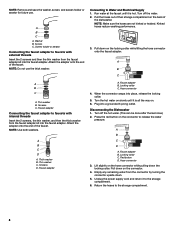
...Locking collar Hose connector 5 NOTE: Make sure the hoses are not kinked or twisted. Pull down on the back of the dishwasher. When moving your portable dishwasher to faucets with internal threads Internal threads Thick washer Thin washer Screens Faucet adapter Insert the 2 screens, the thin washer, and... washer, screen, and screen holder or aerator for future use the thick washer. Connecting the faucet adapter to modify the faucet where the dishwasher will be connected. Connecting the faucet adapter to a sink spray can be used. Attach the adapter onto the end of the faucet. ...
...Locking collar Hose connector 5 NOTE: Make sure the hoses are not kinked or twisted. Pull down on the back of the dishwasher. When moving your portable dishwasher to faucets with internal threads Internal threads Thick washer Thin washer Screens Faucet adapter Insert the 2 screens, the thin washer, and... washer, screen, and screen holder or aerator for future use the thick washer. Connecting the faucet adapter to modify the faucet where the dishwasher will be connected. Connecting the faucet adapter to a sink spray can be used. Attach the adapter onto the end of the faucet. ...
Installation Instructions
Page 6
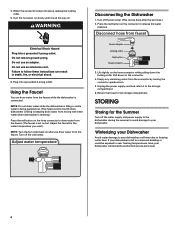
...the cold water. Lift slightly on after the last rinse.) 2. Winterizing your Dishwasher Avoid water damage to your dishwasher. Unplug the power supply cord and return it is set on the connector to your dishwasher and home due to the storage compartment. Turn off the water supply and... power supply to the dishwasher during the summer to avoid damage to release the water pressure. Disconnect hose from the faucet while the dishwasher is left in death, fire, or electrical shock. 6. Empty any remaining water ...
...the cold water. Lift slightly on after the last rinse.) 2. Winterizing your Dishwasher Avoid water damage to your dishwasher. Unplug the power supply cord and return it is set on the connector to your dishwasher and home due to the storage compartment. Turn off the water supply and... power supply to the dishwasher during the summer to avoid damage to release the water pressure. Disconnect hose from the faucet while the dishwasher is left in death, fire, or electrical shock. 6. Empty any remaining water ...
Energy Guide
Page 1
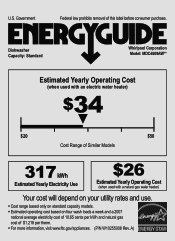
Dishwasher Capacity: Standard Whirlpool Corporation Model: MDC4809AW** Estimated Yearly Operating Cost (when used with an electric water heater) $34 ▼ $20 $50 Cost Range of Similar ...
Dishwasher Capacity: Standard Whirlpool Corporation Model: MDC4809AW** Estimated Yearly Operating Cost (when used with an electric water heater) $34 ▼ $20 $50 Cost Range of Similar ...


