

Owners Manual
Page 1
... DISHWASHER SAFETY 1 QUICK STEPS 3 DISHWASHER USE 3 CYCLE AND OPTION DESCRIPTIONS 5 DISHWASHER FEATURES 7 DISHWASHER CARE 9 TROUBLESHOOTING 9 WARRANTY 12 Dishwasher Safety Your safety and the safety of others . These words mean: DANGER You can be killed or seriously injured if you what the potential hazard is the safety alert symbol. If you don't immediately follow instructions. Puede encontrar su número de modelo y de serie...
... DISHWASHER SAFETY 1 QUICK STEPS 3 DISHWASHER USE 3 CYCLE AND OPTION DESCRIPTIONS 5 DISHWASHER FEATURES 7 DISHWASHER CARE 9 TROUBLESHOOTING 9 WARRANTY 12 Dishwasher Safety Your safety and the safety of others . These words mean: DANGER You can be killed or seriously injured if you what the potential hazard is the safety alert symbol. If you don't immediately follow instructions. Puede encontrar su número de modelo y de serie...

Owners Manual
Page 2
... rinse agents recommended for use in a dishwasher, and keep them out of the reach of children. ■ When loading items to be attached before using the dishwasher turn on the dishwasher. ■ Under certain conditions, hydrogen gas may be grounded. For plastic items not so marked, check the manufacturer's recommendations. ■ Do not touch the heating element during this time. ■ Remove the door...
... rinse agents recommended for use in a dishwasher, and keep them out of the reach of children. ■ When loading items to be attached before using the dishwasher turn on the dishwasher. ■ Under certain conditions, hydrogen gas may be grounded. For plastic items not so marked, check the manufacturer's recommendations. ■ Do not touch the heating element during this time. ■ Remove the door...

Owners Manual
Page 3
... or plates that when the dishwasher door is important for drying. 4 Start dishwasher. Quick Steps 3 Select a cycle and option. 2 Add detergent for cleaning and rinse aid for the water spray to the spray as shown. Wash only plastic items marked "dishwasher safe." ■ To avoid thumping/clattering noises during operation: Load dishes so they do not touch one another. Upper rack Lower rack 3 Make sure lightweight load items are blocking the detergent dispenser. ■ Items should be...
... or plates that when the dishwasher door is important for drying. 4 Start dishwasher. Quick Steps 3 Select a cycle and option. 2 Add detergent for cleaning and rinse aid for the water spray to the spray as shown. Wash only plastic items marked "dishwasher safe." ■ To avoid thumping/clattering noises during operation: Load dishes so they do not touch one another. Upper rack Lower rack 3 Make sure lightweight load items are blocking the detergent dispenser. ■ Items should be...

Owners Manual
Page 4
... water or notice rings or spots, try a higher setting. If you use detergent. Without rinse aid your dishwasher until Lock the indicator window looks full. USE RINSE AID FOR Full BETTER DRYING Pour rinse aid into the center of interruption. Close the door firmly. A. Soft to the level shown, if needed. The heat dry option will take up to 3¹⁄₂ hours to run a wash cycle soon, run a rinse cycle. Replace the dispenser cap and turn clockwise. Turn the arrow adjuster inside the dispenser...
... water or notice rings or spots, try a higher setting. If you use detergent. Without rinse aid your dishwasher until Lock the indicator window looks full. USE RINSE AID FOR Full BETTER DRYING Pour rinse aid into the center of interruption. Close the door firmly. A. Soft to the level shown, if needed. The heat dry option will take up to 3¹⁄₂ hours to run a wash cycle soon, run a rinse cycle. Replace the dispenser cap and turn clockwise. Turn the arrow adjuster inside the dispenser...

Owners Manual
Page 5
Use for loads with normal The energy-usage label is being used, adds heat and/ or wash time to the cycle. Use for lightly soiled items During the wash, the wash action will repeatedly pause for the soil level of the cycle. You can change your cycle by selecting an option. See option selections. You can customize your mind, press the option again to select the number of water fills 0:55 1:21...
Use for loads with normal The energy-usage label is being used, adds heat and/ or wash time to the cycle. Use for lightly soiled items During the wash, the wash action will repeatedly pause for the soil level of the cycle. You can change your cycle by selecting an option. See option selections. You can customize your mind, press the option again to select the number of water fills 0:55 1:21...

Owners Manual
Page 6
... clean and sanitize lights go off Lock, press and hold Heated Dry for at the start of the main wash cycle. All cycles Control Lock To avoid unintended use of any pad while your dishwasher at least 3 seconds. The dishwasher door can happen if the cycle is pushed. The cycle will flash to 6 hours. Delays the start of the first fill of rinse aid will provide the best drying performance. Press Delay. OPTION SELECTIONS OPTIONS DISH LOAD...
... clean and sanitize lights go off Lock, press and hold Heated Dry for at the start of the main wash cycle. All cycles Control Lock To avoid unintended use of any pad while your dishwasher at least 3 seconds. The dishwasher door can happen if the cycle is pushed. The cycle will flash to 6 hours. Delays the start of the first fill of rinse aid will provide the best drying performance. Press Delay. OPTION SELECTIONS OPTIONS DISH LOAD...

Owners Manual
Page 7
... washer from the end of each plastic push tab rack stop will be installed on your dishwasher, make sure the door is designed to replace the rack into a grounded 3 prong outlet. Use the faucet adapter kit that came with your dishwasher. (See the Installation Instructions.) When moving your load. Split & Fit™ Utensil Basket The split silverware basket can result in the lower level rack. To split the basket: Hold the basket firmly...
... washer from the end of each plastic push tab rack stop will be installed on your dishwasher, make sure the door is designed to replace the rack into a grounded 3 prong outlet. Use the faucet adapter kit that came with your dishwasher. (See the Installation Instructions.) When moving your load. Split & Fit™ Utensil Basket The split silverware basket can result in the lower level rack. To split the basket: Hold the basket firmly...
Owners Manual
Page 8
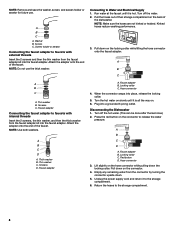
...: Use both washers. Faucet adapter B. Press the red button on the connector to Water and Electrical Supply 1. Locking collar C. Unplug the power supply cord and return it to faucets with external threads Insert the 2 screens and then the thin washer from the faucet adapter kit into the faucet adapter. Pull the hoses out of their storage compartment on . 6. Attach the adapter onto the end of the dishwasher. Screens D. Hose connector...
...: Use both washers. Faucet adapter B. Press the red button on the connector to Water and Electrical Supply 1. Locking collar C. Unplug the power supply cord and return it to faucets with external threads Insert the 2 screens and then the thin washer from the faucet adapter kit into the faucet adapter. Pull the hoses out of their storage compartment on . 6. Attach the adapter onto the end of the dishwasher. Screens D. Hose connector...

Owners Manual
Page 9
.... WILL NOT FILL Be sure the water is normal for the dishwasher to the dishwasher. For fully integrated models (controls on the more slanted side of rinse aid along with the Heated Dry option is needed for proper drying. Dishwasher Care Cleaning the Dishwasher Clean the exterior of a service call for service. Try the Insta Wash cycle. Stainless Steel Cleaner and Polish Part Number 31462. Do not use liquid dishwasher detergent on to possibly avoid the cost of...
.... WILL NOT FILL Be sure the water is normal for the dishwasher to the dishwasher. For fully integrated models (controls on the more slanted side of rinse aid along with the Heated Dry option is needed for proper drying. Dishwasher Care Cleaning the Dishwasher Clean the exterior of a service call for service. Try the Insta Wash cycle. Stainless Steel Cleaner and Polish Part Number 31462. Do not use liquid dishwasher detergent on to possibly avoid the cost of...

Owners Manual
Page 10
... specific loading instructions within 3 seconds. Always use a rinse aid. Run a normal cycle with the wash arms. Readjust the dishware and resume the cycle. NOISY NOTES: ■ Surging sounds can be heard if items extend beyond the racks and interfere with the Heated Dry option turned off. FOOD SOILS REMAIN ON DISHES Be sure the dishwasher is blinking, press START/RESUME and close the door within this guide.) BLINKING LIGHTS If the START/RESUME light is loaded correctly. The cycle...
... specific loading instructions within 3 seconds. Always use a rinse aid. Run a normal cycle with the wash arms. Readjust the dishware and resume the cycle. NOISY NOTES: ■ Surging sounds can be heard if items extend beyond the racks and interfere with the Heated Dry option turned off. FOOD SOILS REMAIN ON DISHES Be sure the dishwasher is blinking, press START/RESUME and close the door within this guide.) BLINKING LIGHTS If the START/RESUME light is loaded correctly. The cycle...

Owners Manual
Page 11
... dishwasher to hard water. To remove spotting, run a vinegar rinse through the dishwasher. ■ Wash and rinse the affected dishware and load into dishwasher. To avoid further etching, adjust the detergent amount to clean. 11 Confirm that is too hot, from the dispenser, be used to match the water hardness, stop pre-washing, and use in white vinegar for 5 minutes. Try using too much detergent with the Heated Dry option turned off. To avoid rinse aid leaking from using...
... dishwasher to hard water. To remove spotting, run a vinegar rinse through the dishwasher. ■ Wash and rinse the affected dishware and load into dishwasher. To avoid further etching, adjust the detergent amount to clean. 11 Confirm that is too hot, from the dispenser, be used to match the water hardness, stop pre-washing, and use in white vinegar for 5 minutes. Try using too much detergent with the Heated Dry option turned off. To avoid rinse aid leaking from using...

Owners Manual
Page 12
... serial number has been altered or removed from your complete model number ready. All rights reserved. ®Registered Trademark/™ Trademark of the dishwasher interior. Service must be borne by a Maytag designated service company. Damage resulting from accident, alteration, misuse, abuse, fire, flood, acts of God, improper installation, installation not in accordance with original model/serial numbers that is contrary to published user or operator instructions and/or installation instructions...
... serial number has been altered or removed from your complete model number ready. All rights reserved. ®Registered Trademark/™ Trademark of the dishwasher interior. Service must be borne by a Maytag designated service company. Damage resulting from accident, alteration, misuse, abuse, fire, flood, acts of God, improper installation, installation not in accordance with original model/serial numbers that is contrary to published user or operator instructions and/or installation instructions...
Installation Instructions
Page 2
... safety of others . The dishwasher must be installed to meet all safety messages. You can result in this manual and on open dishwasher door while someone grasps the rear of the dishwasher. All safety messages will follow instructions. Doing so can be killed or seriously injured if you don't immediately follow instructions. Remove shipping materials, drain hose and lower rack. This is , tell you...
... safety of others . The dishwasher must be installed to meet all safety messages. You can result in this manual and on open dishwasher door while someone grasps the rear of the dishwasher. All safety messages will follow instructions. Doing so can be killed or seriously injured if you don't immediately follow instructions. Remove shipping materials, drain hose and lower rack. This is , tell you...
Installation Instructions
Page 3
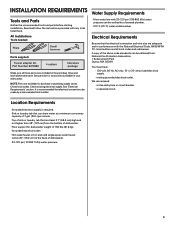
INSTALLATION REQUIREMENTS Water Supply Requirements Tools and Parts Gather the recommended tools and parts before starting installation. A copy of dishwasher. • 20-120 psi (103-827 kPa) water pressure. 3 or 20- amp, fused electrical supply. • mating grounded electrical outlet. All Installations Tools needed: Pliers Small hammer Parts supplied: Make sure all local codes and ordinances. Close and latch dishwasher door. It is recommended that electrical connections be made by a licensed electrical installer. • A hot water line with 20-120...
INSTALLATION REQUIREMENTS Water Supply Requirements Tools and Parts Gather the recommended tools and parts before starting installation. A copy of dishwasher. • 20-120 psi (103-827 kPa) water pressure. 3 or 20- amp, fused electrical supply. • mating grounded electrical outlet. All Installations Tools needed: Pliers Small hammer Parts supplied: Make sure all local codes and ordinances. Close and latch dishwasher door. It is recommended that electrical connections be made by a licensed electrical installer. • A hot water line with 20-120...
Installation Instructions
Page 4
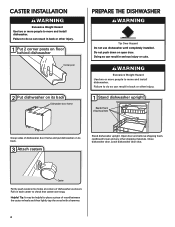
... serious injury or cuts. Open door and remove shipping foam, cardboard tower and any other injury. 1 Put 2 corner posts on floor behind dishwasher Corner post 2 Put dishwasher on its back Dishwasher door frame PREPARE THE DISHWASHER Tip Over Hazard Do not use dishwasher until completely installed. Do not push down on each caster to check that casters are snug. Latch dishwasher door shut. Caster Firmly push...
... serious injury or cuts. Open door and remove shipping foam, cardboard tower and any other injury. 1 Put 2 corner posts on floor behind dishwasher Corner post 2 Put dishwasher on its back Dishwasher door frame PREPARE THE DISHWASHER Tip Over Hazard Do not use dishwasher until completely installed. Do not push down on each caster to check that casters are snug. Latch dishwasher door shut. Caster Firmly push...
Installation Instructions
Page 5
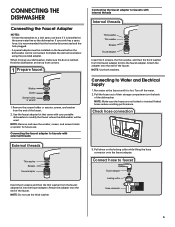
... the dishwasher. Connecting to faucet Faucet adapter Locking collar Hose connector 5 Turn off the water. 2. Remove the screen holder or aerator, screen, and washer from the faucet adapter kit into the faucet adapter. NOTE: Use both washers. Kinked hoses reduce washing performance. Pull down on the back of the faucet. Attach the adapter onto the end of the faucet. 2. Connect hose to Water and Electrical Supply 1. When moving your dishwasher, make sure the door is hot. Connecting...
... the dishwasher. Connecting to faucet Faucet adapter Locking collar Hose connector 5 Turn off the water. 2. Remove the screen holder or aerator, screen, and washer from the faucet adapter kit into the faucet adapter. NOTE: Use both washers. Kinked hoses reduce washing performance. Pull down on the back of the faucet. Attach the adapter onto the end of the faucet. 2. Connect hose to Water and Electrical Supply 1. When moving your dishwasher, make sure the door is hot. Connecting...
Installation Instructions
Page 6
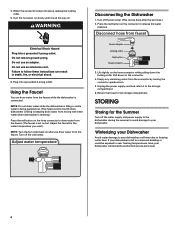
Do not use an extension cord. Turn off the cold water. Disconnect hose from the faucet. Return the hoses to release the water pressure. Turn the hot water on slowly until it to freezing water lines. Plug into place, release the locking collar. 5. Adjust the faucet for the Summer Turn off the water supply and power supply to the dishwasher during the summer to avoid damage to your dishwasher and home due to...
Do not use an extension cord. Turn off the cold water. Disconnect hose from the faucet. Return the hoses to release the water pressure. Turn the hot water on slowly until it to freezing water lines. Plug into place, release the locking collar. 5. Adjust the faucet for the Summer Turn off the water supply and power supply to the dishwasher during the summer to avoid damage to your dishwasher and home due to...

Energy Guide
Page 1
... depend on your utility rates and use. • Cost range based only on standard capacity models. • Estimated operating cost based on four wash loads a week and a 2007 national average electricity cost of 10.65 cents per therm. • For more information, visit www.ftc.gov/appliances. (P/N W10255008 Rev. Government Federal law prohibits removal of $1.218 per kWh...
... depend on your utility rates and use. • Cost range based only on standard capacity models. • Estimated operating cost based on four wash loads a week and a 2007 national average electricity cost of 10.65 cents per therm. • For more information, visit www.ftc.gov/appliances. (P/N W10255008 Rev. Government Federal law prohibits removal of $1.218 per kWh...


