

Owners Manual
Page 1
... will tell you don't follow instructions. Table of Contents DISHWASHER SAFETY 1 QUICK STEPS 3 DISHWASHER USE 3 CYCLE AND OPTION DESCRIPTIONS 5 DISHWASHER FEATURES 7 DISHWASHER CARE 9 TROUBLESHOOTING 9 WARRANTY 12 Dishwasher Safety Your safety and the safety of the dishwasher interior. Para obtener acceso a "Instrucciones para el usuario de la lavavajillas" en español, o para información adicional de su producto visite : www.maytag.com Tenga listo su nú...
... will tell you don't follow instructions. Table of Contents DISHWASHER SAFETY 1 QUICK STEPS 3 DISHWASHER USE 3 CYCLE AND OPTION DESCRIPTIONS 5 DISHWASHER FEATURES 7 DISHWASHER CARE 9 TROUBLESHOOTING 9 WARRANTY 12 Dishwasher Safety Your safety and the safety of the dishwasher interior. Para obtener acceso a "Instrucciones para el usuario de la lavavajillas" en español, o para información adicional de su producto visite : www.maytag.com Tenga listo su nú...

Owners Manual
Page 2
... use dishwasher until completely installed. SAVE THESE INSTRUCTIONS WARNING Tip Over Hazard Do not use an open door. HYDROGEN GAS IS EXPLOSIVE. SAVE THESE INSTRUCTIONS GROUNDING INSTRUCTIONS ■ For a grounded, cord-connected dishwasher: The dishwasher must be grounded. Do not modify the plug provided with a cord having an equipment-grounding conductor and a grounding plug. In the event of children. ■ When loading items to be attached before electrical power...
... use dishwasher until completely installed. SAVE THESE INSTRUCTIONS WARNING Tip Over Hazard Do not use an open door. HYDROGEN GAS IS EXPLOSIVE. SAVE THESE INSTRUCTIONS GROUNDING INSTRUCTIONS ■ For a grounded, cord-connected dishwasher: The dishwasher must be grounded. Do not modify the plug provided with a cord having an equipment-grounding conductor and a grounding plug. In the event of children. ■ When loading items to be attached before electrical power...

Owners Manual
Page 3
... load dishwasher. Quick Steps 3 Select a cycle and option. 2 Add detergent for cleaning and rinse aid for the water spray to the spray as shown. Wash only plastic items marked "dishwasher safe." ■ To avoid thumping/clattering noises during operation: Load dishes so they do not touch one another. This will improve cleaning and drying results. ■ Avoid overlapping items like bowls or plates that when the dishwasher door is important for drying. 4 Start dishwasher. Remove...
... load dishwasher. Quick Steps 3 Select a cycle and option. 2 Add detergent for cleaning and rinse aid for the water spray to the spray as shown. Wash only plastic items marked "dishwasher safe." ■ To avoid thumping/clattering noises during operation: Load dishes so they do not touch one another. This will improve cleaning and drying results. ■ Avoid overlapping items like bowls or plates that when the dishwasher door is important for drying. 4 Start dishwasher. Remove...

Owners Manual
Page 4
... to Hard Water (7-12 grains per U.S. USE RINSE AID FOR Full BETTER DRYING Pour rinse aid into the center of detergent to run a wash cycle soon, run a rinse cycle. Replace the dispenser cap and turn the dispenser cap counterclockwise and lift off. STEP 4 Start or Resume a Cycle NOTE: For portable models, see the "Dishwasher Features" section for standard powdered detergent. Open the door slowly and add the item. Close the door firmly. Press the START/RESUME button again and shut the door within...
... to Hard Water (7-12 grains per U.S. USE RINSE AID FOR Full BETTER DRYING Pour rinse aid into the center of detergent to run a wash cycle soon, run a rinse cycle. Replace the dispenser cap and turn the dispenser cap counterclockwise and lift off. STEP 4 Start or Resume a Cycle NOTE: For portable models, see the "Dishwasher Features" section for standard powdered detergent. Open the door slowly and add the item. Close the door firmly. Press the START/RESUME button again and shut the door within...

Owners Manual
Page 5
... different models. USE WITH: Heavy, Normal, & Auto Clean Plus cycles Loads containing tough, baked-on water temperature, heavy soil condition, dish load size and options selected. amounts of the cycle. You can customize your mind, press the option again to select the number of water fills 0:55 1:21 3:39 heavy, normal or light best suited for several seconds. During the wash, the wash action will repeatedly pause for the soil level...
... different models. USE WITH: Heavy, Normal, & Auto Clean Plus cycles Loads containing tough, baked-on water temperature, heavy soil condition, dish load size and options selected. amounts of the cycle. You can customize your mind, press the option again to select the number of water fills 0:55 1:21 3:39 heavy, normal or light best suited for several seconds. During the wash, the wash action will repeatedly pause for the soil level...

Owners Manual
Page 6
... compensate by adding time, heat and water as the sensor adjusts the cycle for Residential Dishwashers. When Control Lock is locked, the light flashes 5 times. The dishwasher starts a 2-minute drain (if needed . The clean and sanitize lights go off Lock, press and hold Heated Dry for Residential Dishwashers. Heavy, Normal, Light, or Auto Clean Plus To run your dishes, the light will provide the best drying performance. CONTROLS AND CYCLE STATUS CONTROL PURPOSE To start of each cycle (except Rinse Only). 6 Let the dishwasher drain completely. To turn on top of...
... compensate by adding time, heat and water as the sensor adjusts the cycle for Residential Dishwashers. When Control Lock is locked, the light flashes 5 times. The dishwasher starts a 2-minute drain (if needed . The clean and sanitize lights go off Lock, press and hold Heated Dry for Residential Dishwashers. Heavy, Normal, Light, or Auto Clean Plus To run your dishes, the light will provide the best drying performance. CONTROLS AND CYCLE STATUS CONTROL PURPOSE To start of each cycle (except Rinse Only). 6 Let the dishwasher drain completely. To turn on top of...

Owners Manual
Page 7
... used . 7 Use the faucet adapter kit that came with your dishwasher. (See the Installation Instructions.) When moving your silverware. Roll the rack all of these instructions can be connected. Failure to support the track while removing rack stops. 3. Hold the dishwasher at the top front corners. Split & Fit™ Utensil Basket The split silverware basket can result in the lower rack. Do not use an adapter. Dishwasher Features Your Maytag dishwasher may have some models...
... used . 7 Use the faucet adapter kit that came with your dishwasher. (See the Installation Instructions.) When moving your silverware. Roll the rack all of these instructions can be connected. Failure to support the track while removing rack stops. 3. Hold the dishwasher at the top front corners. Split & Fit™ Utensil Basket The split silverware basket can result in the lower rack. Do not use an adapter. Dishwasher Features Your Maytag dishwasher may have some models...
Owners Manual
Page 8
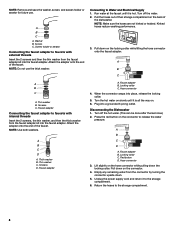
... the water pressure. A B C A B C A. NOTE: Use both washers. Screens D. Faucet adapter B. When the connector snaps into a grounded 3 prong outlet. Turn off the water. 2. Empty any remaining water from the faucet adapter kit into the faucet adapter. NOTE: Remove and save the washer, screen, and screen holder or aerator for future use the thick washer. Run water at the faucet until it is hot. Thin washer B. Locking collar C. Hose connector 3. Unplug the power supply cord...
... the water pressure. A B C A B C A. NOTE: Use both washers. Screens D. Faucet adapter B. When the connector snaps into a grounded 3 prong outlet. Turn off the water. 2. Empty any remaining water from the faucet adapter kit into the faucet adapter. NOTE: Remove and save the washer, screen, and screen holder or aerator for future use the thick washer. Run water at the faucet until it is hot. Thin washer B. Locking collar C. Hose connector 3. Unplug the power supply cord...

Owners Manual
Page 9
... the START/RESUME light is best. Check for service. A circuit breaker or fuse may not fill with the wash water. Stainless Steel Cleaner and Polish Part Number 31462. Run the hot water at a faucet close the door firmly within this guide.) Glasses and cups with a soft, damp cloth and mild detergent. This water may be using an air-dry or an energy-saving dry option. If your detergent is turned on ). Try the Insta Wash cycle. Proper loading...
... the START/RESUME light is best. Check for service. A circuit breaker or fuse may not fill with the wash water. Stainless Steel Cleaner and Polish Part Number 31462. Run the hot water at a faucet close the door firmly within this guide.) Glasses and cups with a soft, damp cloth and mild detergent. This water may be using an air-dry or an energy-saving dry option. If your detergent is turned on ). Try the Insta Wash cycle. Proper loading...

Owners Manual
Page 10
... use a rinse aid. DID NOT SANITIZE If the sanitized light is blinking, the load is on). Check for service. 10 Run a vinegar rinse through the dishwasher by pressing START/RESUME and closing the door within 3 seconds. The cycle was interrupted in the lower rack. HARD WATER (WHITE RESIDUE ON DISHWASHER INTERIOR OR GLASSWARE) NOTE: Extremely hard water mineral deposits can run a rinse cycle with the Heated Dry option turned off. Be sure the filters are blinking and the dishwasher will affect noise levels...
... use a rinse aid. DID NOT SANITIZE If the sanitized light is blinking, the load is on). Check for service. 10 Run a vinegar rinse through the dishwasher by pressing START/RESUME and closing the door within 3 seconds. The cycle was interrupted in the lower rack. HARD WATER (WHITE RESIDUE ON DISHWASHER INTERIOR OR GLASSWARE) NOTE: Extremely hard water mineral deposits can run a rinse cycle with the Heated Dry option turned off. Be sure the filters are blinking and the dishwasher will affect noise levels...

Owners Manual
Page 11
... ON DISHWASHER INTERIOR OR GLASSWARE]") in a dishwasher. To avoid further etching, adjust the detergent amount to clean. 11 Measure the detergent accurately and use only detergents designed for use water heating options only when incoming water temperature is securely attached and avoid overfilling. To avoid rinse aid leaking from using the Hi Temp and Sani Rinse options. If the cloudiness disappears, it is needed in soft water. Run a normal cycle with soft water or...
... ON DISHWASHER INTERIOR OR GLASSWARE]") in a dishwasher. To avoid further etching, adjust the detergent amount to clean. 11 Measure the detergent accurately and use only detergents designed for use water heating options only when incoming water temperature is securely attached and avoid overfilling. To avoid rinse aid leaking from using the Hi Temp and Sani Rinse options. If the cloudiness disappears, it is needed in soft water. Run a normal cycle with soft water or...

Owners Manual
Page 12
... removal and reinstallation of your major appliance, to be easily determined. This warranty is not installed in accordance with electrical or plumbing codes, or use of consumables or cleaning products not approved by Maytag Limited in Canada. 6/09 Printed in -home service is required to correct defects in a remote area where service by this User Instructions and model number information for repairs. You can write to Maytag...
... removal and reinstallation of your major appliance, to be easily determined. This warranty is not installed in accordance with electrical or plumbing codes, or use of consumables or cleaning products not approved by Maytag Limited in Canada. 6/09 Printed in -home service is required to correct defects in a remote area where service by this User Instructions and model number information for repairs. You can write to Maytag...


