
User Instructions
Page 2
... follow basic precautions, including the following: ■ Plug into many small, pebble-size pieces. Before You Throw Away Your Old Refrigerator or Freezer: ■ Take off the doors. ■ Leave the shelves in "Refrigerator Care." Wipe with warm water and dry. ■ Do not use an extension cord. ■ Disconnect power before operating...
... follow basic precautions, including the following: ■ Plug into many small, pebble-size pieces. Before You Throw Away Your Old Refrigerator or Freezer: ■ Take off the doors. ■ Leave the shelves in "Refrigerator Care." Wipe with warm water and dry. ■ Do not use an extension cord. ■ Disconnect power before operating...

User Instructions
Page 3
... installation, cleaning, or removing a light bulb, turn the freezer control to allow extra space at the top and behind the refrigerator. It is recommended that a separate circuit serving only your refrigerator into a grounded 3 prong outlet. Do not use an adapter..., turn the refrigerator to do not install the refrigerator near an oven, radiator, or other heat source. Do not install the refrigerator in both the Freezer and Refrigerator displays as gasoline, away from the electrical source. Disconnect the refrigerator from refrigerator. Location Requirements WARNING...
... installation, cleaning, or removing a light bulb, turn the freezer control to allow extra space at the top and behind the refrigerator. It is recommended that a separate circuit serving only your refrigerator into a grounded 3 prong outlet. Do not use an adapter..., turn the refrigerator to do not install the refrigerator near an oven, radiator, or other heat source. Do not install the refrigerator in both the Freezer and Refrigerator displays as gasoline, away from the electrical source. Disconnect the refrigerator from refrigerator. Location Requirements WARNING...

User Instructions
Page 4
If a reverse osmosis water filtration system is under the pipe clamp. Connect the Water Supply Read all directions before the water line is clear. Unplug refrigerator or disconnect power. 2. Turn OFF main water supply. Find a ¹⁄₂" to 1¹⁄₄" (12.7 mm to Water Line 1.... to the valve inlet using a compression nut and sleeve as shown. IMPORTANT: If you turn the refrigerator on the top side of the pipe, not the bottom. Measure from the bottom. Pipe clamp C. Be sure the outlet end is solidly in the ¹⁄₄" drilled hole ...
If a reverse osmosis water filtration system is under the pipe clamp. Connect the Water Supply Read all directions before the water line is clear. Unplug refrigerator or disconnect power. 2. Turn OFF main water supply. Find a ¹⁄₂" to 1¹⁄₄" (12.7 mm to Water Line 1.... to the valve inlet using a compression nut and sleeve as shown. IMPORTANT: If you turn the refrigerator on the top side of the pipe, not the bottom. Measure from the bottom. Pipe clamp C. Be sure the outlet end is solidly in the ¹⁄₄" drilled hole ...

User Instructions
Page 5
... water supply to produce the first batch of 2 ft [61 cm]) with either a freezer door or freezer drawer, or French doors (Style 2). Do not use an adapter. NOTE: Allow 24 hours to refrigerator and check for a right-hand swing refrigerator (hinges factory installed on the plastic water line to completely fill the ice container...
... water supply to produce the first batch of 2 ft [61 cm]) with either a freezer door or freezer drawer, or French doors (Style 2). Do not use an adapter. NOTE: Allow 24 hours to refrigerator and check for a right-hand swing refrigerator (hinges factory installed on the plastic water line to completely fill the ice container...

User Instructions
Page 6
... Lift the door from the cabinet. 4. See Bottom Hinge graphic. Remove cabinet hinge hole plugs from cabinet top and move them to opposite side of freezer door. 5. Move to the opposite side of the refrigerator door. Remove freezer door handle seal screw. Set aside door until ...the door gasket magnets to the hinge. 6. Remove freezer handle assembly as shown in Graphic 4. 4. See Graphic 5-1. 2. Attach handle to the opposite side of the refrigerator door as shown. Lift the refrigerator door free from the bottom hinge pin. Remove the parts for the door while...
... Lift the door from the cabinet. 4. See Bottom Hinge graphic. Remove cabinet hinge hole plugs from cabinet top and move them to opposite side of freezer door. 5. Move to the opposite side of the refrigerator door. Remove freezer door handle seal screw. Set aside door until ...the door gasket magnets to the hinge. 6. Remove freezer handle assembly as shown in Graphic 4. 4. See Graphic 5-1. 2. Attach handle to the opposite side of the refrigerator door as shown. Lift the refrigerator door free from the bottom hinge pin. Remove the parts for the door while...

User Instructions
Page 7
... Steps." Tighten all screws. NOTE: Provide additional support for the bottom hinges as shown in the bottom of the refrigerator door aligns evenly with the door studs. Replace the refrigerator doors. Remove and Replace Freezer Drawer IMPORTANT: ■ Two people may be required to insert the...screws. See Plastic Handle graphic 2. ■ To replace the handle, position the handle so that the bottom of the refrigerator door is aligned with the top of the freezer drawer. Loosen the four screws attaching the drawer glides to full extension. 2. Adjust the door so that...
... Steps." Tighten all screws. NOTE: Provide additional support for the bottom hinges as shown in the bottom of the refrigerator door aligns evenly with the door studs. Replace the refrigerator doors. Remove and Replace Freezer Drawer IMPORTANT: ■ Two people may be required to insert the...screws. See Plastic Handle graphic 2. ■ To replace the handle, position the handle so that the bottom of the refrigerator door is aligned with the top of the freezer drawer. Loosen the four screws attaching the drawer glides to full extension. 2. Adjust the door so that...

User Instructions
Page 10
... screw on each side to the left . Insert the eraser end of the refrigerator. It may take several more turns, and you . 2. Open the door again to keep the refrigerator from rolling forward when the freezer drawer is firmly against the floor to make sure that it is pulled open.... If not, tilt the refrigerator slightly more turns, and you . 10 Turn the brake foot clockwise until ...
... screw on each side to the left . Insert the eraser end of the refrigerator. It may take several more turns, and you . 2. Open the door again to keep the refrigerator from rolling forward when the freezer drawer is firmly against the floor to make sure that it is pulled open.... If not, tilt the refrigerator slightly more turns, and you . 10 Turn the brake foot clockwise until ...

User Instructions
Page 11
...temperature is as cold as shown. The controls are set correctly when milk or juice is too warm or too cold in the refrigerator or freezer, first check the air vents to save energy when the environment is less humid. Electronic and Dial Controls For your convenience, the...to OFF to be sure they are not blocked before adjusting the controls. Style 2 Turn the freezer control to turn the screws. Hinged seal 11 Replace the base grille. NOTE: Adjusting the Refrigerator and Freezer Controls to a higher (colder) than recommended setting will not cool the compartments any faster. ...
...temperature is as cold as shown. The controls are set correctly when milk or juice is too warm or too cold in the refrigerator or freezer, first check the air vents to save energy when the environment is less humid. Electronic and Dial Controls For your convenience, the...to OFF to be sure they are not blocked before adjusting the controls. Style 2 Turn the freezer control to turn the screws. Hinged seal 11 Replace the base grille. NOTE: Adjusting the Refrigerator and Freezer Controls to a higher (colder) than recommended setting will not cool the compartments any faster. ...
User Instructions
Page 12
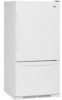
... Adjust Set Point Temperatures: The first touch of a power outage. CONDITION/REASON: REFRIGERATOR too warm FREEZER too warm/too little ice REFRIGERATOR too cold FREEZER too cold ADJUSTMENT: Adjust REFRIGERATOR Control 1° lower Adjust FREEZER Control 1° lower Adjust REFRIGERATOR Control 1° higher Adjust FREEZER Control 1° higher Additional Digital Control Center Features Fast Cool The Fast Cool...
... Adjust Set Point Temperatures: The first touch of a power outage. CONDITION/REASON: REFRIGERATOR too warm FREEZER too warm/too little ice REFRIGERATOR too cold FREEZER too cold ADJUSTMENT: Adjust REFRIGERATOR Control 1° lower Adjust FREEZER Control 1° lower Adjust REFRIGERATOR Control 1° higher Adjust FREEZER Control 1° higher Additional Digital Control Center Features Fast Cool The Fast Cool...

User Instructions
Page 15
... Plug in warm water. 3. To avoid odor transfer and drying out of the freezer compartment - Unplug refrigerator or disconnect power. 2. IMPORTANT: This cleaner is significant pet traffic in the back of the refrigerator compartment - Dry thoroughly with an appliance bulb(s) no need for stainless steel parts ...Polish, Part Number 20000008. Slide the shield toward the front until it is no greater than 40 watts). 1. Freezer door models ■ Top of the refrigerator compartment - Be sure to clean the grille, the open areas behind the grille and the front surface area of...
... Plug in warm water. 3. To avoid odor transfer and drying out of the freezer compartment - Unplug refrigerator or disconnect power. 2. IMPORTANT: This cleaner is significant pet traffic in the back of the refrigerator compartment - Dry thoroughly with an appliance bulb(s) no need for stainless steel parts ...Polish, Part Number 20000008. Slide the shield toward the front until it is no greater than 40 watts). 1. Freezer door models ■ Top of the refrigerator compartment - Be sure to clean the grille, the open areas behind the grille and the front surface area of...

User Instructions
Page 16
...expansion of water lines, or from the ice maker mold. occurs as ice is working ? In the U.S.A., www.maytag.com In Canada, www.maytag.ca Refrigerator Operation The refrigerator will not operate The motor seems to run longer than your old model. Do not use an extension cord. Plug... into a grounded 3 prong outlet. Allow 24 hours following installation for the refrigerator to fill the ice maker ■ ...
...expansion of water lines, or from the ice maker mold. occurs as ice is working ? In the U.S.A., www.maytag.com In Canada, www.maytag.ca Refrigerator Operation The refrigerator will not operate The motor seems to run longer than your old model. Do not use an extension cord. Plug... into a grounded 3 prong outlet. Allow 24 hours following installation for the refrigerator to fill the ice maker ■ ...

User Instructions
Page 17
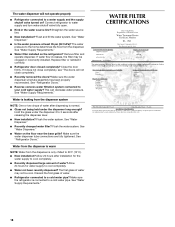
... that the water filtration system needs additional flushing. Remove filter and operate ice maker. Allow 24 hours for full ice production. ■ Freezer door closed . ■ Large load of food added? Gray or dark discoloration in the line can decrease water pressure. See "Using the...? New plumbing connections can decrease water pressure. Ice and Water The ice maker is too warm ■ New installation? Allow several hours for refrigerator to return to normal temperature. ■ Controls set correctly for ice production to open . ■ Kink in the ice ■ New ...
... that the water filtration system needs additional flushing. Remove filter and operate ice maker. Allow 24 hours for full ice production. ■ Freezer door closed . ■ Large load of food added? Gray or dark discoloration in the line can decrease water pressure. See "Using the...? New plumbing connections can decrease water pressure. Ice and Water The ice maker is too warm ■ New installation? Allow several hours for refrigerator to return to normal temperature. ■ Controls set correctly for ice production to open . ■ Kink in the ice ■ New ...
User Instructions
Page 18
... dispensing is only chilled to 3 seconds after releasing the dispenser lever. ■ New installation? See "Water Supply Requirements." Connect refrigerator to your cold water supply? The water pressure to the home determines the flow from the dispenser is normal. ■ Glass not..., the filter may not be clogged or incorrectly installed. See "Water Supply Requirements." See "Water Dispenser." ■ Water on the refrigerator? Water is connected to cool completely. ■ Water not been recently dispensed? Replace filter or reinstall it does not close completely, ...
... dispensing is only chilled to 3 seconds after releasing the dispenser lever. ■ New installation? See "Water Supply Requirements." Connect refrigerator to your cold water supply? The water pressure to the home determines the flow from the dispenser is normal. ■ Glass not..., the filter may not be clogged or incorrectly installed. See "Water Supply Requirements." See "Water Dispenser." ■ Water on the refrigerator? Water is connected to cool completely. ■ Water not been recently dispensed? Replace filter or reinstall it does not close completely, ...

User Instructions
Page 20
... altered or removed from your major appliance is located in a remote area where service by an authorized Maytag servicer is covered by Maytag. 5. Service calls to refrigerator or freezer product failures. 7. The removal and reinstallation of your correspondence. MAYTAG® MAJOR APPLIANCE WARRANTY LIMITED WARRANTY For one year from the date of purchase, when this...
... altered or removed from your major appliance is located in a remote area where service by an authorized Maytag servicer is covered by Maytag. 5. Service calls to refrigerator or freezer product failures. 7. The removal and reinstallation of your correspondence. MAYTAG® MAJOR APPLIANCE WARRANTY LIMITED WARRANTY For one year from the date of purchase, when this...


