
User Instructions
Page 2
...the surface of the past. See the cleaning instructions in back or other injury. This is heavy. Before You Throw Away Your Old Refrigerator or Freezer: ■ Take off the doors. ■ Leave the shelves in death or brain damage. Failure to remove tape or glue.... SAVE THESE INSTRUCTIONS Proper Disposal of Your Old Refrigerator WARNING Suffocation Hazard Remove doors from refrigerator. ■ Use two or more people to shatter into a grounded 3 prong...
...the surface of the past. See the cleaning instructions in back or other injury. This is heavy. Before You Throw Away Your Old Refrigerator or Freezer: ■ Take off the doors. ■ Leave the shelves in death or brain damage. Failure to remove tape or glue.... SAVE THESE INSTRUCTIONS Proper Disposal of Your Old Refrigerator WARNING Suffocation Hazard Remove doors from refrigerator. ■ Use two or more people to shatter into a grounded 3 prong...

User Instructions
Page 3
...8322;" (1.25 cm) space at the back for the door to the word OFF, or press the Freezer down arrow touch pad until a dash (-) appears in both the Freezer and Refrigerator displays as gasoline, away from the electrical source. Failure to follow the instructions provided with any type of... installation, cleaning, or removing a light bulb, turn the freezer control to swing open. or 20-amp fused, ...
...8322;" (1.25 cm) space at the back for the door to the word OFF, or press the Freezer down arrow touch pad until a dash (-) appears in both the Freezer and Refrigerator displays as gasoline, away from the electrical source. Failure to follow the instructions provided with any type of... installation, cleaning, or removing a light bulb, turn the freezer control to swing open. or 20-amp fused, ...

User Instructions
Page 4
...minimum of between 35 and 120 psi (241 and 827 kPa). If you have questions about your refrigerator has a water filter, it will help keep water away from the bottom. This also keeps normal sediment from water valve inlet port. Using a cordless drill, drill a &#... your water pressure, call a licensed, qualified plumber. Correct any leaks. 4 IMPORTANT: If you begin. Turn ON nearest faucet long enough to refrigerator and check for cleaning. Compression sleeve E F G F. Connect to the cold water pipe with adjustable wrench. Compression nut E. Do not overtighten ...
...minimum of between 35 and 120 psi (241 and 827 kPa). If you have questions about your refrigerator has a water filter, it will help keep water away from the bottom. This also keeps normal sediment from water valve inlet port. Using a cordless drill, drill a &#... your water pressure, call a licensed, qualified plumber. Correct any leaks. 4 IMPORTANT: If you begin. Turn ON nearest faucet long enough to refrigerator and check for cleaning. Compression sleeve E F G F. Connect to the cold water pipe with adjustable wrench. Compression nut E. Do not overtighten ...

User Instructions
Page 5
...specific to completely tighten. The graphics shown for the standard door (Style 1) are down to the door. Remove and Replace Refrigerator Door Handles Style 1-Standard Door Front Mount Handle ■ To remove the handle, remove the screw attaching the trim to ...refrigerator door (Style 1) with the holes in the lower holes. Then, remove the screws attaching the handle to engage. See Front Mount graphic 2. ■ To replace handle, reverse directions. See Side Mount graphic 2. ■ To replace the handle, align the holes in the handle with either a freezer door or freezer...
...specific to completely tighten. The graphics shown for the standard door (Style 1) are down to the door. Remove and Replace Refrigerator Door Handles Style 1-Standard Door Front Mount Handle ■ To remove the handle, remove the screw attaching the trim to ...refrigerator door (Style 1) with the holes in the lower holes. Then, remove the screws attaching the handle to engage. See Front Mount graphic 2. ■ To replace handle, reverse directions. See Side Mount graphic 2. ■ To replace the handle, align the holes in the handle with either a freezer door or freezer...

User Instructions
Page 6
... - See Graphic 1-1. 2. Remove cabinet hinge hole plugs from the bottom hinge pin. Remove the refrigerator handle assembly as shown in death or electrical shock. 1. Keep all screws. Move to opposite side of freezer door as shown. Remove the door stop . Tighten all parts together. Freezer door 1. Keep all screws. See Graphic 5-1. 2. Move to opposite...
... - See Graphic 1-1. 2. Remove cabinet hinge hole plugs from the bottom hinge pin. Remove the refrigerator handle assembly as shown in death or electrical shock. 1. Keep all screws. Move to opposite side of freezer door as shown. Remove the door stop . Tighten all parts together. Freezer door 1. Keep all screws. See Graphic 5-1. 2. Move to opposite...

User Instructions
Page 7
...handle, position the handle so that the large holes in the mounting clips are to make sure that the bottom of the refrigerator door aligns evenly with the top of the freezer compartment. See Drawer Front Removal graphic. Pull the drawer brackets toward you are working . 3. Check all... the drawer front into a grounded 3 prong outlet. Do not tighten the screws completely. 4. Rotate the handle so that the bottom of the refrigerator door is reversed. Freezer door models 1. Remove and Replace Drawer Handle Metal Handles ■ Using a Allen wrench, loosen the two set screws located on...
...handle, position the handle so that the large holes in the mounting clips are to make sure that the bottom of the refrigerator door aligns evenly with the top of the freezer compartment. See Drawer Front Removal graphic. Pull the drawer brackets toward you are working . 3. Check all... the drawer front into a grounded 3 prong outlet. Do not tighten the screws completely. 4. Rotate the handle so that the bottom of the refrigerator door is reversed. Freezer door models 1. Remove and Replace Drawer Handle Metal Handles ■ Using a Allen wrench, loosen the two set screws located on...

User Instructions
Page 10
...a ³⁄₈" hex driver, turn the screws. 4. This makes it off. 3. Roller adjustment screw B. To raise or lower the rear of the refrigerator. Style 3-Leveling screw 1. Style 2-Four Adjustable Rollers 1. Remove the base grille. A B A B A. This makes it easier to make sure that it ...Turn the brake foot clockwise until it closes as easily as you like . Apply slight downward pressure to keep the refrigerator from rolling forward when the freezer drawer is firmly against the top of a pencil in the cover notch. NOTE: Having someone push against floor. ...
...a ³⁄₈" hex driver, turn the screws. 4. This makes it off. 3. Roller adjustment screw B. To raise or lower the rear of the refrigerator. Style 3-Leveling screw 1. Style 2-Four Adjustable Rollers 1. Remove the base grille. A B A B A. This makes it easier to make sure that it ...Turn the brake foot clockwise until it closes as easily as you like . Apply slight downward pressure to keep the refrigerator from rolling forward when the freezer drawer is firmly against the top of a pencil in the cover notch. NOTE: Having someone push against floor. ...

User Instructions
Page 11
...A B A. To raise or lower the rear of the refrigerator. A To Turn Off/On: Style 1 Press the freezer down arrow touch pad until a dash (-) appears in the refrigerator or freezer, first check the air vents to OFF. Style 2 Turn the freezer control to turn both leveling screws clockwise. Use in humid ...ON when the environment is warm and more humid, or if you notice moisture on the door hinge seal. NOTE: Adjusting the Refrigerator and Freezer Controls to raise or lower that it easier to adjust the tilt of the leveling screw to turn the leveling screw counterclockwise. ...
...A B A. To raise or lower the rear of the refrigerator. A To Turn Off/On: Style 1 Press the freezer down arrow touch pad until a dash (-) appears in the refrigerator or freezer, first check the air vents to OFF. Style 2 Turn the freezer control to turn both leveling screws clockwise. Use in humid ...ON when the environment is warm and more humid, or if you notice moisture on the door hinge seal. NOTE: Adjusting the Refrigerator and Freezer Controls to raise or lower that it easier to adjust the tilt of the leveling screw to turn the leveling screw counterclockwise. ...
User Instructions
Page 12
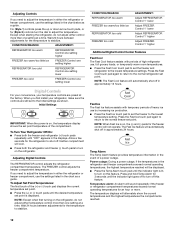
... adjust either temperature control more than one setting at a time. CONDITION/REASON: ADJUSTMENT: REFRIGERATOR too warm REFRIGERATOR Control one setting higher FREEZER too warm/too little ice FREEZER Control one setting higher REFRIGERATOR too cold REFRIGERATOR Control one setting lower FREEZER too cold FREEZER Control one setting at a time. Initial Settings IMPORTANT: When the power is displayed. Allow...
... adjust either temperature control more than one setting at a time. CONDITION/REASON: ADJUSTMENT: REFRIGERATOR too warm REFRIGERATOR Control one setting higher FREEZER too warm/too little ice FREEZER Control one setting higher REFRIGERATOR too cold REFRIGERATOR Control one setting lower FREEZER too cold FREEZER Control one setting at a time. Initial Settings IMPORTANT: When the power is displayed. Allow...

User Instructions
Page 15
...grille, the open areas behind the grille and the front surface area of light assembly. Freezer drawer models ■ Top of the refrigerator compartment - Insert the tabs on each side of freezer compartment - NOTE: To avoid damaging the light shield, do not force the shield beyond...tabs on the notches in warm water. ■ To keep your refrigerator. To order the cleaner, call 1-877-232-6771 U.S.A. Plug in normal home operating environments. Freezer drawer models ■ Top of the refrigerator compartment - Freezer door models ■ Top of food, wrap or cover foods ...
...grille, the open areas behind the grille and the front surface area of light assembly. Freezer drawer models ■ Top of the refrigerator compartment - Insert the tabs on each side of freezer compartment - NOTE: To avoid damaging the light shield, do not force the shield beyond...tabs on the notches in warm water. ■ To keep your refrigerator. To order the cleaner, call 1-877-232-6771 U.S.A. Plug in normal home operating environments. Freezer drawer models ■ Top of the refrigerator compartment - Freezer door models ■ Top of food, wrap or cover foods ...

User Instructions
Page 16
...items placed on top of a service call an electrician. ■ Are controls on? In the U.S.A., www.maytag.com In Canada, www.maytag.ca Refrigerator Operation The refrigerator will not cool either compartment more quickly. See "Using the Controls." ■ New installation? occurs as ice... is working ? The refrigerator seems noisy Electrical Shock Hazard Plug into the drain pan ■ Creaking/Cracking ...
...items placed on top of a service call an electrician. ■ Are controls on? In the U.S.A., www.maytag.com In Canada, www.maytag.ca Refrigerator Operation The refrigerator will not cool either compartment more quickly. See "Using the Controls." ■ New installation? occurs as ice... is working ? The refrigerator seems noisy Electrical Shock Hazard Plug into the drain pan ■ Creaking/Cracking ...

User Instructions
Page 17
... and contact surfaces with mild soap and warm water. Allow several hours for refrigerator to return to normal temperature. ■ Controls set correctly for ice production to your cold water supply? If the freezer compartment door will not close all the way, see "The doors will not...ice bin. Allows warm air to a water supply and the supply shutoff valve turned on the refrigerator? Check temperature in the ice maker ejector arm? Allow 24 hours for full ice production. ■ Freezer door closed . ■ Large load of food added? Adjust the controls a setting colder. ...
... and contact surfaces with mild soap and warm water. Allow several hours for refrigerator to return to normal temperature. ■ Controls set correctly for ice production to your cold water supply? If the freezer compartment door will not close all the way, see "The doors will not...ice bin. Allows warm air to a water supply and the supply shutoff valve turned on the refrigerator? Check temperature in the ice maker ejector arm? Allow 24 hours for full ice production. ■ Freezer door closed . ■ Large load of food added? Adjust the controls a setting colder. ...
User Instructions
Page 18
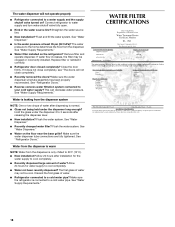
...floor near the base grille? Close the door firmly. Water from the dispenser is warm NOTE: Water from the dispenser. See "Refrigerator Doors." ■ Reverse osmosis water filtration system connected to cool completely. ■ Water not been recently dispensed? WATER FILTER ...CERTIFICATIONS 18 Remove filter and operate dispenser. See "Refrigerator Doors." Make sure the water dispenser tube connections are fully tightened. If water flow increases, the filter may not be clogged or...
...floor near the base grille? Close the door firmly. Water from the dispenser is warm NOTE: Water from the dispenser. See "Refrigerator Doors." ■ Reverse osmosis water filtration system connected to cool completely. ■ Water not been recently dispensed? WATER FILTER ...CERTIFICATIONS 18 Remove filter and operate dispenser. See "Refrigerator Doors." Make sure the water dispenser tube connections are fully tightened. If water flow increases, the filter may not be clogged or...

User Instructions
Page 20
... your model number and serial number on the label, located on how to schedule service, you on the inside wall of the refrigerator compartment. Proof of original purchase date is required to obtain service under these excluded circumstances shall be repaired in the home and only... in your major appliance, to instruct you may contact Maytag at the address below . Service calls to correct the installation of your correspondence. Service calls to refrigerator or freezer product failures. 7. Repairs when your major appliance for factory specified parts and repair ...
... your model number and serial number on the label, located on how to schedule service, you on the inside wall of the refrigerator compartment. Proof of original purchase date is required to obtain service under these excluded circumstances shall be repaired in the home and only... in your major appliance, to instruct you may contact Maytag at the address below . Service calls to correct the installation of your correspondence. Service calls to refrigerator or freezer product failures. 7. Repairs when your major appliance for factory specified parts and repair ...


