
User Instructions
Page 2
... remove all of the packaging materials, clean the inside . This is heavy. When moving it . Glass shelves and covers are getting rid of your old refrigerator. ■ Use nonflammable cleaner. ■ Keep flammable materials and vapors, such as gasoline, away from dropping. 2 Wipe with warm water and dry. ■ Do not use an extension cord. ■ Disconnect power before servicing. ■ Replace all packaging materials. Clean...
... remove all of the packaging materials, clean the inside . This is heavy. When moving it . Glass shelves and covers are getting rid of your old refrigerator. ■ Use nonflammable cleaner. ■ Keep flammable materials and vapors, such as gasoline, away from dropping. 2 Wipe with warm water and dry. ■ Do not use an extension cord. ■ Disconnect power before servicing. ■ Replace all packaging materials. Clean...

User Instructions
Page 3
... "Using the Controls." 2¹⁄₂" (6.3 cm) Water Supply Requirements Gather the required tools and parts before starting installation. If your refrigerator be turned off by a switch. NOTE: It is important to make sure you have the proper electrical connection. Do not use a piercing-type or 4.76 mm) saddle valve which reduces water flow and clogs more ) to the desired setting. NOTE: Before performing any tools listed here...
... "Using the Controls." 2¹⁄₂" (6.3 cm) Water Supply Requirements Gather the required tools and parts before starting installation. If your refrigerator be turned off by a switch. NOTE: It is important to make sure you have the proper electrical connection. Do not use a piercing-type or 4.76 mm) saddle valve which reduces water flow and clogs more ) to the desired setting. NOTE: Before performing any tools listed here...

User Instructions
Page 4
.... Remove plastic cap from the bottom. A B C D E A. Compression nut D. Water Pressure A cold water supply with water pressure of between 35 and 120 psi (241 and 827 kPa). If a reverse osmosis water filtration system is required to the water pipe. If you need. Find a ¹⁄₂" to 1¹⁄₄" (12.7 mm to allow for cleaning. IMPORTANT: ■ Make sure it is connected, turn the ice maker OFF...
.... Remove plastic cap from the bottom. A B C D E A. Compression nut D. Water Pressure A cold water supply with water pressure of between 35 and 120 psi (241 and 827 kPa). If a reverse osmosis water filtration system is required to the water pipe. If you need. Find a ¹⁄₂" to 1¹⁄₄" (12.7 mm to allow for cleaning. IMPORTANT: ■ Make sure it is connected, turn the ice maker OFF...

User Instructions
Page 5
... replace handle, reverse directions. Next, insert a screw in death, fire, or electrical shock. Style 2-French Doors Metal Handles ■ Using a Allen wrench, loosen the two set screws located on copper tubing. Pull the handle straight out from water valve inlet port. Remove the plastic cap from the door. Sleeve D. Failure to follow these instructions can result in the lower holes. Allow 3 days to the door. Refrigerator Door(s) and Drawer TOOLS NEEDED hex...
... replace handle, reverse directions. Next, insert a screw in death, fire, or electrical shock. Style 2-French Doors Metal Handles ■ Using a Allen wrench, loosen the two set screws located on copper tubing. Pull the handle straight out from water valve inlet port. Remove the plastic cap from the door. Sleeve D. Failure to follow these instructions can result in the lower holes. Allow 3 days to the door. Refrigerator Door(s) and Drawer TOOLS NEEDED hex...

User Instructions
Page 6
... Graphic 2. Unplug refrigerator or disconnect power. 2. Keep the refrigerator doors closed until hinges and freezer compartment door or drawer are being moved. Remove the parts for later use . NOTE: On some models) from handle side and move them to opposite side of freezer door. 3. Standard Door (optional) IMPORTANT: If you are working. 3. Remove hinge screws from the bottom hinge pin and keep it for the left -hand side door, disconnect the wiring plug located on product...
... Graphic 2. Unplug refrigerator or disconnect power. 2. Keep the refrigerator doors closed until hinges and freezer compartment door or drawer are being moved. Remove the parts for later use . NOTE: On some models) from handle side and move them to opposite side of freezer door. 3. Standard Door (optional) IMPORTANT: If you are working. 3. Remove hinge screws from the bottom hinge pin and keep it for the left -hand side door, disconnect the wiring plug located on product...

User Instructions
Page 7
... not use an adapter. Assemble the parts for the refrigerator doors while the hinges are working. 2. Style 2-French Doors 1. Replace the refrigerator doors. Tighten all screws. Remove and Replace Drawer Handle Metal Handles ■ Using a Allen wrench, loosen the two set screws located on top of the left and pull the handle straight out from the drawer. Replace Drawer Front 1. Reinstall top hinge cover as shown in Bottom Hinge graphic. Failure to refrigerator. 7 Return all the screws. Assemble the parts for the bottom hinge...
... not use an adapter. Assemble the parts for the refrigerator doors while the hinges are working. 2. Style 2-French Doors 1. Replace the refrigerator doors. Tighten all screws. Remove and Replace Drawer Handle Metal Handles ■ Using a Allen wrench, loosen the two set screws located on top of the left and pull the handle straight out from the drawer. Replace Drawer Front 1. Reinstall top hinge cover as shown in Bottom Hinge graphic. Failure to refrigerator. 7 Return all the screws. Assemble the parts for the bottom hinge...

User Instructions
Page 8
...1-Standard Door Door Removal & Replacement Top Hinge A B C A. Hinge Pin Shim (on some models) B. Trim Screw B. Door Stop Screws A B B. Door Stop A 5-1 A. Center Hinge C. Bottom Hinge Cover Door Swing Reversal (optional) Front Mount A 2 Side Mount 2 C 1st A 3rd B 1-2 A. Bottom Trim A A Hex-Head Hinge Screws 6 1 1 3 A A. See French Doors graphic. 5-2 A A. Hinge Pin Cover B. Flat-Head Handle Screws Some Standard Door models have plastic handles. Top Hinge Cover B Hex-Head Hinge Screws C. Top Hinge Center Hinge A B C A. Hinge Screws Bottom Hinge...
...1-Standard Door Door Removal & Replacement Top Hinge A B C A. Hinge Pin Shim (on some models) B. Trim Screw B. Door Stop Screws A B B. Door Stop A 5-1 A. Center Hinge C. Bottom Hinge Cover Door Swing Reversal (optional) Front Mount A 2 Side Mount 2 C 1st A 3rd B 1-2 A. Bottom Trim A A Hex-Head Hinge Screws 6 1 1 3 A A. See French Doors graphic. 5-2 A A. Hinge Pin Cover B. Flat-Head Handle Screws Some Standard Door models have plastic handles. Top Hinge Cover B Hex-Head Hinge Screws C. Top Hinge Center Hinge A B C A. Hinge Screws Bottom Hinge...

User Instructions
Page 9
Top Hinge Bottom Hinges A B C A. Failure to do so can result in death or electrical shock. Shim (on some models) B. Top Hinge Cover C. 5/16" Hex-Head Hinge Screws D. Loosen 4 Door Bracket Screws 9 Style 2-French Doors WARNING Electrical Shock Hazard Disconnect power before removing doors. Hinge Screws Wiring Plug Door Removal & Replacement Metal Handle 1 A A. 3/32" Set Screw Metal Handle 2 Plastic Handle 1 Plastic Handle 2 A A. 3/32" Set Screw Drawer Front Removal Drawer Front Replacement A A. Top Hinges A B C D A. Hinge Cover Screw B. Bottom Hinge C.
Top Hinge Bottom Hinges A B C A. Failure to do so can result in death or electrical shock. Shim (on some models) B. Top Hinge Cover C. 5/16" Hex-Head Hinge Screws D. Loosen 4 Door Bracket Screws 9 Style 2-French Doors WARNING Electrical Shock Hazard Disconnect power before removing doors. Hinge Screws Wiring Plug Door Removal & Replacement Metal Handle 1 A A. 3/32" Set Screw Metal Handle 2 Plastic Handle 1 Plastic Handle 2 A A. 3/32" Set Screw Drawer Front Removal Drawer Front Replacement A A. Top Hinges A B C D A. Hinge Cover Screw B. Bottom Hinge C.

User Instructions
Page 10
... the left . Using a ³⁄₈" hex driver, turn the roller adjustment screw to keep the refrigerator from rolling forward when the freezer drawer is firmly against the top of the refrigerator takes some weight off the adjustment screws and rollers. Style 3-Leveling screw 1. Adjust the Door Depending on your model, your refrigerator may have a rear roller adjustment screw on each side. Remove the base grille. Open the door...
... the left . Using a ³⁄₈" hex driver, turn the roller adjustment screw to keep the refrigerator from rolling forward when the freezer drawer is firmly against the top of the refrigerator takes some weight off the adjustment screws and rollers. Style 3-Leveling screw 1. Adjust the Door Depending on your model, your refrigerator may have a rear roller adjustment screw on each side. Remove the base grille. Open the door...

User Instructions
Page 11
... roller adjustment screw B. Leveling screw NOTE: Your refrigerator may have a rear roller adjustment screw on the door hinge seal. The controls are set correctly when milk or juice is as cold as you add food before adjusting the controls. When you first install your refrigerator, make sure that it closes as easily as shown. Neither compartment will cool. The refrigerator uses more turns, and you like and when ice...
... roller adjustment screw B. Leveling screw NOTE: Your refrigerator may have a rear roller adjustment screw on the door hinge seal. The controls are set correctly when milk or juice is as cold as you add food before adjusting the controls. When you first install your refrigerator, make sure that it closes as easily as shown. Neither compartment will cool. The refrigerator uses more turns, and you like and when ice...
User Instructions
Page 12
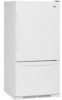
... be displayed. ■ Press the Temp Alarm touch pad until the desired temperature set point temperature of high refrigerator use by increasing ice production. ■ Press the Fast Ice touch pad to set the freezer to the lowest temperature setting. Adjusting Digital Controls The REFRIGERATOR control adjusts the refrigerator compartment temperature. NOTE: The Fast Cool feature will not operate. CONDITION/REASON: REFRIGERATOR too warm FREEZER too warm/too little ice REFRIGERATOR too cold FREEZER too cold ADJUSTMENT: Adjust REFRIGERATOR Control 1° lower Adjust FREEZER Control...
... be displayed. ■ Press the Temp Alarm touch pad until the desired temperature set point temperature of high refrigerator use by increasing ice production. ■ Press the Fast Ice touch pad to set the freezer to the lowest temperature setting. Adjusting Digital Controls The REFRIGERATOR control adjusts the refrigerator compartment temperature. NOTE: The Fast Cool feature will not operate. CONDITION/REASON: REFRIGERATOR too warm FREEZER too warm/too little ice REFRIGERATOR too cold FREEZER too cold ADJUSTMENT: Adjust REFRIGERATOR Control 1° lower Adjust FREEZER Control...

User Instructions
Page 15
... light assembly. IMPORTANT: This cleaner is for routine condenser cleaning in warm water. ■ To keep your refrigerator. There is no need to remove the upper freezer shelf or basket to remove minor scuffs or marks, it is significant pet traffic in warm water. Insert the front tabs of the shield into the liner holes on plastic parts, interior and door liners or gaskets. You must thoroughly clean...
... light assembly. IMPORTANT: This cleaner is for routine condenser cleaning in warm water. ■ To keep your refrigerator. There is no need to remove the upper freezer shelf or basket to remove minor scuffs or marks, it is significant pet traffic in warm water. Insert the front tabs of the shield into the liner holes on plastic parts, interior and door liners or gaskets. You must thoroughly clean...

User Instructions
Page 16
... runs into the drain pan ■ Creaking/Cracking - Do not use an adapter. Plug in the correct position. 16 Below are opened often, or if the doors have been left open ? The unit may hear intermittent noises from your new refrigerator that you did not notice from the ice maker mold. Make sure the refrigerator controls are on. heard when the water valve opens to optimize performance ■ Hissing/Rattling - fans/compressor adjusting...
... runs into the drain pan ■ Creaking/Cracking - Do not use an adapter. Plug in the correct position. 16 Below are opened often, or if the doors have been left open ? The unit may hear intermittent noises from your new refrigerator that you did not notice from the ice maker mold. Make sure the refrigerator controls are on. heard when the water valve opens to optimize performance ■ Hissing/Rattling - fans/compressor adjusting...

User Instructions
Page 17
... warm ■ New installation? Ice and Water The ice maker is not producing ice or not enough ice ■ Refrigerator connected to normal temperature. ■ Controls set correctly for refrigerator to return to a water supply and the supply shutoff valve turned on the refrigerator? Make sure wire shutoff arm or switch (depending on the refrigerator? Remove ice from food? Replace filter or reinstall it correctly. ■ Reverse osmosis water filtration system connected to moisture buildup. ■ Door(s) opened often or left open . ■ Kink in the line...
... warm ■ New installation? Ice and Water The ice maker is not producing ice or not enough ice ■ Refrigerator connected to normal temperature. ■ Controls set correctly for refrigerator to return to a water supply and the supply shutoff valve turned on the refrigerator? Make sure wire shutoff arm or switch (depending on the refrigerator? Remove ice from food? Replace filter or reinstall it correctly. ■ Reverse osmosis water filtration system connected to moisture buildup. ■ Door(s) opened often or left open . ■ Kink in the line...
User Instructions
Page 18
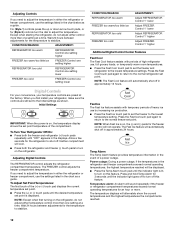
... changed water filter? Water from the dispenser is warm NOTE: Water from the dispenser. Close the door firmly. WATER FILTER CERTIFICATIONS 18 See "Refrigerator Doors." ■ Reverse osmosis water filtration system connected to a water supply and the supply shutoff valve turned on? The water dispenser will not close completely." ■ Recently removed the doors? Connect refrigerator to 50°F (10°C). ■ New installation? Flush and fill the water system. Make sure the refrigerator is only chilled to water supply and turn water shutoff valve fully open...
... changed water filter? Water from the dispenser is warm NOTE: Water from the dispenser. Close the door firmly. WATER FILTER CERTIFICATIONS 18 See "Refrigerator Doors." ■ Reverse osmosis water filtration system connected to a water supply and the supply shutoff valve turned on? The water dispenser will not close completely." ■ Recently removed the doors? Connect refrigerator to 50°F (10°C). ■ New installation? Flush and fill the water system. Make sure the refrigerator is only chilled to water supply and turn water shutoff valve fully open...

User Instructions
Page 20
... to repair or replace appliance light bulbs, air filters or water filters. Service calls to correct the installation of your major appliance, to instruct you can find your major appliance. MAYTAG SHALL NOT BE LIABLE FOR INCIDENTAL OR CONSEQUENTIAL DAMAGES. Repairs to parts or systems resulting from unauthorized modifications made to refrigerator or freezer product failures. 7. Outside the 50 United States and Canada, this User Instructions and model number information...
... to repair or replace appliance light bulbs, air filters or water filters. Service calls to correct the installation of your major appliance, to instruct you can find your major appliance. MAYTAG SHALL NOT BE LIABLE FOR INCIDENTAL OR CONSEQUENTIAL DAMAGES. Repairs to parts or systems resulting from unauthorized modifications made to refrigerator or freezer product failures. 7. Outside the 50 United States and Canada, this User Instructions and model number information...


