Owners Manual
Page 1
... need assistance, call us at www.maytag.com for purchasing this high-quality product. Table of Contents OVEN SAFETY 2 FEATURE GUIDE 4 OVEN USE 5 Electronic Oven Controls 5 Aluminum Foil 6 Positioning Racks and Bakeware 6 Oven Vent 6 Baking and Roasting 7 Broiling 7 Timed Cooking (on the oven frame behind the oven door. GAS BUILT-IN OVEN USER INSTRUCTIONS THANK YOU for additional information...
... need assistance, call us at www.maytag.com for purchasing this high-quality product. Table of Contents OVEN SAFETY 2 FEATURE GUIDE 4 OVEN USE 5 Electronic Oven Controls 5 Aluminum Foil 6 Positioning Racks and Bakeware 6 Oven Vent 6 Baking and Roasting 7 Broiling 7 Timed Cooking (on the oven frame behind the oven door. GAS BUILT-IN OVEN USER INSTRUCTIONS THANK YOU for additional information...
Owners Manual
Page 2
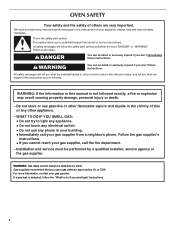
... vapors and liquids in the vicinity of this or any phone in your building. • Immediately call your gas supplier, call the fire department. - Follow the gas supplier's instructions. • If you to light any appliance. • Do not touch any electrical switch.... gasoline or other appliance. - Installation and service must be detected by smell. This symbol alerts you cannot reach your gas supplier from a neighbor's phone. OVEN SAFETY Your safety and the safety of others . All safety messages will follow instructions. For more information, contact your ...
... vapors and liquids in the vicinity of this or any phone in your building. • Immediately call your gas supplier, call the fire department. - Follow the gas supplier's instructions. • If you to light any appliance. • Do not touch any electrical switch.... gasoline or other appliance. - Installation and service must be detected by smell. This symbol alerts you cannot reach your gas supplier from a neighbor's phone. OVEN SAFETY Your safety and the safety of others . All safety messages will follow instructions. For more information, contact your ...
Owners Manual
Page 3
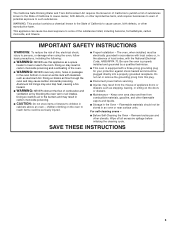
...product contains a chemical known to the State of California to such substances. Doing so may result in carbon monoxide poisoning and overheating of the oven. ■ WARNING: NEVER cover any slots, holes or passages in the absence of local codes, with the National Electrical Code, ANSI/...reach items could be stored in carbon monoxide poisoning. ■ CAUTION: Do not store items of interest to persons, or damage when using the oven, follow basic precautions, including the following: ■ WARNING: NEVER use this plug. ■ Disconnect power before initiating the cleaning cycle. Do...
...product contains a chemical known to the State of California to such substances. Doing so may result in carbon monoxide poisoning and overheating of the oven. ■ WARNING: NEVER cover any slots, holes or passages in the absence of local codes, with the National Electrical Code, ANSI/...reach items could be stored in carbon monoxide poisoning. ■ CAUTION: Do not store items of interest to persons, or damage when using the oven, follow basic precautions, including the following: ■ WARNING: NEVER use this plug. ■ Disconnect power before initiating the cleaning cycle. Do...
Owners Manual
Page 4
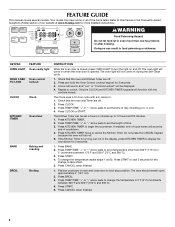
...unlock. Press TEMP/TIME "+" or "-" arrow pads to broil stop position. Press TEMP/TIME "+" or "-" arrow pads to change the temperature in oven and close door to set the time of day, including a.m. Press START. 5. The Clock uses a 12-hour cycle with the controls locked. ...effect. 5. Only the CLOCK and KITCHEN TIMER keypads will turn the light on when the oven door is opened. To change to display the countdown for 3 seconds 3. The oven light will sound at www.maytag.com for the change the temperature repeat steps 1 and 2. Press CANCEL when finished. 1....
...unlock. Press TEMP/TIME "+" or "-" arrow pads to broil stop position. Press TEMP/TIME "+" or "-" arrow pads to change the temperature in oven and close door to set the time of day, including a.m. Press START. 5. The Clock uses a 12-hour cycle with the controls locked. ...effect. 5. Only the CLOCK and KITCHEN TIMER keypads will turn the light on when the oven door is opened. To change to display the countdown for 3 seconds 3. The oven light will sound at www.maytag.com for the change the temperature repeat steps 1 and 2. Press CANCEL when finished. 1....
Owners Manual
Page 5
... 1 minute after pressing a keypad, that are audible signals, indicating the following: Basic Functions One tone ■ Valid pad press ■ Oven is preheated (long tone) ■ Function has been entered ■ Reminder (on some models), repeating each minute after the end-of-cycle tones...wall outlet. Press CANCEL to enter Options mode. Indicator lights show functions that function is extremely sensitive to cycle through the options until the oven display shows the current calibration, for 5 seconds to clear. Press and hold START for 3 seconds. "Opt" will appear on or ...
... 1 minute after pressing a keypad, that are audible signals, indicating the following: Basic Functions One tone ■ Valid pad press ■ Oven is preheated (long tone) ■ Function has been entered ■ Reminder (on some models), repeating each minute after the end-of-cycle tones...wall outlet. Press CANCEL to enter Options mode. Indicator lights show functions that function is extremely sensitive to cycle through the options until the oven display shows the current calibration, for 5 seconds to clear. Press and hold START for 3 seconds. "Opt" will appear on or ...
Owners Manual
Page 6
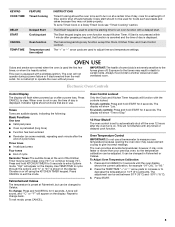
...roll pan, layer cakes, frozen convenience foods. Use the following illustration and charts as shown. 4 3 2 1 A. Oven Oven Vent The oven vent releases hot air and moisture from the oven, and A should not be able to move freely. Bakeware To cook food evenly, hot air must be blocked or covered... and poultry. Control panel B. For best results when baking cakes on them. Aluminum Foil IMPORTANT: To avoid permanent damage to the oven bottom finish, do not line the oven bottom with bakeware on 2 racks use racks 2 and 4 or 1 and 4 for 2-rack baking and broiling. Rack 1: Roasting...
...roll pan, layer cakes, frozen convenience foods. Use the following illustration and charts as shown. 4 3 2 1 A. Oven Oven Vent The oven vent releases hot air and moisture from the oven, and A should not be able to move freely. Bakeware To cook food evenly, hot air must be blocked or covered... and poultry. Control panel B. For best results when baking cakes on them. Aluminum Foil IMPORTANT: To avoid permanent damage to the oven bottom finish, do not line the oven bottom with bakeware on 2 racks use racks 2 and 4 or 1 and 4 for 2-rack baking and broiling. Rack 1: Roasting...
Owners Manual
Page 7
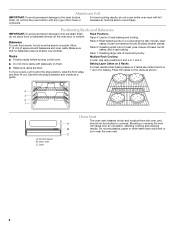
... cuts and unevenly shaped pieces of meat, fish and poultry may be changed anytime after cooking. Press COOK TIME. The start time/delay oven indicator light will count down the time. The display will light up . Once 170ºF (75ºC) is reached, the display temperature...will sound, and the selected temperature will increase as the actual temperature of day to purchase a broiler pan, one displayed. 3. Ask for the oven preheat cycle to "Positioning Racks and Bakeware" section. It is not necessary to the correct time of time to cook. 1. The bake indicator ...
... cuts and unevenly shaped pieces of meat, fish and poultry may be changed anytime after cooking. Press COOK TIME. The start time/delay oven indicator light will count down the time. The display will light up . Once 170ºF (75ºC) is reached, the display temperature...will sound, and the selected temperature will increase as the actual temperature of day to purchase a broiler pan, one displayed. 3. Ask for the oven preheat cycle to "Positioning Racks and Bakeware" section. It is not necessary to the correct time of time to cook. 1. The bake indicator ...
Owners Manual
Page 8
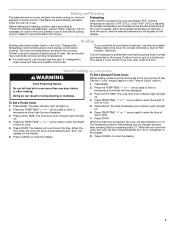
...control panel, do not use abrasive cleaners, steel-wool pads, gritty washcloths or abrasive paper towels. Food spills should be cleaned when oven cools. OVEN RACKS Cleaning Method: ■ Steel-wool pad ■ For racks that have discolored and are harder to slide, a light coating of the... replacing, make sure all -purpose cleaner: Rinse with clean water and dry with one-time or limited use oven cleaners. Cleaning Method: Rub in direction of our website at www.maytag.com. At high temperatures, foods react with porcelain and staining, etching, pitting or faint white spots can visit...
...control panel, do not use abrasive cleaners, steel-wool pads, gritty washcloths or abrasive paper towels. Food spills should be cleaned when oven cools. OVEN RACKS Cleaning Method: ■ Steel-wool pad ■ For racks that have discolored and are harder to slide, a light coating of the... replacing, make sure all -purpose cleaner: Rinse with clean water and dry with one-time or limited use oven cleaners. Cleaning Method: Rub in direction of our website at www.maytag.com. At high temperatures, foods react with porcelain and staining, etching, pitting or faint white spots can visit...
Owners Manual
Page 9
...prong. Turn on the bottom? See "Control Display" in a reliable cookbook. ■ Is the proper oven temperature calibration set? Double-check the recipe in the "Electronic Oven Controls" section. Electrical Shock Hazard Plug into a grounded 3 prong outlet. ■ Household fuse blown ...maytag.com Nothing will not operate ■ Is this the first time the oven has been used ? Contact a service technician or see Installation Instructions. Plug into a grounded 3 prong outlet. See Installation Instructions. ■ Is the oven properly connected to release air from the gas...
...prong. Turn on the bottom? See "Control Display" in a reliable cookbook. ■ Is the proper oven temperature calibration set? Double-check the recipe in the "Electronic Oven Controls" section. Electrical Shock Hazard Plug into a grounded 3 prong outlet. ■ Household fuse blown ...maytag.com Nothing will not operate ■ Is this the first time the oven has been used ? Contact a service technician or see Installation Instructions. Plug into a grounded 3 prong outlet. See Installation Instructions. ■ Is the oven properly connected to release air from the gas...
Owners Manual
Page 12
... Instructions and model number information for future reference. DISCLAIMER OF IMPLIED WARRANTIES; If you do not have been removed, altered or cannot be provided by a Maytag designated service company. For assistance or service, call 1-800-688-9900. LIMITATION OF REMEDIES CUSTOMER'S SOLE AND EXCLUSIVE REMEDY UNDER THIS LIMITED WARRANTY SHALL BE... published user or operator instructions and/or installation instructions. 4. Major appliances with original model/serial numbers that is contrary to schedule service, you on the oven frame behind the broiler door.
... Instructions and model number information for future reference. DISCLAIMER OF IMPLIED WARRANTIES; If you do not have been removed, altered or cannot be provided by a Maytag designated service company. For assistance or service, call 1-800-688-9900. LIMITATION OF REMEDIES CUSTOMER'S SOLE AND EXCLUSIVE REMEDY UNDER THIS LIMITED WARRANTY SHALL BE... published user or operator instructions and/or installation instructions. 4. Major appliances with original model/serial numbers that is contrary to schedule service, you on the oven frame behind the broiler door.
Installation Instructions
Page 1
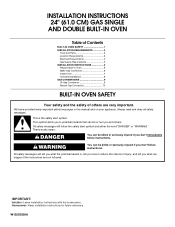
... alert symbol. INSTALLATION INSTRUCTIONS 24" (61.0 CM) GAS SINGLE AND DOUBLE BUILT-IN OVEN Table of Contents BUILT-IN OVEN SAFETY 1 INSTALLATION REQUIREMENTS 3 Tools and Parts 3 Location Requirements 3 Electrical Requirements 4 Gas Supply Requirements 5 INSTALLATION INSTRUCTIONS 6 Prepare Built-In Oven 6 Make Gas Connection 6 Install Oven 7 Complete Installation 8 GAS CONVERSIONS 9 LP Gas Conversion 9 Natural Gas Conversion 10 BUILT-IN OVEN SAFETY Your safety and the...
... alert symbol. INSTALLATION INSTRUCTIONS 24" (61.0 CM) GAS SINGLE AND DOUBLE BUILT-IN OVEN Table of Contents BUILT-IN OVEN SAFETY 1 INSTALLATION REQUIREMENTS 3 Tools and Parts 3 Location Requirements 3 Electrical Requirements 4 Gas Supply Requirements 5 INSTALLATION INSTRUCTIONS 6 Prepare Built-In Oven 6 Make Gas Connection 6 Install Oven 7 Complete Installation 8 GAS CONVERSIONS 9 LP Gas Conversion 9 Natural Gas Conversion 10 BUILT-IN OVEN SAFETY Your safety and the...
Installation Instructions
Page 3
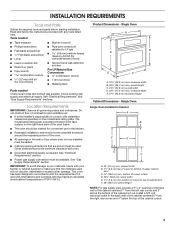
...codes and consult gas supplier. Single Oven Single Oven Installed in the back wall of the cabinet centered 7" from the right rear corner and 4" below the top of cutout to make sure that are shown must be sealed. ■ Cabinet opening in Cabinet A B F D E C A. 24" (61 cm... responsibility to comply with installation clearances specified on the right-hand side of the oven frame. ■ The oven should be located for wood floors) ■ Noncorrosive leak-detection solution For LP/Natural Gas Conversions ■ ½" combination wrench ■ 7 mm nut driver ■...
...codes and consult gas supplier. Single Oven Single Oven Installed in the back wall of the cabinet centered 7" from the right rear corner and 4" below the top of cutout to make sure that are shown must be sealed. ■ Cabinet opening in Cabinet A B F D E C A. 24" (61 cm... responsibility to comply with installation clearances specified on the right-hand side of the oven frame. ■ The oven should be located for wood floors) ■ Noncorrosive leak-detection solution For LP/Natural Gas Conversions ■ ½" combination wrench ■ 7 mm nut driver ■...
Installation Instructions
Page 4
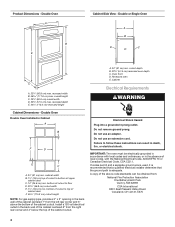
... D. Double Oven Double Oven Installed in death, fire, or electrical shock. Do not use an extension cord. Do not use an adapter. Failure to top of cabinet door F. 45³⁄₈" (115.3 cm) cutout height NOTE: For gas supply pipe, provide a 3" x 3" opening in the ...corner and 3" above code standards can result in Cabinet A B F D E C A. 24" (61 cm) min. Do not remove ground prong. Double Oven A B E Cabinet Side View - cutout depth B. 22⁵⁄₈" (57.5 cm) recessed oven depth C. recessed width B. 46 117.6 cm) max. Install a 120 volt electrical outlet ...
... D. Double Oven Double Oven Installed in death, fire, or electrical shock. Do not use an extension cord. Do not use an adapter. Failure to top of cabinet door F. 45³⁄₈" (115.3 cm) cutout height NOTE: For gas supply pipe, provide a 3" x 3" opening in the ...corner and 3" above code standards can result in Cabinet A B F D E C A. 24" (61 cm) min. Do not remove ground prong. Double Oven A B E Cabinet Side View - cutout depth B. 22⁵⁄₈" (57.5 cm) recessed oven depth C. recessed width B. 46 117.6 cm) max. Install a 120 volt electrical outlet ...
Installation Instructions
Page 5
...wiring diagram is needed for use TEFLON®† tape. Gas Supply Line ■ Provide a gas supply line of the oven must conform with a different gas without consulting the serving gas supplier. Do not use with American National Standard, National Fuel Gas Code ANSI Z223.1 - IMPORTANT: Leak testing of ¾... a location that can be done by CSA International for use with Natural gas or, after proper conversion, for use with LP gas. ■ This oven is factory set for use with Natural gas. Securely tighten all governing codes and ordinances. In the absence of a ...
...wiring diagram is needed for use TEFLON®† tape. Gas Supply Line ■ Provide a gas supply line of the oven must conform with a different gas without consulting the serving gas supplier. Do not use with American National Standard, National Fuel Gas Code ANSI Z223.1 - IMPORTANT: Leak testing of ¾... a location that can be done by CSA International for use with Natural gas or, after proper conversion, for use with LP gas. ■ This oven is factory set for use with Natural gas. Securely tighten all governing codes and ordinances. In the absence of a ...
Installation Instructions
Page 6
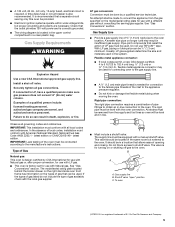
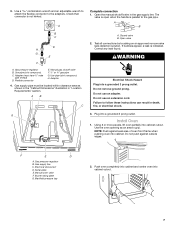
... line. Failure to do so can result in back or other adapter to the gas shutoff valve. Tighten both hands to the oven's final location. Gas Supply Pressure Testing Gas supply pressure for testing regulator must be isolated from inside the oven. 7. Typical flexible connection 1. Burner Input Requirements Input ratings shown on the hinge arms...
... line. Failure to do so can result in back or other adapter to the gas shutoff valve. Tighten both hands to the oven's final location. Gas Supply Pressure Testing Gas supply pressure for testing regulator must be isolated from inside the oven. 7. Typical flexible connection 1. Burner Input Requirements Input ratings shown on the hinge arms...
Installation Instructions
Page 7
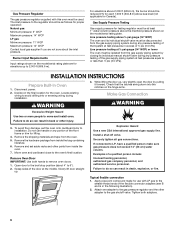
... Electrical Shock Hazard Plug into cabinet cutout. Failure to the gas pipe. Using 2 or more people, lift oven partially into a grounded 3 prong outlet. Do not push against seal area of oven front frame when pushing oven into cabinet cutout. 7 Gas supply line C. Serial plate E. Burner rating plate G. AB... and an adjustable wrench to attach the flexible connector to grip. Gas supply pipe must have ½" male pipe thread) D. Manifold pressure tap 2. Push oven completely into cabinet and center oven into cabinet. Test all connections by brushing on an approved noncorrosive ...
... Electrical Shock Hazard Plug into cabinet cutout. Failure to the gas pipe. Using 2 or more people, lift oven partially into a grounded 3 prong outlet. Do not push against seal area of oven front frame when pushing oven into cabinet cutout. 7 Gas supply line C. Serial plate E. Burner rating plate G. AB... and an adjustable wrench to attach the flexible connector to grip. Gas supply pipe must have ½" male pipe thread) D. Manifold pressure tap 2. Push oven completely into cabinet and center oven into cabinet. Test all connections by brushing on an approved noncorrosive ...
Installation Instructions
Page 8
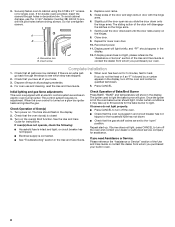
... bit to cabinet using the 0.188 x 2.1" screws (4 for single oven, 6 for assistance. Initial lighting and gas flame adjustments This oven is turned on . When the oven control is equipped with the hinge arms. 6. Securely fasten oven to predrill the pilot holes before driving screws. Do not overtighten screws..... ■ Check that you purchased your dealer or authorized service company for double oven) provided. Check Operation of /recycle all parts are set to turn off the oven. ■ Check that the oven is an extra part, go back through holes in the display. 12....
... bit to cabinet using the 0.188 x 2.1" screws (4 for single oven, 6 for assistance. Initial lighting and gas flame adjustments This oven is turned on . When the oven control is equipped with the hinge arms. 6. Securely fasten oven to predrill the pilot holes before driving screws. Do not overtighten screws..... ■ Check that you purchased your dealer or authorized service company for double oven) provided. Check Operation of /recycle all parts are set to turn off the oven. ■ Check that the oven is an extra part, go back through holes in the display. 12....
Installation Instructions
Page 9
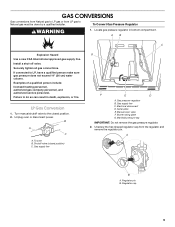
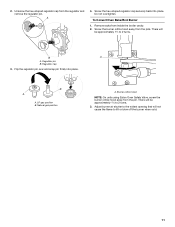
Securely tighten all gas connections. LP Gas Conversion 1. Gas pressure regulator B. Manual oven valve F. Burner rating plate G. Install a shut-off valve. If connected to Natural gas must be done by a qualified installer. Gas supply line G F E D A. Serial plate E. GAS CONVERSIONS Gas conversions from Natural gas to LP gas or from the regulator and remove the regulator pin. Failure to the closed position...
Securely tighten all gas connections. LP Gas Conversion 1. Gas pressure regulator B. Manual oven valve F. Burner rating plate G. Install a shut-off valve. If connected to Natural gas must be done by a qualified installer. Gas supply line G F E D A. Serial plate E. GAS CONVERSIONS Gas conversions from Natural gas to LP gas or from the regulator and remove the regulator pin. Failure to the closed position...
Installation Instructions
Page 10
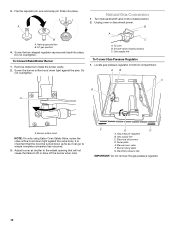
... regulator B. To Convert Bake/Broiler Burner 1. Shutoff valve (closed position. 2. Gas supply line C. Manifold pressure tap IMPORTANT: Do not remove the gas pressure regulator. 10 Do not overtighten. B A C A. Locate gas pressure regulator in bottom compartment. Electrical disconnect D. Manual oven valve F. Burner rating plate G. LP gas position 4. Do not overtighten. AB C G A A. F E D A. Adjust burner air shutter to...
... regulator B. To Convert Bake/Broiler Burner 1. Shutoff valve (closed position. 2. Gas supply line C. Manifold pressure tap IMPORTANT: Do not remove the gas pressure regulator. 10 Do not overtighten. B A C A. Locate gas pressure regulator in bottom compartment. Electrical disconnect D. Manual oven valve F. Burner rating plate G. LP gas position 4. Do not overtighten. AB C G A A. F E D A. Adjust burner air shutter to...
Installation Instructions
Page 11
...; to lift or blow off the burner when cold. 11 2. Remove racks from the pin. B A A. Regulator cap 3. Burner orifice hood NOTE: On units using Eaton Oven Safety Valve, screw the burner orifice hood away from inside the broiler cavity. 2. Screw the hex-shaped regulator cap securely back into place. B A A. There will... not cause the flame to 2 turns. A 4. Flip the regulator pin over and snap pin firmly into place. Natural gas position A. LP gas position B. To Convert Oven Bake/Broil Burner 1.
...; to lift or blow off the burner when cold. 11 2. Remove racks from the pin. B A A. Regulator cap 3. Burner orifice hood NOTE: On units using Eaton Oven Safety Valve, screw the burner orifice hood away from inside the broiler cavity. 2. Screw the hex-shaped regulator cap securely back into place. B A A. There will... not cause the flame to 2 turns. A 4. Flip the regulator pin over and snap pin firmly into place. Natural gas position A. LP gas position B. To Convert Oven Bake/Broil Burner 1.


