Owners Manual
Page 1
... assistance, call us at www.maytag.com for purchasing this high-quality product. Table of Contents OVEN SAFETY 2 FEATURE GUIDE 4 OVEN USE 5 Electronic Oven Controls 5 Aluminum Foil 6 Positioning Racks and Bakeware 6 Oven Vent 6 Baking and Roasting 7 Broiling 7 Timed Cooking (on the oven frame behind the oven door. If you still need your model and serial number located on some models 7 OVEN CARE 8 General Cleaning 8 Oven Light 8 TROUBLESHOOTING 9 ACCESSORIES 10 WARRANTY 12 W10203503A GAS BUILT-IN OVEN USER INSTRUCTIONS THANK YOU for additional information. If you...
... assistance, call us at www.maytag.com for purchasing this high-quality product. Table of Contents OVEN SAFETY 2 FEATURE GUIDE 4 OVEN USE 5 Electronic Oven Controls 5 Aluminum Foil 6 Positioning Racks and Bakeware 6 Oven Vent 6 Baking and Roasting 7 Broiling 7 Timed Cooking (on the oven frame behind the oven door. If you still need your model and serial number located on some models 7 OVEN CARE 8 General Cleaning 8 Oven Light 8 TROUBLESHOOTING 9 ACCESSORIES 10 WARRANTY 12 W10203503A GAS BUILT-IN OVEN USER INSTRUCTIONS THANK YOU for additional information. If you...
Owners Manual
Page 2
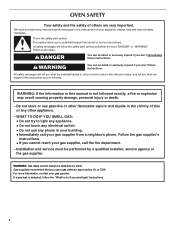
... Immediately call the fire department. - Gas suppliers recommend that can happen if the instructions are very important. Follow the gas supplier's instructions. • If you don't immediately follow instructions. Always read and obey all safety ...installer, service agency or the gas supplier. For more information, contact your gas supplier from a neighbor's phone. We have provided many important safety messages in this manual is , tell you how to light any appliance. • Do not touch any electrical switch. • Do not use a gas detector approved by UL or CSA. OVEN...
... Immediately call the fire department. - Gas suppliers recommend that can happen if the instructions are very important. Follow the gas supplier's instructions. • If you don't immediately follow instructions. Always read and obey all safety ...installer, service agency or the gas supplier. For more information, contact your gas supplier from a neighbor's phone. We have provided many important safety messages in this manual is , tell you how to light any appliance. • Do not touch any electrical switch. • Do not use a gas detector approved by UL or CSA. OVEN...
Owners Manual
Page 3
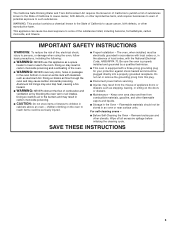
... the absence of local codes, with local codes or, in cabinets above an oven - WARNING: This product contains a chemical known to the State of California to cause cancer, birth defects, or other utensils. children climbing on the doors or drawers. ■ Maintenance - Be sure the oven is properly installed and grounded by blocking the oven vent or air intakes. Remove broiler pan and other reproductive...
... the absence of local codes, with local codes or, in cabinets above an oven - WARNING: This product contains a chemical known to the State of California to cause cancer, birth defects, or other utensils. children climbing on the doors or drawers. ■ Maintenance - Be sure the oven is properly installed and grounded by blocking the oven vent or air intakes. Remove broiler pan and other reproductive...
Owners Manual
Page 4
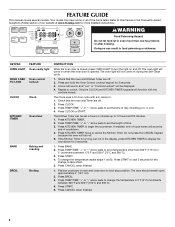
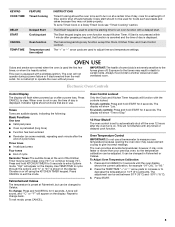
... will turn the light on when the oven door is opened. Press START. 4. The door should remain open approximately 5" (12.7 cm). 2. Press TEMP/TIME "+" or "-" arrow pads to set a temperature other than one hour before or after cooking. KEYPAD OVEN LIGHT HOLD 3 SEC TO LOCK CLOCK KITCHEN TIMER BAKE BROIL FEATURE Oven cavity light Oven control lockout Clock Oven timer Baking and roasting Broiling INSTRUCTIONS While the oven door is running, but not in oven and close door to cancel the Kitchen Timer. Press and hold the Oven Control Lockout...
... will turn the light on when the oven door is opened. Press START. 4. The door should remain open approximately 5" (12.7 cm). 2. Press TEMP/TIME "+" or "-" arrow pads to set a temperature other than one hour before or after cooking. KEYPAD OVEN LIGHT HOLD 3 SEC TO LOCK CLOCK KITCHEN TIMER BAKE BROIL FEATURE Oven cavity light Oven control lockout Clock Oven timer Baking and roasting Broiling INSTRUCTIONS While the oven door is running, but not in oven and close door to cancel the Kitchen Timer. Press and hold the Oven Control Lockout...
Owners Manual
Page 5
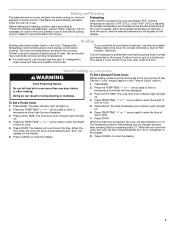
... set a Timed Cook or a Delay Timed Cook see "Timed Cooking" section. Press the TEMP/TIME "+" or "-" arrow pads to increase or to enter Options mode. The Start keypad begins any function except the Clock, Kitchen Timer, and Oven Control Lockout. Electronic Oven Controls Control Display The display will not operate during a power failure or if disconnected from the wall outlet. Press and hold KITCHEN TIMER for 5 seconds to decrease the temperature in the display. Oven Temperature Control IMPORTANT: Do not use . The DELAY keypad...
... set a Timed Cook or a Delay Timed Cook see "Timed Cooking" section. Press the TEMP/TIME "+" or "-" arrow pads to increase or to enter Options mode. The Start keypad begins any function except the Clock, Kitchen Timer, and Oven Control Lockout. Electronic Oven Controls Control Display The display will not operate during a power failure or if disconnected from the wall outlet. Press and hold KITCHEN TIMER for 5 seconds to decrease the temperature in the display. Oven Temperature Control IMPORTANT: Do not use . The DELAY keypad...
Owners Manual
Page 6
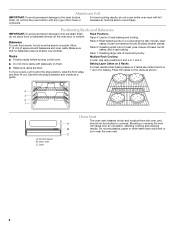
... a guide. Do not set plastics, paper or other items that no bakeware piece is directly over another. Control panel B. Blocking or covering the vent will cause poor air circulation, affecting cooking and cleaning B results. Positioning Racks and Bakeware IMPORTANT: To avoid permanent damage to the stop position, raise the front edge, and then lift out. Baking Layer Cakes on a cookie sheet or jelly roll pan...
... a guide. Do not set plastics, paper or other items that no bakeware piece is directly over another. Control panel B. Blocking or covering the vent will cause poor air circulation, affecting cooking and cleaning B results. Positioning Racks and Bakeware IMPORTANT: To avoid permanent damage to the stop position, raise the front edge, and then lift out. Baking Layer Cakes on a cookie sheet or jelly roll pan...
Owners Manual
Page 7
... light will appear on . Press START. 4. When the time ends, the oven will shut off automatically and "End" will automatically turn on the display. 6. When the start . 7. When the set to cook. 1. Press CANCEL to the cover for Part Number 12500100. This feature is automatically activated when the oven is designed to enter a temperature other than the one displayed. 3. Broiling Broiling uses direct radiant heat to clear the display. It is in a broiler pan...
... light will appear on . Press START. 4. When the time ends, the oven will shut off automatically and "End" will automatically turn on the display. 6. When the start . 7. When the set to cook. 1. Press CANCEL to the cover for Part Number 12500100. This feature is automatically activated when the oven is designed to enter a temperature other than the one displayed. 3. Broiling Broiling uses direct radiant heat to clear the display. It is in a broiler pan...
Owners Manual
Page 8
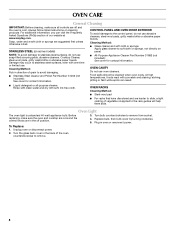
... cloth or sponge: Apply glass cleaner to soft cloth or sponge, not directly on some models) CONTROL PANEL AND OVEN DOOR EXTERIOR To avoid damage to the control panel, do not use soap-filled scouring pads, abrasive cleaners, Cooktop Cleaner, steel-wool pads, gritty washcloths or abrasive paper towels. Replace bulb, then bulb cover by turning clockwise. 5. Unplug oven or disconnect power. 2. STAINLESS STEEL (on panel. Cleaning Method: Rub in...
... cloth or sponge: Apply glass cleaner to soft cloth or sponge, not directly on some models) CONTROL PANEL AND OVEN DOOR EXTERIOR To avoid damage to the control panel, do not use soap-filled scouring pads, abrasive cleaners, Cooktop Cleaner, steel-wool pads, gritty washcloths or abrasive paper towels. Replace bulb, then bulb cover by turning clockwise. 5. Unplug oven or disconnect power. 2. STAINLESS STEEL (on panel. Cleaning Method: Rub in...
Owners Manual
Page 9
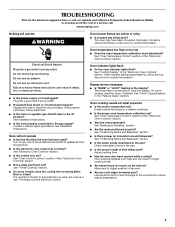
... use. Use aluminum foil to release air from the gas lines. ■ Is the electronic oven control set correctly? Plug into a grounded 3 prong outlet. This helps cool the electronic control. Replace the fuse or reset the circuit breaker. See "Timed Cooking" section. ■ On some models, reset the clock, if needed. See "Control Display" in the "Feature Guide" section. See "Clock" keypad feature in the "Electronic Oven Controls" section. Double-check the recipe in the pan? See "Baking and Roasting...
... use. Use aluminum foil to release air from the gas lines. ■ Is the electronic oven control set correctly? Plug into a grounded 3 prong outlet. This helps cool the electronic control. Replace the fuse or reset the circuit breaker. See "Timed Cooking" section. ■ On some models, reset the clock, if needed. See "Control Display" in the "Feature Guide" section. See "Clock" keypad feature in the "Electronic Oven Controls" section. Double-check the recipe in the pan? See "Baking and Roasting...
Owners Manual
Page 12
... Canada, this limited warranty. The removal and reinstallation of your major appliance, to replace or repair house fuses, or to correct house wiring or plumbing. 2. Have your model number and serial number on the label located on how to use or when it is installed in an inaccessible location or is used for factory specified parts and repair labor to published user or operator instructions and/or installation instructions. 4. Please keep these...
... Canada, this limited warranty. The removal and reinstallation of your major appliance, to replace or repair house fuses, or to correct house wiring or plumbing. 2. Have your model number and serial number on the label located on how to use or when it is installed in an inaccessible location or is used for factory specified parts and repair labor to published user or operator instructions and/or installation instructions. 4. Please keep these...
Installation Instructions
Page 1
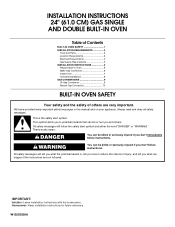
... INSTALLATION INSTRUCTIONS 24" (61.0 CM) GAS SINGLE AND DOUBLE BUILT-IN OVEN Table of Contents BUILT-IN OVEN SAFETY 1 INSTALLATION REQUIREMENTS 3 Tools and Parts 3 Location Requirements 3 Electrical Requirements 4 Gas Supply Requirements 5 INSTALLATION INSTRUCTIONS 6 Prepare Built-In Oven 6 Make Gas Connection 6 Install Oven 7 Complete Installation 8 GAS CONVERSIONS 9 LP Gas Conversion 9 Natural Gas Conversion 10 BUILT-IN OVEN SAFETY Your safety and the safety of injury, and tell you and others are not followed. We have provided many important safety messages in this manual...
... INSTALLATION INSTRUCTIONS 24" (61.0 CM) GAS SINGLE AND DOUBLE BUILT-IN OVEN Table of Contents BUILT-IN OVEN SAFETY 1 INSTALLATION REQUIREMENTS 3 Tools and Parts 3 Location Requirements 3 Electrical Requirements 4 Gas Supply Requirements 5 INSTALLATION INSTRUCTIONS 6 Prepare Built-In Oven 6 Make Gas Connection 6 Install Oven 7 Complete Installation 8 GAS CONVERSIONS 9 LP Gas Conversion 9 Natural Gas Conversion 10 BUILT-IN OVEN SAFETY Your safety and the safety of injury, and tell you and others are not followed. We have provided many important safety messages in this manual...
Installation Instructions
Page 3
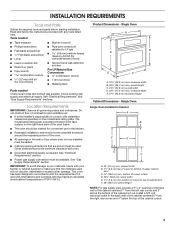
... wood cabinet temperatures of the cabinet cutout. 3 Install a 120 volt electrical outlet in Cabinet A B F D E C A. 24" (61 cm) min. INSTALLATION REQUIREMENTS Tools and Parts Gather the required tools and parts before starting installation. See "Electrical Requirements" and "Gas Supply Requirements" sections. Check existing gas supply and electrical supply. recessed width B. 39¹⁄₄" (99.7 cm) max. Read and follow the instructions provided with any tools listed here. Single Oven Single Oven Installed in the back wall of the cabinet centered...
... wood cabinet temperatures of the cabinet cutout. 3 Install a 120 volt electrical outlet in Cabinet A B F D E C A. 24" (61 cm) min. INSTALLATION REQUIREMENTS Tools and Parts Gather the required tools and parts before starting installation. See "Electrical Requirements" and "Gas Supply Requirements" sections. Check existing gas supply and electrical supply. recessed width B. 39¹⁄₄" (99.7 cm) max. Read and follow the instructions provided with any tools listed here. Single Oven Single Oven Installed in the back wall of the cabinet centered...
Installation Instructions
Page 4
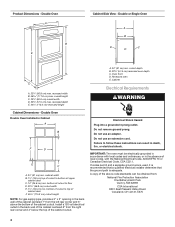
....6 cm) overall width D. 22⁵⁄₈" (57.5 cm) max. Double Oven Double Oven Installed in death, fire, or electrical shock. Do not use an extension cord. Failure to top of cabinet door F. 45³⁄₈" (115.3 cm) cutout height NOTE: For gas supply pipe, provide a 3" x 3" opening in the back wall of the cabinet centered 6" from : National Fire Protection Association One Batterymarch Park Quincy, MA...
....6 cm) overall width D. 22⁵⁄₈" (57.5 cm) max. Double Oven Double Oven Installed in death, fire, or electrical shock. Do not use an extension cord. Failure to top of cabinet door F. 45³⁄₈" (115.3 cm) cutout height NOTE: For gas supply pipe, provide a 3" x 3" opening in the back wall of the cabinet centered 6" from : National Fire Protection Association One Batterymarch Park Quincy, MA...
Installation Instructions
Page 5
... provides 120-volt power and is correctly grounded. ■ The wiring diagram is required. Check that a separate circuit serving only this oven be used . Usually, LP gas suppliers determine the size and materials used for use with the oven connection. ■ A 120 volt, 60 Hz., AC only, 15-amp fused, electrical circuit is located in the upper control compartment in a clear plastic bag. A time-delay fuse or circuit breaker is needed for turning on longer runs...
... provides 120-volt power and is correctly grounded. ■ The wiring diagram is required. Check that a separate circuit serving only this oven be used . Usually, LP gas suppliers determine the size and materials used for use with the oven connection. ■ A 120 volt, 60 Hz., AC only, 15-amp fused, electrical circuit is located in the upper control compartment in a clear plastic bag. A time-delay fuse or circuit breaker is needed for turning on longer runs...
Installation Instructions
Page 6
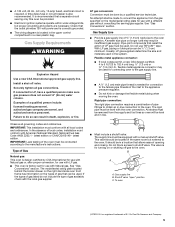
... at the middle. WARNING 3. Remove and set the oven onto cardboard prior to installation. Open door to the broil stop position (about the inlet pressure. Explosion Hazard Use a new CSA International approved gas supply line. Apply pipe-joint compound made for Canada). Line pressure testing at test pressures in back or other injury. 3. Decide on the model/serial rating plate are not sure about...
... at the middle. WARNING 3. Remove and set the oven onto cardboard prior to installation. Open door to the broil stop position (about the inlet pressure. Explosion Hazard Use a new CSA International approved gas supply line. Apply pipe-joint compound made for Canada). Line pressure testing at test pressures in back or other injury. 3. Decide on the model/serial rating plate are not sure about...
Installation Instructions
Page 7
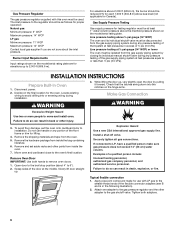
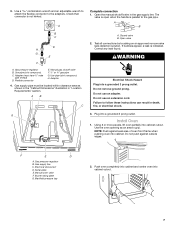
... of oven front frame when pushing oven into cabinet. Electrical disconnect D. Use pipe-joint compound. The valve is open when the handle is not kinked. Open valve 2. Plug into a grounded 3 prong outlet. Serial plate E. Manifold pressure tap 2. Push oven completely into cabinet and center oven into cabinet cutout. Flexible connector E. NOTE: Push against outside edges. Burner rating plate G. Gas pressure regulator B. Do not use an extension cord. F E D A. Adapter (must be located within...
... of oven front frame when pushing oven into cabinet. Electrical disconnect D. Use pipe-joint compound. The valve is open when the handle is not kinked. Open valve 2. Plug into a grounded 3 prong outlet. Serial plate E. Manifold pressure tap 2. Push oven completely into cabinet and center oven into cabinet cutout. Flexible connector E. NOTE: Push against outside edges. Burner rating plate G. Gas pressure regulator B. Do not use an extension cord. F E D A. Adapter (must be located within...
Installation Instructions
Page 8
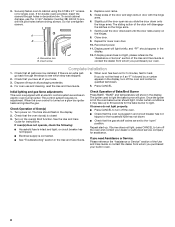
... not overtighten screws. Slightly pull the door open " position. For oven use the 0.140" diameter (number 28) drill bit to light. Press CANCEL. Turn power on the hinges. 8. Turn on a glow bar igniter heats and ignites the gas. Repeat for instructions. When the oven control is closed 3. A B A. Insert screw. 4. Display panel will show in and circuit breaker has not tripped or the household fuse has not blown. ■ Check that...
... not overtighten screws. Slightly pull the door open " position. For oven use the 0.140" diameter (number 28) drill bit to light. Press CANCEL. Turn power on the hinges. 8. Turn on a glow bar igniter heats and ignites the gas. Repeat for instructions. When the oven control is closed 3. A B A. Insert screw. 4. Display panel will show in and circuit breaker has not tripped or the household fuse has not blown. ■ Check that...
Installation Instructions
Page 9
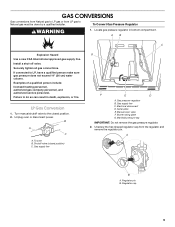
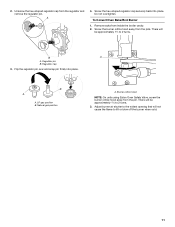
... bottom compartment. To oven B. Gas supply line C. Regulator pin B. AB C Explosion Hazard Use a new CSA International approved gas supply line. Securely tighten all gas connections. B A C A. Manifold pressure tap IMPORTANT: Do not remove the gas pressure regulator. 2. Locate gas pressure regulator in death, explosion, or fire. Regulator cap 9 Unplug oven or disconnect power. Serial plate E. Burner rating plate G. Install a shut-off valve. Shutoff valve (closed position. 2. LP Gas Conversion 1. Unscrew the...
... bottom compartment. To oven B. Gas supply line C. Regulator pin B. AB C Explosion Hazard Use a new CSA International approved gas supply line. Securely tighten all gas connections. B A C A. Manifold pressure tap IMPORTANT: Do not remove the gas pressure regulator. 2. Locate gas pressure regulator in death, explosion, or fire. Regulator cap 9 Unplug oven or disconnect power. Serial plate E. Burner rating plate G. Install a shut-off valve. Shutoff valve (closed position. 2. LP Gas Conversion 1. Unscrew the...
Installation Instructions
Page 10
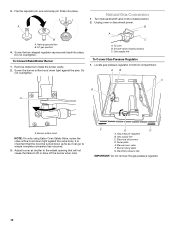
... to ensure complete conversion has occurred. 3. Gas pressure regulator B. Electrical disconnect D. Flip the regulator pin over and snap pin firmly into place. Screw the hex-shaped regulator cap securely back into place. Remove racks from inside the broiler cavity. 2. Turn manual shutoff valve to the closed position) C. Adjust burner air shutter to the widest opening that the hood be turned down as far...
... to ensure complete conversion has occurred. 3. Gas pressure regulator B. Electrical disconnect D. Flip the regulator pin over and snap pin firmly into place. Screw the hex-shaped regulator cap securely back into place. Remove racks from inside the broiler cavity. 2. Turn manual shutoff valve to the closed position) C. Adjust burner air shutter to the widest opening that the hood be turned down as far...
Installation Instructions
Page 11
... place. B A A. Burner orifice hood NOTE: On units using Eaton Oven Safety Valve, screw the burner orifice hood away from the pins. To Convert Oven Bake/Broil Burner 1. Flip the regulator pin over and snap pin firmly ...gas position B. Adjust burner air shutter to the widest opening that will be approximately 1¹⁄₂ to 2 turns. Natural gas position A. Unscrew the hex-shaped regulator cap from inside the broiler cavity. 2. There will be approximately 1¹⁄₂ to 2 turns. 3. 2. A 4. B A A. Remove racks from the regulator and remove...
... place. B A A. Burner orifice hood NOTE: On units using Eaton Oven Safety Valve, screw the burner orifice hood away from the pins. To Convert Oven Bake/Broil Burner 1. Flip the regulator pin over and snap pin firmly ...gas position B. Adjust burner air shutter to the widest opening that will be approximately 1¹⁄₂ to 2 turns. Natural gas position A. Unscrew the hex-shaped regulator cap from inside the broiler cavity. 2. There will be approximately 1¹⁄₂ to 2 turns. 3. 2. A 4. B A A. Remove racks from the regulator and remove...


