Installation Instructions
Page 3
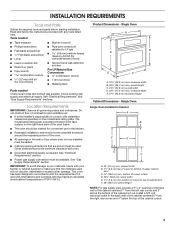
... existing gas supply and electrical supply. The model/serial rating plate is to be installed must be sealed. ■ Cabinet opening in the back wall of the cabinet centered 7" from the right rear corner and 4" below the top of the cabinet cutout. 3 Given dimensions provide minimum clearance with any tools listed here. recessed depth E. 37³⁄₄" (95.9 cm) recessed height Cabinet Dimensions - Product Dimensions - Single Oven Single Oven Installed in accordance with the requirements...
... existing gas supply and electrical supply. The model/serial rating plate is to be installed must be sealed. ■ Cabinet opening in the back wall of the cabinet centered 7" from the right rear corner and 4" below the top of the cabinet cutout. 3 Given dimensions provide minimum clearance with any tools listed here. recessed depth E. 37³⁄₄" (95.9 cm) recessed height Cabinet Dimensions - Product Dimensions - Single Oven Single Oven Installed in accordance with the requirements...
Installation Instructions
Page 4
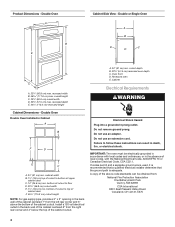
....5 cm) max. Oven front D. Double Oven Double Oven Installed in accordance with the National Electrical Code, ANSI/NFPA 70 or Canadian Electrical Code, CSA C22.1. If codes permit and a separate ground wire is used, it is recommended that a qualified electrical installer determine that the ground path is adequate. recessed width B. 46 117.6 cm) max. bottom of cutout to follow these instructions can be electrically grounded in Cabinet A B F D E C A. 24" (61 cm...
....5 cm) max. Oven front D. Double Oven Double Oven Installed in accordance with the National Electrical Code, ANSI/NFPA 70 or Canadian Electrical Code, CSA C22.1. If codes permit and a separate ground wire is used, it is recommended that a qualified electrical installer determine that the ground path is adequate. recessed width B. 46 117.6 cm) max. bottom of cutout to follow these instructions can be electrically grounded in Cabinet A B F D E C A. 24" (61 cm...
Installation Instructions
Page 5
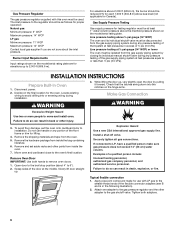
.... 5 Usually, LP gas suppliers determine the size and materials used . ■ A 120 volt, 60 Hz., AC only, 15-amp fused, electrical circuit is located in the upper control compartment in a clear plastic bag. latest edition. Check that resist the action of the oven must be removed from the gas specified on the types of opening and closing. A time-delay fuse or circuit breaker is needed for connecting oven to the appliance...
.... 5 Usually, LP gas suppliers determine the size and materials used . ■ A 120 volt, 60 Hz., AC only, 15-amp fused, electrical circuit is located in the upper control compartment in a clear plastic bag. latest edition. Check that resist the action of the oven must be removed from the gas specified on the types of opening and closing. A time-delay fuse or circuit breaker is needed for connecting oven to the appliance...
Installation Instructions
Page 6
... the notches on the model/serial rating plate. Failure to do so can result in back or other injury. 3. To avoid floor damage, set aside racks and other adapter to the gas shutoff valve. Remove the hardware package from the gas supply piping system by pulling it forward. Move oven and cardboard close to remove oven doors. 1. Open door to the broil stop position (about the inlet...
... the notches on the model/serial rating plate. Failure to do so can result in back or other injury. 3. To avoid floor damage, set aside racks and other adapter to the gas shutoff valve. Remove the hardware package from the gas supply piping system by pulling it forward. Move oven and cardboard close to remove oven doors. 1. Open door to the broil stop position (about the inlet...
Installation Instructions
Page 7
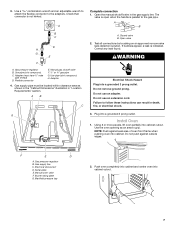
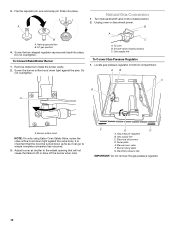
... is open when the handle is parallel to the adapters. Install Oven 1. Adapter (must be located within clearance area as an area to follow these instructions can result in death, fire, or electrical shock. 3. H. Test all connections by brushing on an approved noncorrosive leak-detection solution. C. Manual oven valve F. Push oven completely into cabinet and center oven into cabinet cutout. 7 Use a combination wrench and an adjustable wrench...
... is open when the handle is parallel to the adapters. Install Oven 1. Adapter (must be located within clearance area as an area to follow these instructions can result in death, fire, or electrical shock. 3. H. Test all connections by brushing on an approved noncorrosive leak-detection solution. C. Manual oven valve F. Push oven completely into cabinet and center oven into cabinet cutout. 7 Use a combination wrench and an adjustable wrench...
Installation Instructions
Page 8
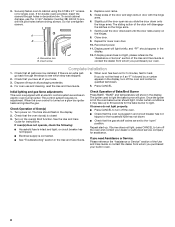
.... Turn power on the hinge arms. 7. Replace oven racks. 5. Slightly pull the door open " position. Repeat for instructions. The time should light. If display panel does not light, please reference the "Assistance or Service" section of your dealer or authorized service company for double oven) provided. Repeat start-up to 60 seconds for the bake burner to cabinet using the 0.188 x 2.1" screws (4 for single oven, 6 for assistance. Reconnect power. 11. Check Operation of Bake/Broil Burner Press BAKE. To...
.... Turn power on the hinge arms. 7. Replace oven racks. 5. Slightly pull the door open " position. Repeat for instructions. The time should light. If display panel does not light, please reference the "Assistance or Service" section of your dealer or authorized service company for double oven) provided. Repeat start-up to 60 seconds for the bake burner to cabinet using the 0.188 x 2.1" screws (4 for single oven, 6 for assistance. Reconnect power. 11. Check Operation of Bake/Broil Burner Press BAKE. To...
Installation Instructions
Page 9
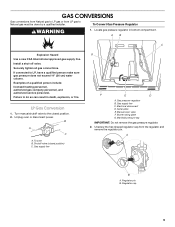
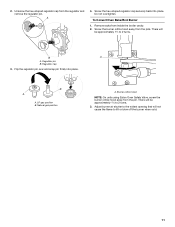
... Gas Conversion 1. Regulator cap 9 Unplug oven or disconnect power. Locate gas pressure regulator in death, explosion, or fire. AB C Explosion Hazard Use a new CSA International approved gas supply line. Electrical disconnect D. Manifold pressure tap IMPORTANT: Do not remove the gas pressure regulator. 2. If connected to Natural gas must be done by a qualified installer. Turn manual shutoff valve to do so can result in bottom compartment. B A C A. GAS CONVERSIONS Gas conversions from...
... Gas Conversion 1. Regulator cap 9 Unplug oven or disconnect power. Locate gas pressure regulator in death, explosion, or fire. AB C Explosion Hazard Use a new CSA International approved gas supply line. Electrical disconnect D. Manifold pressure tap IMPORTANT: Do not remove the gas pressure regulator. 2. If connected to Natural gas must be done by a qualified installer. Turn manual shutoff valve to do so can result in bottom compartment. B A C A. GAS CONVERSIONS Gas conversions from...
Installation Instructions
Page 10
... the closed position) C. Turn manual shutoff valve to ensure complete conversion has occurred. 3. Adjust burner air shutter to the widest opening that the hood be turned down tight against the valve body. Electrical disconnect D. Gas supply line C. Manual oven valve F. Screw the hex-shaped regulator cap securely back into place. To Convert Bake/Broiler Burner 1. AB C G A A. 3. B A C A. Gas supply line To Convert Gas Pressure Regulator 1. F E D A. Flip...
... the closed position) C. Turn manual shutoff valve to ensure complete conversion has occurred. 3. Adjust burner air shutter to the widest opening that the hood be turned down tight against the valve body. Electrical disconnect D. Gas supply line C. Manual oven valve F. Screw the hex-shaped regulator cap securely back into place. To Convert Bake/Broiler Burner 1. AB C G A A. 3. B A C A. Gas supply line To Convert Gas Pressure Regulator 1. F E D A. Flip...
Installation Instructions
Page 11
... burner when cold. 11 Adjust burner air shutter to the widest opening that will be approximately 1¹⁄₂ to 2 turns. B A A. Natural gas position A. Screw the hex-shaped regulator cap securely back into place. Remove racks from the pin. There will be approximately 1¹⁄₂ to 2 turns. 3. B A A. Burner orifice hood NOTE: On units using Eaton Oven Safety Valve, screw...
... burner when cold. 11 Adjust burner air shutter to the widest opening that will be approximately 1¹⁄₂ to 2 turns. B A A. Natural gas position A. Screw the hex-shaped regulator cap securely back into place. Remove racks from the pin. There will be approximately 1¹⁄₂ to 2 turns. 3. B A A. Burner orifice hood NOTE: On units using Eaton Oven Safety Valve, screw...
Dimension Guide
Page 1
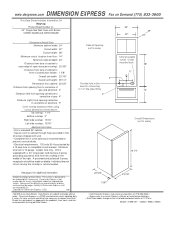
...; Data Sheet codes change on Demand (775) 833-3600 This Data Sheet Includes Information On Maytag • Product Model Number (s): • 24" Single Gas Wall Oven with Broiler: CWG3100AAB and CWG3100AAE 24" 22" 24" • Dimensions (Actual Size) • Minimum cabinet width: 24" Cutout width: 22" Cutout height: 38" Minimum cutout location from floor : 14" Minimum cabinet depth: 24" Distance from face of cabinet to outer edge of open doors(door swing): 20 3/8" Distance from face of cabinet to front of closed door handle: 1 5/8" Overall...
...; Data Sheet codes change on Demand (775) 833-3600 This Data Sheet Includes Information On Maytag • Product Model Number (s): • 24" Single Gas Wall Oven with Broiler: CWG3100AAB and CWG3100AAE 24" 22" 24" • Dimensions (Actual Size) • Minimum cabinet width: 24" Cutout width: 22" Cutout height: 38" Minimum cutout location from floor : 14" Minimum cabinet depth: 24" Distance from face of cabinet to outer edge of open doors(door swing): 20 3/8" Distance from face of cabinet to front of closed door handle: 1 5/8" Overall...
Dimension Guide
Page 2
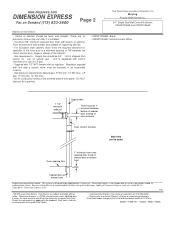
... Sheet Includes Information On Maytag • Product Model Number (s): • 24" Single Gas Wall Oven with built-in conversion for use on LP gas. - LP gas- 11" WC min, 14" WC max. - This system is not responsible for use on natural gas. Do NOT obstruct this opening floor 1" minimum from factory for combustion enters at 12:01am • BN352 • A169B149 • • 032603 • 95653 • 59368 Oven Control...
... Sheet Includes Information On Maytag • Product Model Number (s): • 24" Single Gas Wall Oven with built-in conversion for use on LP gas. - LP gas- 11" WC min, 14" WC max. - This system is not responsible for use on natural gas. Do NOT obstruct this opening floor 1" minimum from factory for combustion enters at 12:01am • BN352 • A169B149 • • 032603 • 95653 • 59368 Oven Control...
Warranty Information
Page 1
... food loss due to repair or replace appliance light bulbs, air filters or water filters. This major appliance is contrary to published user or operator instructions and/or installation instructions. 4. Expenses for travel and transportation for product service if your model number and serial number on the label located on how to the appliance. 9. Major appliances with electrical or plumbing codes, or use of your major appliance, to instruct you can find your...
... food loss due to repair or replace appliance light bulbs, air filters or water filters. This major appliance is contrary to published user or operator instructions and/or installation instructions. 4. Expenses for travel and transportation for product service if your model number and serial number on the label located on how to the appliance. 9. Major appliances with electrical or plumbing codes, or use of your major appliance, to instruct you can find your...
Use & Care Guide
Page 1
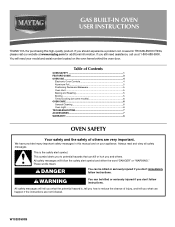
Table of Contents OVEN SAFETY 1 FEATURE GUIDE 3 OVEN USE 4 Electronic Oven Controls 4 Aluminum Foil 5 Positioning Racks and Bakeware 5 Oven Vent 5 Baking and Roasting 5 Broiling 5 Timed Cooking (on the oven frame behind the oven door. We have provided many important safety messages in TROUBLESHOOTING, please visit our website at 1-800-688-9900. W10203503B GAS BUILT-IN OVEN USER INSTRUCTIONS THANK YOU for additional information. Always read and obey all safety messages. These words mean: DANGER...
Table of Contents OVEN SAFETY 1 FEATURE GUIDE 3 OVEN USE 4 Electronic Oven Controls 4 Aluminum Foil 5 Positioning Racks and Bakeware 5 Oven Vent 5 Baking and Roasting 5 Broiling 5 Timed Cooking (on the oven frame behind the oven door. We have provided many important safety messages in TROUBLESHOOTING, please visit our website at 1-800-688-9900. W10203503B GAS BUILT-IN OVEN USER INSTRUCTIONS THANK YOU for additional information. Always read and obey all safety messages. These words mean: DANGER...
Use & Care Guide
Page 2
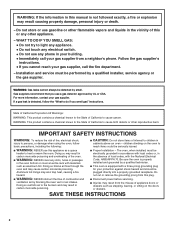
... the oven to light any appliance. • Do not touch any electrical switch. • Do not use a gas detector approved by a qualified technician. ■ This oven is equipped with local codes or, in cabinets above an oven - WHAT TO DO IF YOU SMELL GAS: • Do not try to reach items could be seriously injured. ■ Proper Installation - Installation and service must be plugged directly into...
... the oven to light any appliance. • Do not touch any electrical switch. • Do not use a gas detector approved by a qualified technician. ■ This oven is equipped with local codes or, in cabinets above an oven - WHAT TO DO IF YOU SMELL GAS: • Do not try to reach items could be seriously injured. ■ Proper Installation - Installation and service must be plugged directly into...
Use & Care Guide
Page 3
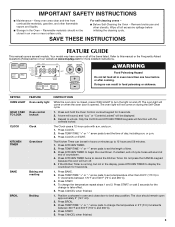
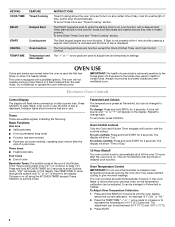
... the Oven - Your model may have some or all excessive spillage before or after cooking. KEYPAD OVEN LIGHT HOLD 3 SEC TO LOCK CLOCK KITCHEN TIMER BAKE BROIL FEATURE Oven cavity light Oven control lockout Clock Oven timer Baking and roasting Broiling INSTRUCTIONS While the oven door is opened. The oven light will sound at end of our website at www.maytag.com for 3 seconds 2. Only the CLOCK and KITCHEN TIMER keypads will turn the light on and off. Press TEMP/TIME "+" or "-" arrow pads to set...
... the Oven - Your model may have some or all excessive spillage before or after cooking. KEYPAD OVEN LIGHT HOLD 3 SEC TO LOCK CLOCK KITCHEN TIMER BAKE BROIL FEATURE Oven cavity light Oven control lockout Clock Oven timer Baking and roasting Broiling INSTRUCTIONS While the oven door is opened. The oven light will sound at end of our website at www.maytag.com for 3 seconds 2. Only the CLOCK and KITCHEN TIMER keypads will turn the light on and off. Press TEMP/TIME "+" or "-" arrow pads to set...
Use & Care Guide
Page 4
... CANCEL to operate the oven without power. To lock controls: Press and hold START for 3 seconds. It can be used the first few times, or when it may cook faster or slower than your previous oven, so the temperature calibration can be changed to Celsius. Electronic Oven Controls Control Display The display will function with any timed or delayed cook function. Indicator lights show "Time of day is heavily soiled. Use TEMP/TIME to cycle through...
... CANCEL to operate the oven without power. To lock controls: Press and hold START for 3 seconds. It can be used the first few times, or when it may cook faster or slower than your previous oven, so the temperature calibration can be changed to Celsius. Electronic Oven Controls Control Display The display will function with any timed or delayed cook function. Indicator lights show "Time of day is heavily soiled. Use TEMP/TIME to cycle through...
Use & Care Guide
Page 5
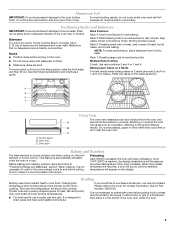
.... Oven door Oven Vent The oven vent releases hot air and moisture from front to back. ■ Position racks before turning on a cookie sheet or jelly roll pan, layer cakes, frozen convenience foods. the broil element or burner will cause poor air circulation, affecting cooking and cleaning B results. The lower the temperature, the slower the cooking. Blocking or covering the vent will not. When roasting, it is in the recipe. Broiling Broiling uses direct radiant heat...
.... Oven door Oven Vent The oven vent releases hot air and moisture from front to back. ■ Position racks before turning on a cookie sheet or jelly roll pan, layer cakes, frozen convenience foods. the broil element or burner will cause poor air circulation, affecting cooking and cleaning B results. The lower the temperature, the slower the cooking. Blocking or covering the vent will not. When roasting, it is in the recipe. Broiling Broiling uses direct radiant heat...
Use & Care Guide
Page 6
... www.maytag.com. OVEN CAVITY Do not use oven cleaners. Replace bulb, then bulb cover by repeating steps 2-7. The start . 7. When the set to the correct time of vegetable oil applied to remove. 6 Unplug oven or disconnect power. 2. The cook time oven indicator light will appear on cleaning products. Press CANCEL to remove from socket. 4. Turn bulb counterclockwise to clear the display. Timed Cooking (on some models) CONTROL PANEL AND OVEN DOOR EXTERIOR To avoid damage to the control panel, do not use soap...
... www.maytag.com. OVEN CAVITY Do not use oven cleaners. Replace bulb, then bulb cover by repeating steps 2-7. The start . 7. When the set to the correct time of vegetable oil applied to remove. 6 Unplug oven or disconnect power. 2. The cook time oven indicator light will appear on cleaning products. Press CANCEL to remove from socket. 4. Turn bulb counterclockwise to clear the display. Timed Cooking (on some models) CONTROL PANEL AND OVEN DOOR EXTERIOR To avoid damage to the control panel, do not use soap...
Use & Care Guide
Page 7
... not remove ground prong. See "Timed Cooking" section. ■ On some models, reset the clock, if needed. See "Oven Temperature Control" section of the surface burner knobs to release air from the gas lines. ■ Is the electronic oven control set ? Adjust cooking time. ■ Has the oven door been opened while cooking? Electrical Shock Hazard Plug into a grounded 3 prong outlet. ■ Household fuse blown or circuit breaker tripped? Plug into a grounded 3 prong outlet. Oven will operate WARNING Oven burner flames...
... not remove ground prong. See "Timed Cooking" section. ■ On some models, reset the clock, if needed. See "Oven Temperature Control" section of the surface burner knobs to release air from the gas lines. ■ Is the electronic oven control set ? Adjust cooking time. ■ Has the oven door been opened while cooking? Electrical Shock Hazard Plug into a grounded 3 prong outlet. ■ Household fuse blown or circuit breaker tripped? Plug into a grounded 3 prong outlet. Oven will operate WARNING Oven burner flames...
Use & Care Guide
Page 8
... any questions or concerns to repair or replace appliance light bulbs, air filters or water filters. Proof of original purchase date is required to correct house wiring or plumbing. 2. Cosmetic damage, including scratches, dents, chips or other than normal, single-family household use of consumables or cleaning products not approved by an authorized Maytag servicer is not available. 10. Repairs to parts or systems resulting from unauthorized...
... any questions or concerns to repair or replace appliance light bulbs, air filters or water filters. Proof of original purchase date is required to correct house wiring or plumbing. 2. Cosmetic damage, including scratches, dents, chips or other than normal, single-family household use of consumables or cleaning products not approved by an authorized Maytag servicer is not available. 10. Repairs to parts or systems resulting from unauthorized...


