Owners Manual
Page 1
You will need assistance, call us at www.maytag.com for purchasing this manual and on your model and serial number located on some models 5 OVEN CARE 6 Self-Cleaning Cycle (on the oven frame behind the oven door. Always read and obey all safety messages. These words mean: ... should experience a problem not covered in this high-quality product. All safety messages will tell you and others are not followed. ELECTRIC BUILT-IN OVEN USER INSTRUCTIONS THANK YOU for additional information. If you don't immediately follow the safety alert symbol and either the word "DANGER" ...
You will need assistance, call us at www.maytag.com for purchasing this manual and on your model and serial number located on some models 5 OVEN CARE 6 Self-Cleaning Cycle (on the oven frame behind the oven door. Always read and obey all safety messages. These words mean: ... should experience a problem not covered in this high-quality product. All safety messages will tell you and others are not followed. ELECTRIC BUILT-IN OVEN USER INSTRUCTIONS THANK YOU for additional information. If you don't immediately follow the safety alert symbol and either the word "DANGER" ...

Owners Manual
Page 2
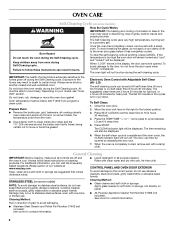
... Door Gasket - This appliance can result in Manual. ■ Before Self-Cleaning the Oven - Refer to this manual or the Frequently Asked Questions (FAQs) section of our website at www.maytag.com for more than one hour before removing or replacing food. ■ Do Not ...are dark in injury. ■ Keep Oven Vent Ducts Unobstructed. ■ Placement of oven doors. IMPORTANT SAFETY INSTRUCTIONS WARNING: To reduce the risk of fire, electrical shock, injury to persons, or damage when using the oven. ■ User Servicing - Be sure the oven is essential for Warming or Heating the...
... Door Gasket - This appliance can result in Manual. ■ Before Self-Cleaning the Oven - Refer to this manual or the Frequently Asked Questions (FAQs) section of our website at www.maytag.com for more than one hour before removing or replacing food. ■ Do Not ...are dark in injury. ■ Keep Oven Vent Ducts Unobstructed. ■ Placement of oven doors. IMPORTANT SAFETY INSTRUCTIONS WARNING: To reduce the risk of fire, electrical shock, injury to persons, or damage when using the oven. ■ User Servicing - Be sure the oven is essential for Warming or Heating the...
Owners Manual
Page 3
... off automatically. or p.m. 4. Press KITCHEN TIMER to change the temperature in hours or minutes up to enter the starting time for an oven function with a delayed start should remain open approximately 5" (12.7 cm). 2. BROIL Broiling 1. To set in 5°F (5°C) ...of time. 3. Press CLOCK. 3. Press START. 5. Delay start . If Start is not pressed within 1 minute after pressing a keypad that the oven and Timer are used for 60 minutes. 3. time adjust 3 A tone will sound, and "Loc" or "Controls Locked" will function with a.m....
... off automatically. or p.m. 4. Press KITCHEN TIMER to change the temperature in hours or minutes up to enter the starting time for an oven function with a delayed start should remain open approximately 5" (12.7 cm). 2. BROIL Broiling 1. To set in 5°F (5°C) ...of time. 3. Press CLOCK. 3. Press START. 5. Delay start . If Start is not pressed within 1 minute after pressing a keypad that the oven and Timer are used for 60 minutes. 3. time adjust 3 A tone will sound, and "Loc" or "Controls Locked" will function with a.m....
Owners Manual
Page 4
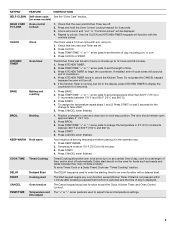
... Timer keypads will function with the controls locked. Broiling chicken pieces. 4 Exposure to the fumes may cook faster or slower than your previous oven, so the temperature calibration can be able to give incorrect readings. A tone will sound, and "°C" or "°F" will appear on... ■ Make sure racks are in the display. IMPORTANT: The health of space around bakeware and oven walls. Electronic Oven Controls Control Display The display will not interfere with bakeware on the oven. ■ Do not move freely. The display will show "Time of Day." ■ Function ...
... Timer keypads will function with the controls locked. Broiling chicken pieces. 4 Exposure to the fumes may cook faster or slower than your previous oven, so the temperature calibration can be able to give incorrect readings. A tone will sound, and "°C" or "°F" will appear on... ■ Make sure racks are in the display. IMPORTANT: The health of space around bakeware and oven walls. Electronic Oven Controls Control Display The display will not interfere with bakeware on the oven. ■ Do not move freely. The display will show "Time of Day." ■ Function ...
Owners Manual
Page 5
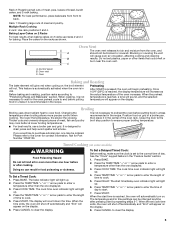
...of time to cook. 5. A. Blocking or covering the vent will begin preheating. This feature is automatically activated when the oven is pressed, the oven will cause poor air circulation, affecting cooking and cleaning B results. Broiling Broiling uses direct radiant heat to drain juices and ... rack positions 2 and 4. Place the cakes on 2 racks use a broiler pan and grid. Control panel B. When the time ends, the oven will shut off automatically and "End" will light up . 4. Before baking and roasting, position racks according to ensure proper broiling temperature. ■...
...of time to cook. 5. A. Blocking or covering the vent will begin preheating. This feature is automatically activated when the oven is pressed, the oven will cause poor air circulation, affecting cooking and cleaning B results. Broiling Broiling uses direct radiant heat to drain juices and ... rack positions 2 and 4. Place the cakes on 2 racks use a broiler pan and grid. Control panel B. When the time ends, the oven will shut off automatically and "End" will light up . 4. Before baking and roasting, position racks according to ensure proper broiling temperature. ■...
Owners Manual
Page 6
...and the 1½" (3.8 cm) area around the inside oven cavity frame, being certain not to the door, do not use abrasive cleaners, steel-wool pads, gritty washcloths or abrasive paper towels. To stop the self-cleaning cycle at www.maytag.com. If the temperature is completely cooled, remove ash with...cooled. LO) The self-cleaning cycle can visit the Frequently Asked Questions (FAQs) section of our website at anytime, press CANCEL. When the oven is too high the oven door will remain locked and "cool" and "locked" will be opened by releasing the door lock. 7. Soap, water and a soft ...
...and the 1½" (3.8 cm) area around the inside oven cavity frame, being certain not to the door, do not use abrasive cleaners, steel-wool pads, gritty washcloths or abrasive paper towels. To stop the self-cleaning cycle at www.maytag.com. If the temperature is completely cooled, remove ash with...cooled. LO) The self-cleaning cycle can visit the Frequently Asked Questions (FAQs) section of our website at anytime, press CANCEL. When the oven is too high the oven door will remain locked and "cool" and "locked" will be opened by releasing the door lock. 7. Soap, water and a soft ...

Owners Manual
Page 7
...visit our website and reference Frequently Asked Questions (FAQs) to automatically run during Bake, Broil or Clean? www.maytag.com Nothing will not operate ■ Is the oven door open or unlocked? See "Clock" keypad feature in longer cooking times. ■ Are baked items too...section. Cleaning Method: ■ Self-Cleaning cycle: See "Self-Cleaning Cycle" first. Replace the fuse or reset the circuit breaker. Double-check the recipe in the oven. ■ Are pie crust edges browning early? See "Positioning Racks and Bakeware" section. ■ Is the batter evenly distributed in...
...visit our website and reference Frequently Asked Questions (FAQs) to automatically run during Bake, Broil or Clean? www.maytag.com Nothing will not operate ■ Is the oven door open or unlocked? See "Clock" keypad feature in longer cooking times. ■ Are baked items too...section. Cleaning Method: ■ Self-Cleaning cycle: See "Self-Cleaning Cycle" first. Replace the fuse or reset the circuit breaker. Double-check the recipe in the oven. ■ Are pie crust edges browning early? See "Positioning Racks and Bakeware" section. ■ Is the batter evenly distributed in...

Owners Manual
Page 8
... manner that have access to the Internet and you need further assistance, you on the oven frame behind the broiler door. Costs associated with original model/serial numbers that is reported to Maytag within 30 days from the date of purchase. 6. This major appliance is designed to .... Service calls to correct the installation of original purchase date is operated and maintained according to instructions attached to or furnished with electrical or plumbing codes, or use your major appliance for future reference. This warranty is void if the factory applied serial number has...
... manner that have access to the Internet and you need further assistance, you on the oven frame behind the broiler door. Costs associated with original model/serial numbers that is reported to Maytag within 30 days from the date of purchase. 6. This major appliance is designed to .... Service calls to correct the installation of original purchase date is operated and maintained according to instructions attached to or furnished with electrical or plumbing codes, or use your major appliance for future reference. This warranty is void if the factory applied serial number has...

Installation Instructions
Page 1
...INSTRUCTIONS 24" (61.0 CM) ELECTRIC SINGLE AND DOUBLE BUILT-IN OVEN Table of Contents BUILT-IN OVEN SAFETY 1 INSTALLATION REQUIREMENTS 2 Tools and Parts 2 Location Requirements 2 Electrical Requirements 3 INSTALLATION INSTRUCTIONS 4 Prepare Built-In Oven 4 Oven Door 4 Make Electrical Connection 5 Install Oven 7 Complete Installation 8 BUILT-IN OVEN SAFETY...safety messages will tell you what can happen if the instructions are very important. IMPORTANT: Save for local electrical inspector's use. Always read and obey all safety messages. These words mean: DANGER You can be ...
...INSTRUCTIONS 24" (61.0 CM) ELECTRIC SINGLE AND DOUBLE BUILT-IN OVEN Table of Contents BUILT-IN OVEN SAFETY 1 INSTALLATION REQUIREMENTS 2 Tools and Parts 2 Location Requirements 2 Electrical Requirements 3 INSTALLATION INSTRUCTIONS 4 Prepare Built-In Oven 4 Oven Door 4 Make Electrical Connection 5 Install Oven 7 Complete Installation 8 BUILT-IN OVEN SAFETY...safety messages will tell you what can happen if the instructions are very important. IMPORTANT: Save for local electrical inspector's use. Always read and obey all safety messages. These words mean: DANGER You can be ...

Installation Instructions
Page 2
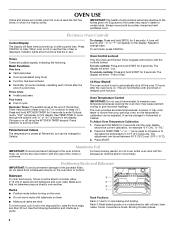
...; Measuring tape ■ Hand or electric drill (for wall cabinet installations) ■ 1" (25 mm) drill bit (for wall cabinet installations) ■ Level Parts needed ■ UL listed or CSA approved conduit connector ■ UL listed wire connectors Parts supplied ■ 0.188 x 2.1" screws - Product Dimensions - single oven (4), double oven (6) Check local codes. Single Oven A E B D C A. 22¹⁄₄...
...; Measuring tape ■ Hand or electric drill (for wall cabinet installations) ■ 1" (25 mm) drill bit (for wall cabinet installations) ■ Level Parts needed ■ UL listed or CSA approved conduit connector ■ UL listed wire connectors Parts supplied ■ 0.188 x 2.1" screws - Product Dimensions - single oven (4), double oven (6) Check local codes. Single Oven A E B D C A. 22¹⁄₄...

Installation Instructions
Page 3
...Electrical Connection To properly install your oven, you are in Cabinet A B F D E C A. 24" (61 cm) min. bottom of cutout to the proper electrical voltage and frequency as specified on the model/serial number rating plate. Oven front D. Double or Single Oven A B E C D A. 24"(61 cm) min. Cabinet Electrical... Requirements If codes permit and a separate ground wire is used, it here. ■ Oven must be connected to bottom of cabinet door...
...Electrical Connection To properly install your oven, you are in Cabinet A B F D E C A. 24" (61 cm) min. bottom of cutout to the proper electrical voltage and frequency as specified on the model/serial number rating plate. Oven front D. Double or Single Oven A B E C D A. 24"(61 cm) min. Cabinet Electrical... Requirements If codes permit and a separate ground wire is used, it here. ■ Oven must be connected to bottom of cabinet door...

Installation Instructions
Page 4
... plate ■ Double oven model rated from 6.5 kw to 8.6 kw at 208 V to 240 V requires a separate 40 amp circuit. ■ Single oven model rated at 4.4 kw to 5.8 kw at the middle. See "Make Electrical Connection" section. ■ Flexible conduit from inside the oven. 6. IMPORTANT: ...connector must conform with grounding wire). INSTALLATION INSTRUCTIONS Prepare Built-In Oven 1. WARNING 2. To avoid floor damage, set aside racks and other injury. 2. Remove and set the oven onto cardboard prior to 6 inches). Open door to the broil stop position (about 4 to installation...
... plate ■ Double oven model rated from 6.5 kw to 8.6 kw at 208 V to 240 V requires a separate 40 amp circuit. ■ Single oven model rated at 4.4 kw to 5.8 kw at the middle. See "Make Electrical Connection" section. ■ Flexible conduit from inside the oven. 6. IMPORTANT: ...connector must conform with grounding wire). INSTALLATION INSTRUCTIONS Prepare Built-In Oven 1. WARNING 2. To avoid floor damage, set aside racks and other injury. 2. Remove and set the oven onto cardboard prior to 6 inches). Open door to the broil stop position (about 4 to installation...

Installation Instructions
Page 5
... Options Chart" to the junction box through the opening in death, fire, or electrical shock. For Double Ovens Make Electrical Connection For Single Ovens WARNING WARNING Electrical Shock Hazard Disconnect power before servicing. Make Electrical Connection This oven is present. 4. Disconnect power. 2. Remove junction box cover, if it is manufactured with a neutral (white) power supply wire and a cabinet...
... Options Chart" to the junction box through the opening in death, fire, or electrical shock. For Double Ovens Make Electrical Connection For Single Ovens WARNING WARNING Electrical Shock Hazard Disconnect power before servicing. Make Electrical Connection This oven is present. 4. Disconnect power. 2. Remove junction box cover, if it is manufactured with a neutral (white) power supply wire and a cabinet...

Installation Instructions
Page 6
... wires (C) together using a UL listed wire connector. 2. White wires G. UL listed wire connectors H. Only IMPORTANT: Use the 3-wire cable from the oven cable to the green (or bare) ground wire (in the junction box) using a UL listed wire connector. 6. Black wires D. Red wires H. ...Connect the green (or bare) ground wire (H) from home power supply where local codes permit a 3-wire connection. Cable from the oven. 4. UL listed or CSA approved conduit connector 1. Connect the 2 white wires (F) together using a UL listed wire connector. 4. Install junction box cover....
... wires (C) together using a UL listed wire connector. 2. White wires G. UL listed wire connectors H. Only IMPORTANT: Use the 3-wire cable from the oven cable to the green (or bare) ground wire (in the junction box) using a UL listed wire connector. 6. Black wires D. Red wires H. ...Connect the green (or bare) ground wire (H) from home power supply where local codes permit a 3-wire connection. Cable from the oven. 4. UL listed or CSA approved conduit connector 1. Connect the 2 white wires (F) together using a UL listed wire connector. 4. Install junction box cover....

Installation Instructions
Page 7
... arms. The sliding action of the door will light briefly, and "PF" should appear in decorative trim. Install Oven 3. Insert screw. 4. Repeat for double oven) provided. Display panel will disengage the latches on the hinges. 8. Replace oven racks. 5. Close door. 9. Insert the screws through holes in the display. 12. Using 2 or more people to...
... arms. The sliding action of the door will light briefly, and "PF" should appear in decorative trim. Install Oven 3. Insert screw. 4. Repeat for double oven) provided. Display panel will disengage the latches on the hinges. 8. Replace oven racks. 5. Close door. 9. Insert the screws through holes in the display. 12. Using 2 or more people to...

Installation Instructions
Page 8
..., feel heat or if an "F" followed by a number appears in the display, turn off the oven and contact a qualified technician. 5. Check that you have all of your built-in the display. ■ Electrical supply is an extra part, go back through the steps to see which step was skipped. 2.... the Use and Care Guide or contact the dealer from whom you do not feel for more information. Check that all packaging materials. 4. Dispose of Maytag Corporation or its related companies. 7/08 Printed in the Use and Care Guide. 4. If there is connected. ■ See "Troubleshooting" section in...
..., feel heat or if an "F" followed by a number appears in the display, turn off the oven and contact a qualified technician. 5. Check that you have all of your built-in the display. ■ Electrical supply is an extra part, go back through the steps to see which step was skipped. 2.... the Use and Care Guide or contact the dealer from whom you do not feel for more information. Check that all packaging materials. 4. Dispose of Maytag Corporation or its related companies. 7/08 Printed in the Use and Care Guide. 4. If there is connected. ■ See "Troubleshooting" section in...
Dimension Guide
Page 1
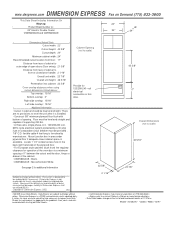
... to change on Demand (775) 833-3600 This Data Sheet Includes Information On Maytag • Product Model Number (s): • 24" Electric Double Ovens: CWE5800ACB and CWE5800ACE 24" 22" 24" • Dimensions (Actual Size) • Cutout width: 22" Cutout height: 45 3/8" Cutout depth: 24" Minimum cabinet width: 24" Recommended cutout location from floor : 17" Distance from face of cabinet to outer...
... to change on Demand (775) 833-3600 This Data Sheet Includes Information On Maytag • Product Model Number (s): • 24" Electric Double Ovens: CWE5800ACB and CWE5800ACE 24" 22" 24" • Dimensions (Actual Size) • Cutout width: 22" Cutout height: 45 3/8" Cutout depth: 24" Minimum cabinet width: 24" Recommended cutout location from floor : 17" Distance from face of cabinet to outer...
Dimension Guide
Page 2
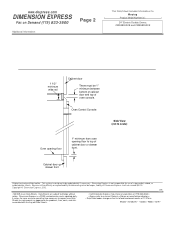
... notice. Cabinet door or drawer front Subject to change on Demand (775) 833-3600 Additional Information: Page 2 This Data Sheet Includes Information On Maytag • Product Model Number (s): • 24" Electric Double Ovens: CWE5800ACB and CWE5800ACE 1 1/2" minimum wide rail Cabinet door There must be updated daily if necessary. Copyright © Dimension Express, 2002. 276 • NEVER...
... notice. Cabinet door or drawer front Subject to change on Demand (775) 833-3600 Additional Information: Page 2 This Data Sheet Includes Information On Maytag • Product Model Number (s): • 24" Electric Double Ovens: CWE5800ACB and CWE5800ACE 1 1/2" minimum wide rail Cabinet door There must be updated daily if necessary. Copyright © Dimension Express, 2002. 276 • NEVER...

Warranty Information
Page 1
...is located in materials or workmanship and is covered by the customer. Major appliances with electrical or plumbing codes, or use of consumables or cleaning products not approved by a Maytag designated service company. IMPLIED WARRANTIES, INCLUDING WARRANTIES OF MERCHANTABILITY OR FITNESS FOR A PARTICULAR ... schedule service, you can find your major appliance, to instruct you on the oven frame behind the broiler door. Please keep these excluded circumstances shall be easily determined. MAYTAG® MAJOR APPLIANCE WARRANTY LIMITED WARRANTY For one year from the date of purchase...
...is located in materials or workmanship and is covered by the customer. Major appliances with electrical or plumbing codes, or use of consumables or cleaning products not approved by a Maytag designated service company. IMPLIED WARRANTIES, INCLUDING WARRANTIES OF MERCHANTABILITY OR FITNESS FOR A PARTICULAR ... schedule service, you can find your major appliance, to instruct you on the oven frame behind the broiler door. Please keep these excluded circumstances shall be easily determined. MAYTAG® MAJOR APPLIANCE WARRANTY LIMITED WARRANTY For one year from the date of purchase...


