
Owners Manual
Page 2
... Safety 9. A moment of electric shock. 7. Ensure the switch is an increased risk of these are provided for carrying, pulling or unplugging the power tool. Remove any way. Keep proper footing and balance at all instructions. Use of electric shock if your mains-operated (corded) power tool or battery-operated (cordless) power tool. Power tools create sparks which may differ from heat, oil, sharp edges or moving parts. Do not abuse the cord. When operating a power tool outdoors, use...
... Safety 9. A moment of electric shock. 7. Ensure the switch is an increased risk of these are provided for carrying, pulling or unplugging the power tool. Remove any way. Keep proper footing and balance at all instructions. Use of electric shock if your mains-operated (corded) power tool or battery-operated (cordless) power tool. Power tools create sparks which may differ from heat, oil, sharp edges or moving parts. Do not abuse the cord. When operating a power tool outdoors, use...

Owners Manual
Page 3
... off . Wait until blade stops before use. A typical illustration of the workpiece. Blades that cannot be repaired. 18. Power tool use a rip fence or straight edge guide. Use the correct power tool for lubricating and changing accessories. 25. Any power tool that do not allow persons unfamiliar with sharp cutting edges are less likely to stable platform. Check for operations different from oil and grease. GEB031-2 CIRCULAR SAW SAFETY WARNINGS Danger: 1. If both hands are caused by...
... off . Wait until blade stops before use. A typical illustration of the workpiece. Blades that cannot be repaired. 18. Power tool use a rip fence or straight edge guide. Use the correct power tool for lubricating and changing accessories. 25. Any power tool that do not allow persons unfamiliar with sharp cutting edges are less likely to stable platform. Check for operations different from oil and grease. GEB031-2 CIRCULAR SAW SAFETY WARNINGS Danger: 1. If both hands are caused by...
Owners Manual
Page 4
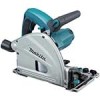
... back toward the operator. If blade adjustment shifts while cutting, it may cut . 000156 Do not support board or panel away from the workpiece as given below. • Maintain a firm grip with the blade. The blade washers and bolt were specially designed for your arms to eliminate the cause of blade pinching and kickback. Never use gasoline. • Blade depth and bevel adjusting locking levers must be...
... back toward the operator. If blade adjustment shifts while cutting, it may cut . 000156 Do not support board or panel away from the workpiece as given below. • Maintain a firm grip with the blade. The blade washers and bolt were specially designed for your arms to eliminate the cause of blade pinching and kickback. Never use gasoline. • Blade depth and bevel adjusting locking levers must be...

Owners Manual
Page 5
... and remove all angles and depths of cut " when the blade bevel setting is not at a speed so that guard moves freely and does not touch the blade or any part of tool without slowing. 10. Never attempt to saw forward at 90°. Push the saw with the blade exposed. Never clamp or tie the guard with the circular saw to maintain smooth advancement of your hand, leading to cut...
... and remove all angles and depths of cut " when the blade bevel setting is not at a speed so that guard moves freely and does not touch the blade or any part of tool without slowing. 10. Never attempt to saw forward at 90°. Push the saw with the blade exposed. Never clamp or tie the guard with the circular saw to maintain smooth advancement of your hand, leading to cut...

Owners Manual
Page 6
... is switched off and unplugged before adjusting or checking function on the scale plate. Some material contains chemicals which can cause personal injury. At the desired depth of cut , tighten the clamping screw firmly. MISUSE or failure to prevent dust inhalation and skin contact. Adjusting depth of cut 1. SAVE THESE INSTRUCTIONS. Quick stop the blades by lateral pressure on the gear housing aside the rear handle when using guide rail (accessory...
... is switched off and unplugged before adjusting or checking function on the scale plate. Some material contains chemicals which can cause personal injury. At the desired depth of cut , tighten the clamping screw firmly. MISUSE or failure to prevent dust inhalation and skin contact. Adjusting depth of cut 1. SAVE THESE INSTRUCTIONS. Quick stop the blades by lateral pressure on the gear housing aside the rear handle when using guide rail (accessory...

Owners Manual
Page 7
... lever return to 0° by itself. To get the left while pushing these two 1. Then, tilt the tool base until it . This is convenient for free depth of cut , push in front and back. Quick stop button toward the saw blade. And then tilt the tool handle to the left 1° bevel angle, loosen the clamping screws in the direction of arrow which has a marking -1. Clamping screws 2. Loosen the clamping screws...
... lever return to 0° by itself. To get the left while pushing these two 1. Then, tilt the tool base until it . This is convenient for free depth of cut , push in front and back. Quick stop button toward the saw blade. And then tilt the tool handle to the left 1° bevel angle, loosen the clamping screws in the direction of arrow which has a marking -1. Clamping screws 2. Loosen the clamping screws...
Owners Manual
Page 8
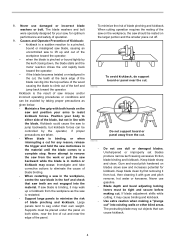
.... Use only saw blades but the service life of number 6; Speed adjusting dial 1 007663 The tool speed can be sure that the switch trigger actuates properly and returns to 1. However, the appropriate speed may no longer work on the tool. Overload protector When the tool is switched off button is turned in the lock-off button 2. Soft start feature Soft start the tool, push in the direction of the blade will allow you to cut . Hex wrench...
.... Use only saw blades but the service life of number 6; Speed adjusting dial 1 007663 The tool speed can be sure that the switch trigger actuates properly and returns to 1. However, the appropriate speed may no longer work on the tool. Overload protector When the tool is switched off button is turned in the lock-off button 2. Soft start feature Soft start the tool, push in the direction of the blade will allow you to cut . Hex wrench...

Owners Manual
Page 9
... out. Removing or installing saw blade CAUTION: • Do not use saw blades which do not comply with scale plate. Outer flange 3. To remove hex wrench, just pull it onto the dust port. Fastener 1 010506 9 Dust bag 007655 With the lock-off button 2. Lock-off button depressed and the locking lever turned, lower the handle so that the lock pin fits in these instructions. • Use only saw blades which are rated for replacing a blade. 1. Hex wrench is stored...
... out. Removing or installing saw blade CAUTION: • Do not use saw blades which do not comply with scale plate. Outer flange 3. To remove hex wrench, just pull it onto the dust port. Fastener 1 010506 9 Dust bag 007655 With the lock-off button 2. Lock-off button depressed and the locking lever turned, lower the handle so that the lock pin fits in these instructions. • Use only saw blades which are rated for replacing a blade. 1. Hex wrench is stored...
Owners Manual
Page 10
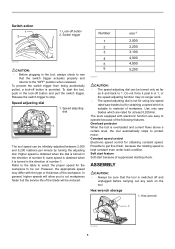
... with both hands are holding saw head slowly to turn the tool on the tool base so that the tool slides smoothly without the blade making any part of your intended cut line, do not attempt to the preset depth of cut and cut without a clatter. Use eye protection to the cutting edge. Hold the tool firmly. The tool is exposed under the tool base when section cutting, especially at starting. The edge of the...
... with both hands are holding saw head slowly to turn the tool on the tool base so that the tool slides smoothly without the blade making any part of your intended cut line, do not attempt to the preset depth of cut and cut without a clatter. Use eye protection to the cutting edge. Hold the tool firmly. The tool is exposed under the tool base when section cutting, especially at starting. The edge of the...
Owners Manual
Page 11
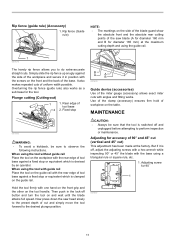
...; or 45° the blade with the rear edge of tool base against a fixed stop or equivalent which is switched off and unplugged before attempting to observe the following instructions. Adjusting for diameter 165 mm) at the factory. Rip fence (Guide rule) NOTE: • The markings on the tool handle. It also makes repeated cuts of the miter gauge (accessory) allows exact miter cuts with one hand on the front grip...
...; or 45° the blade with the rear edge of tool base against a fixed stop or equivalent which is switched off and unplugged before attempting to observe the following instructions. Adjusting for diameter 165 mm) at the factory. Rip fence (Guide rule) NOTE: • The markings on the tool handle. It also makes repeated cuts of the miter gauge (accessory) allows exact miter cuts with one hand on the front grip...

Owners Manual
Page 12
...; cut cannot be performed by Makita Authorized Service Centers, always using Makita replacement parts. 12 1. Keep the carbon brushes clean and free to persons. Use a screwdriver to the limit mark. Replacing carbon brushes 1. The use with your local Makita Service Center. • Saw blades • Guide rail • Rip fence (Guide rule) • Miter gauge • Clamp • Hex wrench • Sheet set for guide rail • Rubber sheet set for guide rail • Position sheet set for its stated purpose. If you need any other maintenance or adjustment...
...; cut cannot be performed by Makita Authorized Service Centers, always using Makita replacement parts. 12 1. Keep the carbon brushes clean and free to persons. Use a screwdriver to the limit mark. Replacing carbon brushes 1. The use with your local Makita Service Center. • Saw blades • Guide rail • Rip fence (Guide rule) • Miter gauge • Clamp • Hex wrench • Sheet set for guide rail • Rubber sheet set for guide rail • Position sheet set for its stated purpose. If you need any other maintenance or adjustment...

Owners Manual
Page 13
... THE SALE OR USE OF THE PRODUCT. EN0006-1 13 This Warranty gives you specific legal rights, and you may not apply to be free of defects from workmanship and materials for the period of original purchase. MAKITA LIMITED ONE YEAR WARRANTY Warranty Policy Every Makita tool is caused by others: repairs are required because of Makita's Factory or Authorized Service Centers. It...
... THE SALE OR USE OF THE PRODUCT. EN0006-1 13 This Warranty gives you specific legal rights, and you may not apply to be free of defects from workmanship and materials for the period of original purchase. MAKITA LIMITED ONE YEAR WARRANTY Warranty Policy Every Makita tool is caused by others: repairs are required because of Makita's Factory or Authorized Service Centers. It...

Parts Breakdown
Page 2
...-7 SPINDLE 1 26 285689-7 BEARING RETAINER 55 1 27 911221-8 PAN HEAD SCREW M5X16 2 28 419620-3 DUST NOZZLE 1 29 213460-9 O RING 35 1 029-1 213416-2 O RING 26 1 30 233479-2 COMPRESSION SPRING 11 1 31 419624-5 SPRING HOLDER 1 32 158095-8 LEVER 20 COMPLETE 1 32 263002-9 RUBBER PIN 4 1 33 213021-5 O RING 5 1 34 324710-8 PIN 8 1 35 266007-8 TAPPING SCREW BIND PT 3X10 1 36 253821-1 FLAT WASHER 3 1 37 419625-3 DEPTH GUIDE 1 38...
...-7 SPINDLE 1 26 285689-7 BEARING RETAINER 55 1 27 911221-8 PAN HEAD SCREW M5X16 2 28 419620-3 DUST NOZZLE 1 29 213460-9 O RING 35 1 029-1 213416-2 O RING 26 1 30 233479-2 COMPRESSION SPRING 11 1 31 419624-5 SPRING HOLDER 1 32 158095-8 LEVER 20 COMPLETE 1 32 263002-9 RUBBER PIN 4 1 33 213021-5 O RING 5 1 34 324710-8 PIN 8 1 35 266007-8 TAPPING SCREW BIND PT 3X10 1 36 253821-1 FLAT WASHER 3 1 37 419625-3 DEPTH GUIDE 1 38...

Parts Breakdown
Page 3
...-0 HEX. SOCKET HEAD BOLT M6 1 53 158214-6 BLADE CASE COVER COMPLETE 1 53 810303-2 CAUTION LABEL 1 54 266034-5 TAPPING SCREW CT 4X16 5 55 188197-6 HANDLE SET 1 55 INC. 102 0 56 265776-8 THUMB SCREW M6X26 1 57 253111-2 FLAT WASHER 6 1 58 419596-4 REAR ANGULAR GUIDE 1 059-1 318179-6 BASE 1 60 265995-6 TAPPING SCREW 4X18 2 61 324731-0 STOPPER PIN 1 62 252157-5 SQUARE NUT M6 1 63 266085-8 H.S.SET SCREW(FLAT POINT)M6X10...
...-0 HEX. SOCKET HEAD BOLT M6 1 53 158214-6 BLADE CASE COVER COMPLETE 1 53 810303-2 CAUTION LABEL 1 54 266034-5 TAPPING SCREW CT 4X16 5 55 188197-6 HANDLE SET 1 55 INC. 102 0 56 265776-8 THUMB SCREW M6X26 1 57 253111-2 FLAT WASHER 6 1 58 419596-4 REAR ANGULAR GUIDE 1 059-1 318179-6 BASE 1 60 265995-6 TAPPING SCREW 4X18 2 61 324731-0 STOPPER PIN 1 62 252157-5 SQUARE NUT M6 1 63 266085-8 H.S.SET SCREW(FLAT POINT)M6X10...

Parts Breakdown
Page 4
... CASE LABEL 1 90 631728-5 CONTROLLER 1 91 213261-5 O RING 17 1 92 418905-4 DIAL 1 94 419622-9 SWITCH LEVER 1 95 651922-3 SWITCH TG71B 1 96 345745-6 LINK PLATE 1 97 419629-5 LOCK OFF BUTTON 1 98 233089-5 COMPRESSION SPRING 12 1 99 265995-6 TAPPING SCREW 4X18 6 100 911273-9 PAN HEAD SCREW M5X50 1 101 862913-1 SP6000 NAME PLATE 1 102 188197-6 HANDLE SET 1 102 INC. 55 0 103 664265-4 POWER SUPPLY CORD AWG#16-2-2.5 1 104 682505-8 CORD GUARD...
... CASE LABEL 1 90 631728-5 CONTROLLER 1 91 213261-5 O RING 17 1 92 418905-4 DIAL 1 94 419622-9 SWITCH LEVER 1 95 651922-3 SWITCH TG71B 1 96 345745-6 LINK PLATE 1 97 419629-5 LOCK OFF BUTTON 1 98 233089-5 COMPRESSION SPRING 12 1 99 265995-6 TAPPING SCREW 4X18 6 100 911273-9 PAN HEAD SCREW M5X50 1 101 862913-1 SP6000 NAME PLATE 1 102 188197-6 HANDLE SET 1 102 INC. 55 0 103 664265-4 POWER SUPPLY CORD AWG#16-2-2.5 1 104 682505-8 CORD GUARD...

Flyer (English)
Page 1
...; Powerful 12 AMP Motor for Continuous Operation • Electronic Soft Start Feature for splinter-free cutting enables to easily cut a preliminary groove at 45º) CONVENIENCE Close-to-wall cutting; makitatools.com only 11/16"away from wall PRECISION Depth stopper for Smooth Start-Ups • Large Cutting Capacity (2-3/16" at 90º and 1-9/16" at a depth of 1/16" ACCURACY Models SP6000J SP6000J1 (Includes 55" Guide...
...; Powerful 12 AMP Motor for Continuous Operation • Electronic Soft Start Feature for splinter-free cutting enables to easily cut a preliminary groove at 45º) CONVENIENCE Close-to-wall cutting; makitatools.com only 11/16"away from wall PRECISION Depth stopper for Smooth Start-Ups • Large Cutting Capacity (2-3/16" at 90º and 1-9/16" at a depth of 1/16" ACCURACY Models SP6000J SP6000J1 (Includes 55" Guide...

Flyer (English)
Page 2
...) n Clamp set (194385-5) n Miter guide set depth adjustment with large scale n Smooth and convenient plunge release lever for added comfort n Large 1-7/16" rear dust port directs material away from the operator and in position to be replaced Wrench is inserted Blade wrench through a hole attaches to the saw in the market Model SP6000J Model SP6000J1 0 88381 63900 2 0 88381 65082 3 STANDARD EQUIPMENT OPTIONAL ACCESSORIES n Carbide-tipped blade 48T (B-07353) n Hex blade wrench (783203-8) n Plastic tool case n 55" guide rail...
...) n Clamp set (194385-5) n Miter guide set depth adjustment with large scale n Smooth and convenient plunge release lever for added comfort n Large 1-7/16" rear dust port directs material away from the operator and in position to be replaced Wrench is inserted Blade wrench through a hole attaches to the saw in the market Model SP6000J Model SP6000J1 0 88381 63900 2 0 88381 65082 3 STANDARD EQUIPMENT OPTIONAL ACCESSORIES n Carbide-tipped blade 48T (B-07353) n Hex blade wrench (783203-8) n Plastic tool case n 55" guide rail...


