Owners Manual
Page 2
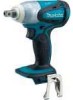
... load speed (RPM) 0 - 2,200 /min. 0 - 2,100 /min. SAVE THESE INSTRUCTIONS. Power tools create sparks which may result in moving parts. Electrical Safety 4. Do not expose power tools to follow all of electric shock. 5. Stay alert, watch what you are doing and use the cord... Damaged or entangled cords increase the risk of inattention while operating power tools may differ from heat, oil, sharp edges or moving parts. Personal Safety 9. Always wear eye protection. Failure to rain or wet conditions. Cluttered and dark areas invite accidents. 2. Never use...
... load speed (RPM) 0 - 2,200 /min. 0 - 2,100 /min. SAVE THESE INSTRUCTIONS. Power tools create sparks which may result in moving parts. Electrical Safety 4. Do not expose power tools to follow all of electric shock. 5. Stay alert, watch what you are doing and use the cord... Damaged or entangled cords increase the risk of inattention while operating power tools may differ from heat, oil, sharp edges or moving parts. Personal Safety 9. Always wear eye protection. Failure to rain or wet conditions. Cluttered and dark areas invite accidents. 2. Never use...
Owners Manual
Page 3
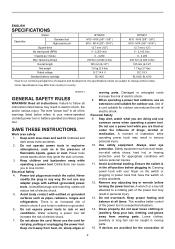
...torque with water. Power tool use and care 23. Check for misalignment or binding of moving parts, breakage of the power tool for the particular type of untrained users. 20. Use of parts and any other condition that is suitable for wear, cracks or damage before making any other... use this instruction manual may be performed. Check the socket carefully for one is below when using only identical replacement parts. Use of these devices can make exposed metal parts of fire when used for which it away from the power tool before installation. 4. Do not force the power ...
...torque with water. Power tool use and care 23. Check for misalignment or binding of moving parts, breakage of the power tool for the particular type of untrained users. 20. Use of parts and any other condition that is suitable for wear, cracks or damage before making any other... use this instruction manual may be performed. Check the socket carefully for one is below when using only identical replacement parts. Use of these devices can make exposed metal parts of fire when used for which it away from the power tool before installation. 4. Do not force the power ...
Owners Manual
Page 4
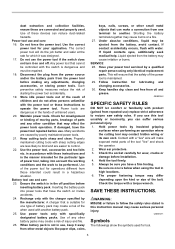
... the battery cartridge, align the tongue on (1) battery charger, (2) battery, and (3) product using battery cartridge, read all the way until the red part cannot be sure that the tool is switched off the tool before adjusting or checking function on the tool. Do not incinerate the battery cartridge...strike battery. Be careful not to you or someone around you notice less tool power. 2. Button 3. A battery short can see the red part on the front of your eyes, rinse them out with a little click. Charge the battery cartridge before charging it is not locked completely. Charge...
... the battery cartridge, align the tongue on (1) battery charger, (2) battery, and (3) product using battery cartridge, read all the way until the red part cannot be sure that the tool is switched off the tool before adjusting or checking function on the tool. Do not incinerate the battery cartridge...strike battery. Be careful not to you or someone around you notice less tool power. 2. Button 3. A battery short can see the red part on the front of your eyes, rinse them out with a little click. Charge the battery cartridge before charging it is not locked completely. Charge...
Owners Manual
Page 6
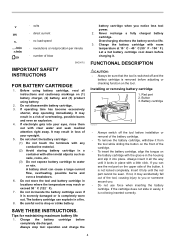
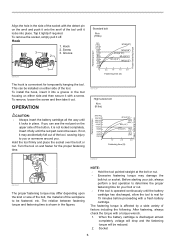
... of factors including the following. OPERATION 007538 High tensile bolt N m (ft lbs) CAUTION: • Always insert the battery cartridge all the way until the red part cannot be installed on either side and then secure it with a screw. If you . Screw 3 3. If not, it locks in place. NOTE: • Hold the... side of the socket with the detent pin on the upper side of the button, it is not locked completely. This can see the red part on the anvil and push it onto the anvil of the workpiece to determine the proper fastening time for your bolt or nut. • If...
... of factors including the following. OPERATION 007538 High tensile bolt N m (ft lbs) CAUTION: • Always insert the battery cartridge all the way until the red part cannot be installed on either side and then secure it with a screw. If you . Screw 3 3. If not, it locks in place. NOTE: • Hold the... side of the socket with the detent pin on the upper side of the button, it is not locked completely. This can see the red part on the anvil and push it onto the anvil of the workpiece to determine the proper fastening time for your bolt or nut. • If...
Owners Manual
Page 7
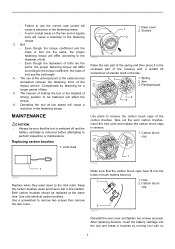
... brushes. Operating the tool at the same time. Arm 3. After replacing brushes, insert the battery cartridge into the holes in the recessed part of the housing with no 7 Take out the worn carbon brushes, insert the new ones and replace the carbon brush caps in brushes.... Carbon brush cap 1 1 006258 Replace when they wear down to the limit mark. Recessed part 3 2 007459 Use pliers to remove the carbon brush caps of time. 5. Hole 2. Screws 2 007458 Raise the arm part of the spring and then place it in brush holders securely. 1 1. MAINTENANCE CAUTION: •...
... brushes. Operating the tool at the same time. Arm 3. After replacing brushes, insert the battery cartridge into the holes in the recessed part of the housing with no 7 Take out the worn carbon brushes, insert the new ones and replace the carbon brush caps in brushes.... Carbon brush cap 1 1 006258 Replace when they wear down to the limit mark. Recessed part 3 2 007459 Use pliers to remove the carbon brush caps of time. 5. Hole 2. Screws 2 007458 Raise the arm part of the spring and then place it in brush holders securely. 1 1. MAINTENANCE CAUTION: •...
Owners Manual
Page 8
..., so the above limitation or exclusion may also have been made or attempted by Makita Authorized or Factory Service Centers, always using Makita replacement parts. The use of any trouble develop during this manual. Only use with your local Makita Service Center. • Sockets • Extension bar • Universal joint • Bit adapter •...
..., so the above limitation or exclusion may also have been made or attempted by Makita Authorized or Factory Service Centers, always using Makita replacement parts. The use of any trouble develop during this manual. Only use with your local Makita Service Center. • Sockets • Extension bar • Universal joint • Bit adapter •...
Parts Diagram
Page 2
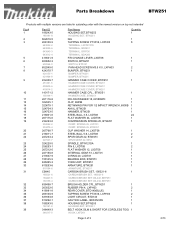
...1 HOUSING SET,BTW253 1 HOUSING SET, BTW251 BELT HOOK SILM & SHORT FOR CORDLESS TOOLS1 HOOK, LXFD01 Page 2 of 3 2/13 Parts Breakdown BTW251 Products with multiple versions are listed in subsiding order with the newest version on top not indented Fig # 1 2 3 ...158145-9 638495-3 619253-6 619194-6 CB440 195021-6 194427-5 194159-4 638498-7 263032-0 418981-8 266130-9 631693-8 810292-1 188243-5 188191-8 346449-3 346317-0 Part Name Quantity HOUSING SET,BTW253 1 HOUSING SET, BTW251 N/A 1 TAPPING SCREW PT3X16, LXPH03 8 TERMINAL, LXFD01CW TERMINAL, BDF451 TERMINAL, BFR750 TERMINAL,...
...1 HOUSING SET,BTW253 1 HOUSING SET, BTW251 BELT HOOK SILM & SHORT FOR CORDLESS TOOLS1 HOOK, LXFD01 Page 2 of 3 2/13 Parts Breakdown BTW251 Products with multiple versions are listed in subsiding order with the newest version on top not indented Fig # 1 2 3 ...158145-9 638495-3 619253-6 619194-6 CB440 195021-6 194427-5 194159-4 638498-7 263032-0 418981-8 266130-9 631693-8 810292-1 188243-5 188191-8 346449-3 346317-0 Part Name Quantity HOUSING SET,BTW253 1 HOUSING SET, BTW251 N/A 1 TAPPING SCREW PT3X16, LXPH03 8 TERMINAL, LXFD01CW TERMINAL, BDF451 TERMINAL, BFR750 TERMINAL,...
Parts Diagram
Page 3
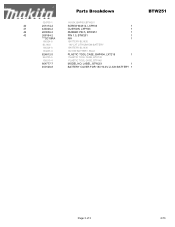
Parts Breakdown BTW251 324705-1 HOOK, BHP451,BTW251 40 251314-2 SCREW M4X12, LXPH03 1 41 424026-2 CUSHION, LXPH03 1 42 263036-2 RUBBER PIN 5, BTW251 1 43 268184-2 PIN 1.5, BTW251 1 ***DC18RA N/A 1 195324-8 BATTERY BL1830 BL1830 18V LXT LITHIUM-ION BATTERY 195324-8 BATTERY BL1830 194205-3 BL1830 BATTERY, BULK 824812-5 PLASTIC TOOL CASE, BHP454, LXT218 1 824753-5 PLASTIC TOOL CASE, BTD140 158210-4 PLASTIC TOOL CASE, BTP140 804777-7 MODEL NO. LABEL, BTW251 1 450128-8 BATTERY COVER FOR 18V/14.4V LI-ION BATTERY 1 Page 3 of 3 2/13
Parts Breakdown BTW251 324705-1 HOOK, BHP451,BTW251 40 251314-2 SCREW M4X12, LXPH03 1 41 424026-2 CUSHION, LXPH03 1 42 263036-2 RUBBER PIN 5, BTW251 1 43 268184-2 PIN 1.5, BTW251 1 ***DC18RA N/A 1 195324-8 BATTERY BL1830 BL1830 18V LXT LITHIUM-ION BATTERY 195324-8 BATTERY BL1830 194205-3 BL1830 BATTERY, BULK 824812-5 PLASTIC TOOL CASE, BHP454, LXT218 1 824753-5 PLASTIC TOOL CASE, BTD140 158210-4 PLASTIC TOOL CASE, BTP140 804777-7 MODEL NO. LABEL, BTW251 1 450128-8 BATTERY COVER FOR 18V/14.4V LI-ION BATTERY 1 Page 3 of 3 2/13


