Owners Manual
Page 3
... your hair, clothing, and gloves away from the power source before using. Tools are doing and use tool while tired or under the influence of the tool in the Maintenance section of electric shock. 8. Keep cutting tools sharp and clean. Check for appropriate conditions. If damaged, have the switch on or off before turning the...
... your hair, clothing, and gloves away from the power source before using. Tools are doing and use tool while tired or under the influence of the tool in the Maintenance section of electric shock. 8. Keep cutting tools sharp and clean. Check for appropriate conditions. If damaged, have the switch on or off before turning the...
Owners Manual
Page 4
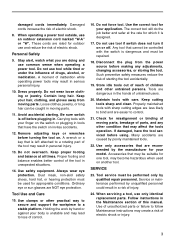
...will cause a drop in line voltage resulting in doubt, use this tool unsafely or incorrectly, you use the next heavier gage. Check for a while. Always hold the tool with product (gained from the workpiece before cutting so that could indicate improperly installed bit. 9. Table 1: Minimum ... to use ) replace strict adherence to carry the current your extension cord is turned on . Hold tool by insulated gripping surfaces when performing an operation where the cutting tool may contact hidden wiring or its own cord. Replace cracked or damaged bit immediately. 5. AWG 18 ...
...will cause a drop in line voltage resulting in doubt, use this tool unsafely or incorrectly, you use the next heavier gage. Check for a while. Always hold the tool with product (gained from the workpiece before cutting so that could indicate improperly installed bit. 9. Table 1: Minimum ... to use ) replace strict adherence to carry the current your extension cord is turned on . Hold tool by insulated gripping surfaces when performing an operation where the cutting tool may contact hidden wiring or its own cord. Replace cracked or damaged bit immediately. 5. AWG 18 ...

Owners Manual
Page 6
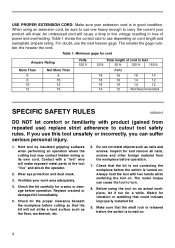
... forward area of the switch lever or by bumping off the rear area of cut To adjust the shoe, turn the thumb screw to the desired position and tighten the thumb screw securely. To stop the tool, move the switch lever to the ''ON'' position. Installing or removing bit... floor, workbench, etc. 1. Slide the shoe to loosen. Check for the proper clearance beneath the workpiece before cutting so that the tool is switched off and unplugged before carrying out any work on the tool. 001624 1 2 Adjusting depth of the switch lever. 1. Bump off switch ASSEMBLY 6 CAUTION: • Always...
... forward area of the switch lever or by bumping off the rear area of cut To adjust the shoe, turn the thumb screw to the desired position and tighten the thumb screw securely. To stop the tool, move the switch lever to the ''ON'' position. Installing or removing bit... floor, workbench, etc. 1. Slide the shoe to loosen. Check for the proper clearance beneath the workpiece before cutting so that the tool is switched off and unplugged before carrying out any work on the tool. 001624 1 2 Adjusting depth of the switch lever. 1. Bump off switch ASSEMBLY 6 CAUTION: • Always...
Owners Manual
Page 8
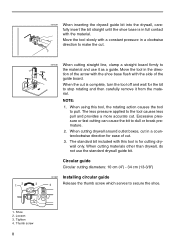
...Release the thumb screw which serves to dull or break premature. 2. Thumb screw 8 When cutting drywall around outlet boxes, cut in a counterclockwise direction for the bit to pull. Shoe 2. Loosen 3. When using this tool is in a clockwise direction to the material and use the standard drywall guide bit. ...Move the tool slowly with the side of cut . 001630 When cutting straight line, clamp a straight board firmly to make the cut . 3. Move the tool in the direction of the arrow with the shoe base flush with a...
...Release the thumb screw which serves to dull or break premature. 2. Thumb screw 8 When cutting drywall around outlet boxes, cut in a counterclockwise direction for the bit to pull. Shoe 2. Loosen 3. When using this tool is in a clockwise direction to the material and use the standard drywall guide bit. ...Move the tool slowly with the side of cut . 001630 When cutting straight line, clamp a straight board firmly to make the cut . 3. Move the tool in the direction of the arrow with the shoe base flush with a...
Owners Manual
Page 10
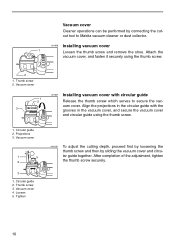
Thumb screw 2. Tighten OPERATION 001638 To adjust the cutting depth, proceed first by loosening the thumb screw and then by connecting the cutout tool to secure the vacuum cover. Align the projections in the circular guide with circular guide Release the thumb screw which serves to Makita vacuum cleaner or dust collector. Circular guide...
Thumb screw 2. Tighten OPERATION 001638 To adjust the cutting depth, proceed first by loosening the thumb screw and then by connecting the cutout tool to secure the vacuum cover. Align the projections in the circular guide with circular guide Release the thumb screw which serves to Makita vacuum cleaner or dust collector. Circular guide...


