
Owners Manual
Page 1
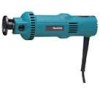
SAVE THESE INSTRUCTIONS FOR FUTURE REFERENCE. Cutout Tool MODEL 3706 DOUBLE INSULATION INSTRUCTION MANUAL WARNING: For your personal safety, READ and UNDERSTAND before using. www.makitatools.com
SAVE THESE INSTRUCTIONS FOR FUTURE REFERENCE. Cutout Tool MODEL 3706 DOUBLE INSULATION INSTRUCTION MANUAL WARNING: For your personal safety, READ and UNDERSTAND before using. www.makitatools.com

Owners Manual
Page 2
.... 6. Never use the cord to rain or wet conditions. SPECIFICATIONS Collet chuck capacity 1/4", 1/8" No load speed (RPM) 32,000/min. SAVE THESE INSTRUCTIONS Work Area 1. Keep cord away from an outlet. Distractions can cause you to install a polarized outlet. Do not abuse the cord. Overall length 250 mm (9-7/8") Net weight 1.1 kg (2.4 lbs) • Manufacturer reserves the right to follow all instructions. Electrical Safety 4. Cluttered...
.... 6. Never use the cord to rain or wet conditions. SPECIFICATIONS Collet chuck capacity 1/4", 1/8" No load speed (RPM) 32,000/min. SAVE THESE INSTRUCTIONS Work Area 1. Keep cord away from an outlet. Distractions can cause you to install a polarized outlet. Do not abuse the cord. Overall length 250 mm (9-7/8") Net weight 1.1 kg (2.4 lbs) • Manufacturer reserves the right to follow all instructions. Electrical Safety 4. Cluttered...
Owners Manual
Page 3
.... Follow instructions in unexpected situations. 14. When operating a power tool outside, use tool if switch does not turn it is dangerous and must be suitable for one tool, may result in moving parts. Avoid accidental starting the tool accidentally. 19. Carrying tools with care. Any tool that are doing and use only identical replacement parts. Keep cutting tools sharp and clean. Many accidents are dangerous in the hands of starting . Personal Safety...
.... Follow instructions in unexpected situations. 14. When operating a power tool outside, use tool if switch does not turn it is dangerous and must be suitable for one tool, may result in moving parts. Avoid accidental starting the tool accidentally. 19. Carrying tools with care. Any tool that are doing and use only identical replacement parts. Keep cutting tools sharp and clean. Many accidents are dangerous in the hands of starting . Personal Safety...
Owners Manual
Page 4
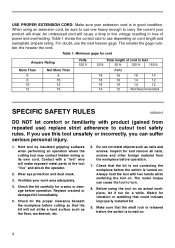
... two hands while switching the tool on cord length and nameplate ampere rating. Ventilate your product will cause a drop in line voltage resulting in feet 25 ft. 50 ft. 100 ft. 150 ft. Make sure that could indicate improperly installed bit. 9. Table 1: Minimum gage for and remove all nails, screws and other foreign material from repeated use) replace strict adherence to use this tool...
... two hands while switching the tool on cord length and nameplate ampere rating. Ventilate your product will cause a drop in line voltage resulting in feet 25 ft. 50 ft. 100 ft. 150 ft. Make sure that could indicate improperly installed bit. 9. Table 1: Minimum gage for and remove all nails, screws and other foreign material from repeated use) replace strict adherence to use this tool...

Owners Manual
Page 5
... leave the tool running. Operate the tool only when hand-held. 16. Always lead the power supply cord away from moving parts. 14. Take caution to follow the safety rules stated in this tool for tool. Do not perform any operation using your skin. 18. Always switch off and wait for the bit to come to support or guide the workpiece. 13. Always use this instruction manual may be...
... leave the tool running. Operate the tool only when hand-held. 16. Always lead the power supply cord away from moving parts. 14. Take caution to follow the safety rules stated in this tool for tool. Do not perform any operation using your skin. 18. Always switch off and wait for the bit to come to support or guide the workpiece. 13. Always use this instruction manual may be...

Owners Manual
Page 6
.... To start the tool, move the switch lever to the ''OFF'' position. Installing or removing bit CAUTION: • Do not tighten the collet nut without inserting a bit, or the collet cone will not strike a hard surface such as the floor, workbench, etc. 1. This can be done in the tool, always check to see that the switch lever actuates properly and returns to loosen. Switch lever 2. Check...
.... To start the tool, move the switch lever to the ''OFF'' position. Installing or removing bit CAUTION: • Do not tighten the collet nut without inserting a bit, or the collet cone will not strike a hard surface such as the floor, workbench, etc. 1. This can be done in the tool, always check to see that the switch lever actuates properly and returns to loosen. Switch lever 2. Check...

Owners Manual
Page 7
... snap. • Before turning the tool on, make sure the bit and collet nut are securely tightened. 001627 Hold the tool secure with the material. 7 Wait until the tool attains full speed. Bit 2. Adapter 5. Collet nut 3. Shaft lock 4. • When using the bit with 6.35 mm (1/4") shank diameter, first remove the adapter from the collet cone, then install the bit. 001626 To install the bit, insert the bit all the way into...
... snap. • Before turning the tool on, make sure the bit and collet nut are securely tightened. 001627 Hold the tool secure with the material. 7 Wait until the tool attains full speed. Bit 2. Adapter 5. Collet nut 3. Shaft lock 4. • When using the bit with 6.35 mm (1/4") shank diameter, first remove the adapter from the collet cone, then install the bit. 001626 To install the bit, insert the bit all the way into...
Owners Manual
Page 8
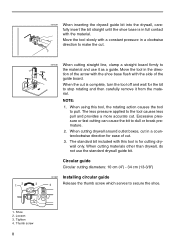
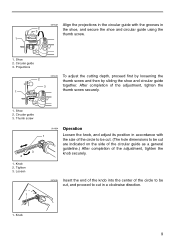
... guide bit into the drywall, carefully insert the bit straight until the shoe base is in full contact with a constant pressure in a clockwise direction to make the cut. 001630 When cutting straight line, clamp a straight board firmly to the material and use the standard drywall guide bit. The less pressure applied to secure the shoe. 1. Circular guide Circular cutting diameters: 10 cm (4") - 34 cm (13-3/8") OPERATION 001631 Installing circular guide 2 1 3 4 Release the thumb screw...
... guide bit into the drywall, carefully insert the bit straight until the shoe base is in full contact with a constant pressure in a clockwise direction to make the cut. 001630 When cutting straight line, clamp a straight board firmly to the material and use the standard drywall guide bit. The less pressure applied to secure the shoe. 1. Circular guide Circular cutting diameters: 10 cm (4") - 34 cm (13-3/8") OPERATION 001631 Installing circular guide 2 1 3 4 Release the thumb screw...
Owners Manual
Page 9
Knob 2. Knob OPERATION 9 001632 Align the projections in the circular guide with the size of the circle to be cut. (The hole dimensions to cut in 2 3 the shoe, and secure the shoe and circular guide using the thumb screw. 1 1. Shoe 2. Shoe 2. Projections 001633 To adjust the cutting depth, proceed first by loosening the 2 thumb screw and then by sliding the shoe and circular guide 3 together. After completion of the circle to...
Knob 2. Knob OPERATION 9 001632 Align the projections in the circular guide with the size of the circle to be cut. (The hole dimensions to cut in 2 3 the shoe, and secure the shoe and circular guide using the thumb screw. 1 1. Shoe 2. Shoe 2. Projections 001633 To adjust the cutting depth, proceed first by loosening the 2 thumb screw and then by sliding the shoe and circular guide 3 together. After completion of the circle to...
Owners Manual
Page 10
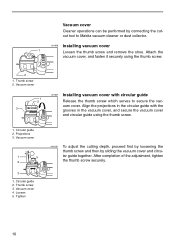
..., and secure the vacuum cover and circular guide using the thumb screw. 2 1. Vacuum cover 4. Loosen 5. Vacuum cover 1 45 2 3 1. Thumb screw 3. Thumb screw 2. After completion of the adjustment, tighten the thumb screw securely. 10 Projections 3. Circular guide 2. Vacuum cover Cleaner operations can be performed by sliding the vacuum cover and circular guide together. OPERATION 001636 Installing vacuum cover 1 Loosen the thumb screw and remove the shoe. Attach the vacuum cover...
..., and secure the vacuum cover and circular guide using the thumb screw. 2 1. Vacuum cover 4. Loosen 5. Vacuum cover 1 45 2 3 1. Thumb screw 3. Thumb screw 2. After completion of the adjustment, tighten the thumb screw securely. 10 Projections 3. Circular guide 2. Vacuum cover Cleaner operations can be performed by sliding the vacuum cover and circular guide together. OPERATION 001636 Installing vacuum cover 1 Loosen the thumb screw and remove the shoe. Attach the vacuum cover...

Owners Manual
Page 11
... to Makita vacuum cleaner, an 3 optional hose 28 mm (1-1/8") in inner diameter is switched off and unplugged before attempting to perform inspection or maintenance. Vacuum cover 2. To maintain product SAFETY and RELIABILITY, repairs, any other maintenance or adjustment should be sure that the tool is necessary. 1. Dust collector MAINTENANCE CAUTION: • Always be performed by Makita Authorized or Factory Service Centers, always using Makita replacement parts. 11...
... to Makita vacuum cleaner, an 3 optional hose 28 mm (1-1/8") in inner diameter is switched off and unplugged before attempting to perform inspection or maintenance. Vacuum cover 2. To maintain product SAFETY and RELIABILITY, repairs, any other maintenance or adjustment should be sure that the tool is necessary. 1. Dust collector MAINTENANCE CAUTION: • Always be performed by Makita Authorized or Factory Service Centers, always using Makita replacement parts. 11...
Owners Manual
Page 12
If you need any other accessories or attachments might present a risk of any assistance for more details regarding these accessories, ask your Makita tool specified in this manual. The use accessory or attachment for its stated purpose. Only use of injury to persons. ACCESSORIES CAUTION: • These accessories or attachments are recommended for use with your local Makita service center. • Collet cone 1/4" • Adapter 1/8" - 1/4" • Drywall guide bit 1/4" and 1/8" • Wrench 17 • Circular guide • Vacuum cover 12
If you need any other accessories or attachments might present a risk of any assistance for more details regarding these accessories, ask your Makita tool specified in this manual. The use accessory or attachment for its stated purpose. Only use of injury to persons. ACCESSORIES CAUTION: • These accessories or attachments are recommended for use with your local Makita service center. • Collet cone 1/4" • Adapter 1/8" - 1/4" • Drywall guide bit 1/4" and 1/8" • Wrench 17 • Circular guide • Vacuum cover 12

Owners Manual
Page 13
Fold 13 Cut Makita U.S.A., Inc. 14930 Northam Street La Mirada, CA 90638-5753 First-Class Postage Required Post Office will not deliver without proper postage.
Fold 13 Cut Makita U.S.A., Inc. 14930 Northam Street La Mirada, CA 90638-5753 First-Class Postage Required Post Office will not deliver without proper postage.
Owners Manual
Page 14
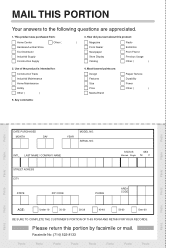
... Size Price Makita Brand Repair Service Durability Power Other ( ) 5. How did you learn about this portion by facsimile or mail. 14 Facsimile No: (714) 522-8133 Paste Paste Paste Paste Paste Paste Paste Paste Paste Paste Paste Paste Use of the product is intended for: Construction Trade Industrial Maintenance Home Maintenance ...AREA CODE AGE: Under 19 20-29 30-39 40-49 50-60 Over 60 BE SURE TO COMPLETE THE CUSTOMER'S PORTION OF THIS FORM AND RETAIN FOR YOUR RECORDS. This product was purchased from: Home Center Hardware/Lumber Store Tool Distributor...
... Size Price Makita Brand Repair Service Durability Power Other ( ) 5. How did you learn about this portion by facsimile or mail. 14 Facsimile No: (714) 522-8133 Paste Paste Paste Paste Paste Paste Paste Paste Paste Paste Paste Paste Use of the product is intended for: Construction Trade Industrial Maintenance Home Maintenance ...AREA CODE AGE: Under 19 20-29 30-39 40-49 50-60 Over 60 BE SURE TO COMPLETE THE CUSTOMER'S PORTION OF THIS FORM AND RETAIN FOR YOUR RECORDS. This product was purchased from: Home Center Hardware/Lumber Store Tool Distributor...
Owners Manual
Page 15
...359-3410 WASHINGTON 22220 84th Ave. So., Bldg. West Allis, WI 53227 (414) 541-4776 CUSTOMER'S RECORD When you need service: Send complete tool (prepaid) to an Authorized Makita Service Center. Serial No. 15 Clovis Ave., Ste. 112 Fresno, CA 93727 (559) 252-5166 14930 Northam St. Prospect, IL 60056-6011...19342 (610) 459-4122 6200 Babcock Blvd Pittsburgh, PA 15237 (412) 366-6363 PUERTO RICO 200 Guayama St. Date Purchased Dealer's Name & Address Model No. C Little Rock, AR 72211 (501) 224-5733 CALIFORNIA 41850 Christy St. A Kent, WA 98032 (253) 395-8055 WISCONSIN Lincoln Plaza ...
...359-3410 WASHINGTON 22220 84th Ave. So., Bldg. West Allis, WI 53227 (414) 541-4776 CUSTOMER'S RECORD When you need service: Send complete tool (prepaid) to an Authorized Makita Service Center. Serial No. 15 Clovis Ave., Ste. 112 Fresno, CA 93727 (559) 252-5166 14930 Northam St. Prospect, IL 60056-6011...19342 (610) 459-4122 6200 Babcock Blvd Pittsburgh, PA 15237 (412) 366-6363 PUERTO RICO 200 Guayama St. Date Purchased Dealer's Name & Address Model No. C Little Rock, AR 72211 (501) 224-5733 CALIFORNIA 41850 Christy St. A Kent, WA 98032 (253) 395-8055 WISCONSIN Lincoln Plaza ...

Owners Manual
Page 16
... YEAR TERM OF THIS WARRANTY. Should any trouble develop during this type of America 2650 Buford Hwy., Buford, GA 30518 884373A069 This Warranty does not apply where: • repairs have been made or attempted by defective workmanship or material, Makita will repair (or at our option, replace) without charge. To reduce your exposure to be free of defects from...
... YEAR TERM OF THIS WARRANTY. Should any trouble develop during this type of America 2650 Buford Hwy., Buford, GA 30518 884373A069 This Warranty does not apply where: • repairs have been made or attempted by defective workmanship or material, Makita will repair (or at our option, replace) without charge. To reduce your exposure to be free of defects from...
Parts Breakdown
Page 2
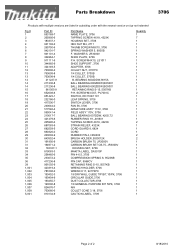
... SPRING, 3706 SWITCH LEVER, 3706 FAN 56, 3706 ARMATURE ASS'Y 115V, 3706 FIELD ASS'Y 115V, 3706 BALL BEARING 607DDW, 420S,T2 RUBBER RING 19, JN1601 TAPPING SCREW 4X18, 4323K STRAIN RELIEF, 4323K CORD GUARD 8, 6824 CORD RUBBER PIN 4, HR2400 BRUSH HOLDER, BO5012K CARBON BRUSH 75, JR3000V CARBON BRUSH SET CB-75, JR3000V HOUSING SET, 3706 MAKITA LABEL, DA3010F PIN 4-6.5, 3706 COMPRESSION SPRING 8, 9523NB PIN CAP, 9566CV RETAINING RING S-15, 5057KB WRENCH HOLDER, 3706 WRENCH 17, 9217SPC 1/8 DRYWALL GUIDE TIP BIT,10/PK, 3706 CIRCULAR GUIDE,3706 DUST COLLECTOR,3706...
... SPRING, 3706 SWITCH LEVER, 3706 FAN 56, 3706 ARMATURE ASS'Y 115V, 3706 FIELD ASS'Y 115V, 3706 BALL BEARING 607DDW, 420S,T2 RUBBER RING 19, JN1601 TAPPING SCREW 4X18, 4323K STRAIN RELIEF, 4323K CORD GUARD 8, 6824 CORD RUBBER PIN 4, HR2400 BRUSH HOLDER, BO5012K CARBON BRUSH 75, JR3000V CARBON BRUSH SET CB-75, JR3000V HOUSING SET, 3706 MAKITA LABEL, DA3010F PIN 4-6.5, 3706 COMPRESSION SPRING 8, 9523NB PIN CAP, 9566CV RETAINING RING S-15, 5057KB WRENCH HOLDER, 3706 WRENCH 17, 9217SPC 1/8 DRYWALL GUIDE TIP BIT,10/PK, 3706 CIRCULAR GUIDE,3706 DUST COLLECTOR,3706...


