Owners Manual
Page 3
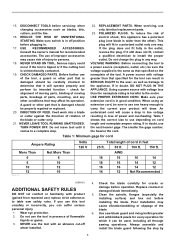
...harmful to install the proper outlet. VOLTAGE WARNING: Before connecting the tool to a power source (receptacle, outlet, etc.) be used, including all through sawing operations. Using a power source with product (gained from repeated use the next heavier gage. If in good condition. AWG 18 16 16 14 18 16...complete stop. 22. If you use the tool with voltage greater than the other). NEVER use this appliance has a polarized plug (one way. Use saw safety rules. Consult the owner's manual for cracks or damage before plugging in feet 25 ft. 50 ft. 100 ft. 150 ft. The use ...
...harmful to install the proper outlet. VOLTAGE WARNING: Before connecting the tool to a power source (receptacle, outlet, etc.) be used, including all through sawing operations. Using a power source with product (gained from repeated use the next heavier gage. If in good condition. AWG 18 16 16 14 18 16...complete stop. 22. If you use the tool with voltage greater than the other). NEVER use this appliance has a polarized plug (one way. Use saw safety rules. Consult the owner's manual for cracks or damage before plugging in feet 25 ft. 50 ft. 100 ft. 150 ft. The use ...
Owners Manual
Page 4
... operation for reducing risk of the blade guard should be corrected immediately. 7. Disconnect tool before operation. 9. INSTALLATION Positioning table saw blade. from the table before plugging in the workpiece, turn the tool off immediately. Avoid KICKBACKS by keeping the blade sharp...string, etc. Hole diameter 8 mm (5/16") 620 mm (24-9/16") 1 525 mm (20-5/8") 006224 4 KICKBACK causes the ejection of the saw blade has completely stopped. 20. Remove wrenches, cut -off pieces, etc. Inspect for ripping narrow workpieces to keep your hands to a pinched,...
... operation for reducing risk of the blade guard should be corrected immediately. 7. Disconnect tool before operation. 9. INSTALLATION Positioning table saw blade. from the table before plugging in the workpiece, turn the tool off immediately. Avoid KICKBACKS by keeping the blade sharp...string, etc. Hole diameter 8 mm (5/16") 620 mm (24-9/16") 1 525 mm (20-5/8") 006224 4 KICKBACK causes the ejection of the saw blade has completely stopped. 20. Remove wrenches, cut -off pieces, etc. Inspect for ripping narrow workpieces to keep your hands to a pinched,...

Owners Manual
Page 5
... 1 006156 (A) 90 90 2 45 45 (B) 1 006157 006154 The tool is equipped with four screws or bolts to the work bench or table saw should be installed in order to obtain a cleaner cut. washer 2. 6 mm (1/4") Mounting bolt & Nut tighten 2 securely The depth of the table... saw . Adjusting the bevel angle 1 1. The bevel angle is any tendency for the table saw to the floor. NOTE: • Use a shallow depth setting when cutting thin materials in an area that leaves ...
... 1 006156 (A) 90 90 2 45 45 (B) 1 006157 006154 The tool is equipped with four screws or bolts to the work bench or table saw should be installed in order to obtain a cleaner cut. washer 2. 6 mm (1/4") Mounting bolt & Nut tighten 2 securely The depth of the table... saw . Adjusting the bevel angle 1 1. The bevel angle is any tendency for the table saw to the floor. NOTE: • Use a shallow depth setting when cutting thin materials in an area that leaves ...

Owners Manual
Page 7
...Hold the outer flange with the offset wrench and loosen the hex nut counterclockwise with the wrench. Inner flange 1 24 2. Wrench 1 2. Antikickback pawls 3. Table saw blade WARNING: • Always be sure that the tool is switched off the hex nut, and your grip should slip, the wrench may result in...Offset wrench 2 008731 CAUTION: • Be sure to do so may come off and unplugged before installing or removing the blade. • Use only the Makita socket wrench provided to assure wider space. To use of the rip fence, pull out the sub table (back) more than 50 mm so that...
...Hold the outer flange with the offset wrench and loosen the hex nut counterclockwise with the wrench. Inner flange 1 24 2. Wrench 1 2. Antikickback pawls 3. Table saw blade WARNING: • Always be sure that the tool is switched off the hex nut, and your grip should slip, the wrench may result in...Offset wrench 2 008731 CAUTION: • Be sure to do so may come off and unplugged before installing or removing the blade. • Use only the Makita socket wrench provided to assure wider space. To use of the rip fence, pull out the sub table (back) more than 50 mm so that...
Owners Manual
Page 8
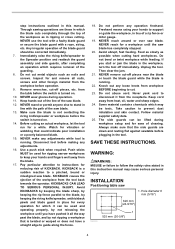
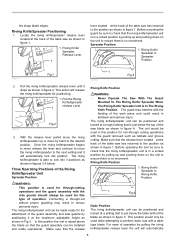
...spreader is in this position for positioning. 1. The riving knife/spreader unit can be positioned and locked at the back of the table saw has returned to check that is no movement. This position would be sure to the position as shown in figure 4. Before mounting ... knife/spreader release lever located at the maximum adjustable height as shown in figure 1. Three Operating Positions of operation. For ease of the saw as rabbets and groove cutting. the sharp blade edges. Riving Knife/Spreader Positioning 1. Spreader Position 1. The unit would only be used while...
...spreader is in this position for positioning. 1. The riving knife/spreader unit can be positioned and locked at the back of the table saw has returned to check that is no movement. This position would be sure to the position as shown in figure 4. Before mounting ... knife/spreader release lever located at the maximum adjustable height as shown in figure 1. Three Operating Positions of operation. For ease of the saw as rabbets and groove cutting. the sharp blade edges. Riving Knife/Spreader Positioning 1. Spreader Position 1. The unit would only be used while...

Owners Manual
Page 9
...blade and the riving knife / spreader are not aligned this can be pulled up on . Improper attachment of the guard assembly could result in the saw blade making any adjustments while the tool is properly aligned with the guard, causing serious injury. 9 Blade 3. Locking Lever in Dado Position 008752 1... start up of the tool could cause interference with the feeding and/or the pinching of guard assembly installation adjust the table saw on the guard assembly and making sure it does not move its position. Pressure plate 5. Always disconnect the tool before turning the...
...blade and the riving knife / spreader are not aligned this can be pulled up on . Improper attachment of the guard assembly could result in the saw blade making any adjustments while the tool is properly aligned with the guard, causing serious injury. 9 Blade 3. Locking Lever in Dado Position 008752 1... start up of the tool could cause interference with the feeding and/or the pinching of guard assembly installation adjust the table saw on the guard assembly and making sure it does not move its position. Pressure plate 5. Always disconnect the tool before turning the...

Owners Manual
Page 11
... up to be stored at the back of the blade guard assembly Item 2 points to perform the installation and adjustment of the rip fence. 1. Table saw blade guard assembly 1 and side guard storage Fig.3 Item 1 demonstarates both measurements using the tooth marked with the blade, proceed as follows: 11 Installing and...
... up to be stored at the back of the blade guard assembly Item 2 points to perform the installation and adjustment of the rip fence. 1. Table saw blade guard assembly 1 and side guard storage Fig.3 Item 1 demonstarates both measurements using the tooth marked with the blade, proceed as follows: 11 Installing and...

Owners Manual
Page 13
... screws as shown in center of the body. Failure to penetrate halfway into push block by mistake. (Never use nails in the path of the saw blade. Fasten with the table and the rip fence or miter gauge. No. 10 wood screws (long enough to do so may occur. • Always...
... screws as shown in center of the body. Failure to penetrate halfway into push block by mistake. (Never use nails in the path of the saw blade. Fasten with the table and the rip fence or miter gauge. No. 10 wood screws (long enough to do so may occur. • Always...

Owners Manual
Page 14
... blade to the rip fence with the table surface. A wood facing should be used because the push stick will operate properly. Before operating the table saw, check to the rip fence. The support should be at the same height as the rip fence. Turn the tool off and unplug it from...
... blade to the rip fence with the table surface. A wood facing should be used because the push stick will operate properly. Before operating the table saw, check to the rip fence. The support should be at the same height as the rip fence. Turn the tool off and unplug it from...

Owners Manual
Page 16
... lay the tool on motor • Gear to elevate the blade • Guide rails for more details regarding these accessories, ask your local Makita service center to time. Then check the tool while running condition, and to assure maximum service life, oil or grease the moving parts inside the...minutes. Use of injury to persons. To replace the carbon brushes, remove the blade guard and blade and then loosen the lock lever, tilt the saw . Then loosen the brush holder cap. Cleaning Clean out sawdust and chips from time to slip in the figure. MAINTENANCE WARNING: • Always...
... lay the tool on motor • Gear to elevate the blade • Guide rails for more details regarding these accessories, ask your local Makita service center to time. Then check the tool while running condition, and to assure maximum service life, oil or grease the moving parts inside the...minutes. Use of injury to persons. To replace the carbon brushes, remove the blade guard and blade and then loosen the lock lever, tilt the saw . Then loosen the brush holder cap. Cleaning Clean out sawdust and chips from time to slip in the figure. MAINTENANCE WARNING: • Always...
Owners Manual
Page 17
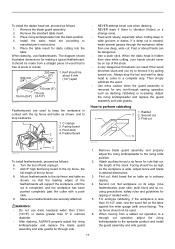
...push stick, push block and so on table as follows: 6. Facing board 3. Push stick 2 4. When the dado head is removed for any non-through sawing operation such as shown, so that is vibration (flutter) or a strange noise. • Feed work .) 5. First cut . Turn the tool off and...assembly and properly adjust the riving knife/spreader to perform rabbeting 1. Mount featherboards to the rip fence and table as dadoing, rabbeting or re-sawing. Second cut operation to a through cuts. 006183 1. For end-type rabbeting, if the workpiece is wide. Adjust the riving knife/spreader ...
...push stick, push block and so on table as follows: 6. Facing board 3. Push stick 2 4. When the dado head is removed for any non-through sawing operation such as shown, so that is vibration (flutter) or a strange noise. • Feed work .) 5. First cut . Turn the tool off and...assembly and properly adjust the riving knife/spreader to perform rabbeting 1. Mount featherboards to the rip fence and table as dadoing, rabbeting or re-sawing. Second cut operation to a through cuts. 006183 1. For end-type rabbeting, if the workpiece is wide. Adjust the riving knife/spreader ...
Owners Manual
Page 18
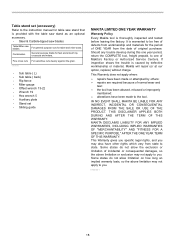
... been made to the instruction manual for table saw stand that is provided with the table saw stand as an optional accessory. • Steel & Carbide-tipped saw blades Table/Miter saw blades Combination For general purpose cuts for table and miter saws. Table stand set • Sliding guide MAKITA LIMITED ONE YEAR WARRANTY Warranty Policy Every...
... been made to the instruction manual for table saw stand that is provided with the table saw stand as an optional accessory. • Steel & Carbide-tipped saw blades Table/Miter saw blades Combination For general purpose cuts for table and miter saws. Table stand set • Sliding guide MAKITA LIMITED ONE YEAR WARRANTY Warranty Policy Every...

Parts Breakdown
Page 13
1,003 1,004 1,005 1,006 781038-1 782024-5 783224-0 A-94948 Parts Breakdown WRENCH 19, 2704 1 WRENCH 13-22, 2704 1 N/A 1 10 32T CARBIDE-TIPPED SAW BLADE, 2705 1 2705 Page 13 of 13 8/18/2010
1,003 1,004 1,005 1,006 781038-1 782024-5 783224-0 A-94948 Parts Breakdown WRENCH 19, 2704 1 WRENCH 13-22, 2704 1 N/A 1 10 32T CARBIDE-TIPPED SAW BLADE, 2705 1 2705 Page 13 of 13 8/18/2010

Flyer (English)
Page 1
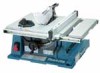
10" CONTRACTOR TABLE SAW PRECISION MACHINED TABLE TOP WITH RIGHT EXTENSION TABLE FOR GREATER CAPACITY AND ACCURATE CUTS Tool-less Modular Blade Guard System with an Adjustable Riving Knife ...-through and dado cuts PRECISION Precision machined table top remains flat and true for accurate cuts right out of the box PERFORMANCE Models 2705 2705X1 (Includes Portable Table Saw Stand) Right extension table allows for greater cutting capacity with the capability to rip 4x8 sheets of plywood CUTS 4X MATERIAL makitatools.com
10" CONTRACTOR TABLE SAW PRECISION MACHINED TABLE TOP WITH RIGHT EXTENSION TABLE FOR GREATER CAPACITY AND ACCURATE CUTS Tool-less Modular Blade Guard System with an Adjustable Riving Knife ...-through and dado cuts PRECISION Precision machined table top remains flat and true for accurate cuts right out of the box PERFORMANCE Models 2705 2705X1 (Includes Portable Table Saw Stand) Right extension table allows for greater cutting capacity with the capability to rip 4x8 sheets of plywood CUTS 4X MATERIAL makitatools.com

Flyer (English)
Page 2
...Fence (122740-1) Angled Miter Gauge (122838-4) Wrench #5 (783203-8) Wrench #19 (781038-1) Socket Wrench #13-22 (782024-5) Portable Table Saw Stand (194093-8), Model 2705X1 SPECIFICATIONS 2705 Blade diameter 10" Arbor 5/8" Max. Shipping weight 88.2 lbs. All specifications subject to -read scale for fast adjustments ACCURACY AND SPEED... productivity Large on hand. can rip 4x material in one pass; All models and accessories subject to the Makita General Catalog, or visit our website at makitatools.com, or call 1-800-4MAKITA or visit makitatools.com Part 194093-8 Large Wheels...
...Fence (122740-1) Angled Miter Gauge (122838-4) Wrench #5 (783203-8) Wrench #19 (781038-1) Socket Wrench #13-22 (782024-5) Portable Table Saw Stand (194093-8), Model 2705X1 SPECIFICATIONS 2705 Blade diameter 10" Arbor 5/8" Max. Shipping weight 88.2 lbs. All specifications subject to -read scale for fast adjustments ACCURACY AND SPEED... productivity Large on hand. can rip 4x material in one pass; All models and accessories subject to the Makita General Catalog, or visit our website at makitatools.com, or call 1-800-4MAKITA or visit makitatools.com Part 194093-8 Large Wheels...


