
Owners Manual
Page 1
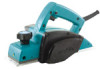
www.makitatools.com Power Planer MODEL 1902 DOUBLE INSULATION 002543 INSTRUCTION MANUAL WARNING: For your personal safety, READ and UNDERSTAND before using. SAVE THESE INSTRUCTIONS FOR FUTURE REFERENCE.
www.makitatools.com Power Planer MODEL 1902 DOUBLE INSULATION 002543 INSTRUCTION MANUAL WARNING: For your personal safety, READ and UNDERSTAND before using. SAVE THESE INSTRUCTIONS FOR FUTURE REFERENCE.
Owners Manual
Page 2
... away while operating a power tool. SPECIFICATIONS Model Planing width Planing depth Shiplapping depth No load speed (RPM) Overall length Net weight 1902 82 mm (3-1/4") 1 mm (1/32") 9 mm (11/32") 16,000/min. 290 mm (11-3/8") 2.5 kg (5.5 lbs) • Manufacturer reserves the right to change specifications without notice. • Specifications may ignite the dust or fumes. 3. Double insulated tools are equipped with a polarized plug (one blade is...
... away while operating a power tool. SPECIFICATIONS Model Planing width Planing depth Shiplapping depth No load speed (RPM) Overall length Net weight 1902 82 mm (3-1/4") 1 mm (1/32") 9 mm (11/32") 16,000/min. 290 mm (11-3/8") 2.5 kg (5.5 lbs) • Manufacturer reserves the right to change specifications without notice. • Specifications may ignite the dust or fumes. 3. Double insulated tools are equipped with a polarized plug (one blade is...

Owners Manual
Page 3
.... Tool Use and Care 15. Use the correct tool for the three wire grounded power cord and grounded power supply system. 5. change the plug in the hands of untrained users. 20. Keep cord away from moving parts. Do not wear loose clothing or jewelry. Loose clothes, jewelry, or long hair can be repaired. 18. Remove adjusting keys or wrenches before making any other practical way to secure and support...
.... Tool Use and Care 15. Use the correct tool for the three wire grounded power cord and grounded power supply system. 5. change the plug in the hands of untrained users. 20. Keep cord away from moving parts. Do not wear loose clothing or jewelry. Loose clothes, jewelry, or long hair can be repaired. 18. Remove adjusting keys or wrenches before making any other practical way to secure and support...

Owners Manual
Page 4
Service or main- When servicing a tool, use this manual. Be sure the blade installation bolts are should never be performed only by unqualified personnel could indicate 4 securely tightened before operation. 3. Use only sharp blades. Keep hands away from repeated use) replace strict adherence to use depending on cord length and nameplate ampere rating. Rags, cloth, cord, string and the like 4. SERVICE 23. Avoid cutting nails. Follow instructions in doubt, use one tool, may create...
Service or main- When servicing a tool, use this manual. Be sure the blade installation bolts are should never be performed only by unqualified personnel could indicate 4 securely tightened before operation. 3. Use only sharp blades. Keep hands away from repeated use) replace strict adherence to use depending on cord length and nameplate ampere rating. Rags, cloth, cord, string and the like 4. SERVICE 23. Avoid cutting nails. Follow instructions in doubt, use one tool, may create...
Owners Manual
Page 5
... caution to follow the safety rules stated in this instruction manual may cause serious personal injury. Operate the tool only when hand-held. 14. Use only Makita blades specified in this manual. 18. poor installation or a poorly balanced blade. 8. Wait until the blade attains full speed before putting the tool aside. 17. SYMBOLS USD201-2 The followings show the symbols used for complete run-down before cutting. 10.
... caution to follow the safety rules stated in this instruction manual may cause serious personal injury. Operate the tool only when hand-held. 14. Use only Makita blades specified in this manual. 18. poor installation or a poorly balanced blade. 8. Wait until the blade attains full speed before putting the tool aside. 17. SYMBOLS USD201-2 The followings show the symbols used for complete run-down before cutting. 10.
Owners Manual
Page 6
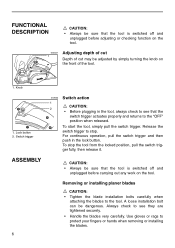
...; Tighten the blade installation bolts carefully when attaching the blades to the "OFF" position when released. A loose installation bolt can be dangerous. FUNCTIONAL DESCRIPTION CAUTION: • Always be sure that the tool is switched off and unplugged before carrying out any work on the front of cut may be adjusted by simply turning the knob on the tool. Knob 1. Lock button 2. To start the tool, simply pull the switch trigger. To stop...
...; Tighten the blade installation bolts carefully when attaching the blades to the "OFF" position when released. A loose installation bolt can be dangerous. FUNCTIONAL DESCRIPTION CAUTION: • Always be sure that the tool is switched off and unplugged before carrying out any work on the front of cut may be adjusted by simply turning the knob on the tool. Knob 1. Lock button 2. To start the tool, simply pull the switch trigger. To stop...
Owners Manual
Page 7
... side of the gauge base. Set the adjusting plate/set plate on the drum, unscrew the three installation bolts with the inside flank of the gauge plate, the planer blade locating lugs sit in the heel of the adjusting plate flush with the back side of the gauge base and tighten the pan head screws. 4. Mini planer blade 2. Drum • Use only the Makita wrench provided to ensure uniform cutting. 5. Tighten the three hex...
... side of the gauge base. Set the adjusting plate/set plate on the drum, unscrew the three installation bolts with the inside flank of the gauge plate, the planer blade locating lugs sit in the heel of the adjusting plate flush with the back side of the gauge base and tighten the pan head screws. 4. Mini planer blade 2. Drum • Use only the Makita wrench provided to ensure uniform cutting. 5. Tighten the three hex...
Owners Manual
Page 8
... blade must be mounted so that the cutting edge is absolutely level, that is set properly and securely. Gouging at start Cause: One or both blades fails to have edge parallel to rear base line. Below are some examples of proper and improper settings. (A) Front base (Movable shoe) (B) Rear base (Stationary shoe) Correct setting (A) Nicks in relation to rear base line. 002570 Nozzle assembly (optional accessory) Use...
... blade must be mounted so that the cutting edge is absolutely level, that is set properly and securely. Gouging at start Cause: One or both blades fails to have edge parallel to rear base line. Below are some examples of proper and improper settings. (A) Front base (Movable shoe) (B) Rear base (Stationary shoe) Correct setting (A) Nicks in relation to rear base line. 002570 Nozzle assembly (optional accessory) Use...
Owners Manual
Page 9
... in the figure, use the edge fence (guide rule). 9 Start 002579 Planing operation First, rest the tool front base flat upon the workpiece surface without the blades making any contact. 002571 1 2 The nozzle assembly may be attached after the chip cover on and wait 2 until the blades attain full speed. Then move the tool gently forward. For rough cutting, the depth of cut and advance the...
... in the figure, use the edge fence (guide rule). 9 Start 002579 Planing operation First, rest the tool front base flat upon the workpiece surface without the blades making any contact. 002571 1 2 The nozzle assembly may be attached after the chip cover on and wait 2 until the blades attain full speed. Then move the tool gently forward. For rough cutting, the depth of cut and advance the...
Owners Manual
Page 10
... attaching an extra piece of the tool. Maximum shiplapping (rabbeting) depth is 9 mm (11/32"). 2 002584 You may result. Otherwise uneven planing may wish to add to the length of the fence by tightening the screw. Blade edge 2. Cutting line 1 1. Insert the edge fence into the hole in the fence for this purpose, and also for attaching an extension guide (optional accessory). 10 Convenient holes...
... attaching an extra piece of the tool. Maximum shiplapping (rabbeting) depth is 9 mm (11/32"). 2 002584 You may result. Otherwise uneven planing may wish to add to the length of the fence by tightening the screw. Blade edge 2. Cutting line 1 1. Insert the edge fence into the hole in the fence for this purpose, and also for attaching an extension guide (optional accessory). 10 Convenient holes...
Owners Manual
Page 11
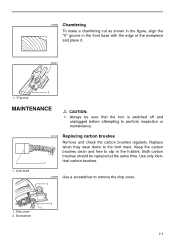
... holders. Limit mark 001145 Replacing carbon brushes Remove and check the carbon brushes regularly. Screwdriver 11 Keep the carbon brushes clean and free to the limit mark. Both carbon brushes should be sure that the tool is switched off and unplugged before attempting to remove the chip cover. 1 2 1. Replace when they wear down to slip in the front base with the edge of the workpiece and plane it. 002587 1 1. Use...
... holders. Limit mark 001145 Replacing carbon brushes Remove and check the carbon brushes regularly. Screwdriver 11 Keep the carbon brushes clean and free to the limit mark. Both carbon brushes should be sure that the tool is switched off and unplugged before attempting to remove the chip cover. 1 2 1. Replace when they wear down to slip in the front base with the edge of the workpiece and plane it. 002587 1 1. Use...
Owners Manual
Page 12
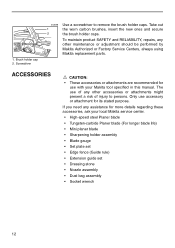
... local Makita service center. • High-speed steel Planer blade • Tungsten-carbide Planer blade (For longer blade life) • Mini planer blade • Sharpening holder assembly • Blade gauge • Set plate set • Edge fence (Guide rule) • Extension guide set • Dressing stone • Nozzle assembly • Dust bag assembly • Socket wrench 12 Take out the worn carbon brushes, insert the new ones and secure the brush holder caps. 1. Brush holder cap 2. Screwdriver 002598 1 2 Use a screwdriver to persons. ACCESSORIES CAUTION...
... local Makita service center. • High-speed steel Planer blade • Tungsten-carbide Planer blade (For longer blade life) • Mini planer blade • Sharpening holder assembly • Blade gauge • Set plate set • Edge fence (Guide rule) • Extension guide set • Dressing stone • Nozzle assembly • Dust bag assembly • Socket wrench 12 Take out the worn carbon brushes, insert the new ones and secure the brush holder caps. 1. Brush holder cap 2. Screwdriver 002598 1 2 Use a screwdriver to persons. ACCESSORIES CAUTION...
Owners Manual
Page 13
Cut Makita U.S.A., Inc. 14930 Northam Street La Mirada, CA 90638-5753 First-Class Postage Required Post Office will not deliver without proper postage. Fold 13
Cut Makita U.S.A., Inc. 14930 Northam Street La Mirada, CA 90638-5753 First-Class Postage Required Post Office will not deliver without proper postage. Fold 13
Owners Manual
Page 14
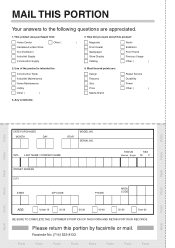
...to the following questions are : Design Features Size Price Makita Brand Repair Service Durability Power Other ( ) 5. This product was purchased from: Home Center Hardware/Lumber Store Tool Distributor Industrial Supply Construction Supply Other ( 3. SERIAL NO. Please return this product: ) Magazine ...522-8133 Paste Paste Paste Paste Paste Paste Paste Paste Paste Paste Paste Paste Use of the product is intended for: Construction Trade Industrial Maintenance Home Maintenance Hobby Other ( ) 4. Any comments: Paste Paste Paste Paste Paste Paste Paste...
...to the following questions are : Design Features Size Price Makita Brand Repair Service Durability Power Other ( ) 5. This product was purchased from: Home Center Hardware/Lumber Store Tool Distributor Industrial Supply Construction Supply Other ( 3. SERIAL NO. Please return this product: ) Magazine ...522-8133 Paste Paste Paste Paste Paste Paste Paste Paste Paste Paste Paste Paste Use of the product is intended for: Construction Trade Industrial Maintenance Home Maintenance Hobby Other ( ) 4. Any comments: Paste Paste Paste Paste Paste Paste Paste...

Owners Manual
Page 15
...CUSTOMER'S RECORD When you need service: Send complete tool (prepaid) to one of the Makita Factory Service Centers listed, or to the outside of the carton detailing the problem with your tool. Be sure to attach a letter to an Authorized Makita Service Center. Broadway Rd., Ste...6427 Penn Ave. Decatur Blvd. Fremont, CA 94538-5107 (510) 657-9881 14930 Northam St. FACTORY SERVICE CENTERS 1-800-4-MAKITA RETAIN THIS PORTION FOR YOUR RECORDS ARIZONA 3707 E. Prospect, IL 60056-6011 (847) 297-3100 MARYLAND.... 2245 S. 108th St. Date Purchased Dealer's Name & Address Model No. Serial No. 15
...CUSTOMER'S RECORD When you need service: Send complete tool (prepaid) to one of the Makita Factory Service Centers listed, or to the outside of the carton detailing the problem with your tool. Be sure to attach a letter to an Authorized Makita Service Center. Broadway Rd., Ste...6427 Penn Ave. Decatur Blvd. Fremont, CA 94538-5107 (510) 657-9881 14930 Northam St. FACTORY SERVICE CENTERS 1-800-4-MAKITA RETAIN THIS PORTION FOR YOUR RECORDS ARIZONA 3707 E. Prospect, IL 60056-6011 (847) 297-3100 MARYLAND.... 2245 S. 108th St. Date Purchased Dealer's Name & Address Model No. Serial No. 15

Owners Manual
Page 16
... power sanding, sawing, grinding, drilling, and other construction activities contains chemicals known to the State of normal wear and tear: • the tool has been abused, misused or improperly maintained: • alterations have been made or attempted by others: • repairs are specially designed to cause cancer, birth defects or other reproductive harm. This Warranty gives you specific...
... power sanding, sawing, grinding, drilling, and other construction activities contains chemicals known to the State of normal wear and tear: • the tool has been abused, misused or improperly maintained: • alterations have been made or attempted by others: • repairs are specially designed to cause cancer, birth defects or other reproductive harm. This Warranty gives you specific...

Parts Breakdown
Page 2
... WRENCH, 4200H N/A DOUBLE EDGED BLADE SET, N1900B N/A P.H. SCREW M4X25, 5057KB B. BEARING 6000ZZ, N1900B RUBBER PIN 4, HR2400 SET PLATE (MINI BLADE), N1900B ADJUST PLATE, 1902 P.H. SCREW M4X25, 5057KB POLY V BELT, 1902 V-PULLEY 4-38, HM0860C B. BEARING 6000LLB, 6222DWE STOP RING E-9, BO5021 FAN, N1900B ARMATURE ASS'Y 115V, N1900B INS. SCREW M4X5, 1902 DRUM PLATE SET, N1900B H.F.H. SCREW M4X18, N9501B SWITCH, 9218SB HANDLE COVER, N1900B,T1 P.H. BEARING 608ZZ, N1900B DRUM, N1900B PAN HEAD SCREW M4X60, HM0860C BRACKET COMPLETE, HM0860C P.H. Parts Breakdown 1902...
... WRENCH, 4200H N/A DOUBLE EDGED BLADE SET, N1900B N/A P.H. SCREW M4X25, 5057KB B. BEARING 6000ZZ, N1900B RUBBER PIN 4, HR2400 SET PLATE (MINI BLADE), N1900B ADJUST PLATE, 1902 P.H. SCREW M4X25, 5057KB POLY V BELT, 1902 V-PULLEY 4-38, HM0860C B. BEARING 6000LLB, 6222DWE STOP RING E-9, BO5021 FAN, N1900B ARMATURE ASS'Y 115V, N1900B INS. SCREW M4X5, 1902 DRUM PLATE SET, N1900B H.F.H. SCREW M4X18, N9501B SWITCH, 9218SB HANDLE COVER, N1900B,T1 P.H. BEARING 608ZZ, N1900B DRUM, N1900B PAN HEAD SCREW M4X60, HM0860C BRACKET COMPLETE, HM0860C P.H. Parts Breakdown 1902...


