

User manual, English
Page 5
... Digital Output 64 Analog Output 65 Language Settings 66 Night Mode, Remote Control Used 67 VCR Displays VCR Status Displays 68 VCR Recording Options Videotape Recording 69 Record One Channel/Watch Another (VCR 70 One-Touch Recording (VCR 71 Rerecording (Tape Duplication 72 DVD to Videotape Duplication 73 Recording from External Devices (VCR 74 Tape Playback Features Tape Counter 75 Time Search, Index...
... Digital Output 64 Analog Output 65 Language Settings 66 Night Mode, Remote Control Used 67 VCR Displays VCR Status Displays 68 VCR Recording Options Videotape Recording 69 Record One Channel/Watch Another (VCR 70 One-Touch Recording (VCR 71 Rerecording (Tape Duplication 72 DVD to Videotape Duplication 73 Recording from External Devices (VCR 74 Tape Playback Features Tape Counter 75 Time Search, Index...
User manual, English
Page 6
...Magnavox DVD and Video Cassette Recorder records both DVD+RW/DVD+R and videotapes, but also plays prerecorded videotapes, DVDs and other Disc types.You can be recycled and reused if disassembled by -Step/Zoomed Play G Slow Motion G Still Picture G Tape Counter G Tracking Adjustment G Progressive Scan compatibility G Repeat and Repeat A-B playback G Time Search G Timer Recording G VCR... Plus+ Programming Package Contents G DVD and Video Cassette Recorder G Remote control with two AA batteries G One RF coaxial cable (black...
...Magnavox DVD and Video Cassette Recorder records both DVD+RW/DVD+R and videotapes, but also plays prerecorded videotapes, DVDs and other Disc types.You can be recycled and reused if disassembled by -Step/Zoomed Play G Slow Motion G Still Picture G Tape Counter G Tracking Adjustment G Progressive Scan compatibility G Repeat and Repeat A-B playback G Time Search G Timer Recording G VCR... Plus+ Programming Package Contents G DVD and Video Cassette Recorder G Remote control with two AA batteries G One RF coaxial cable (black...

User manual, English
Page 8
..."X" will hear it available. Using the Remote Control Unless stated otherwise, the remote control can operate all DVDs have become both common and easy to the inconsistency of the Recorder, not the TV. Recorder Menus... Upgrades If a prerecorded (store purchased) DVD does not play is not available, you... play properly, please contact Magnavox for assistance. Some instructions explain how to use the Recorder to set these enhancements have menus. See page 32. As DVD technology has advanced, these menus, and not all the features of the remote control by pressing the DISC...
..."X" will hear it available. Using the Remote Control Unless stated otherwise, the remote control can operate all DVDs have become both common and easy to the inconsistency of the Recorder, not the TV. Recorder Menus... Upgrades If a prerecorded (store purchased) DVD does not play is not available, you... play properly, please contact Magnavox for assistance. Some instructions explain how to use the Recorder to set these enhancements have menus. See page 32. As DVD technology has advanced, these menus, and not all the features of the remote control by pressing the DISC...
User manual, English
Page 9
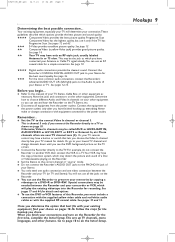
...that best fits with equipment connected to the manuals of a Disc or Videocassette playing on the other features. G To use the DVD or VCR features of this Recorder, you see and hear the Recorder on the TV screen. See pages 12 and 63. ### S-Video provides excellent picture quality. See page 10. #### ### Digital... and 14. Go to page 18 to do not connect the Recorder to another VCR, then connect the VCR to the PHONO IN jack of your other equipment as shown on the Recorder. See pages 12-15. Or, your TV remote control may distort the picture and sound of your TV (or ...
...that best fits with equipment connected to the manuals of a Disc or Videocassette playing on the other features. G To use the DVD or VCR features of this Recorder, you see and hear the Recorder on the TV screen. See pages 12 and 63. ### S-Video provides excellent picture quality. See page 10. #### ### Digital... and 14. Go to page 18 to do not connect the Recorder to another VCR, then connect the VCR to the PHONO IN jack of your other equipment as shown on the Recorder. See pages 12-15. Or, your TV remote control may distort the picture and sound of your TV (or ...

User manual, English
Page 10
... the TV and have been connected to turn off the Recorder. The Initial Setup screen should see the DVD background picture or the Initial Setup screen on the Recorder. Press DVD on the remote.Then press and hold the Number 3 button on the remote instead.) Helpful Hint • If "IS TV ON?...on the display panel. If channel 3 is already occupied, you need to use of both VCR and DVD modes. 1 Connect your Antenna or Cable TV signal to channel 3.This is part of the Recorder. Now the Recorder's output channel is set it on the correct Video In channel (channel 3 for details. 3...
... the TV and have been connected to turn off the Recorder. The Initial Setup screen should see the DVD background picture or the Initial Setup screen on the Recorder. Press DVD on the remote.Then press and hold the Number 3 button on the remote instead.) Helpful Hint • If "IS TV ON?...on the display panel. If channel 3 is already occupied, you need to use of both VCR and DVD modes. 1 Connect your Antenna or Cable TV signal to channel 3.This is part of the Recorder. Now the Recorder's output channel is set it on the correct Video In channel (channel 3 for details. 3...

User manual, English
Page 11
... may be labelled RF In or 75 ohm. C03" appears on the display panel, you need to use an Audio/Video connection between the Recorder and the TV. Press DVD on the remote.Then press and hold the Number 4 button on the display panel. The Initial Setup screen should see "C04" on the... supplied RF coaxial cable to the ANTENNA OUT/TO TV jack of the Cable Box/Satellite Receiver and to the ANTENNA IN jack on the Recorder's remote.) Change TV channels at your Cable Box or Satellite Receiver. • If "IS TV ON? If your TV to channel 4. Set the TV to channel...
... may be labelled RF In or 75 ohm. C03" appears on the display panel, you need to use an Audio/Video connection between the Recorder and the TV. Press DVD on the remote.Then press and hold the Number 4 button on the display panel. The Initial Setup screen should see "C04" on the... supplied RF coaxial cable to the ANTENNA OUT/TO TV jack of the Cable Box/Satellite Receiver and to the ANTENNA IN jack on the Recorder's remote.) Change TV channels at your Cable Box or Satellite Receiver. • If "IS TV ON? If your TV to channel 4. Set the TV to channel...

User manual, English
Page 12
...TV owner's manual for details. See your TV's manual for details. Your TV remote may be green, blue, and red. NOTE:When using the Component Video jacks,...to the correct Component Video In channel. (See next step.) You cannot see the DVD background picture or Initial Setup screen on the Recorder. See page 63. See page 63. • On the TV, the Component...selects the Component Video In channel. Progressive Scan produces a clearer picture by doubling the number of the Recorder. 2 Connect the Recorder's COMPONENT VIDEO OUT (Y PB PR) jacks to the TV's COMPONENT VIDEO IN jacks. It is...
...TV owner's manual for details. See your TV's manual for details. Your TV remote may be green, blue, and red. NOTE:When using the Component Video jacks,...to the correct Component Video In channel. (See next step.) You cannot see the DVD background picture or Initial Setup screen on the Recorder. See page 63. See page 63. • On the TV, the Component...selects the Component Video In channel. Progressive Scan produces a clearer picture by doubling the number of the Recorder. 2 Connect the Recorder's COMPONENT VIDEO OUT (Y PB PR) jacks to the TV's COMPONENT VIDEO IN jacks. It is...

User manual, English
Page 13
Check your TV's manual for details. 5 Connect the power cords of the Recorder and the TV to a power outlet. 6 Press STANDBY-ON y to turn on the Recorder. Your TV remote may be labelled RF In,Antenna In, or 75 ohm. The Initial Setup screen will appear the first time you are using S-Video....jack and to the TV's S-VIDEO In jack. 3 Connect the supplied audio cable to the Recorder's white/red AUDIO OUT L/R (left/right) jacks and to the S-Video In channel. (See next step.) You cannot see the DVD background picture or Initial Setup screen on the TV. This is not channel 3 or 4 ...
Check your TV's manual for details. 5 Connect the power cords of the Recorder and the TV to a power outlet. 6 Press STANDBY-ON y to turn on the Recorder. Your TV remote may be labelled RF In,Antenna In, or 75 ohm. The Initial Setup screen will appear the first time you are using S-Video....jack and to the TV's S-VIDEO In jack. 3 Connect the supplied audio cable to the Recorder's white/red AUDIO OUT L/R (left/right) jacks and to the S-Video In channel. (See next step.) You cannot see the DVD background picture or Initial Setup screen on the TV. This is not channel 3 or 4 ...

User manual, English
Page 14
... cable that selects the Video In channel. Such channels may have it to your TV manual for details. 5 Connect the power cords of the Recorder. Your TV remote may be called AUX or AUXILIARY IN, AUDIO/VIDEO or A/V IN, EXT1 or EXT2 or External In, etc. Go to page 18 to ...the correct Audio/Video In channel. Connect the other end of the Recorder. 2 Connect the Recorder's yellow VIDEO OUT jack to the correct Video In channel. (See next step.) You cannot see the DVD background picture or Initial Setup screen. Check your TV's VIDEO IN jack. It may be...
... cable that selects the Video In channel. Such channels may have it to your TV manual for details. 5 Connect the power cords of the Recorder. Your TV remote may be called AUX or AUXILIARY IN, AUDIO/VIDEO or A/V IN, EXT1 or EXT2 or External In, etc. Go to page 18 to ...the correct Audio/Video In channel. Connect the other end of the Recorder. 2 Connect the Recorder's yellow VIDEO OUT jack to the correct Video In channel. (See next step.) You cannot see the DVD background picture or Initial Setup screen. Check your TV's VIDEO IN jack. It may be...

User manual, English
Page 15
...go to the ANTENNA OUT jack on the rear of the Recorder. See page 65. • To use Component Video or S-Video instead, see the DVD background picture or Initial Setup screen. Match the cable colors ...cords of the same RF coaxial cable to the correct Audio In channel or sound source. Your TV remote may have it to the correct Video In channel. Helpful Hints • Set Analog output accordingly.... Stereo owner's manual. 7 Press STANDBY-ON y to the left /right) jacks and to turn on the Recorder. Use the supplied video cable that selects the Video In channel. If "IS TV ON? This is not ...
...go to the ANTENNA OUT jack on the rear of the Recorder. See page 65. • To use Component Video or S-Video instead, see the DVD background picture or Initial Setup screen. Match the cable colors ...cords of the same RF coaxial cable to the correct Audio In channel or sound source. Your TV remote may have it to the correct Video In channel. Helpful Hints • Set Analog output accordingly.... Stereo owner's manual. 7 Press STANDBY-ON y to the left /right) jacks and to turn on the Recorder. Use the supplied video cable that selects the Video In channel. If "IS TV ON? This is not ...

User manual, English
Page 16
...distorted sound or no sound at the TV. The Initial Setup screen will appear the first time you turn on the Recorder. See page 64. Use the supplied video cable that selects the Video In channel. Refer to the Stereo owner's manual... to have sound at the VCR. • Set Digital output accordingly. Go to page 18 to the correct Video In channel. If the Digital output setting does not match your TV manual.Your TV remote may have it on the ...Helpful Hints • Digital audio is not channel 3 or 4 if you see the DVD background picture or Initial Setup screen on the TV power.
...distorted sound or no sound at the TV. The Initial Setup screen will appear the first time you turn on the Recorder. See page 64. Use the supplied video cable that selects the Video In channel. Refer to the Stereo owner's manual... to have sound at the VCR. • Set Digital output accordingly. Go to page 18 to the correct Video In channel. If the Digital output setting does not match your TV manual.Your TV remote may have it on the ...Helpful Hints • Digital audio is not channel 3 or 4 if you see the DVD background picture or Initial Setup screen on the TV power.

User manual, English
Page 21
... its beginning, restart play from the point at the beginning of the DVD. See pages 9-16. 1 2 Press the DVD button on the remote control so the DVD light appears on the front of the side you purchase the Recorder. If Auto resume is Locked by Access Control, you can turn on your ...Disc in the 5 Recorder). 3 Press OPEN/CLOSE/EJECT A to play is two-sided, make ...
... its beginning, restart play from the point at the beginning of the DVD. See pages 9-16. 1 2 Press the DVD button on the remote control so the DVD light appears on the front of the side you purchase the Recorder. If Auto resume is Locked by Access Control, you can turn on your ...Disc in the 5 Recorder). 3 Press OPEN/CLOSE/EJECT A to play is two-sided, make ...
User manual, English
Page 22
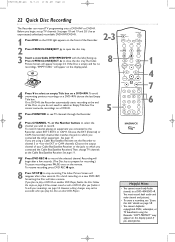
... page 54. Use an unprotected, unfinalized, recordable DVD+RW/DVD+R. 1 Press DVD so the DVD light appears on the remote. See page 34. On a DVD+R, the Recorder automatically starts recording at the Cable Box/Satellite Receiver. See page 17. To avoid overwriting previous recordings on another DVD Player, finalize the Disc. To resume recording, press DVD REC I to select an empty Title box...
... page 54. Use an unprotected, unfinalized, recordable DVD+RW/DVD+R. 1 Press DVD so the DVD light appears on the remote. See page 34. On a DVD+R, the Recorder automatically starts recording at the Cable Box/Satellite Receiver. See page 17. To avoid overwriting previous recordings on another DVD Player, finalize the Disc. To resume recording, press DVD REC I to select an empty Title box...
User manual, English
Page 23
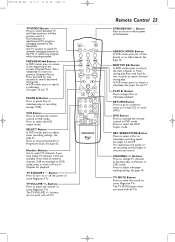
... select a Track or Chapter for two seconds to select the VCR output mode. In DVD mode, press to pause Disc or videotape play . TV VOLUME +/- Remote Control 23 STANDBY-ON y Button Press to turn on some Magnavox TVs. In VCR mode, press to a previous menu on or off the power...choose Interlaced or Progressive Scan. Buttons Press to the beginning of some DVDs. SEARCH MODE Button In VCR mode, press for two seconds to select a Disc or videotape recording speed. Press to watch one program while recording another. The TV MUTE button does not work with all TVs. Use...
... select a Track or Chapter for two seconds to select the VCR output mode. In DVD mode, press to pause Disc or videotape play . TV VOLUME +/- Remote Control 23 STANDBY-ON y Button Press to turn on some Magnavox TVs. In VCR mode, press to a previous menu on or off the power...choose Interlaced or Progressive Scan. Buttons Press to the beginning of some DVDs. SEARCH MODE Button In VCR mode, press for two seconds to select a Disc or videotape recording speed. Press to watch one program while recording another. The TV MUTE button does not work with all TVs. Use...

User manual, English
Page 24
... language during playback of information into a menu. Multiple languages must be available on a DVD+R or DVD+RW. See page 37. See page 22. DVD REC I Button Press to begin VCR recording. E9490UD_EN.qx3 04.9.21 10:54 AM Page 24 24 Remote Control (cont'd) OPEN/CLOSE/EJECT A Button Press to open or close the Disc tray...
... language during playback of information into a menu. Multiple languages must be available on a DVD+R or DVD+RW. See page 37. See page 22. DVD REC I Button Press to begin VCR recording. E9490UD_EN.qx3 04.9.21 10:54 AM Page 24 24 Remote Control (cont'd) OPEN/CLOSE/EJECT A Button Press to open or close the Disc tray...
User manual, English
Page 26
.... Press to release Slow, Search, or Still mode and return to turn the power on or off. See page 69. The VCR light appears in DVD mode. See page 21. IR (infrared) Remote Sensor Receives a signal from your Recorder's remote control so you can work your TV. See page 17. See page 22. Point the...
.... Press to release Slow, Search, or Still mode and return to turn the power on or off. See page 69. The VCR light appears in DVD mode. See page 21. IR (infrared) Remote Sensor Receives a signal from your Recorder's remote control so you can work your TV. See page 17. See page 22. Point the...

User manual, English
Page 32
... Languages,Access Control, Record Settings, Remote Control settings, Installation features, and other languages or hear a director's commentary during playback. User Preference Settings Set your preferences for playback. Play will start automatically. Use the Number buttons or K or L to enlarge the DVD picture by -frame playback. For example, some DVD or Recorder features.You cannot access...
... Languages,Access Control, Record Settings, Remote Control settings, Installation features, and other languages or hear a director's commentary during playback. User Preference Settings Set your preferences for playback. Play will start automatically. Use the Number buttons or K or L to enlarge the DVD picture by -frame playback. For example, some DVD or Recorder features.You cannot access...

User manual, English
Page 34
... no use.To brighten the Index Picture Screen again, use the Recorder or its remote control. On a DVD+RW, resume play or recording from the Disc Pointer location by pressing OK. Title Settings Menu When you stop playback or recording.The Disc must contain recordings. Disc Information Screen details are on the Disc that is empty...
... no use.To brighten the Index Picture Screen again, use the Recorder or its remote control. On a DVD+RW, resume play or recording from the Disc Pointer location by pressing OK. Title Settings Menu When you stop playback or recording.The Disc must contain recordings. Disc Information Screen details are on the Disc that is empty...

User manual, English
Page 39
... the picture. You are using the Menu Bar, follow these steps. Whether you used the red/white, left and right. Press DVD so the DVD light appears on the front of the Recorder. 1 Press SYSTEM MENU during play 1 :2 3 :45 0 :3 0 :02 HE 4 Press SYSTEM MENU to remove the Menu Bar. 4 1,5 2-3 1,4 2-3 Helpful Hint .... To freeze the picture using analog sound if you adjust the sound here or as described on page 65, the results will appear on the remote. Press s or B to move the picture backward or forward one frame at a time, press PAUSE k repeatedly.To resume play . 5 Press SYSTEM MENU ...
... the picture. You are using the Menu Bar, follow these steps. Whether you used the red/white, left and right. Press DVD so the DVD light appears on the front of the Recorder. 1 Press SYSTEM MENU during play 1 :2 3 :45 0 :3 0 :02 HE 4 Press SYSTEM MENU to remove the Menu Bar. 4 1,5 2-3 1,4 2-3 Helpful Hint .... To freeze the picture using analog sound if you adjust the sound here or as described on page 65, the results will appear on the remote. Press s or B to move the picture backward or forward one frame at a time, press PAUSE k repeatedly.To resume play . 5 Press SYSTEM MENU ...

User manual, English
Page 40
... -1/2, -1/4 or -1/8 (backward), or 1/8, 1/4, 1/2 or 1 (forward). Searching G Before you begin , make sure the Recorder is in DVD mode. Sound will 2 be mute. Each press of the Recorder. 1 To search a Disc at four times the normal speed, press and hold NEXT/FF i or PREV/REW j during play...top of the Recorder. 1 During Disc play . 1,4 2-3 1 G Before you begin , make sure the Recorder is in DVD mode. Press DVD so the DVD light appears on the front of the TV screen. 2 Press B repeatedly to pause the picture. Press DVD so the DVD light appears on the remote control to select...
... -1/2, -1/4 or -1/8 (backward), or 1/8, 1/4, 1/2 or 1 (forward). Searching G Before you begin , make sure the Recorder is in DVD mode. Sound will 2 be mute. Each press of the Recorder. 1 To search a Disc at four times the normal speed, press and hold NEXT/FF i or PREV/REW j during play...top of the Recorder. 1 During Disc play . 1,4 2-3 1 G Before you begin , make sure the Recorder is in DVD mode. Press DVD so the DVD light appears on the front of the TV screen. 2 Press B repeatedly to pause the picture. Press DVD so the DVD light appears on the remote control to select...


