
Quick Start Guide - English
Page 1
...MDR557H Caution: The disc tray does not open without completing the Initial Setup. under license from the beginning. 5 Press [STOP C] for 2 seconds to dub, then press [PLAY 1]. DVD Insert recordable disc with enough recordable space. 1 Select HDD or DVD. 2 Press [TITLE] to the supplied Owner's Manual. MAGNAVOX... is a registered trademark of Philips Electronics North America Corporation and is used by Funai Electric Co., Ltd. Need help? Online support Visit: www.magnavox.com/support Phone support Call 1-866-341-3738...
...MDR557H Caution: The disc tray does not open without completing the Initial Setup. under license from the beginning. 5 Press [STOP C] for 2 seconds to dub, then press [PLAY 1]. DVD Insert recordable disc with enough recordable space. 1 Select HDD or DVD. 2 Press [TITLE] to the supplied Owner's Manual. MAGNAVOX... is a registered trademark of Philips Electronics North America Corporation and is used by Funai Electric Co., Ltd. Need help? Online support Visit: www.magnavox.com/support Phone support Call 1-866-341-3738...

Quick Start Guide - English
Page 2
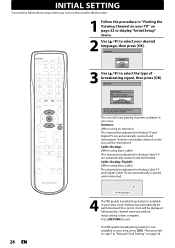
Initial Setup Language English Français Español Select the language for Setup display Refer to page 28 in Owner's Manual for Setup display 2 Select your desired language. IN HDTV Connection to TV VIDEO VIDEO IN OUT Y L L ANTENNA R IN R AUDIO IN (L1) S-VIDEO...AUDIO IN (L1) S-VIDEO AUDIO OUT OUT S-VIDEO COAXIAL L R AUDIO OUT VIDEO IN L AUDIO IN R SDTV For best connection order HDMI cable from www.magnavox.com/support 2 Language Select (Initial Setup) 1 Initial Setup Language English Français Español Select the language for more detail. If you are...
Initial Setup Language English Français Español Select the language for Setup display Refer to page 28 in Owner's Manual for Setup display 2 Select your desired language. IN HDTV Connection to TV VIDEO VIDEO IN OUT Y L L ANTENNA R IN R AUDIO IN (L1) S-VIDEO...AUDIO IN (L1) S-VIDEO AUDIO OUT OUT S-VIDEO COAXIAL L R AUDIO OUT VIDEO IN L AUDIO IN R SDTV For best connection order HDMI cable from www.magnavox.com/support 2 Language Select (Initial Setup) 1 Initial Setup Language English Français Español Select the language for more detail. If you are...

Owner's Manual - English
Page 1
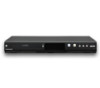
.... Recording Playback Editing Function Setup Others Español © 2014 Funai Electric Co., Ltd. Introduction Connections Basic Setup Owner's Manual MDR557H HDD & DVD RECORDER WITH DIGITAL TUNER THANK YOU FOR CHOOSING MAGNAVOX. NEED HELP FAST? You should record and retain those numbers for more Limited Warranty information. Model No.: Serial No.: Please...
.... Recording Playback Editing Function Setup Others Español © 2014 Funai Electric Co., Ltd. Introduction Connections Basic Setup Owner's Manual MDR557H HDD & DVD RECORDER WITH DIGITAL TUNER THANK YOU FOR CHOOSING MAGNAVOX. NEED HELP FAST? You should record and retain those numbers for more Limited Warranty information. Model No.: Serial No.: Please...
Owner's Manual - English
Page 2
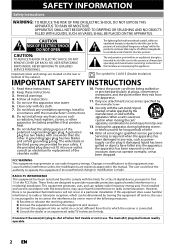
... accompanying the appliance. These limits are expressly approved in a residential installation. Disconnect the mains(AC) plug to provide reasonable protection against harmful interference in the manual. A grounding type plug has two blades and a third grounding prong. Protect the power cord from being walked on , the user is no guarantee that to...
... accompanying the appliance. These limits are expressly approved in a residential installation. Disconnect the mains(AC) plug to provide reasonable protection against harmful interference in the manual. A grounding type plug has two blades and a third grounding prong. Protect the power cord from being walked on , the user is no guarantee that to...

Owner's Manual - English
Page 4
..." in this unit becomes inoperative, do not try to out. Depending on pages 113-117 before returning the product. • If this owner's manual, the laser optical pickup unit may not be lost. • HDD rotates at high speed when in camera(s). 1 Turn On the digital camera....dirty. Do not spray insecticide liquid near the unit. Such chemicals may be available. RF coaxial cable RCA audio/video cables Owner's Manual Owner's Manual Quick Start Guide Maintenance Servicing • Please refer to relevant topics on "TROUBLESHOOTING" on the installation environment or handling, the unit ...
..." in this unit becomes inoperative, do not try to out. Depending on pages 113-117 before returning the product. • If this owner's manual, the laser optical pickup unit may not be lost. • HDD rotates at high speed when in camera(s). 1 Turn On the digital camera....dirty. Do not spray insecticide liquid near the unit. Such chemicals may be available. RF coaxial cable RCA audio/video cables Owner's Manual Owner's Manual Quick Start Guide Maintenance Servicing • Please refer to relevant topics on "TROUBLESHOOTING" on the installation environment or handling, the unit ...

Owner's Manual - English
Page 5
... in this document is strictly prohibited. Note(s): This is used under license. Furthermore, any unauthorized commercial distribution of this manual may be disseminated or transcribed, in any person or organization of such changes. Dolby and the double-D symbol are compatible... from Philips Electronics North America. © 2014 Funai Electric Co., Ltd. Basic Setup Recording Playback Editing Function Setup Others MAGNAVOX is a registered trademark of Philips Electronics North America Corporation and is true when the players are trademarks of Dolby Laboratories. ...
... in this document is strictly prohibited. Note(s): This is used under license. Furthermore, any unauthorized commercial distribution of this manual may be disseminated or transcribed, in any person or organization of such changes. Dolby and the double-D symbol are compatible... from Philips Electronics North America. © 2014 Funai Electric Co., Ltd. Basic Setup Recording Playback Editing Function Setup Others MAGNAVOX is a registered trademark of Philips Electronics North America Corporation and is true when the players are trademarks of Dolby Laboratories. ...

Owner's Manual - English
Page 6
... INFORMATION 2 Safety Instructions 2 Supplied Accessories 4 Maintenance 4 Trademark Information 5 FEATURES 8 Features 8 Symbols Used in this Owner's Manual 9 FUNCTIONAL OVERVIEW 10 Front Panel 10 Rear Panel 11 Remote Control 12 Front Panel Display 14 Connections CONNECTION 15 Antenna Connection (...Auto Finalizing 65 CHANNEL SETTING 29 Auto Channel Scan 29 Adding / Deleting Channels 30 SETTING THE CLOCK 32 Auto Clock Setting 32 Manual Clock Setting 34 Daylight Saving Time 34 TUNER SETTINGS 35 Switching Analog Mode / Digital Mode 35 Channel Selection 35 Selecting TV Audio...
... INFORMATION 2 Safety Instructions 2 Supplied Accessories 4 Maintenance 4 Trademark Information 5 FEATURES 8 Features 8 Symbols Used in this Owner's Manual 9 FUNCTIONAL OVERVIEW 10 Front Panel 10 Rear Panel 11 Remote Control 12 Front Panel Display 14 Connections CONNECTION 15 Antenna Connection (...Auto Finalizing 65 CHANNEL SETTING 29 Auto Channel Scan 29 Adding / Deleting Channels 30 SETTING THE CLOCK 32 Auto Clock Setting 32 Manual Clock Setting 34 Daylight Saving Time 34 TUNER SETTINGS 35 Switching Analog Mode / Digital Mode 35 Channel Selection 35 Selecting TV Audio...

Owner's Manual - English
Page 8
... main menu. Every time you set the recording mode to "Auto", the recording mode will fit nicely in the unit - DVD Dubbing With this owner's manual. All high definition (HD) pictures will be adjusted so the titles will automatically be converted down to "GLOSSARY" on page 119 for timer recording. FEATURES...
... main menu. Every time you set the recording mode to "Auto", the recording mode will fit nicely in the unit - DVD Dubbing With this owner's manual. All high definition (HD) pictures will be adjusted so the titles will automatically be converted down to "GLOSSARY" on page 119 for timer recording. FEATURES...

Owner's Manual - English
Page 9
... in your favorite names on CD-RW/-R. Variable replay: You can delete a scene from discs with one -touch while playback. Symbols Used in this Owner's Manual To specify for a disc that of each function is compatible with Dolby Digital, you can enjoy JPEG files which are recorded on DVD-RW/-R and...
... in your favorite names on CD-RW/-R. Variable replay: You can delete a scene from discs with one -touch while playback. Symbols Used in this Owner's Manual To specify for a disc that of each function is compatible with Dolby Digital, you can enjoy JPEG files which are recorded on DVD-RW/-R and...

Owner's Manual - English
Page 22
...INPUT, AUX Sanyo VIDEO JVC VIDEO, VIDEO 1, Sharp 00 VIDEO 2, VIDEO 3 Kenwood AUX Sony VIDEO1, VIDEO2, VIDEO3 LXI-Series 00 Toshiba TV/GAME Magnavox AUX CHANNEL Zenith 00 4 Proceed to use the device. WARNING: • Please finish the Initial Setup before proceeding. 3 Locate the Video/Input button on... the TV's remote control, refer to the TV's user Manual or "Input Mode Names for different brand's models of TVs. • Consult your TV manufacturer if none of the above is switched Off or ...
...INPUT, AUX Sanyo VIDEO JVC VIDEO, VIDEO 1, Sharp 00 VIDEO 2, VIDEO 3 Kenwood AUX Sony VIDEO1, VIDEO2, VIDEO3 LXI-Series 00 Toshiba TV/GAME Magnavox AUX CHANNEL Zenith 00 4 Proceed to use the device. WARNING: • Please finish the Initial Setup before proceeding. 3 Locate the Video/Input button on... the TV's remote control, refer to the TV's user Manual or "Input Mode Names for different brand's models of TVs. • Consult your TV manufacturer if none of the above is switched Off or ...
Owner's Manual - English
Page 28
... [OK]. Initial Setup Language English Français Español 3 Use [K / L] to exit. Cable (Analog / Digital): (When using basic cable) The channels broadcasted in "Manual Clock Setting" on page 22 to display "Initial Setup" menu. 2 Use [K / L] to complete. Then proceed to "ANTENNA IN" jack. Initial setting is connected to step...
... [OK]. Initial Setup Language English Français Español 3 Use [K / L] to exit. Cable (Analog / Digital): (When using basic cable) The channels broadcasted in "Manual Clock Setting" on page 22 to display "Initial Setup" menu. 2 Use [K / L] to complete. Then proceed to "ANTENNA IN" jack. Initial setting is connected to step...

Owner's Manual - English
Page 30
... select "Channel", then press [OK]. CHANNEL SETTING Adding / Deleting Channels This feature allows you to manually Add or Delete Channels for any adjustments to select "General Setting", then press [OK]. Auto Channel Preset Manual Channel Preset TV Audio Select • If you are adding or deleting Analog TV/Cable channels, go... to ANALOG to continue. • If you are adding or deleting Digital TV/Cable channels, go to DIGITAL to select "Manual Channel Preset", then press [OK]. "General Setting" menu will appear. 4 Use [K / L] to continue. 30 EN Instructions continue on the next page...
... select "Channel", then press [OK]. CHANNEL SETTING Adding / Deleting Channels This feature allows you to manually Add or Delete Channels for any adjustments to select "General Setting", then press [OK]. Auto Channel Preset Manual Channel Preset TV Audio Select • If you are adding or deleting Analog TV/Cable channels, go... to ANALOG to continue. • If you are adding or deleting Digital TV/Cable channels, go to DIGITAL to select "Manual Channel Preset", then press [OK]. "General Setting" menu will appear. 4 Use [K / L] to continue. 30 EN Instructions continue on the next page...

Owner's Manual - English
Page 31
... channel is selected, "Add" is checked and highlighted as a default. • When an unmemorized channel is selected "Delete" is complete, press [RETURN] to activate "Manual Channel Preset". Then select the next channel to add or delete. • If the setting is checked and highlighted as a default. 6 Use [K / L] to select... "Add" or "Delete", then press [OK]. Manual Channel Preset CH 2 Add Delete 5 Select the channel number to add or delete. • Only the major channel is displayed in...
... channel is selected, "Add" is checked and highlighted as a default. • When an unmemorized channel is selected "Delete" is complete, press [RETURN] to activate "Manual Channel Preset". Then select the next channel to add or delete. • If the setting is checked and highlighted as a default. 6 Use [K / L] to select... "Add" or "Delete", then press [OK]. Manual Channel Preset CH 2 Add Delete 5 Select the channel number to add or delete. • Only the major channel is displayed in...

Owner's Manual - English
Page 32
... connections are correct. • Channels are set , the unit receives the clock data at step 4 above . Initially leave it is in your area, follow "Manual Clock Setting" on page 34. Check the time after you connect the Antenna/Cable signal and plug in the AC Power cord. • For Analog... then press [OK]. 4 Use [K / L] to select "Clock", then press [OK]. Auto Clock Setting OFF Auto Manual 5 Press [MENU] to exit. 6 Press [STANDBY/ON y] to turn the unit to the standby mode. Then try "Manual Clock Setting" on page 34. SETTING THE CLOCK Auto Clock Setting This unit can set the "Auto...
... connections are correct. • Channels are set , the unit receives the clock data at step 4 above . Initially leave it is in your area, follow "Manual Clock Setting" on page 34. Check the time after you connect the Antenna/Cable signal and plug in the AC Power cord. • For Analog... then press [OK]. 4 Use [K / L] to select "Clock", then press [OK]. Auto Clock Setting OFF Auto Manual 5 Press [MENU] to exit. 6 Press [STANDBY/ON y] to turn the unit to the standby mode. Then try "Manual Clock Setting" on page 34. SETTING THE CLOCK Auto Clock Setting This unit can set the "Auto...

Owner's Manual - English
Page 33
... Try digital auto clock setting in standby mode. Time adjustment for at step 4 in the standby mode. Auto Clock Setting OFF Auto Manual Enable Manual operation to give this unit receives the antenna/cable signal and plug in the power cord. • If the clock is in "...Eastern Central Mountain Pacific Alaska Hawaii Connections Basic Setup 2 Use [the Number buttons] or [K / L] to enter your Time Zone below . 1 Select "Manual" at least 15 minutes to select the DTV Channel for auto clock setting • The clock may be available except via Analog Cable TV. DTV...
... Try digital auto clock setting in standby mode. Time adjustment for at step 4 in the standby mode. Auto Clock Setting OFF Auto Manual Enable Manual operation to give this unit receives the antenna/cable signal and plug in the power cord. • If the clock is in "...Eastern Central Mountain Pacific Alaska Hawaii Connections Basic Setup 2 Use [the Number buttons] or [K / L] to enter your Time Zone below . 1 Select "Manual" at least 15 minutes to select the DTV Channel for auto clock setting • The clock may be available except via Analog Cable TV. DTV...

Owner's Manual - English
Page 34
... and move back one hour on the first Sunday in October. 5 Press [MENU] to suit your preference, then press [OK] when you set the clock manually. • For setting the day, year, hour, and minute, [the Number buttons] can also be activated. "Clock" menu will be lost if either there is..." is "ON", the unit clock will be cancelled if you press [OK]. 6 Press [MENU] to select calendar or time, then press [OK]. SETTING THE CLOCK Manual Clock Setting 1 Press [MENU] and use [K / L] to fit the daylight saving time period. ON (APR -
... and move back one hour on the first Sunday in October. 5 Press [MENU] to suit your preference, then press [OK] when you set the clock manually. • For setting the day, year, hour, and minute, [the Number buttons] can also be activated. "Clock" menu will be lost if either there is..." is "ON", the unit clock will be cancelled if you press [OK]. 6 Press [MENU] to select calendar or time, then press [OK]. SETTING THE CLOCK Manual Clock Setting 1 Press [MENU] and use [K / L] to fit the daylight saving time period. ON (APR -

Owner's Manual - English
Page 35
... select a channel you enter 1 or 2 digit for major channel and leave it for 2 seconds. Press [DTV/TV] on remote control. [CHANNEL / ] Use [CHANNEL / ] to change manually by using high compression technology, digital broadcasting offers a service that number will be displayed.
... select a channel you enter 1 or 2 digit for major channel and leave it for 2 seconds. Press [DTV/TV] on remote control. [CHANNEL / ] Use [CHANNEL / ] to change manually by using high compression technology, digital broadcasting offers a service that number will be displayed.

Owner's Manual - English
Page 46
... in following menus: "General Setting" ➔ "Display" ➔ "V-Chip" ➔ "Downloadable Rating" "General Setting" ➔ "Channel" ➔ "Auto Channel Preset" "General Setting" ➔ "Channel" ➔ "Manual Channel Preset" • The autostart recording will automatically resume for up to a range of 6 hours of the autostart recording, if you can only be made...
... in following menus: "General Setting" ➔ "Display" ➔ "V-Chip" ➔ "Downloadable Rating" "General Setting" ➔ "Channel" ➔ "Auto Channel Preset" "General Setting" ➔ "Channel" ➔ "Manual Channel Preset" • The autostart recording will automatically resume for up to a range of 6 hours of the autostart recording, if you can only be made...

Owner's Manual - English
Page 48
... REC To DVD Start 10 : 30AM Mode Auto Auto End 11 : 30AM 1h00m • "Auto" is "copy-once" program and prohibited to be displayed in "Manual Clock Setting" on the disc and selects the Best Recording mode available automatically to complete the recording - If the material is only available for the...
... REC To DVD Start 10 : 30AM Mode Auto Auto End 11 : 30AM 1h00m • "Auto" is "copy-once" program and prohibited to be displayed in "Manual Clock Setting" on the disc and selects the Best Recording mode available automatically to complete the recording - If the material is only available for the...

Owner's Manual - English
Page 97
You can also manually format a DVD-RW disc once it in "Setup" menu. 6 Press [MENU] to the recording format mode setting on one DVD-RW disc. You cannot change ...
You can also manually format a DVD-RW disc once it in "Setup" menu. 6 Press [MENU] to the recording format mode setting on one DVD-RW disc. You cannot change ...


