User manual, English (US)
Page 3
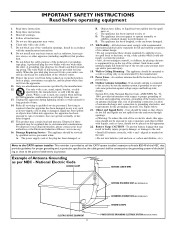
... to an antenna discharge unit, size of grounding connectors, location of antenna-discharge unit, connection to rain or moisture and objects filled with + and - Power Lines - Outdoor Antenna Grounding - See Figure below. 21. Battery Usage CAUTION - Example of the polarized or groundingtype plug. IMPORTANT SAFETY INSTRUCTIONS Read before operating equipment 1. Heed all instructions. 5. Do not install near water. 6. Protect the power cord from being...
... to an antenna discharge unit, size of grounding connectors, location of antenna-discharge unit, connection to rain or moisture and objects filled with + and - Power Lines - Outdoor Antenna Grounding - See Figure below. 21. Battery Usage CAUTION - Example of the polarized or groundingtype plug. IMPORTANT SAFETY INSTRUCTIONS Read before operating equipment 1. Heed all instructions. 5. Do not install near water. 6. Protect the power cord from being...
User manual, English (US)
Page 4
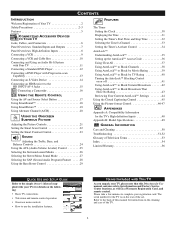
... TV Jacks, Cables, and Connectors 6 Panel Overviews: Standard Inputs and Outputs 7 Panel Overviews: High-definition Inputs 8 Connecting a VCR 9 Connecting a VCR and Cable Box 10 Connecting and Using an Audio Hi-fi System with Your TV 11 Connecting a Standard DVD Player 12 Connecting a DVD Player with Progressive-scan Capability 13 Connecting an S-Video Device 14 Connecting an HD Receiver to the HD INPUT-AV 4 Jacks 15 POWER TV SWAP VCR PIP CH ACC ACTIVE CONTROL FREEZE DN UP SOUND PICTURE STATUS/ EXIT MENU/ SELECT Connecting a Camcorder 16 USING THE REMOTE CONTROL...
... TV Jacks, Cables, and Connectors 6 Panel Overviews: Standard Inputs and Outputs 7 Panel Overviews: High-definition Inputs 8 Connecting a VCR 9 Connecting a VCR and Cable Box 10 Connecting and Using an Audio Hi-fi System with Your TV 11 Connecting a Standard DVD Player 12 Connecting a DVD Player with Progressive-scan Capability 13 Connecting an S-Video Device 14 Connecting an HD Receiver to the HD INPUT-AV 4 Jacks 15 POWER TV SWAP VCR PIP CH ACC ACTIVE CONTROL FREEZE DN UP SOUND PICTURE STATUS/ EXIT MENU/ SELECT Connecting a Camcorder 16 USING THE REMOTE CONTROL...
User manual, English (US)
Page 5
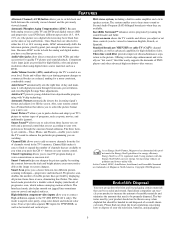
... to connect High-definition signals to switch back and forth between the dark and bright picture areas more consistent, comfortable sound. The Interlaced mode also helps smooth out jagged lines sometimes seen on your old television, batteries, and packaging 5 Energy Star® is superb color purity, crisp color detail, and reduced color noise. AutoLock™ protects young children from the list of channels stored in and disposed of Magnavox...
... to connect High-definition signals to switch back and forth between the dark and bright picture areas more consistent, comfortable sound. The Interlaced mode also helps smooth out jagged lines sometimes seen on your old television, batteries, and packaging 5 Energy Star® is superb color purity, crisp color detail, and reduced color noise. AutoLock™ protects young children from the list of channels stored in and disposed of Magnavox...
User manual, English (US)
Page 7
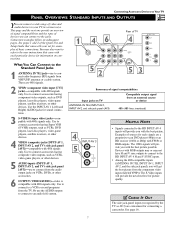
... Rear of TV 4 INPUT-AV 2 VIDEO S-VIDEO L L AUDIO R HD INPUT-AV 4 G/Y R/Pr B/Pb V L SYNC AUDIO H R 53 Summary of signal compatabilities Input jacks on TV ANTENNA IN 75Ω, INPUT AV-1, INPUT AV-2, and side jack panel (AV3) Compatible output signal from the TV. Use the INPUT-AV 1 L(eft) and R(ight) AUDIO jacks for sound connections. . 3 S-VIDEO (super video) jacks-compatible with your TV, in various ways. Use to connect accessories having composite video outputs, such as VCRs, DVD players, laser-disc players, video-game players, satellite receivers...
... Rear of TV 4 INPUT-AV 2 VIDEO S-VIDEO L L AUDIO R HD INPUT-AV 4 G/Y R/Pr B/Pb V L SYNC AUDIO H R 53 Summary of signal compatabilities Input jacks on TV ANTENNA IN 75Ω, INPUT AV-1, INPUT AV-2, and side jack panel (AV3) Compatible output signal from the TV. Use the INPUT-AV 1 L(eft) and R(ight) AUDIO jacks for sound connections. . 3 S-VIDEO (super video) jacks-compatible with your TV, in various ways. Use to connect accessories having composite video outputs, such as VCRs, DVD players, laser-disc players, video-game players, satellite receivers...
User manual, English (US)
Page 8
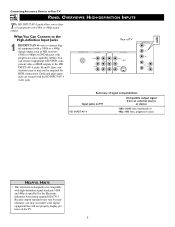
... with high-definition signal standards 1080i and 480p as HD receivers (1080i or 480p) or DVD players with 1080i or 480p signal output. Connecting Accessory Devices to Your TV PANEL OVERVIEWS: HIGH-DEFINITION INPUTS The HD INPUT-AV 4 jacks allow you may encounter some digital equipment that will not properly display pictures on TV Compatible output signal from an external source or device HD INPUT-AV 4 1080i (1080 lines, interlaced) or 480p (480 lines, progressive scan) HELPFUL...
... with high-definition signal standards 1080i and 480p as HD receivers (1080i or 480p) or DVD players with 1080i or 480p signal output. Connecting Accessory Devices to Your TV PANEL OVERVIEWS: HIGH-DEFINITION INPUTS The HD INPUT-AV 4 jacks allow you may encounter some digital equipment that will not properly display pictures on TV Compatible output signal from an external source or device HD INPUT-AV 4 1080i (1080 lines, interlaced) or 480p (480 lines, progressive scan) HELPFUL...

User manual, English (US)
Page 9
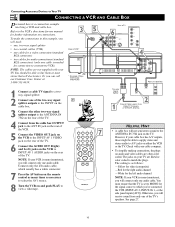
... connect only one audio cable. The coding is set to MONO for direct picture and sound connections between the TV and accessory devices such as necessary to select the AV1 source. 6 Turn the VCR on and press PLAY to view a videotape on the remote control as many times as VCRs, DVD players, and others that have color-code connectors. You must ensure that sell electronics. Otherwise, you will need...
... connect only one audio cable. The coding is set to MONO for direct picture and sound connections between the TV and accessory devices such as necessary to select the AV1 source. 6 Turn the VCR on and press PLAY to view a videotape on the remote control as many times as VCRs, DVD players, and others that have color-code connectors. You must ensure that sell electronics. Otherwise, you will need...
User manual, English (US)
Page 10
... supplied with your TV are often color coded. Connecting Accessory Devices to Your TV CONNECTING A VCR AND CABLE BOX Presented here is mono (nonstereo), you will connect only one of the TV's speakers. Refer to the VCR's directions-for-use manual for the signal source to which usually has a white connector. 7 Press the AV button on the remote control as many times as follows: -Yellow for video (composite) -Red for the right audio channel -White for connection...
... supplied with your TV are often color coded. Connecting Accessory Devices to Your TV CONNECTING A VCR AND CABLE BOX Presented here is mono (nonstereo), you will connect only one of the TV's speakers. Refer to the VCR's directions-for-use manual for the signal source to which usually has a white connector. 7 Press the AV button on the remote control as many times as follows: -Yellow for video (composite) -Red for the right audio channel -White for connection...
User manual, English (US)
Page 12
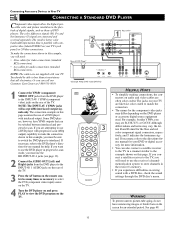
.... Connecting Accessory Devices to Your TV CONNECTING A STANDARD DVD PLAYER Component video inputs allow the highest possible color and picture resolution in the playback of digital signals, such as necessary to select the CVI (component video input) source on the TV. 4 Turn the DVD player on and press PLAY to view the DVD program on the TV. 2ANTENNA IN 75Ω INPUT-AV 1 VIDEO L AUDIO R OUTPUT Y Pb Pr 1 Rear of TV HD INPUT-AV 4 G/Y INPUT-AV 2 VIDEO S-VIDEO L L AUDIO R R/Pr B/Pb V L SYNC AUDIO H R Rear of DVD Player* DIGITAL AUDIO OUT...
.... Connecting Accessory Devices to Your TV CONNECTING A STANDARD DVD PLAYER Component video inputs allow the highest possible color and picture resolution in the playback of digital signals, such as necessary to select the CVI (component video input) source on the TV. 4 Turn the DVD player on and press PLAY to view the DVD program on the TV. 2ANTENNA IN 75Ω INPUT-AV 1 VIDEO L AUDIO R OUTPUT Y Pb Pr 1 Rear of TV HD INPUT-AV 4 G/Y INPUT-AV 2 VIDEO S-VIDEO L L AUDIO R R/Pr B/Pb V L SYNC AUDIO H R Rear of DVD Player* DIGITAL AUDIO OUT...
User manual, English (US)
Page 13
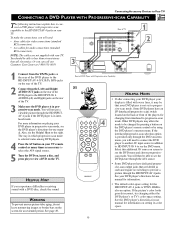
... images or border bars on the DVD player's remote control or by using the DVD player's onscreen menu. See your TV remote control as many times as such and require no switching to provide a picture through the HD INPUTAV 4 jacks if the DVD player is in which progressive-scan mode is selected varies among DVD players. 4 Press the AV button on your DVD player's directions-for-use manual for -use manual. Rear of TV ANTENNA IN 75Ω INPUT-AV 1 VIDEO L AUDIO R OUTPUT Y Pb Pr INPUT-AV 2 VIDEO S-VIDEO L L AUDIO R HD INPUT...
... images or border bars on the DVD player's remote control or by using the DVD player's onscreen menu. See your TV remote control as many times as such and require no switching to provide a picture through the HD INPUTAV 4 jacks if the DVD player is in which progressive-scan mode is selected varies among DVD players. 4 Press the AV button on your DVD player's directions-for-use manual for -use manual. Rear of TV ANTENNA IN 75Ω INPUT-AV 1 VIDEO L AUDIO R OUTPUT Y Pb Pr INPUT-AV 2 VIDEO S-VIDEO L L AUDIO R HD INPUT...
User manual, English (US)
Page 15
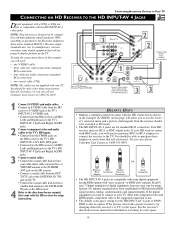
... INPUT-AV 1 VIDEO L AUDIO R Rear of TV OUTPUT Y Pb Pr INPUT-AV 2 VIDEO S-VIDEO L L AUDIO R HD INPUT-AV 4 G/Y R/Pr B/Pb V L SYNC AUDIO H R 2 2 Coaxial Cable Lead-in from Satellite Dish Antenna Y PB RF PR PHONE JACK REMOTE AUDIO AUDIO L L R R VCR CONTROL 1 OUT TO TV CH 3 CH 4 DIGITAL AUDIO OUT VIDEO VIDEO S-VIDEO IN FROM ANT SATELLITE IN Rear of HD Receiver (Example: Philips DSHD800) Coaxial Cable Lead-in from Cable Outlet, Cable Converter Box, or VHF/UHF Antenna 3 3 1 Connect S-VIDEO and audio cables. • Connect an S-VIDEO cable from the HD receiver's S-VIDEO jack...
... INPUT-AV 1 VIDEO L AUDIO R Rear of TV OUTPUT Y Pb Pr INPUT-AV 2 VIDEO S-VIDEO L L AUDIO R HD INPUT-AV 4 G/Y R/Pr B/Pb V L SYNC AUDIO H R 2 2 Coaxial Cable Lead-in from Satellite Dish Antenna Y PB RF PR PHONE JACK REMOTE AUDIO AUDIO L L R R VCR CONTROL 1 OUT TO TV CH 3 CH 4 DIGITAL AUDIO OUT VIDEO VIDEO S-VIDEO IN FROM ANT SATELLITE IN Rear of HD Receiver (Example: Philips DSHD800) Coaxial Cable Lead-in from Cable Outlet, Cable Converter Box, or VHF/UHF Antenna 3 3 1 Connect S-VIDEO and audio cables. • Connect an S-VIDEO cable from the HD receiver's S-VIDEO jack...
User manual, English (US)
Page 30
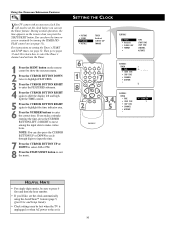
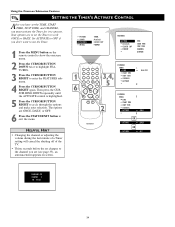
... power to show the time on screen constantly by turning the TIMER DISPLAY control on (see page 32. Then go to pages 33 and 34 to learn how to select the Timer's channel and activate the Timer. 1 Press the MENU button on the remote control to the set the clock automatically using the AutoChron™ feature (page 5, Quick Use and Setup Guide). • Clock settings may be lost when the TV...
... power to show the time on screen constantly by turning the TIMER DISPLAY control on (see page 32. Then go to pages 33 and 34 to learn how to select the Timer's channel and activate the Timer. 1 Press the MENU button on the remote control to the set the clock automatically using the AutoChron™ feature (page 5, Quick Use and Setup Guide). • Clock settings may be lost when the TV...
User manual, English (US)
Page 32
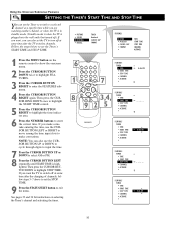
... digits to input the time. 7 Press the CURSOR BUTTON UP or DOWN to select AM or PM. 8 Press the CURSOR BUTTON LEFT repeatedly until START TIME is highlighted. If you make corrections. NOTE: You can also set the TV to turn off at some time after the TV switches channels. PICTURE SOUND FEATURES INSTALL TIMER AutoLock CLOSED CAP FORMAT FEATURES TIMER AutoLock CLOSED CAP FORMAT TIME START TIME STOP TIME CHANNEL ACTIVATE 1 Press the MENU button...
... digits to input the time. 7 Press the CURSOR BUTTON UP or DOWN to select AM or PM. 8 Press the CURSOR BUTTON LEFT repeatedly until START TIME is highlighted. If you make corrections. NOTE: You can also set the TV to turn off at some time after the TV switches channels. PICTURE SOUND FEATURES INSTALL TIMER AutoLock CLOSED CAP FORMAT FEATURES TIMER AutoLock CLOSED CAP FORMAT TIME START TIME STOP TIME CHANNEL ACTIVATE 1 Press the MENU button...
User manual, English (US)
Page 34
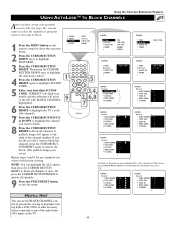
... TIME, START TIME, STOP TIME, and CHANNEL, you must activate the Timer for it to operate. HELPFUL HINT • Changing the channel or adjusting the volume during the last minute of a Timer setting will cancel the shutting off of the TV. • Thirty seconds before the set changes to the channel you set (see page 33), an announcement appears on the remote control to show the onscreen menu. 2 Press the CURSOR BUTTON...
... TIME, START TIME, STOP TIME, and CHANNEL, you must activate the Timer for it to operate. HELPFUL HINT • Changing the channel or adjusting the volume during the last minute of a Timer setting will cancel the shutting off of the TV. • Thirty seconds before the set changes to the channel you set (see page 33), an announcement appears on the remote control to show the onscreen menu. 2 Press the CURSOR BUTTON...
User manual, English (US)
Page 38
... TIME STOP TIME CHANNEL ACTIVATE FEATURES TIMER AutoLock CLOSED CAP FORMAT ACCESS CODE - - - - Or press the CURSOR BUTTON RIGHT to unlock all channels at once, highlight ALL in the channel list.Then press the CURSOR RING RIGHT to highlight FEATURES. 3 Press the CURSOR BUTTON RIGHT. CORRECT will flash very briefly and the submenu will appear to the right of the audio/video (AV) inputs on the remote control...
... TIME STOP TIME CHANNEL ACTIVATE FEATURES TIMER AutoLock CLOSED CAP FORMAT ACCESS CODE - - - - Or press the CURSOR BUTTON RIGHT to unlock all channels at once, highlight ALL in the channel list.Then press the CURSOR RING RIGHT to highlight FEATURES. 3 Press the CURSOR BUTTON RIGHT. CORRECT will flash very briefly and the submenu will appear to the right of the audio/video (AV) inputs on the remote control...

User manual, English (US)
Page 46
... border bars. Use your HD set -top box (for HD programming) or pro-gressive-scan-capable DVD player (for use only with video sources you desire. The width of zoom varies based on the TV. Selecting a Picture Format Using the Remote Control Use your widescreen TV, however, is lost around the edges. The amount of your TV's picture-format modes with video sources connected to the ANTENNA, AV1, CVI, AV2, and AV3 (Side Panel) inputs on the...
... border bars. Use your HD set -top box (for HD programming) or pro-gressive-scan-capable DVD player (for use only with video sources you desire. The width of zoom varies based on the TV. Selecting a Picture Format Using the Remote Control Use your widescreen TV, however, is lost around the edges. The amount of your TV's picture-format modes with video sources connected to the ANTENNA, AV1, CVI, AV2, and AV3 (Side Panel) inputs on the...
User manual, English (US)
Page 50
..., be broadcast channels, cable channels, satellite channels, digital television boxes, DVD discs, laser discs, video games, CD-i discs, videotapes, and others in the back cover of the set . General Information: Care and Cleaning CARE AND CLEANING WARNING Concerning Stationary Images on the TV Screen: Do not leave picture border bars or stationary images on screen for extended periods of time.This can become excessively hot; Use even, easy, vertical strokes when cleaning. But...
..., be broadcast channels, cable channels, satellite channels, digital television boxes, DVD discs, laser discs, video games, CD-i discs, videotapes, and others in the back cover of the set . General Information: Care and Cleaning CARE AND CLEANING WARNING Concerning Stationary Images on the TV Screen: Do not leave picture border bars or stationary images on screen for extended periods of time.This can become excessively hot; Use even, easy, vertical strokes when cleaning. But...
User manual, English (US)
Page 51
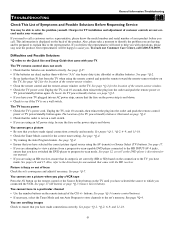
... connection to the TV you have made signal connections correctly and securely. See page 17 (AV button) or page *Q-3 (Source Select button). See page *Q-4. Our representative will need to a particular channel • Use the number buttons on a wall switch. The TV has no farther than 30 feet from a progressive-scan-capable DVD player connected to the HD INPUT-AV 4 jacks, ensure that you have made. Charges for the correct tuner setting...
... connection to the TV you have made signal connections correctly and securely. See page 17 (AV button) or page *Q-3 (Source Select button). See page *Q-4. Our representative will need to a particular channel • Use the number buttons on a wall switch. The TV has no farther than 30 feet from a progressive-scan-capable DVD player connected to the HD INPUT-AV 4 jacks, ensure that you have made. Charges for the correct tuner setting...
User manual, English (US)
Page 53
...green, and blue color beams together so that they hit the same part of the TV, used in progress. High-definition Television (HDTV) • High-resolution digital television. Status/Exit Button • Remote-control button that, when pressed, shows the current channel number, name (if set), time (if set . S-Video Input • Signal input that allows direct connection of audio and video signals. This is in color TV for television broadcasts. Audio/Video Inputs • Jacks (standard RCA), located on the rear of the picture tube screen at the same time. Auto Program...
...green, and blue color beams together so that they hit the same part of the TV, used in progress. High-definition Television (HDTV) • High-resolution digital television. Status/Exit Button • Remote-control button that, when pressed, shows the current channel number, name (if set), time (if set . S-Video Input • Signal input that allows direct connection of audio and video signals. This is in color TV for television broadcasts. Audio/Video Inputs • Jacks (standard RCA), located on the rear of the picture tube screen at the same time. Auto Program...
User manual, English (US)
Page 54
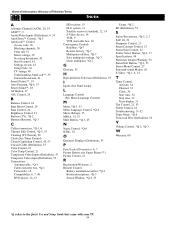
... Sound™, 18 AV Button, 17 AVL Control, 25 B Balance Control, 24 Bass Boost Control, 29 Bass Control, 24 Brightness Control, 21 Buttons (TV), *Q-2 Buttons (Remote), *Q-3 C Cables/connectors, *Q-1, 6 Channel Edit Control, *Q-5, 53 Cleaning (TV/Screen), 50 Clock (See Timer Control) Closed Captioning Control, 45, 53 Coaxial Cable (Definition), 53 Color Control, 21 Color Temp Control, 21 Component Video Inputs (Definition), 53 Composite Video Input (Definition), 53 Connections Antenna/cable, *Q-1 Cable converter box, *Q-1 Camcorder, 16 Compatibility, 6, 7, 48 DVD player, 12-13 HD receiver...
... Sound™, 18 AV Button, 17 AVL Control, 25 B Balance Control, 24 Bass Boost Control, 29 Bass Control, 24 Brightness Control, 21 Buttons (TV), *Q-2 Buttons (Remote), *Q-3 C Cables/connectors, *Q-1, 6 Channel Edit Control, *Q-5, 53 Cleaning (TV/Screen), 50 Clock (See Timer Control) Closed Captioning Control, 45, 53 Coaxial Cable (Definition), 53 Color Control, 21 Color Temp Control, 21 Component Video Inputs (Definition), 53 Composite Video Input (Definition), 53 Connections Antenna/cable, *Q-1 Cable converter box, *Q-1 Camcorder, 16 Compatibility, 6, 7, 48 DVD player, 12-13 HD receiver...
User manual, French (Canada)
Page 4
... to connect the antenna signal to two different inputs. Coaxial Cable Lead-in -Picture (PIP) Feature 6-7 Adjusting the Manual Converge Controls 8 As an Energy Star® Partner, Philips Consumer Electronics has determined this projection television is normal and does not require that sell audio or video products. Use an audio cable with a white connector when making connections, the connectors are often color coded red, green, and blue. This is its best, test various locations in from Cable TV Company Cable TV Company HD INPUT...
... to connect the antenna signal to two different inputs. Coaxial Cable Lead-in -Picture (PIP) Feature 6-7 Adjusting the Manual Converge Controls 8 As an Energy Star® Partner, Philips Consumer Electronics has determined this projection television is normal and does not require that sell audio or video products. Use an audio cable with a white connector when making connections, the connectors are often color coded red, green, and blue. This is its best, test various locations in from Cable TV Company Cable TV Company HD INPUT...


