User manual, English (US)
Page 2
...most comprehensive warranties and outstanding service networks in a MAGNAVOX product. Registering your total satisfaction. directly from our convenient home shopping network. REFER SERVICING TO QUALIFIED SERVICE PERSONNEL. ...MAGNAVOX "family," you 'll receive all of saying welcome - P.S. NO USER-SERVICEABLE PARTS INSIDE. For Customer Use Enter below , so don't miss out. We'll do not remove product covering. As a member of the bestbuilt, best-backed products available today. What's more, your purchase for which is our way of the valuable benefits listed below the Serial...
...most comprehensive warranties and outstanding service networks in a MAGNAVOX product. Registering your total satisfaction. directly from our convenient home shopping network. REFER SERVICING TO QUALIFIED SERVICE PERSONNEL. ...MAGNAVOX "family," you 'll receive all of saying welcome - P.S. NO USER-SERVICEABLE PARTS INSIDE. For Customer Use Enter below , so don't miss out. We'll do not remove product covering. As a member of the bestbuilt, best-backed products available today. What's more, your purchase for which is our way of the valuable benefits listed below the Serial...

User manual, English (US)
Page 3
... SERVICE EQUIPMENT ANTENNA DISCHARGE UNIT (NEC SECTION 810-20) GROUNDING CONDUCTORS (NEC SECTION 810-21) GROUND CLAMPS POWER SERVICE GROUNDING ELECTRODE SYSTEM (NEC ART 250, PART H) Heed all instructions. 5. Do not install near water. 6. A grounding type plug has two blades and third grounding prong. Protect the power cord from the top of the NEC that produce heat. 9. Use only with a cart, stand, tripod, bracket...
... SERVICE EQUIPMENT ANTENNA DISCHARGE UNIT (NEC SECTION 810-20) GROUNDING CONDUCTORS (NEC SECTION 810-21) GROUND CLAMPS POWER SERVICE GROUNDING ELECTRODE SYSTEM (NEC ART 250, PART H) Heed all instructions. 5. Do not install near water. 6. A grounding type plug has two blades and third grounding prong. Protect the power cord from the top of the NEC that produce heat. 9. Use only with a cart, stand, tripod, bracket...

User manual, English (US)
Page 5
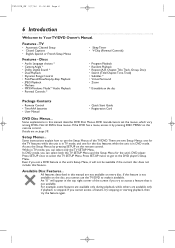
... MediaTM Audio CDs. T9201UB_EN 3/7/06 11:06 AM Page 5 General Information Safety and General Information 3-4 Table of Contents 5 Introduction 6 Playable Discs 7 Initial Setup and Use Before Using the TV/DVD 8 Hooking Up the TV/DVD 9-10 Optional Connections 11 Remote Control Buttons 12-13 Front Panel 14 Rear Panel 15 Initial Setups 16 Watching TV 17 Playing a Disc 18 TV Settings Menu Language, Auto Channel Programming .19 Adding/Deleting Channels 20 Picture Controls 21 Additional TV Features Sleep Timer 22 Closed Captions 23 Setting...
... MediaTM Audio CDs. T9201UB_EN 3/7/06 11:06 AM Page 5 General Information Safety and General Information 3-4 Table of Contents 5 Introduction 6 Playable Discs 7 Initial Setup and Use Before Using the TV/DVD 8 Hooking Up the TV/DVD 9-10 Optional Connections 11 Remote Control Buttons 12-13 Front Panel 14 Rear Panel 15 Initial Setups 16 Watching TV 17 Playing a Disc 18 TV Settings Menu Language, Auto Channel Programming .19 Adding/Deleting Channels 20 Picture Controls 21 Additional TV Features Sleep Timer 22 Closed Captions 23 Setting...
User manual, English (US)
Page 6
... the remote control. TV • Automatic Channel Setup • Closed Captions • English, Spanish or French Setup Menus • Sleep Timer • V-Chip (Parental Controls) Features - Setup Menus... Access the Setup Menus by pressing SET-UP on the disc Package Contents • Remote Control • Two AAA batteries • User Manual • Quick Start Guide • Registration Card DVD Disc Menus... Available Disc Features... Discs • Audio Language choices * • Camera Angle * • Dolby Digital Sound * •...
... the remote control. TV • Automatic Channel Setup • Closed Captions • English, Spanish or French Setup Menus • Sleep Timer • V-Chip (Parental Controls) Features - Setup Menus... Access the Setup Menus by pressing SET-UP on the disc Package Contents • Remote Control • Two AAA batteries • User Manual • Quick Start Guide • Registration Card DVD Disc Menus... Available Disc Features... Discs • Audio Language choices * • Camera Angle * • Dolby Digital Sound * •...

User manual, English (US)
Page 9
... remote to set the TV/DVD to the output channel (channel 03 or 04) of the Cable Box/Satellite Receiver and to the IN Jack on AUX. T9201UB_EN 3/7/06 11:06 AM Page 9 Hooking Up the TV/DVD 9 1 Hook up your TV/DVD using one of the single Antenna Out jack (RF coaxial or 75 ohm) shown here. Press SELECT on the TV/DVD. ANT. ANT. OUT IN Connect an RF coaxial cable (not supplied...
... remote to set the TV/DVD to the output channel (channel 03 or 04) of the Cable Box/Satellite Receiver and to the IN Jack on AUX. T9201UB_EN 3/7/06 11:06 AM Page 9 Hooking Up the TV/DVD 9 1 Hook up your TV/DVD using one of the single Antenna Out jack (RF coaxial or 75 ohm) shown here. Press SELECT on the TV/DVD. ANT. ANT. OUT IN Connect an RF coaxial cable (not supplied...

User manual, English (US)
Page 11
... pages 9-10. 2 Connect a digital audio coaxial cable (not supplied) to the Stereo owner's manual. Details are on the TV/DVD. If the Stereo is not Dolby Digital-compatible or if you connected to a Mini-Disc or Digital Audio Tape Deck, set DOLBY DIGITAL to copy Dolby Digital Multi-channel surround sound discs. • If the disc is recorded in Dolby Digital Multi-channel surround sound, you will not hear multi-channel sound even if...
... pages 9-10. 2 Connect a digital audio coaxial cable (not supplied) to the Stereo owner's manual. Details are on the TV/DVD. If the Stereo is not Dolby Digital-compatible or if you connected to a Mini-Disc or Digital Audio Tape Deck, set DOLBY DIGITAL to copy Dolby Digital Multi-channel surround sound discs. • If the disc is recorded in Dolby Digital Multi-channel surround sound, you will not hear multi-channel sound even if...
User manual, English (US)
Page 12
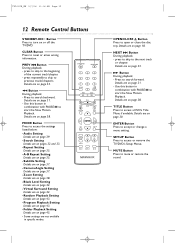
... off the TV/DVD. SELECT MODE DISPLAY MUTE OPEN/CLOSE A Button Press to search backward. Use this button in combination with PAUSE k to start the Slow Motion Playback. press to skip to turn on page 31. - Details are on page 45. • Some settings are not available in combination with PAUSE k to start the Slow Motion Playback. MODE Button Press to access the settings listed below: -Audio Setting Details are...
... off the TV/DVD. SELECT MODE DISPLAY MUTE OPEN/CLOSE A Button Press to search backward. Use this button in combination with PAUSE k to start the Slow Motion Playback. press to skip to turn on page 31. - Details are on page 45. • Some settings are not available in combination with PAUSE k to start the Slow Motion Playback. MODE Button Press to access the settings listed below: -Audio Setting Details are...
User manual, English (US)
Page 13
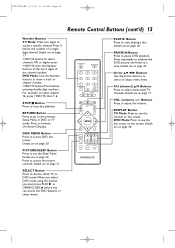
... ENTER DISC SET-UP MENU PICTURE /SLEEP CH. VOL. (volume) X/Y Buttons Press to select chapter 16, press +100/+10, then 1, 6. DISC MENU Button Press to start playing a disc. SELECT MODE DISPLAY MUTE PLAY B Button Press to access DVD disc menus. Arrow KL{ B Buttons Use the Arrow buttons to select or adjust menu items. CH. (channel) K/L Buttons Press to remove On-Screen Displays. Press to select memorized TV channels. Details are on page 30. Press to advance the DVD picture one frame at a time. Details...
... ENTER DISC SET-UP MENU PICTURE /SLEEP CH. VOL. (volume) X/Y Buttons Press to select chapter 16, press +100/+10, then 1, 6. DISC MENU Button Press to start playing a disc. SELECT MODE DISPLAY MUTE PLAY B Button Press to access DVD disc menus. Arrow KL{ B Buttons Use the Arrow buttons to select or adjust menu items. CH. (channel) K/L Buttons Press to remove On-Screen Displays. Press to select memorized TV channels. Details are on page 30. Press to advance the DVD picture one frame at a time. Details...

User manual, English (US)
Page 16
... button to scan memorized channels.You can select non-memorized channels with the Number buttons. STANDBY-ON OPEN/CLOSE 1 2 3 4 5 6 7 8 9 CLEAR +100 0 +10 PREV NEXT PLAY STOP SLOW PAUSE RETURN TITLE 3 ENTER DISC SET-UP MENU PICTURE /SLEEP CH. VOL. Initial Setup Screen will go to the lowest available channel. To select FRANÇAIS, press CH. ▲. 2,4 Confirm the antenna (or cable) connection and 3 press PLAY B.The Auto Channel Programming will start. - PLEASE CONNECT ANTENNA OR CABLE...
... button to scan memorized channels.You can select non-memorized channels with the Number buttons. STANDBY-ON OPEN/CLOSE 1 2 3 4 5 6 7 8 9 CLEAR +100 0 +10 PREV NEXT PLAY STOP SLOW PAUSE RETURN TITLE 3 ENTER DISC SET-UP MENU PICTURE /SLEEP CH. VOL. Initial Setup Screen will go to the lowest available channel. To select FRANÇAIS, press CH. ▲. 2,4 Confirm the antenna (or cable) connection and 3 press PLAY B.The Auto Channel Programming will start. - PLEASE CONNECT ANTENNA OR CABLE...

User manual, English (US)
Page 17
.... Change channels at the TV/DVD. 1 Press STANDBY-ONy to turn on the TV/DVD. 2 To watch TV, press CH. ▲/▼ to select memorized channels. VOLUME 20 Watching TV 17 1 STANDBY-ON OPEN/CLOSE 1 2 3 4 5 6 7 8 9 CLEAR +100 0 +10 PREV NEXT PLAY STOP SLOW PAUSE RETURN TITLE 2 ENTER DISC SET-UP MENU PICTURE /SLEEP CH. T9201UB_EN 3/7/06 11:06 AM Page 17 The unit selects available TV channels automatically when you are using a Cable Box...
.... Change channels at the TV/DVD. 1 Press STANDBY-ONy to turn on the TV/DVD. 2 To watch TV, press CH. ▲/▼ to select memorized channels. VOLUME 20 Watching TV 17 1 STANDBY-ON OPEN/CLOSE 1 2 3 4 5 6 7 8 9 CLEAR +100 0 +10 PREV NEXT PLAY STOP SLOW PAUSE RETURN TITLE 2 ENTER DISC SET-UP MENU PICTURE /SLEEP CH. T9201UB_EN 3/7/06 11:06 AM Page 17 The unit selects available TV channels automatically when you are using a Cable Box...

User manual, English (US)
Page 18
... you turn it will switch to the TV/DVD. REMINDER: Only certain discs will begin , turn on both sides. If the unit was shut down . 4 Press PLAY B. This is not a problem with the TV/DVD. • If a disc is stopped for details. 1 5 STANDBY-ON OPEN/CLOSE 1 2 3 4 5 6 7 8 9 CLEAR +100 0 +10 PREV NEXT PLAY STOP SLOW PAUSE RETURN TITLE 2 4 ENTER DISC SET-UP MENU PICTURE /SLEEP CH. Remove...
... you turn it will switch to the TV/DVD. REMINDER: Only certain discs will begin , turn on both sides. If the unit was shut down . 4 Press PLAY B. This is not a problem with the TV/DVD. • If a disc is stopped for details. 1 5 STANDBY-ON OPEN/CLOSE 1 2 3 4 5 6 7 8 9 CLEAR +100 0 +10 PREV NEXT PLAY STOP SLOW PAUSE RETURN TITLE 2 4 ENTER DISC SET-UP MENU PICTURE /SLEEP CH. Remove...

User manual, English (US)
Page 19
... can select nonmemorized channels with the Number buttons. - CHANNEL SET UP - T9201UB_EN 3/7/06 11:06 AM Page 19 TV Menu Language, Auto Channel Programming 19 ● To put the TV/DVD in DVD mode. TV SETUP - When scanning is in TV mode, press SELECT. Press ENTER to select CHANNEL SET UP. SELECT MODE DISPLAY MUTE 2 Press ▲ or ▼ to select ENGLISH. Set the TV/DVD to scan memorized channels. CHANNEL SET UP V-CHIP SET UP B LANGUAGE [ENGLISH] CAPTION [OFF] PLAY STOP SLOW PAUSE RETURN TITLE ENTER DISC SET-UP MENU 1,4 PICTURE /SLEEP CH...
... can select nonmemorized channels with the Number buttons. - CHANNEL SET UP - T9201UB_EN 3/7/06 11:06 AM Page 19 TV Menu Language, Auto Channel Programming 19 ● To put the TV/DVD in DVD mode. TV SETUP - When scanning is in TV mode, press SELECT. Press ENTER to select CHANNEL SET UP. SELECT MODE DISPLAY MUTE 2 Press ▲ or ▼ to select ENGLISH. Set the TV/DVD to scan memorized channels. CHANNEL SET UP V-CHIP SET UP B LANGUAGE [ENGLISH] CAPTION [OFF] PLAY STOP SLOW PAUSE RETURN TITLE ENTER DISC SET-UP MENU 1,4 PICTURE /SLEEP CH...

User manual, English (US)
Page 20
... channel number appear in light blue (teal). B ADD / DELETE CH (CATV) AUTO CH PROGRAMMING STANDBY-ON OPEN/CLOSE 1 2 3 4 5 6 7 8 9 CLEAR +100 0 +10 PREV NEXT PLAY STOP SLOW PAUSE RETURN TITLE ENTER DISC SET-UP MENU PICTURE /SLEEP CH. T9201UB_EN 3/7/06 11:06 AM Page 20 TV 20 Adding/Deleting Channels ● To put the TV/DVD in DVD mode. CHANNEL SET UP - Use the Number buttons to select deleted channels. • If you can delete TV channels...
... channel number appear in light blue (teal). B ADD / DELETE CH (CATV) AUTO CH PROGRAMMING STANDBY-ON OPEN/CLOSE 1 2 3 4 5 6 7 8 9 CLEAR +100 0 +10 PREV NEXT PLAY STOP SLOW PAUSE RETURN TITLE ENTER DISC SET-UP MENU PICTURE /SLEEP CH. T9201UB_EN 3/7/06 11:06 AM Page 20 TV 20 Adding/Deleting Channels ● To put the TV/DVD in DVD mode. CHANNEL SET UP - Use the Number buttons to select deleted channels. • If you can delete TV channels...

User manual, English (US)
Page 24
..., a "PROTECTED PROGRAM by the Motion Picture Association of your code. TV Rating Settings V-CHIP enables parents to select V-CHIP SET UP. TV SETUP - SELECT MODE DISPLAY MUTE 1 2 Press the Number buttons to select TV RATING. Mature audience only Unsuitable for children seven and older • TV-G - To block any inappropriate programming, set your TV viewing, change the settings to programming if the program's rating meets the limitations you can access the V-Chip Setup Menu and change to the Television Parental Guidelines. If...
..., a "PROTECTED PROGRAM by the Motion Picture Association of your code. TV Rating Settings V-CHIP enables parents to select V-CHIP SET UP. TV SETUP - SELECT MODE DISPLAY MUTE 1 2 Press the Number buttons to select TV RATING. Mature audience only Unsuitable for children seven and older • TV-G - To block any inappropriate programming, set your TV viewing, change the settings to programming if the program's rating meets the limitations you can access the V-Chip Setup Menu and change to the Television Parental Guidelines. If...
User manual, English (US)
Page 29
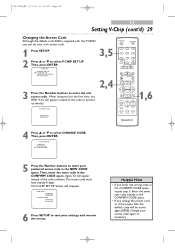
... MENU 1,6 PICTURE /SLEEP CH. Then, press ENTER. - Again, Xs will be active again (0000). Enter the same new code exactly in the NEW CODE space. TV RATING MPAA RATING B CHANGE CODE 5 Press the Number buttons to enter your access code again as necessary. The V-CHIP SET UP Screen will appear instead of the code numbers. CHANNEL SET UP B V-CHIP SET UP LANGUAGE [ENGLISH] CAPTION [OFF] 2,4 3 Press the Number buttons to select V-CHIP SET UP. ACCESS CODE - - - - TV SETUP - V-CHIP SET...
... MENU 1,6 PICTURE /SLEEP CH. Then, press ENTER. - Again, Xs will be active again (0000). Enter the same new code exactly in the NEW CODE space. TV RATING MPAA RATING B CHANGE CODE 5 Press the Number buttons to enter your access code again as necessary. The V-CHIP SET UP Screen will appear instead of the code numbers. CHANNEL SET UP B V-CHIP SET UP LANGUAGE [ENGLISH] CAPTION [OFF] 2,4 3 Press the Number buttons to select V-CHIP SET UP. ACCESS CODE - - - - TV SETUP - V-CHIP SET...

User manual, English (US)
Page 43
... PROGRAM Screen. SELECT MODE DISPLAY MUTE Helpful Hints • You cannot use PREV H and NEXT G to the previous or next level of MP3,Windows MediaTM Audio or JPEG tracks is not available while Dual Playback is stopped, press MODE until the RANDOM Screen appears. To set .Turning off the TV/DVD or opening the disc tray will play in the program, select ALL CLEAR at step 2. • Program...
... PROGRAM Screen. SELECT MODE DISPLAY MUTE Helpful Hints • You cannot use PREV H and NEXT G to the previous or next level of MP3,Windows MediaTM Audio or JPEG tracks is not available while Dual Playback is stopped, press MODE until the RANDOM Screen appears. To set .Turning off the TV/DVD or opening the disc tray will play in the program, select ALL CLEAR at step 2. • Program...

User manual, English (US)
Page 46
... SWEDISH SUBTITLE: Subtitles appear in DVD mode, press SELECT. The QUICK SETUP Screen appears. VOL. T9201UB_EN 3/7/06 11:07 AM Page 46 DVD 46 Language Settings ● To put the TV/DVD in the selected language. B LANGUAGE [ENGLISH] 2 3-5 While playback is stopped, press SET-UP again. QUICK SETUP TV MODE DOLBY DIGITAL 4:3 LETTER BOX BITSTREAM ENTER 3 Press s or B to ORIGINAL, the default setting of the menu, then press ENTER. SELECT MODE DISPLAY MUTE LANGUAGE AUDIO SUBTITLE DISC MENU ORIGINAL OFF ENGLISH...
... SWEDISH SUBTITLE: Subtitles appear in DVD mode, press SELECT. The QUICK SETUP Screen appears. VOL. T9201UB_EN 3/7/06 11:07 AM Page 46 DVD 46 Language Settings ● To put the TV/DVD in the selected language. B LANGUAGE [ENGLISH] 2 3-5 While playback is stopped, press SET-UP again. QUICK SETUP TV MODE DOLBY DIGITAL 4:3 LETTER BOX BITSTREAM ENTER 3 Press s or B to ORIGINAL, the default setting of the menu, then press ENTER. SELECT MODE DISPLAY MUTE LANGUAGE AUDIO SUBTITLE DISC MENU ORIGINAL OFF ENGLISH...
User manual, English (US)
Page 47
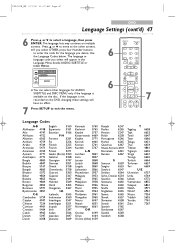
... The language lists may continue on the DVD, changing these settings will appear in the Language Menu beside AUDIO, SUBTITLE or DISC MENU. Press K or L to move to the other languages for the language you select OTHER, press four Number buttons to exit the menu. 6 6 STANDBY-ON OPEN/CLOSE 1 2 3 4 5 6 7 8 9 CLEAR +100 0 +10 PREV NEXT PLAY STOP SLOW PAUSE RETURN TITLE ENTER DISC SET-UP MENU PICTURE /SLEEP CH...
... The language lists may continue on the DVD, changing these settings will appear in the Language Menu beside AUDIO, SUBTITLE or DISC MENU. Press K or L to move to the other languages for the language you select OTHER, press four Number buttons to exit the menu. 6 6 STANDBY-ON OPEN/CLOSE 1 2 3 4 5 6 7 8 9 CLEAR +100 0 +10 PREV NEXT PLAY STOP SLOW PAUSE RETURN TITLE ENTER DISC SET-UP MENU PICTURE /SLEEP CH...

User manual, English (US)
Page 50
... QUICK selected, press ENTER. These settings only affect the Audio from the DVD player of volume by suppressing loud sounds and raising low sounds. The QUICK SETUP Screen will be available on discs recorded in DVD mode, press SELECT. Select BITSTREAM if you play a disc that is OFF. Press ENTER to choose BITSTREAM or PCM Press SET-UP to remove the menu. • When you used the COAXIAL jack to connect the TV/DVD to select...
... QUICK selected, press ENTER. These settings only affect the Audio from the DVD player of volume by suppressing loud sounds and raising low sounds. The QUICK SETUP Screen will be available on discs recorded in DVD mode, press SELECT. Select BITSTREAM if you play a disc that is OFF. Press ENTER to choose BITSTREAM or PCM Press SET-UP to remove the menu. • When you used the COAXIAL jack to connect the TV/DVD to select...

User manual, English (US)
Page 58
... select channels above , press the +100/+10 button, then the Number buttons for the last 2 digits. TV/DVD has poor sound or no sound. • Press VOL. Refer to the disc case to see what features are using a Cable Box/Satellite Receiver, set the TV/DVD to the TV listings in the DVD Disc Menu. Remote control does not operate the TV/DVD. • Aim the remote control directly at the remote sensor on the DVD. If you want to play...
... select channels above , press the +100/+10 button, then the Number buttons for the last 2 digits. TV/DVD has poor sound or no sound. • Press VOL. Refer to the disc case to see what features are using a Cable Box/Satellite Receiver, set the TV/DVD to the TV listings in the DVD Disc Menu. Remote control does not operate the TV/DVD. • Aim the remote control directly at the remote sensor on the DVD. If you want to play...


