
User Manual
Page 3
CONTENTS PRODUCT REGISTRATION 2 PRECAUTIONS 4 IMPORTANT SAFETY INSTRUCTIONS 5 SPECIFICATIONS 7 PARTS AND FEATURES 8 INSTALLATION INSTRUCTIONS 9 OPERATION INSTRUCTIONS 12 CARE AND MAINTENANCE 15 TROUBLESHOOTING 17 LIMITED WARRANTY 18 3
CONTENTS PRODUCT REGISTRATION 2 PRECAUTIONS 4 IMPORTANT SAFETY INSTRUCTIONS 5 SPECIFICATIONS 7 PARTS AND FEATURES 8 INSTALLATION INSTRUCTIONS 9 OPERATION INSTRUCTIONS 12 CARE AND MAINTENANCE 15 TROUBLESHOOTING 17 LIMITED WARRANTY 18 3

User Manual
Page 5
Connect only to the dryer, wait at a high speed and the rotating parts may destroy the electrical insulation causing an electrical shock hazard. 6. It is rotating at least 2 minutes before using the appliance. 2. DO NOT cover or block ... a damaged power cord or plug, if it on again. 21. DO NOT immerse the power cord or plug in any other appliance. Never clean appliance parts with a sponge or soft cloth. Arrange the cord away from the outlet. DO NOT carry the appliance by qualified service personnel. Read all heated surfaces...
Connect only to the dryer, wait at a high speed and the rotating parts may destroy the electrical insulation causing an electrical shock hazard. 6. It is rotating at least 2 minutes before using the appliance. 2. DO NOT cover or block ... a damaged power cord or plug, if it on again. 21. DO NOT immerse the power cord or plug in any other appliance. Never clean appliance parts with a sponge or soft cloth. Arrange the cord away from the outlet. DO NOT carry the appliance by qualified service personnel. Read all heated surfaces...
User Manual
Page 8
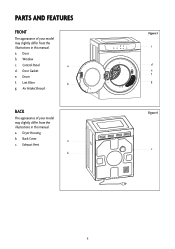
Control Panel a d. Back Cover a c. a. Window c. Door Gasket e. Air Intake Shroud bACK The appearance of your model may slightly differ from the illustrations in this manual. Exhaust Vent b Figure 3 c d e f g Figure 4 c 8 Drum f. a. Dryer Housing b. Lint Filter b g. Door b. PARTS and features fRONT The appearance of your model may slightly differ from the illustrations in this manual.
Control Panel a d. Back Cover a c. a. Window c. Door Gasket e. Air Intake Shroud bACK The appearance of your model may slightly differ from the illustrations in this manual. Exhaust Vent b Figure 3 c d e f g Figure 4 c 8 Drum f. a. Dryer Housing b. Lint Filter b g. Door b. PARTS and features fRONT The appearance of your model may slightly differ from the illustrations in this manual.
User Manual
Page 10
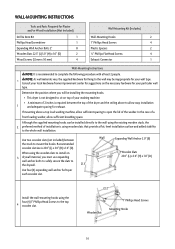
... washing machine. • A minimum of 2 inches is required between the studs to complete the following procedure with at least 2 people. WALL-MOUNTING INSTRUCTIONS Tools and Parts Required for Plaster and/or Wood Installation (Not Included) Drill & 3mm Bit 1 Phillips Head Screwdriver 1 Expanding Wall Anchor Bolts 2" 8 Wooden Slats 22.3" (L) 3.0" (H) x 1.0" (D) 2 Wood Screws (12...
... washing machine. • A minimum of 2 inches is required between the studs to complete the following procedure with at least 2 people. WALL-MOUNTING INSTRUCTIONS Tools and Parts Required for Plaster and/or Wood Installation (Not Included) Drill & 3mm Bit 1 Phillips Head Screwdriver 1 Expanding Wall Anchor Bolts 2" 8 Wooden Slats 22.3" (L) 3.0" (H) x 1.0" (D) 2 Wood Screws (12...
User Manual
Page 15
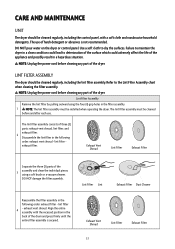
...secured. lint filter exhaust filter. Exhaust Vent Shroud Lint Filter Exhaust Filter 15 Exhaust Vent Shroud Lint Filter Exhaust Filter Separate the three (3) parts of the 3 assembly and clean the individual pieces using the four (4) grip holes in the filter assembly. 1 NOTE: The lint .... Failure to maintain the dryer in a clean condition could lead to deterioration of the surface which could adversely affect the life of three (3) parts: exhaust vent shroud, lint filter, and exhaust filter. 2 Disassemble the lint filter in a hazardous situation. Lint Filter Assembly Remove the lint...
...secured. lint filter exhaust filter. Exhaust Vent Shroud Lint Filter Exhaust Filter 15 Exhaust Vent Shroud Lint Filter Exhaust Filter Separate the three (3) parts of the 3 assembly and clean the individual pieces using the four (4) grip holes in the filter assembly. 1 NOTE: The lint .... Failure to maintain the dryer in a clean condition could lead to deterioration of the surface which could adversely affect the life of three (3) parts: exhaust vent shroud, lint filter, and exhaust filter. 2 Disassemble the lint filter in a hazardous situation. Lint Filter Assembly Remove the lint...
User Manual
Page 16
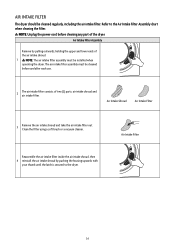
... the filter using a soft brush or a vacuum cleaner. NOTE: Unplug the power cord before and after each use. 2 The air intake filter consists of two (2) parts: air intake shroud and air intake filter. AIR INTAKE FILTER The dryer should be cleaned before cleaning any...
... the filter using a soft brush or a vacuum cleaner. NOTE: Unplug the power cord before and after each use. 2 The air intake filter consists of two (2) parts: air intake shroud and air intake filter. AIR INTAKE FILTER The dryer should be cleaned before cleaning any...
User Manual
Page 18
... in accordance with published installation instructions. • Refunds for non repairable products are hereby limited to request warranty service or order parts. 18 This warranty gives you specific legal rights, and you may also have other rights which vary from state to furnish a new... exclusive remedy under this unit for us any other purposes than its intended purpose. • Disposal costs for any subsequent owner(s). Model MCSDRY35W Parts One Year Labor One Year Type of Service Carry In For Service or Assistance please call 888-775-0202 or visit us on this ...
... in accordance with published installation instructions. • Refunds for non repairable products are hereby limited to request warranty service or order parts. 18 This warranty gives you specific legal rights, and you may also have other rights which vary from state to furnish a new... exclusive remedy under this unit for us any other purposes than its intended purpose. • Disposal costs for any subsequent owner(s). Model MCSDRY35W Parts One Year Labor One Year Type of Service Carry In For Service or Assistance please call 888-775-0202 or visit us on this ...
