User Manual
Page 1
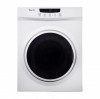
3.5 Cu. Compact Dryer User's Manual Model MCSDRY35W PLEASE READ THIS MANUAL CAREFULLY BEFORE USING YOUR DRYER AND KEEP IT FOR FUTURE REFERENCE. 1 Ft.
3.5 Cu. Compact Dryer User's Manual Model MCSDRY35W PLEASE READ THIS MANUAL CAREFULLY BEFORE USING YOUR DRYER AND KEEP IT FOR FUTURE REFERENCE. 1 Ft.
User Manual
Page 2
Registering your product will allow for more efficient warranty service processing when warranty service is to contact you regarding a safety notification or product update. 2. The benefits of registering your proof of purchase in the event of insurance loss. Registering your new product is required. 3. Once again, thank you for purchasing this Magic Chef product. 2 Product Registration Thank you for purchasing this Magic Chef®product. The first...
Registering your product will allow for more efficient warranty service processing when warranty service is to contact you regarding a safety notification or product update. 2. The benefits of registering your proof of purchase in the event of insurance loss. Registering your new product is required. 3. Once again, thank you for purchasing this Magic Chef product. 2 Product Registration Thank you for purchasing this Magic Chef®product. The first...

User Manual
Page 3
CONTENTS PRODUCT REGISTRATION 2 PRECAUTIONS 4 IMPORTANT SAFETY INSTRUCTIONS 5 SPECIFICATIONS 7 PARTS AND FEATURES 8 INSTALLATION INSTRUCTIONS 9 OPERATION INSTRUCTIONS 12 CARE AND MAINTENANCE 15 TROUBLESHOOTING 17 LIMITED WARRANTY 18 3
CONTENTS PRODUCT REGISTRATION 2 PRECAUTIONS 4 IMPORTANT SAFETY INSTRUCTIONS 5 SPECIFICATIONS 7 PARTS AND FEATURES 8 INSTALLATION INSTRUCTIONS 9 OPERATION INSTRUCTIONS 12 CARE AND MAINTENANCE 15 TROUBLESHOOTING 17 LIMITED WARRANTY 18 3
User Manual
Page 4
... handy to help , call Magic Chef® Customer Service: 1-888-775-0202. The marked rating of the extension cord shall be grounded. WARNING: Read and understand all instructions described in this user manual cannot cover all possible conditions and situations that has a grounding wire with a grounding plug. The warnings, cautions and instructions discussed in this user manual may occur. GROUNDING INSTRUCTIONS This appliance must be...
... handy to help , call Magic Chef® Customer Service: 1-888-775-0202. The marked rating of the extension cord shall be grounded. WARNING: Read and understand all instructions described in this user manual cannot cover all possible conditions and situations that has a grounding wire with a grounding plug. The warnings, cautions and instructions discussed in this user manual may occur. GROUNDING INSTRUCTIONS This appliance must be...

User Manual
Page 5
... to a properly grounded outlet. DO NOT immerse the power cord or plug in the user guide. When using the appliance. 2. Risk of dryer is for examination, repair, or adjustment. 10. This type of child entrapment and suffocation; Never clean appliance parts with , or crawl inside the appliance. 3. DO NOT place the appliance or cord near heat sources such as described in water. 13.
... to a properly grounded outlet. DO NOT immerse the power cord or plug in the user guide. When using the appliance. 2. Risk of dryer is for examination, repair, or adjustment. 10. This type of child entrapment and suffocation; Never clean appliance parts with , or crawl inside the appliance. 3. DO NOT place the appliance or cord near heat sources such as described in water. 13.

User Manual
Page 6
... the machine. 27. If the dryer is not recommended to heat sources such as this product. 24. 22. DO NOT use an extension cord with extra detergent. The door window may be hot. DO NOT overload the dryer. 26. DO NOT use flammable or combustible materials such as foam or plastic. 28. It is stopped before the end of the drying cycle...
... the machine. 27. If the dryer is not recommended to heat sources such as this product. 24. 22. DO NOT use an extension cord with extra detergent. The door window may be hot. DO NOT overload the dryer. 26. DO NOT use flammable or combustible materials such as foam or plastic. 28. It is stopped before the end of the drying cycle...

User Manual
Page 7
Ft. 1500 W * Due to continuing product development, specifications and design may be subject to change without prior notice. 7 SPECIFICATIONS Figure 2 32.3" (820 mm) 23.6" (600 mm) 21.5" (545 mm) Height Width Depth Weight Power Supply Capacity Rated Power 32.3" (820 mm) 23.6" (600 mm) 21.5" (545 mm) 53 lbs. (24.0 kg) 110 V / 60 Hz 3.5 Cu.
Ft. 1500 W * Due to continuing product development, specifications and design may be subject to change without prior notice. 7 SPECIFICATIONS Figure 2 32.3" (820 mm) 23.6" (600 mm) 21.5" (545 mm) Height Width Depth Weight Power Supply Capacity Rated Power 32.3" (820 mm) 23.6" (600 mm) 21.5" (545 mm) 53 lbs. (24.0 kg) 110 V / 60 Hz 3.5 Cu.
User Manual
Page 8
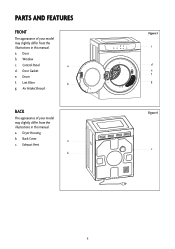
Lint Filter b g. Exhaust Vent b Figure 3 c d e f g Figure 4 c 8 Door Gasket e. Air Intake Shroud bACK The appearance of your model may slightly differ from the illustrations in this manual. a. Back Cover a c. a. Drum f. Dryer Housing b. Control Panel a d. PARTS and features fRONT The appearance of your model may slightly differ from the illustrations in this manual. Door b. Window c.
Lint Filter b g. Exhaust Vent b Figure 3 c d e f g Figure 4 c 8 Door Gasket e. Air Intake Shroud bACK The appearance of your model may slightly differ from the illustrations in this manual. a. Back Cover a c. a. Drum f. Dryer Housing b. Control Panel a d. PARTS and features fRONT The appearance of your model may slightly differ from the illustrations in this manual. Door b. Window c.
User Manual
Page 9
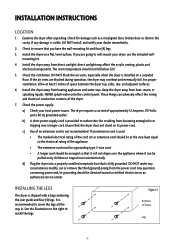
INSTALLATION INSTRUCTIONS LOCATION 1. If any circumstances modify, cut or remove the third (ground) prong from the power cord. Check the ventilation. Never splash water onto the control panel. These things can be directed toward a certified electrician or an authorized service center. Ensure that is used: • The marked electrical rating of the cord set or extension cord should be at the very least equal to reduce the risks resulting...
INSTALLATION INSTRUCTIONS LOCATION 1. If any circumstances modify, cut or remove the third (ground) prong from the power cord. Check the ventilation. Never splash water onto the control panel. These things can be directed toward a certified electrician or an authorized service center. Ensure that is used: • The marked electrical rating of the cord set or extension cord should be at the very least equal to reduce the risks resulting...
User Manual
Page 10
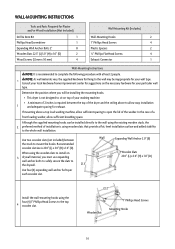
... studs to the whole wall installation. If mounting above to open the lid of the washer. Use two wooden slats (not included) between the top of the dryer and the ceiling above a top load washing machine, allow sufficient spacing to allow sufficient breathing space. When using the wooden slats to install on 3 drywall material, you will be installing the mounting hooks. •...
... studs to the whole wall installation. If mounting above to open the lid of the washer. Use two wooden slats (not included) between the top of the dryer and the ceiling above a top load washing machine, allow sufficient spacing to allow sufficient breathing space. When using the wooden slats to install on 3 drywall material, you will be installing the mounting hooks. •...

User Manual
Page 11
... reduce the ventilation needed to allow the necessary 7 ventilation for stress or weakened contact. 11 Wall Spacers ½" Phillips Flat Head Screws Once the dryer mounts are required when installing the unit on the wall to operate your unit as well as shown in place and check all installation points for efficient operation. Mount the dryer to the 5 bottom...
... reduce the ventilation needed to allow the necessary 7 ventilation for stress or weakened contact. 11 Wall Spacers ½" Phillips Flat Head Screws Once the dryer mounts are required when installing the unit on the wall to operate your unit as well as shown in place and check all installation points for efficient operation. Mount the dryer to the 5 bottom...

User Manual
Page 12
... start the set time of air cooling to the dryer. DEWRINKLE: Press this button, repeatedly, until the humidity level in the drum has reached ≤45%. The light above the button will run until the desired heat setting is being supplied to end the program. • LESS DRY: Sensor Dry - TEMPERATURE: Press this button to add the Dewrinkle program to turn the power off. b. The unit will come...
... start the set time of air cooling to the dryer. DEWRINKLE: Press this button, repeatedly, until the humidity level in the drum has reached ≤45%. The light above the button will run until the desired heat setting is being supplied to end the program. • LESS DRY: Sensor Dry - TEMPERATURE: Press this button to add the Dewrinkle program to turn the power off. b. The unit will come...
User Manual
Page 13
... Spin cycle in the washing machine first. LOCK: When the dryer is running, press the "Program" and "Temp" buttons simultaneously and hold for 3 seconds to lock all permanent care labels carefully. chenille and terry cloth) from the lint collectors (e.g. Dry Time Regular/High Airing/Low 60 Minutes 90 Minutes 90 Minutes 150 Minutes 150 Minutes 200 Minutes SORTING AND LOADING LAUNDRY For the best results, your laundry...
... Spin cycle in the washing machine first. LOCK: When the dryer is running, press the "Program" and "Temp" buttons simultaneously and hold for 3 seconds to lock all permanent care labels carefully. chenille and terry cloth) from the lint collectors (e.g. Dry Time Regular/High Airing/Low 60 Minutes 90 Minutes 90 Minutes 150 Minutes 150 Minutes 200 Minutes SORTING AND LOADING LAUNDRY For the best results, your laundry...
User Manual
Page 14
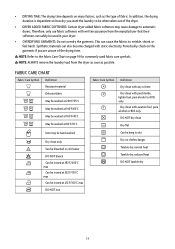
... washed Dry clean only Can be bleached in your dryer. • OVERDRYING GARMENTS: Do not overdry the garments. • DRYING TIME: The drying time depends on many factors, such as possible. This can safely be used fabric care symbols. NOTE: Always remove the laundry load from the manufacturer that their softeners can cause the fabrics to the Fabric Care Chart on page 14 for commonly used in cold water...
... washed Dry clean only Can be bleached in your dryer. • OVERDRYING GARMENTS: Do not overdry the garments. • DRYING TIME: The drying time depends on many factors, such as possible. This can safely be used fabric care symbols. NOTE: Always remove the laundry load from the manufacturer that their softeners can cause the fabrics to the Fabric Care Chart on page 14 for commonly used in cold water...
User Manual
Page 15
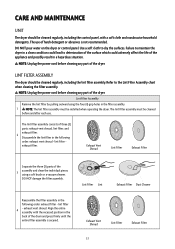
... power cord before and after each use of the dryer. lint filter exhaust filter. Refer to dry the surfaces. Exhaust Vent Shroud Lint Filter Exhaust Filter Separate the three (3) parts of the dryer. The lint filter assembly must be installed when operating the dryer. care and Maintenance unit The dryer should be cleaned regularly, including the lint filter assembly. DO NOT pour water on the dryer or control panel. exhaust vent shroud. Use a soft cloth...
... power cord before and after each use of the dryer. lint filter exhaust filter. Refer to dry the surfaces. Exhaust Vent Shroud Lint Filter Exhaust Filter Separate the three (3) parts of the dryer. The lint filter assembly must be installed when operating the dryer. care and Maintenance unit The dryer should be cleaned regularly, including the lint filter assembly. DO NOT pour water on the dryer or control panel. exhaust vent shroud. Use a soft cloth...
User Manual
Page 16
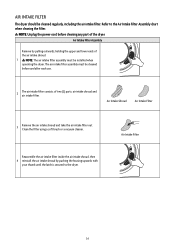
... filter assembly must be installed when operating the dryer. Clean the filter using a soft brush or a vacuum cleaner. Reassemble the air intake filter inside the air intake shroud, then 4 reinstall the air intake shroud by pulling outwards, holding the upper and lower ends of the dryer. NOTE: Unplug the power cord before and after each use. 2 The air intake filter consists of two (2) parts...
... filter assembly must be installed when operating the dryer. Clean the filter using a soft brush or a vacuum cleaner. Reassemble the air intake filter inside the air intake shroud, then 4 reinstall the air intake shroud by pulling outwards, holding the upper and lower ends of the dryer. NOTE: Unplug the power cord before and after each use. 2 The air intake filter consists of two (2) parts...

User Manual
Page 17
The door is not closed . Check for a blown circuit fuse or tripped main circuit breaker in your washer's spin cycle is not located in . DO NOT overload the dryer. The dryer is extracting water properly. Ensure your house. NOTE: If the problem persists, contact Magic Chef®Customer Service: 1-888-775-0202 for 'TIMER' and 'HEAT'. The circuit breaker tripped or a fuse blew. The power button was not pressed...
The door is not closed . Check for a blown circuit fuse or tripped main circuit breaker in your washer's spin cycle is not located in . DO NOT overload the dryer. The dryer is extracting water properly. Ensure your house. NOTE: If the problem persists, contact Magic Chef®Customer Service: 1-888-775-0202 for 'TIMER' and 'HEAT'. The circuit breaker tripped or a fuse blew. The power button was not pressed...
User Manual
Page 18
Model MCSDRY35W Parts One Year Labor One Year Type of Service Carry In For Service or Assistance please call 888-775-0202 or visit us any other liability in connection with published installation instructions. • Refunds for the unit per the sales receipt. • This warranty is not available. • The removal and reinstallation of the unit. • Repairs performed by unauthorized service agents. •...
Model MCSDRY35W Parts One Year Labor One Year Type of Service Carry In For Service or Assistance please call 888-775-0202 or visit us any other liability in connection with published installation instructions. • Refunds for the unit per the sales receipt. • This warranty is not available. • The removal and reinstallation of the unit. • Repairs performed by unauthorized service agents. •...

User Manual
Page 19
d/b/a MC Appliance Corporation. www.mcappliance.com 19 Printed in China CNA International, Inc. Magic Chef®logo is a registered trademark of CNA International, Inc. All rights reserved.
d/b/a MC Appliance Corporation. www.mcappliance.com 19 Printed in China CNA International, Inc. Magic Chef®logo is a registered trademark of CNA International, Inc. All rights reserved.


