User Manual
Page 1
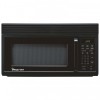
... holes and the vertical exhaust location. This over both gas and electric cooking equipment. 1 II. Introduction Your Over-the-Range microwave oven comes complete with a grounding plug. IMPORTANT: KEEP INSTRUCTIONS FOR LOCAL ELECTRICAL INSPECTOR'S USE. CAUTION: FOR PERSONAL SAFETY, REMOVE... HOUSE FUSE OR OPEN CIRCUIT BREAKER BEFORE BEGINNING INSTALLATION TO AVOID SEVERE OR FATAL SHOCK INJURY. Microwave Oven Installation Manual IMPORTANT SAFETY INSTRUCTION Never operate the oven when it will accept the plug on the appliance. Electrical ...
... holes and the vertical exhaust location. This over both gas and electric cooking equipment. 1 II. Introduction Your Over-the-Range microwave oven comes complete with a grounding plug. IMPORTANT: KEEP INSTRUCTIONS FOR LOCAL ELECTRICAL INSPECTOR'S USE. CAUTION: FOR PERSONAL SAFETY, REMOVE... HOUSE FUSE OR OPEN CIRCUIT BREAKER BEFORE BEGINNING INSTALLATION TO AVOID SEVERE OR FATAL SHOCK INJURY. Microwave Oven Installation Manual IMPORTANT SAFETY INSTRUCTION Never operate the oven when it will accept the plug on the appliance. Electrical ...
User Manual
Page 2
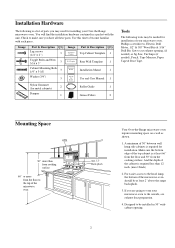
... 30" between wall hung side cabinets is required for installation of the cabinet is at least 2" above the range backsplash. 3. And the depth of your microwave oven. Use this time to become familiar with the unit. Image Part & Description Q'ty Lag screws (1/4" x 2") 3 Toggle Bolts and Nuts 3/16...Tape. Mounting Space OTR 30" more than 12 inch. (max.12inch) 2. Installation Hardware The following tools may need for installing your microwave oven to the outside, see exhaust duct preparation. 4. You will find the installation hardware contained in 30" wide cabinet opening , ...
... 30" between wall hung side cabinets is required for installation of the cabinet is at least 2" above the range backsplash. 3. And the depth of your microwave oven. Use this time to become familiar with the unit. Image Part & Description Q'ty Lag screws (1/4" x 2") 3 Toggle Bolts and Nuts 3/16...Tape. Mounting Space OTR 30" more than 12 inch. (max.12inch) 2. Installation Hardware The following tools may need for installing your microwave oven to the outside, see exhaust duct preparation. 4. You will find the installation hardware contained in 30" wide cabinet opening , ...
User Manual
Page 3
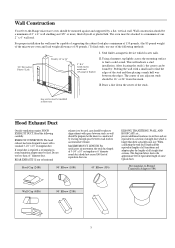
Wall Construction Your Over-the-Range microwave oven should be mounted against and supported by leaving enough space between wall studs to accommodate exhaust. After locating the stud(s), the center can be ... be a minimum of equivalent duct run. Rectangular-to a section of all transitions and adaptors plus a minimum of 135 pounds, (the 85 pound weight of the microwave oven and load weight allowance of 50 pounds.) To find a solid sound. EXHAUST CONNECTION: The hood exhaust has been designed to mate with space between...
Wall Construction Your Over-the-Range microwave oven should be mounted against and supported by leaving enough space between wall studs to accommodate exhaust. After locating the stud(s), the center can be ... be a minimum of equivalent duct run. Rectangular-to a section of all transitions and adaptors plus a minimum of 135 pounds, (the 85 pound weight of the microwave oven and load weight allowance of 50 pounds.) To find a solid sound. EXHAUST CONNECTION: The hood exhaust has been designed to mate with space between...
User Manual
Page 4
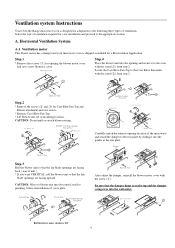
...from step 2. Roll the blower motor clockwise 180˚ 4 Step.4 Place the blower unit into the opening location of the microwave and attach the damper to the rear plate by sliding it to pinching, before reinstallation of mounting location. CAUTION: Do not ...( rear of ventilation. A. Horizontal Ventilation System A-1. Ventilation system Instructions Your Over-the-Range microwave oven is designed for a Recirculation Application. Select the type of ventilation required for your microwave oven is shipped assembled for adaptation to the following three types of unit ). * If ...
...from step 2. Roll the blower motor clockwise 180˚ 4 Step.4 Place the blower unit into the opening location of the microwave and attach the damper to the rear plate by sliding it to pinching, before reinstallation of mounting location. CAUTION: Do not ...( rear of ventilation. A. Horizontal Ventilation System A-1. Ventilation system Instructions Your Over-the-Range microwave oven is designed for a Recirculation Application. Select the type of ventilation required for your microwave oven is shipped assembled for adaptation to the following three types of unit ). * If ...
User Manual
Page 6
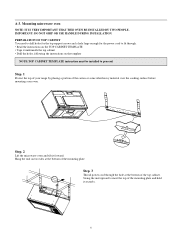
Mounting microwave oven NOTE: IT IS VERY IMPORTANT THAT THIS OVEN BE INSTALLED BY TWO PEOPLE. IMPORTANT: DO NOT GRIP OR USE HANDLE DURING INSTALLATION. PREPARATION OF ... be installed to meet the top of the carton or some other heavy material over the cooking surface before mounting your oven. Step. 2 Lift the microwave oven and tilt it securely. 6
Mounting microwave oven NOTE: IT IS VERY IMPORTANT THAT THIS OVEN BE INSTALLED BY TWO PEOPLE. IMPORTANT: DO NOT GRIP OR USE HANDLE DURING INSTALLATION. PREPARATION OF ... be installed to meet the top of the carton or some other heavy material over the cooking surface before mounting your oven. Step. 2 Lift the microwave oven and tilt it securely. 6
User Manual
Page 7
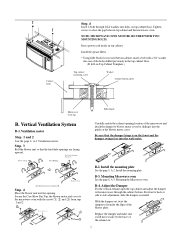
...grease filters. * Using filler block for recessed bottom cabinet, insert a bolt with the screw(1, 2 and 3) from step 1 and 2. Tighten screws to the microwave oven with a 3/4" washer into one of the exhaust air. 7 Vertical Ventilation System B-1. Ventilation motor Step. 1 and 2 See the page 4, A-1 Ventilation ... unit into the guides at the blower motor cover. Be sure that the fun blade openings are facing upward. B-2. B-3. Mounting Microwave oven See the page 6, A-3. Adjust the Damper For the vertical exhaust open the top cabinet and adjust the damper to blower motor...
...grease filters. * Using filler block for recessed bottom cabinet, insert a bolt with the screw(1, 2 and 3) from step 1 and 2. Tighten screws to the microwave oven with a 3/4" washer into one of the exhaust air. 7 Vertical Ventilation System B-1. Ventilation motor Step. 1 and 2 See the page 4, A-1 Ventilation ... unit into the guides at the blower motor cover. Be sure that the fun blade openings are facing upward. B-2. B-3. Mounting Microwave oven See the page 6, A-3. Adjust the Damper For the vertical exhaust open the top cabinet and adjust the damper to blower motor...
User Manual
Page 8
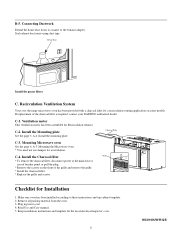
... has been provided with a charcoal filter for the local electrical inspector's use damper for recirculation. Mounting Microwave oven See the page 6, A-3. Make sure oven has been installed according to the exhaust adapter. Read Use and Care ... for Recirculation exhaust. If replacement of the grille and remove the grille. * Install the charcoal filter. * Replace the grille and screws. C-2. Mounting the Microwave oven. * You need not use . 8 MCO160UW/B/Q/S Plug in power cord. 4. B-5. Seal exhaust duct joints using duct tape. Connecting Ductwork Extend the ...
... has been provided with a charcoal filter for the local electrical inspector's use damper for recirculation. Mounting Microwave oven See the page 6, A-3. Make sure oven has been installed according to the exhaust adapter. Read Use and Care ... for Recirculation exhaust. If replacement of the grille and remove the grille. * Install the charcoal filter. * Replace the grille and screws. C-2. Mounting the Microwave oven. * You need not use . 8 MCO160UW/B/Q/S Plug in power cord. 4. B-5. Seal exhaust duct joints using duct tape. Connecting Ductwork Extend the ...


