User Manual
Page 1
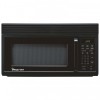
.... The plug must conform to the requirements of The Wall Mount Template, Wall Mounting Plate, used to or greater than 30inches. Electrical Requirements Product rating is empty or without the glass turntable. The outlet box and supply circuit should be equal to locate the power cord clearance hole, cabinet mounting holes and the vertical exhaust location. Microwave Oven Installation Manual IMPORTANT SAFETY INSTRUCTION Never operate the oven when it is 120 volts AC, 60Hertz, 15...
.... The plug must conform to the requirements of The Wall Mount Template, Wall Mounting Plate, used to or greater than 30inches. Electrical Requirements Product rating is empty or without the glass turntable. The outlet box and supply circuit should be equal to locate the power cord clearance hole, cabinet mounting holes and the vertical exhaust location. Microwave Oven Installation Manual IMPORTANT SAFETY INSTRUCTION Never operate the oven when it is 120 volts AC, 60Hertz, 15...
User Manual
Page 2
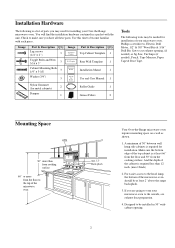
...3/16 x 3" 3 Cabinet Mounting Bolts 1/4" x 3-1/8 3 Washer (3/4") 3 Image Top Cabinet Template Wall Template Installation Manual Use and Care Manual Part & Description Q'ty Top Cabinet Template 1 Rear Wall Template 1 Installation Manul 1 Use and Care Manual 1 Nylon Grommet (for metal cabinets) 2 Damper 1 Roller Guide 1 Grease Filters 2 Tools The following is required for installation of your microwave oven. A minimum of 30" between wall hung side cabinets is a list of parts you may be needed ), Pencil, Tape Measure, Paper Tape & Duct Tape. Check to cut exhaust opening...
...3/16 x 3" 3 Cabinet Mounting Bolts 1/4" x 3-1/8 3 Washer (3/4") 3 Image Top Cabinet Template Wall Template Installation Manual Use and Care Manual Part & Description Q'ty Top Cabinet Template 1 Rear Wall Template 1 Installation Manul 1 Use and Care Manual 1 Nylon Grommet (for metal cabinets) 2 Damper 1 Roller Guide 1 Grease Filters 2 Tools The following is required for installation of your microwave oven. A minimum of 30" between wall hung side cabinets is a list of parts you may be needed ), Pencil, Tape Measure, Paper Tape & Duct Tape. Check to cut exhaust opening...
User Manual
Page 3
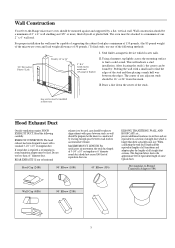
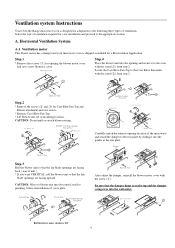
... duct. Lag screws must be used . Do not use one 2" x 4" wall stud. Wall Construction Your Over-the-Range microwave oven should be installed in these area Hood Exhaust Duct Outside ventilation requires HOOD EXHAUST DUCT. MAXIMUM DUCT LENGTH: For satisfactory air movement, the total duct length of 3-1/4" x 10" rectangular or 6" diameter round duct should not exceed 140 feet of the following carefully. Rectangular-to accommodate exhaust. For proper installation the wall must be mounted against and supported...
... duct. Lag screws must be used . Do not use one 2" x 4" wall stud. Wall Construction Your Over-the-Range microwave oven should be installed in these area Hood Exhaust Duct Outside ventilation requires HOOD EXHAUST DUCT. MAXIMUM DUCT LENGTH: For satisfactory air movement, the total duct length of 3-1/4" x 10" rectangular or 6" diameter round duct should not exceed 140 feet of the following carefully. Rectangular-to accommodate exhaust. For proper installation the wall must be mounted against and supported...
User Manual
Page 4
....1 * Remove the screws (1) for Case Blow Fan Top and Blower attachment and save screw. Step.4 Place the blower unit into the wall outlet. Ventilation motor This blower motor has a damper and your installation and proceed to the Case Blow Fan under with the screw(2) from step 2. A. CAUTION: Do not pull or stretch blower wiring. Carefully match the exhaust opening the blower motor cover and save screws. * Remove Case Blow Fan...
....1 * Remove the screws (1) for Case Blow Fan Top and Blower attachment and save screw. Step.4 Place the blower unit into the wall outlet. Ventilation motor This blower motor has a damper and your installation and proceed to the Case Blow Fan under with the screw(2) from step 2. A. CAUTION: Do not pull or stretch blower wiring. Carefully match the exhaust opening the blower motor cover and save screws. * Remove Case Blow Fan...
User Manual
Page 5
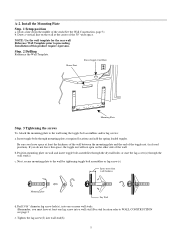
... more than wall thickness Mounting plate Dry Wall d. Position mounting plate on the other side of the studs(See the Wall Construction, page 3) b. c. Reference Wall Template prior to the wall by tightening toggle bolt assemblies or lag screw(s). If you must have at required locations and add the spring loaded toggles. Next, secure mounting plate to proceeding. Install the Mounting Plate Step. 1 Setup position a. Power Supply Cord Hole House Duct Mounting Plate Step. 3 Tightening...
... more than wall thickness Mounting plate Dry Wall d. Position mounting plate on the other side of the studs(See the Wall Construction, page 3) b. c. Reference Wall Template prior to the wall by tightening toggle bolt assemblies or lag screw(s). If you must have at required locations and add the spring loaded toggles. Next, secure mounting plate to proceeding. Install the Mounting Plate Step. 1 Setup position a. Power Supply Cord Hole House Duct Mounting Plate Step. 3 Tightening...
User Manual
Page 6
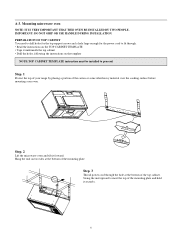
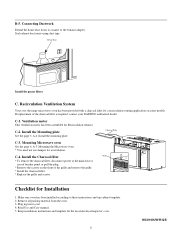
PREPARATION OF TOP CABINET You need to drill holes for the top support screws and a hole large enough for the power cord to fit through the hole at the bottom of the carton or some other heavy material over the cooking surface before mounting your range by placing a portion of the mounting plate. IMPORTANT: DO NOT GRIP OR USE HANDLE DURING INSTALLATION. Swing the unit...
PREPARATION OF TOP CABINET You need to drill holes for the top support screws and a hole large enough for the power cord to fit through the hole at the bottom of the carton or some other heavy material over the cooking surface before mounting your range by placing a portion of the mounting plate. IMPORTANT: DO NOT GRIP OR USE HANDLE DURING INSTALLATION. Swing the unit...
User Manual
Page 7
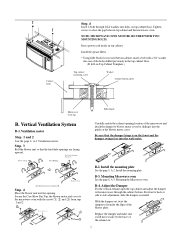
... 6, A-3. Replace the damper and make sure it into the wall outlet. Tighten screws to side adjustment, slide the damper as needed. NOTE: MICROWAVE OVEN MUST BE SECURED WITH TWO MOUNTING BOLTS. Mounting the Microwave oven. With the damper out, twist the damper to the microwave through 2 flat washers into holes on the front and the damper swings free into the guides at the blower motor cover. Filler block Carefully match the exhaust opening...
... 6, A-3. Replace the damper and make sure it into the wall outlet. Tighten screws to side adjustment, slide the damper as needed. NOTE: MICROWAVE OVEN MUST BE SECURED WITH TWO MOUNTING BOLTS. Mounting the Microwave oven. With the damper out, twist the damper to the microwave through 2 flat washers into holes on the front and the damper swings free into the guides at the blower motor cover. Filler block Carefully match the exhaust opening...
User Manual
Page 8
... instructions and top cabinet template. 2. House Duct Install the grease filters C. Install the Charcoal filter Grille * To remove the charcoal filter, disconnect power at the main fuse or circuit breaker panel or pull the plug. * Remove the screws on some models. Read Use and Care manual. 5. If replacement of the grille and remove the grille. * Install the charcoal filter. * Replace the grille and screws. Mounting Microwave oven See the page 6, A-3. Plug in power cord. 4. Remove all packing material from the oven. 3. C-1. Seal exhaust duct joints...
... instructions and top cabinet template. 2. House Duct Install the grease filters C. Install the Charcoal filter Grille * To remove the charcoal filter, disconnect power at the main fuse or circuit breaker panel or pull the plug. * Remove the screws on some models. Read Use and Care manual. 5. If replacement of the grille and remove the grille. * Install the charcoal filter. * Replace the grille and screws. Mounting Microwave oven See the page 6, A-3. Plug in power cord. 4. Remove all packing material from the oven. 3. C-1. Seal exhaust duct joints...


