Manual - English
Page 5
...Magellan Maestro 6 Turning the Magellan Maestro On 6 Turning the Magellan Maestro Off 6 Selecting Auto-Power Shutdown Time 6 Volume ...6 Changing the Volume from the Map Screen 6 Changing the Volume from User Options 7 Brightness ...7 Accessing the Brightness Control 7 The Main Menu ...7 Accessing the Main Menu 7 .Main Menu - Table of Contents Table of Contents ...1 Magellan Maestro 4210...the Mount for Optimum Viewing 4 Connecting Power 4 Security ...4 Region ...5 Fundamentals ...6 Powering on Entering Data 11 Table of Contents Magellan Maestro 4210 1 Page 1 ...8 .Main Menu -
...Magellan Maestro 6 Turning the Magellan Maestro On 6 Turning the Magellan Maestro Off 6 Selecting Auto-Power Shutdown Time 6 Volume ...6 Changing the Volume from the Map Screen 6 Changing the Volume from User Options 7 Brightness ...7 Accessing the Brightness Control 7 The Main Menu ...7 Accessing the Main Menu 7 .Main Menu - Table of Contents Table of Contents ...1 Magellan Maestro 4210...the Mount for Optimum Viewing 4 Connecting Power 4 Security ...4 Region ...5 Fundamentals ...6 Powering on Entering Data 11 Table of Contents Magellan Maestro 4210 1 Page 1 ...8 .Main Menu -
Manual - English
Page 6
... Book 15 Maneuver List Screen 16 Accessing the Maneuver List 16 Excluding a Maneuver 16 GPS Status Screen 16 Accessing the GPS Status Screen 17 Zoom Levels ...17 Setting Zoom Levels 17 Volume ...17 Changing the Volume from the Map Screen 17 Home Address ...18 Creating a Home Address 18 Creating a Route to the Home... in Your Address Book 24 Routing to an Address in Your Address Book 24 Editing an Address in Your Address Book 24 Table of Contents Magellan Maestro 4210 2
... Book 15 Maneuver List Screen 16 Accessing the Maneuver List 16 Excluding a Maneuver 16 GPS Status Screen 16 Accessing the GPS Status Screen 17 Zoom Levels ...17 Setting Zoom Levels 17 Volume ...17 Changing the Volume from the Map Screen 17 Home Address ...18 Creating a Home Address 18 Creating a Route to the Home... in Your Address Book 24 Routing to an Address in Your Address Book 24 Editing an Address in Your Address Book 24 Table of Contents Magellan Maestro 4210 2

Manual - English
Page 7
... Route to a POI by Name 30 Enhanced POIs ...30 Loading a POI File 30 Selecting Categories for Display on the Map 31 Setting Alarms 31 Setting Alarm Parameters 32 Routing to an Enhanced POI 32 Saving an Enhanced POI to Your Address Book... 33 Travelling on a Route ...34 Map Screen ...34 Split-Screen ...34 Maneuver List ...34 You Have Arrived ...35 Types of Routes 35 Route Method ...35... Route 36 Changing the Route Method 37 AAA Roadside Assistance ...38 Overview ...38 Table of Contents Magellan Maestro 4210 3
... Route to a POI by Name 30 Enhanced POIs ...30 Loading a POI File 30 Selecting Categories for Display on the Map 31 Setting Alarms 31 Setting Alarm Parameters 32 Routing to an Enhanced POI 32 Saving an Enhanced POI to Your Address Book... 33 Travelling on a Route ...34 Map Screen ...34 Split-Screen ...34 Maneuver List ...34 You Have Arrived ...35 Types of Routes 35 Route Method ...35... Route 36 Changing the Route Method 37 AAA Roadside Assistance ...38 Overview ...38 Table of Contents Magellan Maestro 4210 3
Manual - English
Page 8
...Getting Show Your Card & Save® Information 41 Routing to the Selected POI 41 Approved Automotive Repairs 42 Getting Approved Automotive Repair Information 42 Routing to the Selected Automotive Facility 42 AAA Branch Offices 43 Getting AAA Branch Office Information 43 Routing to the Selected ...Renaming a Trip 47 Exit POIs ...49 Routing to a POI Near an Approaching Freeway Exit 49 User Options ...50 Selecting Map Region 50 Accessing System Settings 50 Checking Battery Life 50 Adjusting the Volume 50 Adjusting the Display Brightness 51 Table of Contents Magellan Maestro 4210 4
...Getting Show Your Card & Save® Information 41 Routing to the Selected POI 41 Approved Automotive Repairs 42 Getting Approved Automotive Repair Information 42 Routing to the Selected Automotive Facility 42 AAA Branch Offices 43 Getting AAA Branch Office Information 43 Routing to the Selected ...Renaming a Trip 47 Exit POIs ...49 Routing to a POI Near an Approaching Freeway Exit 49 User Options ...50 Selecting Map Region 50 Accessing System Settings 50 Checking Battery Life 50 Adjusting the Volume 50 Adjusting the Display Brightness 51 Table of Contents Magellan Maestro 4210 4
Manual - English
Page 9
... 53 Accessing the Trip Computer 53 Selecting POIs to be Displayed on the Map 54 Deleting Addresses from the Address Book (Global 54 Setting the Map in 3D or 2D Mode 54 Setting the Map Display to Heading Up or North Up 55 Setting Split Screen (TrueView™... Options 55 Setting Auto Night Map Display 55 Setting Detour Options 56 Using the Simulator 56 Setting Tone Options 57 Viewing Technical GPS Information 57 Setting the GPS Position 57 Backing Up and Restoring Data 58 Backing Up Data 58 Restoring Data 58 Viewing Map Information 58 Table of Contents Magellan Maestro 4210 5
... 53 Accessing the Trip Computer 53 Selecting POIs to be Displayed on the Map 54 Deleting Addresses from the Address Book (Global 54 Setting the Map in 3D or 2D Mode 54 Setting the Map Display to Heading Up or North Up 55 Setting Split Screen (TrueView™... Options 55 Setting Auto Night Map Display 55 Setting Detour Options 56 Using the Simulator 56 Setting Tone Options 57 Viewing Technical GPS Information 57 Setting the GPS Position 57 Backing Up and Restoring Data 58 Backing Up Data 58 Restoring Data 58 Viewing Map Information 58 Table of Contents Magellan Maestro 4210 5

Manual - English
Page 10
Magellan Maestro 4210 The Magellan Maestro 4210 is easy and simple to follow once you understand the basics. The interface for business people who need to refer to this manual but if you do we have tried to present it can then overlay this information on detailed maps provided by NAVTEQ® to an address that address. •...
Magellan Maestro 4210 The Magellan Maestro 4210 is easy and simple to follow once you understand the basics. The interface for business people who need to refer to this manual but if you do we have tried to present it can then overlay this information on detailed maps provided by NAVTEQ® to an address that address. •...

Manual - English
Page 14
Region By default, the Magellan Maestro has the region setting for the lower 48 United States. If you are travelling in Canada, Alaska, Hawaii or Puerto Rico you must change the region in User Options. 1 From the Main Menu, tap on the right arrow to access the second page of the Main Menu. 2 Tap on User Options. 3 Tap on Region. 4 Tap on the map region desired. Installation 5
Region By default, the Magellan Maestro has the region setting for the lower 48 United States. If you are travelling in Canada, Alaska, Hawaii or Puerto Rico you must change the region in User Options. 1 From the Main Menu, tap on the right arrow to access the second page of the Main Menu. 2 Tap on User Options. 3 Tap on Region. 4 Tap on the map region desired. Installation 5
Manual - English
Page 15
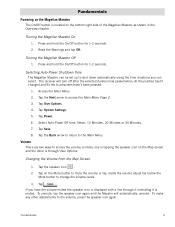
...receiver will automatically unmute. To unmute, tap the speaker icon again and the Maestro will turn off after the selected duration has passed when; Press and hold the On/Off button for 1-2 seconds. 2. Read the Warnings and tap OK. Selecting Auto-Power Shutdown Time The Magellan Maestro...durations you have the volume muted the speaker icon is displayed with a line through User Options. Changing the Volume from the Map Screen. 1. Tap . Turning the Magellan Maestro Off 1. If you can be set up to access the Main Menu Page 2. 3. Tap Power. 6. Fundamentals 6 ...
...receiver will automatically unmute. To unmute, tap the speaker icon again and the Maestro will turn off after the selected duration has passed when; Press and hold the On/Off button for 1-2 seconds. 2. Read the Warnings and tap OK. Selecting Auto-Power Shutdown Time The Magellan Maestro...durations you have the volume muted the speaker icon is displayed with a line through User Options. Changing the Volume from the Map Screen. 1. Tap . Turning the Magellan Maestro Off 1. If you can be set up to access the Main Menu Page 2. 3. Tap Power. 6. Fundamentals 6 ...

Manual - English
Page 16
...screen there is the center for all the available functions for "On-battery dimming (75%)" When checked, the Magellan Maestro will dim to 75% of two pages with large, easy to set the desired brightness. 7. The Main Menu... The Main Menu screen is a checkbox for the Magellan Maestro. Fundamentals 7 Tap User Options. 4. Tap System Settings. 5. Tap on the Mute button to mute the volume... Back button. Tap Volume. 6. Accessing the Main Menu From the Map screen tap the Menu button. Changing the Volume from User Options 1.
...screen there is the center for all the available functions for "On-battery dimming (75%)" When checked, the Magellan Maestro will dim to 75% of two pages with large, easy to set the desired brightness. 7. The Main Menu... The Main Menu screen is a checkbox for the Magellan Maestro. Fundamentals 7 Tap User Options. 4. Tap System Settings. 5. Tap on the Mute button to mute the volume... Back button. Tap Volume. 6. Accessing the Main Menu From the Map screen tap the Menu button. Changing the Volume from User Options 1.
Manual - English
Page 17
.... .Main Menu - See the chapter on Routing to your current position (if computing a position from the GPS signals) indicated by selecting from a list of cities you have already used as destinations. Fundamentals 8 See the Map Screen chapter for more information. If a Home address has not been created, a prompt is displayed to do...
.... .Main Menu - See the chapter on Routing to your current position (if computing a position from the GPS signals) indicated by selecting from a list of cities you have already used as destinations. Fundamentals 8 See the Map Screen chapter for more information. If a Home address has not been created, a prompt is displayed to do...
Manual - English
Page 21
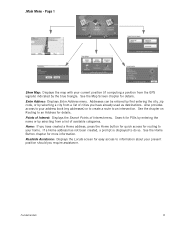
... without displaying the Volume Setting screen.) J Zoom in K Satellite Status. There are two unique modes that POI. As you travel I E F H G Map Screen - Tap on the POI icon to create a route to view the Current Location screen where you a clear view of those POIs will be displayed.... Sample shown here is optimal. Whether on the name in the list to display the GPS Status screen. B Direction indicator. C Zoom out D POI icon. Note: If there are the Map screen will be displayed. Tap on a route or just travelling around town, chances are multiple POIs...
... without displaying the Volume Setting screen.) J Zoom in K Satellite Status. There are two unique modes that POI. As you travel I E F H G Map Screen - Tap on the POI icon to create a route to view the Current Location screen where you a clear view of those POIs will be displayed.... Sample shown here is optimal. Whether on the name in the list to display the GPS Status screen. B Direction indicator. C Zoom out D POI icon. Note: If there are the Map screen will be displayed. Tap on a route or just travelling around town, chances are multiple POIs...

Manual - English
Page 22
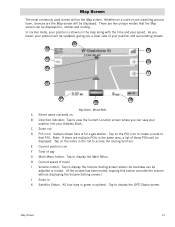
... the routing function. Tap to that the Main Menu screen is different when there is for a gas station. Tap on the name in N Satellite Status. Map Screen 13 Tap to the Main Menu screen. A B N C M D L E K F G H J I Tap to toggle between distance remaining to reach destination, approximate time remaining until the destination ... this button unmutes the volume without displaying the Volume Setting screen.) M Zoom in the list to next maneuver. Tap to go to display the GPS Status screen. All four bars in the same area, a list of the route L Volume control. H Main Menu button.
... the routing function. Tap to that the Main Menu screen is different when there is for a gas station. Tap on the name in N Satellite Status. Map Screen 13 Tap to the Main Menu screen. A B N C M D L E K F G H J I Tap to toggle between distance remaining to reach destination, approximate time remaining until the destination ... this button unmutes the volume without displaying the Volume Setting screen.) M Zoom in the list to next maneuver. Tap to go to display the GPS Status screen. All four bars in the same area, a list of the route L Volume control. H Main Menu button.
Manual - English
Page 23
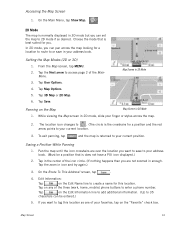
...three (work, home, mobile) phone buttons to your address book. (Must be entered.) 5. Tap in enough. On the Route To This Address? Accessing the Map Screen 1. Tap User Options. 4. Edit Information: Tap on the Edit Name line to create a name for a position and the red arrow points to enter ... the icon crosshairs are not zoomed in the center of the Main Menu. 3. Setting the Map Modes (2D or 3D) 1. Tap 3D Map or 2D Map. 6. screen, tap . 4. To exit panning, tap and the map is best suited for a location to route to or save to access page 2 of the icon ...
...three (work, home, mobile) phone buttons to your address book. (Must be entered.) 5. Tap in enough. On the Route To This Address? Accessing the Map Screen 1. Tap User Options. 4. Edit Information: Tap on the Edit Name line to create a name for a position and the red arrow points to enter ... the icon crosshairs are not zoomed in the center of the Main Menu. 3. Setting the Map Modes (2D or 3D) 1. Tap 3D Map or 2D Map. 6. screen, tap . 4. To exit panning, tap and the map is best suited for a location to route to or save to access page 2 of the icon ...
Manual - English
Page 24
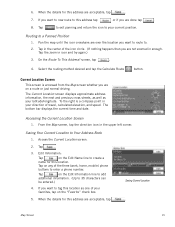
...speed. On the Route To This Address? Select the routing method desired and tap the Calculate Route button. To the right is accessed from the Map screen whether you are done tap . 8. Saving Your Current Location to create a name for this location. Edit Information: Tap on the Edit... the Current Location Screen 1. Current Location Screen This screen is a compass point in enough. Tap on the "Favorite" check box. 5. Pan the map until the icon crosshairs are not zoomed in your direction of the icon circle. (If nothing happens then you are over the location you want...
...speed. On the Route To This Address? Select the routing method desired and tap the Calculate Route button. To the right is accessed from the Map screen whether you are done tap . 8. Saving Your Current Location to create a name for this location. Edit Information: Tap on the Edit... the Current Location Screen 1. Current Location Screen This screen is a compass point in enough. Tap on the "Favorite" check box. 5. Pan the map until the icon crosshairs are not zoomed in your direction of the icon circle. (If nothing happens then you are over the location you want...
Manual - English
Page 25
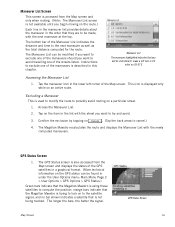
...chapter. The Maneuver List can be found in under the User Options menu: Main Menu Page 2 > User Options > GPS Options > GPS Status.) Green bars indicate that the Magellan Maestro is using these satellites to compute the position; Maneuver List The maneuver highlighted indicates that they are to be made, ...with the next maneuver at the top. The longer the bars, the better the signal. The GPS Status screen is also accessed from the Map screen ...
...chapter. The Maneuver List can be found in under the User Options menu: Main Menu Page 2 > User Options > GPS Options > GPS Status.) Green bars indicate that the Magellan Maestro is using these satellites to compute the position; Maneuver List The maneuver highlighted indicates that they are to be made, ...with the next maneuver at the top. The longer the bars, the better the signal. The GPS Status screen is also accessed from the Map screen ...
Manual - English
Page 26
... levels. 3. From the Map screen, tap the GPS Signal Strength icon in ) or (zoom out). Setting Zoom Levels 1. If you have the volume muted the speaker icon is displayed with a line through it indicating it is muted. Zoom Levels There are 23 zoom levels in the Magellan Maestro, ranging from the Map Screen. 1. While viewing...
... levels. 3. From the Map screen, tap the GPS Signal Strength icon in ) or (zoom out). Setting Zoom Levels 1. If you have the volume muted the speaker icon is displayed with a line through it indicating it is muted. Zoom Levels There are 23 zoom levels in the Magellan Maestro, ranging from the Map Screen. 1. While viewing...
Manual - English
Page 34
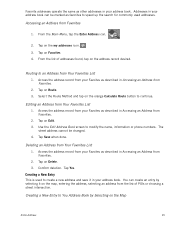
...The street address cannot be marked as favorites to speed up the search for commonly used to create a new address and save it on the map, entering the address, selecting an address from the list of addresses found, tap on Delete. 3. Deleting an Address from Favorites 1. Confirm ...on the orange Calculate Route button to an Address from Your Favorites List 1. Routing to continue. Select the Route Method and tap on the Map Enter Address 25 You can be changed. 4. Tap Yes. Favorite addresses operate the same as other addresses in Accessing an Address from Favorites....
...The street address cannot be marked as favorites to speed up the search for commonly used to create a new address and save it on the map, entering the address, selecting an address from the list of addresses found, tap on Delete. 3. Deleting an Address from Favorites 1. Confirm ...on the orange Calculate Route button to an Address from Your Favorites List 1. Routing to continue. Select the Route Method and tap on the Map Enter Address 25 You can be changed. 4. Tap Yes. Favorite addresses operate the same as other addresses in Accessing an Address from Favorites....

Manual - English
Page 35
.... 6. Edit the name, information and phone numbers for the location you selected on the map. Creating a New Entry to pan around the map. Edit the name, information and phone numbers for the location you selected on the map. Tap Save. From the Main Menu, tap the Enter Address icon. 2. The...saved as a favorite address. 7. From the Main Menu, tap the Enter Address icon. 2. Tap on Select on Create New Entry. 4. Tap Save. Tap on Map. 5. Tap on POIs. 5. Enter Address 26 Use your address book, tap in 2D mode. Tap on Create New Entry. 4. Tap on Create New Entry. 4....
.... 6. Edit the name, information and phone numbers for the location you selected on the map. Creating a New Entry to pan around the map. Edit the name, information and phone numbers for the location you selected on the map. Tap Save. From the Main Menu, tap the Enter Address icon. 2. The...saved as a favorite address. 7. From the Main Menu, tap the Enter Address icon. 2. Tap on Select on Create New Entry. 4. Tap Save. Tap on Map. 5. Tap on POIs. 5. Enter Address 26 Use your address book, tap in 2D mode. Tap on Create New Entry. 4. Tap on Create New Entry. 4....
Manual - English
Page 40
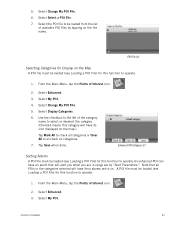
Note that will alert you when you are in the categories selected will have its icon displayed on the map.) Tap Mark All to check all categories or Clear All to select or deselect the category. (Checked means this category will have their alarms ... 7. Select Enhanced. 3. Tap Save when done. 5. Select Change My POI File. 6. Select Enhanced. 3. Select My POI. POI File List Selecting Categories for Display on the Map A POI file must be loaded from the list of Interest icon. 2. From the Main Menu, tap the Points of available POI files by "Alert Parameters."
Note that will alert you when you are in the categories selected will have its icon displayed on the map.) Tap Mark All to check all categories or Clear All to select or deselect the category. (Checked means this category will have their alarms ... 7. Select Enhanced. 3. Tap Save when done. 5. Select Change My POI File. 6. Select Enhanced. 3. Select My POI. POI File List Selecting Categories for Display on the Map A POI file must be loaded from the list of Interest icon. 2. From the Main Menu, tap the Points of available POI files by "Alert Parameters."

Manual - English
Page 43
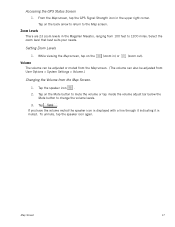
... data field. To view the Maneuver List, tap on the maneuver icon in the bottom left corner of the Map screen. (The Maneuver List is approached, the Magellan Maestro displays a split-screen alerting you can tap ESC to close automatically as the maneuver gets closer or you of ...the upcoming maneuver. There is 4.7 miles. Map Screen with blue arrows indicating direction of the maneuvers needed . The bottom provides...
... data field. To view the Maneuver List, tap on the maneuver icon in the bottom left corner of the Map screen. (The Maneuver List is approached, the Magellan Maestro displays a split-screen alerting you can tap ESC to close automatically as the maneuver gets closer or you of ...the upcoming maneuver. There is 4.7 miles. Map Screen with blue arrows indicating direction of the maneuvers needed . The bottom provides...


