User Manual
Page 11
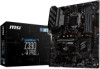
... Audio Console 21 Overview of Components 23 CPU Socket ...25 DIMM Slots...26 PCI_E1~6: PCIe Expansion Slots 27 SATA1~6: SATA 6Gb/s Connectors 27 M2_1: M.2 Slot (Key M 28 JTPM1: TPM Module Connector 28 JFP1, JFP2: Front Panel Connectors 29 JCOM1: Serial Port Connector 29 JTBT1: Thunderbolt Add-on Card Connector 29 CPU_PWR1... JLPT1: Parallel Port Connector 32 CPU_FAN1, PUMP_FAN1, SYS_FAN1~5: Fan Connectors 33 JAUD1: Front Audio Connector 34 JCI1: Chassis Intrusion Connector 34 JBAT1: Clear CMOS (Reset BIOS) Jumper 35 JOC1: Front OC Button Connector 35 Contents 11
... Audio Console 21 Overview of Components 23 CPU Socket ...25 DIMM Slots...26 PCI_E1~6: PCIe Expansion Slots 27 SATA1~6: SATA 6Gb/s Connectors 27 M2_1: M.2 Slot (Key M 28 JTPM1: TPM Module Connector 28 JFP1, JFP2: Front Panel Connectors 29 JCOM1: Serial Port Connector 29 JTBT1: Thunderbolt Add-on Card Connector 29 CPU_PWR1... JLPT1: Parallel Port Connector 32 CPU_FAN1, PUMP_FAN1, SYS_FAN1~5: Fan Connectors 33 JAUD1: Front Audio Connector 34 JCI1: Chassis Intrusion Connector 34 JBAT1: Clear CMOS (Reset BIOS) Jumper 35 JOC1: Front OC Button Connector 35 Contents 11

User Manual
Page 13
...M.2 slot. ** Before using Intel® Optane™ memory modules, please ensure that you have updated the drivers and BIOS to the latest version from MSI website. Specifications CPU Chipset Memory Expansion Slot Onboard Graphics Multi-GPU Storage Supports Intel® Core™ 9000 Series family/...@60Hz y 1x DisplayPort, supports a maximum resolution of 4096x2304@60Hz y Supports 2-Way AMD® CrossFire™ Technology Intel® Z390 Chipset y 6x SATA 6Gb/s ports* y 1x M.2 slot (Key M) ƒ Supports up to 128GB* y Supports DDR4 4400(OC)/ 4300(OC)/ 4266(OC)/ 4200(OC)/ 4133(OC)/ 4000...
...M.2 slot. ** Before using Intel® Optane™ memory modules, please ensure that you have updated the drivers and BIOS to the latest version from MSI website. Specifications CPU Chipset Memory Expansion Slot Onboard Graphics Multi-GPU Storage Supports Intel® Core™ 9000 Series family/...@60Hz y 1x DisplayPort, supports a maximum resolution of 4096x2304@60Hz y Supports 2-Way AMD® CrossFire™ Technology Intel® Z390 Chipset y 6x SATA 6Gb/s ports* y 1x M.2 slot (Key M) ƒ Supports up to 128GB* y Supports DDR4 4400(OC)/ 4300(OC)/ 4266(OC)/ 4200(OC)/ 4133(OC)/ 4000...

User Manual
Page 15
...ATX main power connector y 1x 8-pin ATX 12V power connector y 1x 6-pin ATX 12V power connector y 6x SATA 6Gb/s connectors y 2x M.2 slots (1 M-Key slot,1 E-Key slot) y 2x USB 3.1 Gen1 connectors (supports additional 4 USB 3.1 Gen1 ports) y 2x USB 2.0 connectors (supports additional 4 USB 2.0 ports) y 1x ... connector y 1x thunderbolt Add-on next page Specifications 15 x 9.6 in. (30.5 cm x 24.4 cm) BIOS Features y 1x 128 Mb flash y UEFI AMI BIOS y ACPI 6.1, SMBIOS 2.8 y Multi-language Continued on card connector y 1x Front OC button connector I/O Controller NUVOTON NCT6797 Controller...
...ATX main power connector y 1x 8-pin ATX 12V power connector y 1x 6-pin ATX 12V power connector y 6x SATA 6Gb/s connectors y 2x M.2 slots (1 M-Key slot,1 E-Key slot) y 2x USB 3.1 Gen1 connectors (supports additional 4 USB 3.1 Gen1 ports) y 2x USB 2.0 connectors (supports additional 4 USB 2.0 ports) y 1x ... connector y 1x thunderbolt Add-on next page Specifications 15 x 9.6 in. (30.5 cm x 24.4 cm) BIOS Features y 1x 128 Mb flash y UEFI AMI BIOS y ACPI 6.1, SMBIOS 2.8 y Multi-language Continued on card connector y 1x Front OC button connector I/O Controller NUVOTON NCT6797 Controller...
User Manual
Page 34
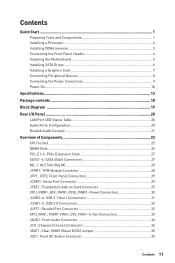
Go to Reset. 3. Set Chassis Intrusion to BIOS > SETTINGS > Security > Chassis Intrusion Configuration. 4. Normal (default) Trigger the chassis intrusion event Using chassis intrusion detector 1. Once the chassis cover is opened again, a warning message ... allows you to connect audio jacks on . Press F10 to save and exit and then press the Enter key to select Yes. 6. Press F10 to save and exit and then press the Enter key to select Yes. 34 Overview of Components JAUD1: Front Audio Connector This connector allows you to connect the...
Go to Reset. 3. Set Chassis Intrusion to BIOS > SETTINGS > Security > Chassis Intrusion Configuration. 4. Normal (default) Trigger the chassis intrusion event Using chassis intrusion detector 1. Once the chassis cover is opened again, a warning message ... allows you to connect audio jacks on . Press F10 to save and exit and then press the Enter key to select Yes. 6. Press F10 to save and exit and then press the Enter key to select Yes. 34 Overview of Components JAUD1: Front Audio Connector This connector allows you to connect the...

User Manual
Page 41
... slightly different from the product you are continuously update for better system performance. Entering BIOS Setup Please refer the following methods to the HELP information panel for BIOS item description. y In MSI Dragon Center application, click on the screen during the boot process. Ctrl+F: Enter ...it provides the modification information. You could also refer to enter BIOS setup. y Press Delete key, when the Press DEL key to enter Setup Menu, F11 to USB flash drive (FAT/ FAT32 format only). BIOS Setup The default settings offer the optimal performance for system stability in...
... slightly different from the product you are continuously update for better system performance. Entering BIOS Setup Please refer the following methods to the HELP information panel for BIOS item description. y In MSI Dragon Center application, click on the screen during the boot process. Ctrl+F: Enter ...it provides the modification information. You could also refer to enter BIOS setup. y Press Delete key, when the Press DEL key to enter Setup Menu, F11 to USB flash drive (FAT/ FAT32 format only). BIOS Setup The default settings offer the optimal performance for system stability in...
User Manual
Page 42
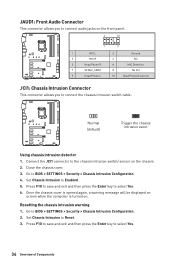
...system will restart automatically. 42 BIOS Setup Insert the USB flash drive that matches your motherboard model from MSI website. Select a BIOS file to the Clear CMOS jumper section for resetting BIOS. Click on Yes to reboot the system. ƒ Reboot and press Del key during POST and click on ...Download icon to enter BIOS. Please refer the following methods to...
...system will restart automatically. 42 BIOS Setup Insert the USB flash drive that matches your motherboard model from MSI website. Select a BIOS file to the Clear CMOS jumper section for resetting BIOS. Click on Yes to reboot the system. ƒ Reboot and press Del key during POST and click on ...Download icon to enter BIOS. Please refer the following methods to...
User Manual
Page 43
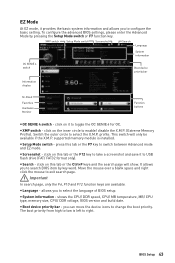
...page will only be available if the X.M.P. click on this tab or the F7 key to exit search page. allows you to search BIOS item by pressing the Setup Mode switch or F7 function key. y XMP switch - Move the mouse over a blank space and right click the...4 switch Boot device priority bar Information display M-Flash Favorites Hardware Monitor Function buttons y OC GENIE 4 switch - To configure the advanced BIOS settings, please enter the Advanced Mode by key word. click on it to USB flash drive (FAT/ FAT32 format only). y Search - y Boot device priority bar - y Setup...
...page will only be available if the X.M.P. click on this tab or the F7 key to exit search page. allows you to search BIOS item by pressing the Setup Mode switch or F7 function key. y XMP switch - Move the mouse over a blank space and right click the...4 switch Boot device priority bar Information display M-Flash Favorites Hardware Monitor Function buttons y OC GENIE 4 switch - To configure the advanced BIOS settings, please enter the Advanced Mode by key word. click on it to USB flash drive (FAT/ FAT32 format only). y Search - y Boot device priority bar - y Setup...
User Manual
Page 44
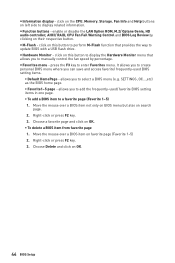
...drive. y Favorites menu - allows you to display related information. press the F3 key to select a BIOS menu (e.g. Right-click or press F2 key. 3. click on OK. 44 BIOS Setup Move the mouse over a BIOS item on this button to perform M-Flash function that allows you to enter Favorites ... LAN Option ROM, M.2/ Optane Genie, HD audio controller, AHCI/ RAID, CPU Fan Fail Warning Control and BIOS Log Review by percentage. y Hardware Monitor - Right-click or press F2 key. 3. y Information display - Choose a favorite page and click on left side to manually control the fan ...
...drive. y Favorites menu - allows you to display related information. press the F3 key to select a BIOS menu (e.g. Right-click or press F2 key. 3. click on OK. 44 BIOS Setup Move the mouse over a BIOS item on this button to perform M-Flash function that allows you to enter Favorites ... LAN Option ROM, M.2/ Optane Genie, HD audio controller, AHCI/ RAID, CPU Fan Fail Warning Control and BIOS Log Review by percentage. y Hardware Monitor - Right-click or press F2 key. 3. y Information display - Choose a favorite page and click on left side to manually control the fan ...
User Manual
Page 45
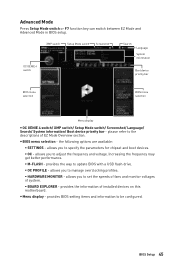
... section. allows you to adjust the frequency and voltage. Advanced Mode Press Setup Mode switch or F7 function key can switch between EZ Mode and Advanced Mode in BIOS setup. the following options are available: ƒ SETTINGS - y Menu display - please refer to specify ... this motherboard. XMP switch Setup Mode switch Screenshot OC GENIE 4 switch Search Language System information Boot device priority bar BIOS menu selection BIOS menu selection Menu display y OC GENIE 4 switch/ XMP switch/ Setup Mode switch/ Screenshot/ Language/ Search/ System information/ Boot ...
... section. allows you to adjust the frequency and voltage. Advanced Mode Press Setup Mode switch or F7 function key can switch between EZ Mode and Advanced Mode in BIOS setup. the following options are available: ƒ SETTINGS - y Menu display - please refer to specify ... this motherboard. XMP switch Setup Mode switch Screenshot OC GENIE 4 switch Search Language System information Boot device priority bar BIOS menu selection BIOS menu selection Menu display y OC GENIE 4 switch/ XMP switch/ Setup Mode switch/ Screenshot/ Language/ Search/ System information/ Boot ...
User Manual
Page 46
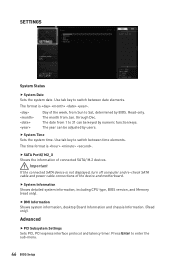
... turn off computer and re-check SATA cable and power cable connections of the week, from Sun to Sat, determined by BIOS. Press Enter to 31 can be keyed by users. The date from Jan. f System Time Sets the system time. Advanced f PCI Subsystem Settings Sets PCI, ... (Read only). f System Information Shows detailed system information, including CPU type, BIOS version, and Memory (read only). The year can be adjusted by numeric function keys. The month from 1 to enter the sub-menu. 46 BIOS Setup The time format is . SETTINGS System Status f System Date Sets the ...
... turn off computer and re-check SATA cable and power cable connections of the week, from Sun to Sat, determined by BIOS. Press Enter to 31 can be keyed by users. The date from Jan. f System Time Sets the system time. Advanced f PCI Subsystem Settings Sets PCI, ... (Read only). f System Information Shows detailed system information, including CPU type, BIOS version, and Memory (read only). The year can be adjusted by numeric function keys. The month from 1 to enter the sub-menu. 46 BIOS Setup The time format is . SETTINGS System Status f System Date Sets the ...
User Manual
Page 51
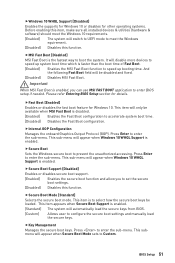
... UEFI mode to configure the secure boot settings and manually load the secure keys. This item will only be available when MSI Fast Boot is enabled. [Standard] The system will automatically load the secure keys from BIOS. [Custom] Allows user to meet the Windows 10 requirements. [Enabled] ...Manages the secure boot keys. BIOS Setup 51 This sub-menu will appear when Windows 10 WHQL Support is enabled. Please refer Entering BIOS Setup section for Windows 10. This submenu will disable more devices to speed up booting time. fMSI Fast Boot [Disabled] MSI Fast Boot is ...
... UEFI mode to configure the secure boot settings and manually load the secure keys. This item will only be available when MSI Fast Boot is enabled. [Standard] The system will automatically load the secure keys from BIOS. [Custom] Allows user to meet the Windows 10 requirements. [Enabled] ...Manages the secure boot keys. BIOS Setup 51 This sub-menu will appear when Windows 10 WHQL Support is enabled. Please refer Entering BIOS Setup section for Windows 10. This submenu will disable more devices to speed up booting time. fMSI Fast Boot [Disabled] MSI Fast Boot is ...

User Manual
Page 52
.... [Disabled] Disables this function. fWake Up Event By [BIOS] Selects the wake up event by BIOS or operating system. [BIOS] Activates the following items, set to [Enabled], the system will be defined by PS/2 keyboard. [Any Key] Enables the system to be awakened from sleep state when activity...). fResume By RTC Alarm [Disabled] Disables or enables the system wake up by OS. fDate (of hot key on PS/2 keyboard is detected. [Disabled] Disables this function. 52 BIOS Setup fResume From S3/S4/S5 by PS/2 Mouse [Disabled] Enables or disables the system wake up by...
.... [Disabled] Disables this function. fWake Up Event By [BIOS] Selects the wake up event by BIOS or operating system. [BIOS] Activates the following items, set to [Enabled], the system will be defined by PS/2 keyboard. [Any Key] Enables the system to be awakened from sleep state when activity...). fResume By RTC Alarm [Disabled] Disables or enables the system wake up by OS. fDate (of hot key on PS/2 keyboard is detected. [Disabled] Disables this function. 52 BIOS Setup fResume From S3/S4/S5 by PS/2 Mouse [Disabled] Enables or disables the system wake up by...

User Manual
Page 53
... 4 sec pon bootup. [Enabled] [Disabled] The system boots straight to the BIOS setup by PS/2 Keyboard to Hot Key. f Boot Option Priorities These items are used to wake the system. BIOS Setup 53 fHot Key [Ctrl+Space] Selects a combination of keys as a hot key to prioritize the installed boot devices. This item will be erased after...
... 4 sec pon bootup. [Enabled] [Disabled] The system boots straight to the BIOS setup by PS/2 Keyboard to Hot Key. f Boot Option Priorities These items are used to wake the system. BIOS Setup 53 fHot Key [Ctrl+Space] Selects a combination of keys as a hot key to prioritize the installed boot devices. This item will be erased after...

User Manual
Page 54
.... The password typed now will confirm the password is opened , the system will always be prompted to build the endorsement key for entering the BIOS Setup. To clear a set password from CMOS memory. A message will replace any previous set password, press when you ...the chassis is being disabled. After clearing the message, please return to clear a set . f Chassis Intrusion Configuration Press to change the BIOS items with user password. f Password Clear [Enabled] Enables or disables the clear CMOS behavior to Enabled or Disabled. [Disabled] Disables this...
.... The password typed now will confirm the password is opened , the system will always be prompted to build the endorsement key for entering the BIOS Setup. To clear a set password from CMOS memory. A message will replace any previous set password, press when you ...the chassis is being disabled. After clearing the message, please return to clear a set . f Chassis Intrusion Configuration Press to change the BIOS items with user password. f Password Clear [Enabled] Enables or disables the clear CMOS behavior to Enabled or Disabled. [Disabled] Disables this...

User Manual
Page 57
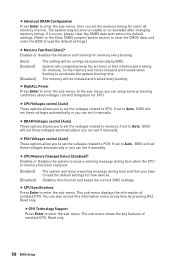
...Read-only. f CPU Base Clock (MHz) [Default] Sets the CPU Base clock. f Adjusted DRAM Frequency Shows the adjusted DRAM frequency. BIOS Setup 57 f GT Ratio [Auto] Sets the integrated graphics ratio. fEnhanced Turbo [Auto]* Enables or disables Enhanced Turbo function for overclocking ...! [Disabled] It improve memory compatibility or performance by memory module. f Adjusted GT Frequency Shows the adjusted integrated graphics frequency. key to open or close the following 3 items related to adjust CPU voltage and core frequency dynamically. It can decrease average power consumption...
...Read-only. f CPU Base Clock (MHz) [Default] Sets the CPU Base clock. f Adjusted DRAM Frequency Shows the adjusted DRAM frequency. BIOS Setup 57 f GT Ratio [Auto] Sets the integrated graphics ratio. fEnhanced Turbo [Auto]* Enables or disables Enhanced Turbo function for overclocking ...! [Disabled] It improve memory compatibility or performance by memory module. f Adjusted GT Frequency Shows the adjusted integrated graphics frequency. key to open or close the following 3 items related to adjust CPU voltage and core frequency dynamically. It can decrease average power consumption...
User Manual
Page 58
... the default settings.) f Memory Fast Boot [Auto]* Enables or disables the initiation and training for each/ all memory channel. If set to Auto, BIOS will set these voltages automatically or you can set it occurs, please clear the CMOS data and restore the default settings. (Refer to the Clear...you to set the voltages related to memory. f CPU Specifications Press Enter to enter the sub-menu. The sub-menu shows the key features of first intiation and training for CPU. This sub-menu displays the information of installed CPU. fCPU Technology Support Press Enter to enter ...
... the default settings.) f Memory Fast Boot [Auto]* Enables or disables the initiation and training for each/ all memory channel. If set to Auto, BIOS will set these voltages automatically or you can set it occurs, please clear the CMOS data and restore the default settings. (Refer to the Clear...you to set the voltages related to memory. f CPU Specifications Press Enter to enter the sub-menu. The sub-menu shows the key features of first intiation and training for CPU. This sub-menu displays the information of installed CPU. fCPU Technology Support Press Enter to enter ...

User Manual
Page 65
...the data into blocks which are only using NVMe PCIe SSDs, go to BIOS > SETTINGS > Advanced > Integrated Peripherals > M2_X Pcie Storage Remapping and ...and provides enhanced read performance. However, most newer version of a RAID. Go to BIOS > SETTINGS > Advanced > Integrated Peripherals > SATA Mode and change setting to RAID/ ...Skip this appendix. RAID 10 uses four hard drives to Enabled. Go to BIOS > SETTINGS > Advanced > Windows OS Configuration > Windows 10 WHQL Support ... and good fault tolerance. If you use the UEFI BIOS for simple and advanced operations. Power on the UEFI ...
...the data into blocks which are only using NVMe PCIe SSDs, go to BIOS > SETTINGS > Advanced > Integrated Peripherals > M2_X Pcie Storage Remapping and ...and provides enhanced read performance. However, most newer version of a RAID. Go to BIOS > SETTINGS > Advanced > Integrated Peripherals > SATA Mode and change setting to RAID/ ...Skip this appendix. RAID 10 uses four hard drives to Enabled. Go to BIOS > SETTINGS > Advanced > Windows OS Configuration > Windows 10 WHQL Support ... and good fault tolerance. If you use the UEFI BIOS for simple and advanced operations. Power on the UEFI ...

User Manual
Page 66
Press F10 to save configuration and exit, and then reboot and press Delete key to BIOS > SETTING > Advanced > Intel(R) Rapid Storage Technology submenu. Enter Create RAID Volume screen. Here are returned to create for the RAID volume. 6. 6. Creating RAID Volume 1. ... completion you want to the Intel(R) Rapid Storage Technology menu. 66 RAID Configuration Select the Strip Size for RAID volume. 4. Go to enter BIOS Setup menu. 7. Specify a Name for the RAID array. The available values range from 4KB to create the RAID volume. The following screen appears: 3. The...
Press F10 to save configuration and exit, and then reboot and press Delete key to BIOS > SETTING > Advanced > Intel(R) Rapid Storage Technology submenu. Enter Create RAID Volume screen. Here are returned to create for the RAID volume. 6. 6. Creating RAID Volume 1. ... completion you want to the Intel(R) Rapid Storage Technology menu. 66 RAID Configuration Select the Strip Size for RAID volume. 4. Go to enter BIOS Setup menu. 7. Specify a Name for the RAID array. The available values range from 4KB to create the RAID volume. The following screen appears: 3. The...

User Manual
Page 67
...unbootable. 1. Go to enter the RAID VOLUME INFO screen. 3. Select the RAID volume from the Intel(R) Rapid Storage Technology screen to BIOS > SETTING > Advanced > Intel(R) Rapid Storage Technology. 2. RAID Configuration 67 The following screen appears: 4. Select the Delete item and ...press Enter key to accept the volume deletion. Select the Yes item and press Enter key to delete the selected RAID volume. Removing a RAID Volume Here you delete the RAID volume, your system...
...unbootable. 1. Go to enter the RAID VOLUME INFO screen. 3. Select the RAID volume from the Intel(R) Rapid Storage Technology screen to BIOS > SETTING > Advanced > Intel(R) Rapid Storage Technology. 2. RAID Configuration 67 The following screen appears: 4. Select the Delete item and ...press Enter key to accept the volume deletion. Select the Yes item and press Enter key to delete the selected RAID volume. Removing a RAID Volume Here you delete the RAID volume, your system...

User Manual
Page 68
... lose all data on the RAID drives and any RAID structures from the Intel(R) Rapid Storage Technology screen to BIOS > SETTING > Advanced > Intel(R) Rapid Storage Technology. 2. Select the Yes item and press Enter key to enter PHYSICAL DISK INFO screen. 4. Resetting Disks to Non-RAID could include issues such as incompatible RAID...
... lose all data on the RAID drives and any RAID structures from the Intel(R) Rapid Storage Technology screen to BIOS > SETTING > Advanced > Intel(R) Rapid Storage Technology. 2. Select the Yes item and press Enter key to enter PHYSICAL DISK INFO screen. 4. Resetting Disks to Non-RAID could include issues such as incompatible RAID...


