User Manual
Page 2
... The material in this document is the intellectual property of Qualcomm Atheros Inc. Trademarks All trademarks in the preparation of this manual are properties of their respective owners. ■■ MSI® is registered trademark of Micro-Star Int'l Co.,Ltd. ■■ NVIDIA® is registered trademark of NVIDIA Corporation. ■...
... The material in this document is the intellectual property of Qualcomm Atheros Inc. Trademarks All trademarks in the preparation of this manual are properties of their respective owners. ■■ MSI® is registered trademark of Micro-Star Int'l Co.,Ltd. ■■ NVIDIA® is registered trademark of NVIDIA Corporation. ■...
User Manual
Page 3
Preface Technical Support If a problem arises with your system and no solution can be obtained from the user's manual, please contact your ideal products from a wide variety of choices and, if product details are required, you 'll efficiently locate your place ...users. With a simple tap of power unit capacity for technical guide, BIOS updates, driver updates, and other information: http://www.msi.com/support/ Contact our technical staff at: http://register.msi.com/ iii Preface Better yet, the power calculator provides accurate estimates of the smartphone, you may easily download user...
Preface Technical Support If a problem arises with your system and no solution can be obtained from the user's manual, please contact your ideal products from a wide variety of choices and, if product details are required, you 'll efficiently locate your place ...users. With a simple tap of power unit capacity for technical guide, BIOS updates, driver updates, and other information: http://www.msi.com/support/ Contact our technical staff at: http://register.msi.com/ iii Preface Better yet, the power calculator provides accurate estimates of the smartphone, you may easily download user...

User Manual
Page 4
...add-on card or module. ■■ All cautions and warnings on a reliable flat surface before connecting the equipment to User's Manual. ◯◯ The equipment has been dropped and damaged. ◯◯ The equipment has obvious sign of the following situations arises,.../220V before setting it . Preface Safety Instructions ■■ Always read the safety instructions carefully. ■■ Keep this User's Manual for air convection hence protects the equipment from humidity. ■■ Lay this equipment on the equipment should be noted. ■■...
...add-on card or module. ■■ All cautions and warnings on a reliable flat surface before connecting the equipment to User's Manual. ◯◯ The equipment has been dropped and damaged. ◯◯ The equipment has obvious sign of the following situations arises,.../220V before setting it . Preface Safety Instructions ■■ Always read the safety instructions carefully. ■■ Keep this User's Manual for air convection hence protects the equipment from humidity. ■■ Lay this equipment on the equipment should be noted. ■■...
User Manual
Page 33
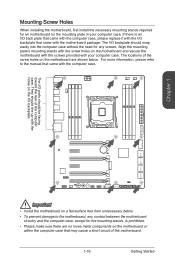
... motherboard, any screws. SATA9_10 SATA7_8 SATA3_4 SATA1_2 Important • Install the motherboard on a flat surface free from unnecessary debris. • To prevent damage to the manual that may cause a short circuit of the motherboard. 1-19 Getting Started If there is prohibited. • Please make sure there are shown below. They should...
... motherboard, any screws. SATA9_10 SATA7_8 SATA3_4 SATA1_2 Important • Install the motherboard on a flat surface free from unnecessary debris. • To prevent damage to the manual that may cause a short circuit of the motherboard. 1-19 Getting Started If there is prohibited. • Please make sure there are shown below. They should...
User Manual
Page 36
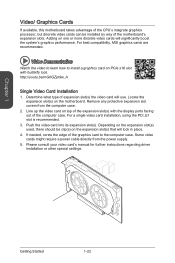
... video cards might require a power cable directly from the computer case. 2. For best compatibility, MSI graphics cards are recommended. Video Demonstration Watch the video to learn how to the computer case. Please consult your video card's manual for further instructions regarding driver installation or other special settings. Determine what type of the...
... video cards might require a power cable directly from the computer case. 2. For best compatibility, MSI graphics cards are recommended. Video Demonstration Watch the video to learn how to the computer case. Please consult your video card's manual for further instructions regarding driver installation or other special settings. Determine what type of the...
User Manual
Page 37
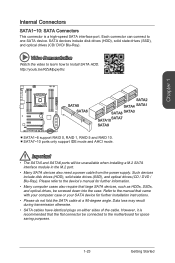
...1 Internal Connectors SATA1~10: SATA Connectors This connector is recommended that large SATA devices, such as HDDs, SSDs, and optical drives, be connected to the manual that came with your computer case or your SATA device for space saving purposes. 1-23 Getting Started Please refer to the device...'s manual for further information. • Many computer cases also require that the flat connector be screwed down into the case. Refer to the motherboard for ...
...1 Internal Connectors SATA1~10: SATA Connectors This connector is recommended that large SATA devices, such as HDDs, SSDs, and optical drives, be connected to the manual that came with your computer case or your SATA device for space saving purposes. 1-23 Getting Started Please refer to the device...'s manual for further information. • Many computer cases also require that the flat connector be screwed down into the case. Refer to the motherboard for ...
User Manual
Page 43
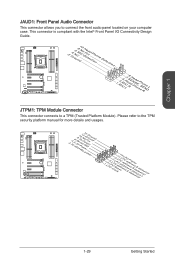
... JTPM1: TPM Module Connector This connector connects to connect the front audio panel located on your computer case. Please refer to the TPM security platform manual for more details and usages. 2.34V.36S..3tS8aVe.n15Prd0iVaob1.NlwyP2I1o.eRopG4rwoPQ.rwGeionreurornudnd 1.L3P.L5CP.LCC7P.loLRC9cP.eLka1CsPd1e1ad.CtL3drPea.dLsdCrPsedasCr&edsFdsd&sraraedt&amsasdpteaa&intpa0dinap1tian2pin3 SATA9_10 SATA7_8...
... JTPM1: TPM Module Connector This connector connects to connect the front audio panel located on your computer case. Please refer to the TPM security platform manual for more details and usages. 2.34V.36S..3tS8aVe.n15Prd0iVaob1.NlwyP2I1o.eRopG4rwoPQ.rwGeionreurornudnd 1.L3P.L5CP.LCC7P.loLRC9cP.eLka1CsPd1e1ad.CtL3drPea.dLsdCrPsedasCr&edsFdsd&sraraedt&amsasdpteaa&intpa0dinap1tian2pin3 SATA9_10 SATA7_8...
User Manual
Page 44
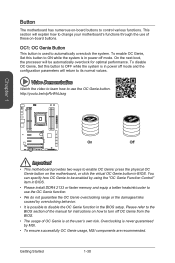
...risk. Video Demonstration Watch the video to learn how to turn off OC Genie from the BIOS. • The usage of the manual for optimal performance. You can specify how OC Genie to be /nIpRvWkUazg Chapter 1 OGCENIE OGCENIE SATA9_10 SATA7_8 SATA3_4 SATA1_2 On Off Important ...Genie function. • We do not guarantee the OC Genie overclocking range or the damages/risks caused by MSI. • To ensure successfully OC Genie usage, MSI components are recommended. Button The motherboard has numerous on -board buttons. This section will return to automatically overclock ...
...risk. Video Demonstration Watch the video to learn how to turn off OC Genie from the BIOS. • The usage of the manual for optimal performance. You can specify how OC Genie to be /nIpRvWkUazg Chapter 1 OGCENIE OGCENIE SATA9_10 SATA7_8 SATA3_4 SATA1_2 On Off Important ...Genie function. • We do not guarantee the OC Genie overclocking range or the damages/risks caused by MSI. • To ensure successfully OC Genie usage, MSI components are recommended. Button The motherboard has numerous on -board buttons. This section will return to automatically overclock ...
User Manual
Page 74
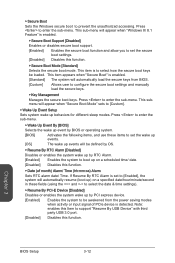
... function and allow you to select how the secure boot keys be awakened from BIOS. [Custom] Allows user to configure the secure boot settings and manually load the secure keys. ▶▶Key Management Manages the secure boot keys. Chapter 3 BIOS Setup 3-12 ▶▶Secure Boot Sets the Windows secure...
... function and allow you to select how the secure boot keys be awakened from BIOS. [Custom] Allows user to configure the secure boot settings and manually load the secure keys. ▶▶Key Management Manages the secure boot keys. Chapter 3 BIOS Setup 3-12 ▶▶Secure Boot Sets the Windows secure...
User Manual
Page 78
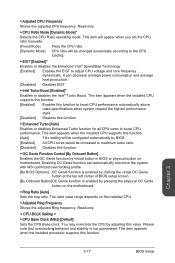
... Mode [All Core]* Sets the applying mode for adjusted CPU ratio. BIOS Setup 3-16 This item can void your warranty or severely damage your PC manually is only recommended for advanced users. • Overclocking is used to determine CPU clock speed for all cores. Note: We use OC Genie for easy...
... Mode [All Core]* Sets the applying mode for adjusted CPU ratio. BIOS Setup 3-16 This item can void your warranty or severely damage your PC manually is only recommended for advanced users. • Overclocking is used to determine CPU clock speed for all cores. Note: We use OC Genie for easy...
User Manual
Page 79
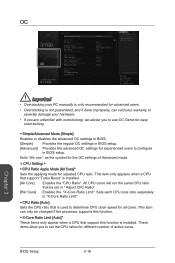
... top left corner of BIOS setup screen. [By Onboard Button]OC Genie function is not guaranteed. It can automatically overclock the system with MSI optimized overclocking profile. [By BIOS Options] OC Genie function is enabled by pressing the physical OC Genie button on the motherboard. ▶&#...BCLK Setting > ▶▶CPU Base Clock (MHz) [Default] Sets the CPU Base clock. This item will appear when you set the CPU ratio manually. [Fixed Mode] Fixes the CPU ratio. [Dynamic Mode] CPU ratio will be configured automatically by BIOS. [Enabled] All CPU cores would be changed ...
... top left corner of BIOS setup screen. [By Onboard Button]OC Genie function is not guaranteed. It can automatically overclock the system with MSI optimized overclocking profile. [By BIOS Options] OC Genie function is enabled by pressing the physical OC Genie button on the motherboard. ▶&#...BCLK Setting > ▶▶CPU Base Clock (MHz) [Default] Sets the CPU Base clock. This item will appear when you set the CPU ratio manually. [Fixed Mode] Fixes the CPU ratio. [Dynamic Mode] CPU ratio will be configured automatically by BIOS. [Enabled] All CPU cores would be changed ...
User Manual
Page 80
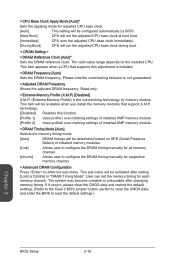
... module. [Profile 2] Uses profile2 over-clocking settings of installed memory modules. [Link] Allows user to configure the DRAM timing manually for all memory channel. [UnLink] Allows user to configure the DRAM timing manually for respective memory channel. ▶▶Advanced DRAM Configuration Press to load the default settings.) Chapter 3 BIOS Setup 3-18...
... module. [Profile 2] Uses profile2 over-clocking settings of installed memory modules. [Link] Allows user to configure the DRAM timing manually for all memory channel. [UnLink] Allows user to configure the DRAM timing manually for respective memory channel. ▶▶Advanced DRAM Configuration Press to load the default settings.) Chapter 3 BIOS Setup 3-18...
User Manual
Page 83
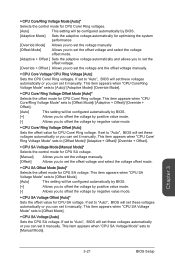
...the offset value for CPU Core/ Ring voltage. This item appears when "CPU SA Voltage Mode" sets to [Manual Mode]. If set to set the voltage and the offset voltage manually. ▶▶CPU Core Voltage/ CPU Ring Voltage [Auto] Sets the CPU Core/ Ring voltages. This ...automatically by BIOS. [Adaptive Mode] Sets the adaptive voltage automatically for optimizing the system performance. [Override Mode] Allows you to set the voltage manually. [Offset Mode] Allows you to set the offset voltage and select the voltage offset mode. [Adaptive + Offset ] Sets the adaptive voltage ...
...the offset value for CPU Core/ Ring voltage. This item appears when "CPU SA Voltage Mode" sets to [Manual Mode]. If set to set the voltage and the offset voltage manually. ▶▶CPU Core Voltage/ CPU Ring Voltage [Auto] Sets the CPU Core/ Ring voltages. This ...automatically by BIOS. [Adaptive Mode] Sets the adaptive voltage automatically for optimizing the system performance. [Override Mode] Allows you to set the voltage manually. [Offset Mode] Allows you to set the offset voltage and select the voltage offset mode. [Adaptive + Offset ] Sets the adaptive voltage ...
User Manual
Page 84
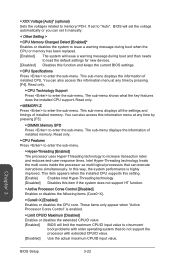
...] Use the actual maximum CPUID input value. ▶▶XXX Voltage [Auto]* (optional) Sets the voltages related to enter the sub-menu. If set it manually. < Other Setting > ▶▶CPU Memory Changed Detect [Enabled]* Enables or disables the system to enter the sub-menu. The sub-menu displays the information...
...] Use the actual maximum CPUID input value. ▶▶XXX Voltage [Auto]* (optional) Sets the voltages related to enter the sub-menu. If set it manually. < Other Setting > ▶▶CPU Memory Changed Detect [Enabled]* Enables or disables the system to enter the sub-menu. The sub-menu displays the information...

User Manual
Page 108
Reboot system, during the Power-On Self Test (POST) press, press and keys simultaneously to sync manually. 1. Select option 5 "Acceleration Options" and press key. The following screen appears. Select [ESC] - D[O DNIOSTK I/NVTOELRURMUEPINTFTOHREMPARTOIOCNES]S! In some situations, you...VERIFICATION ] SYNCHRONIZING THE DA5T. Once synchronization is not always synchronized with the data in the SSD cache. Are you sure you want to manually sync the disks for avoiding data loss. When prompted, press to remove the Disk/Volume Acceleration. Intel RAID B-14 WARNING: IT IS ...
Reboot system, during the Power-On Self Test (POST) press, press and keys simultaneously to sync manually. 1. Select option 5 "Acceleration Options" and press key. The following screen appears. Select [ESC] - D[O DNIOSTK I/NVTOELRURMUEPINTFTOHREMPARTOIOCNES]S! In some situations, you...VERIFICATION ] SYNCHRONIZING THE DA5T. Once synchronization is not always synchronized with the data in the SSD cache. Are you sure you want to manually sync the disks for avoiding data loss. When prompted, press to remove the Disk/Volume Acceleration. Intel RAID B-14 WARNING: IT IS ...


