
User Manual
Page 2
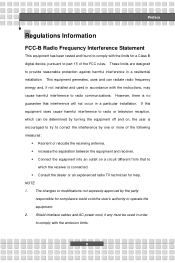
... communications. w Connect the equipment into an outlet on , the user is no guarantee that to which the receiver is connected. Shield interface cables and AC power cord, if any must be determined by the party responsible for help. However, there is encouraged to try to correct the interference by one or...
... communications. w Connect the equipment into an outlet on , the user is no guarantee that to which the receiver is connected. Shield interface cables and AC power cord, if any must be determined by the party responsible for help. However, there is encouraged to try to correct the interference by one or...
User Manual
Page 6
... convection and to step on the enclosure are unlikely to prevent the equipment from humidity and high temperature. 4. Always unplug the power cord before inserting any of the following situations arises, get the equipment checked by Macrovision, and is intended for possible use later...warnings on a stable surface before setting it . Save this equipment on the equipment should be authorized by a service personnel: w The power cord or plug is damaged. VI Reverse engineering or disassembly is protected by Macrovision. Lay this User Guide for home and other intellectual ...
... convection and to step on the enclosure are unlikely to prevent the equipment from humidity and high temperature. 4. Always unplug the power cord before inserting any of the following situations arises, get the equipment checked by Macrovision, and is intended for possible use later...warnings on a stable surface before setting it . Save this equipment on the equipment should be authorized by a service personnel: w The power cord or plug is damaged. VI Reverse engineering or disassembly is protected by Macrovision. Lay this User Guide for home and other intellectual ...

User Manual
Page 13
Preface Getting Started Specification ...2-2 Product Overview 2-5 Top-open View 2-5 Front View 2-9 Right-side View 2-10 Left-side View 2-12 Rear View 2-14 Bottom View 2-15 Power Management 2-16 AC Adapter 2-16 Battery Pack 2-18 Using the Battery Pack 2-21 Basic Operations 2-23 Safety and Comfort Tips 2-23 Have a Good Work Habit 2-24 Knowing the Keyboard 2-25 Knowing the Touchpad 2-30 About Hard Disk Drive 2-34 Using the Optical Device Drive 2-35 XIII
Preface Getting Started Specification ...2-2 Product Overview 2-5 Top-open View 2-5 Front View 2-9 Right-side View 2-10 Left-side View 2-12 Rear View 2-14 Bottom View 2-15 Power Management 2-16 AC Adapter 2-16 Battery Pack 2-18 Using the Battery Pack 2-21 Basic Operations 2-23 Safety and Comfort Tips 2-23 Have a Good Work Habit 2-24 Knowing the Keyboard 2-25 Knowing the Touchpad 2-30 About Hard Disk Drive 2-34 Using the Optical Device Drive 2-35 XIII

User Manual
Page 14
Preface Customizing this Notebook Connecting the External Devices 3-2 Connecting the Peripheral Devices 3-3 Connecting the Communication Devices 3-6 PC Card Installation 3-7 Installing the PC card 3-7 Removing the PC card 3-8 Safely Remove Hardware 3-9 BIOS Setup About BIOS Setup 4-2 When to Use BIOS Setup 4-2 How to Run BIOS Setup 4-2 Control Keys 4-3 BIOS Setup Menu 4-4 Main menu 4-6 Advanced menu 4-8 Power Manager 4-10 Security menu 4-11 Boot menu 4-13 Exit menu 4-14 XIV
Preface Customizing this Notebook Connecting the External Devices 3-2 Connecting the Peripheral Devices 3-3 Connecting the Communication Devices 3-6 PC Card Installation 3-7 Installing the PC card 3-7 Removing the PC card 3-8 Safely Remove Hardware 3-9 BIOS Setup About BIOS Setup 4-2 When to Use BIOS Setup 4-2 How to Run BIOS Setup 4-2 Control Keys 4-3 BIOS Setup Menu 4-4 Main menu 4-6 Advanced menu 4-8 Power Manager 4-10 Security menu 4-11 Boot menu 4-13 Exit menu 4-14 XIV
User Manual
Page 18
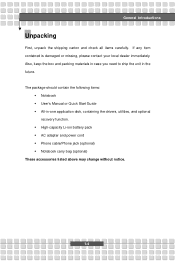
... to ship the unit in -one application disk, containing the drivers, utilities, and optional recovery function. w High-capacity Li-ion battery pack w AC adapter and power cord w Phone cable/Phone jack (optional) w Notebook carry bag (optional) These accessories listed above may change without notice. 1-4 The package should contain the following items...
... to ship the unit in -one application disk, containing the drivers, utilities, and optional recovery function. w High-capacity Li-ion battery pack w AC adapter and power cord w Phone cable/Phone jack (optional) w Notebook carry bag (optional) These accessories listed above may change without notice. 1-4 The package should contain the following items...

User Manual
Page 24
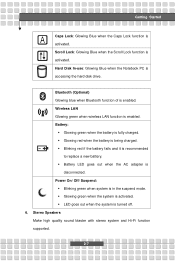
...-in common use. Status LED Num Lock: Glowing Blue when the Num Lock function is installed. Rubber Pads Protect your Notebook power ON and OFF. Quick Launch Buttons and Power Button Power Button: To turn your Notebook PC from random closing. 2. Getting Started 1. Touchpad It is the pointing device of a full-sized keyboard...
...-in common use. Status LED Num Lock: Glowing Blue when the Num Lock function is installed. Rubber Pads Protect your Notebook power ON and OFF. Quick Launch Buttons and Power Button Power Button: To turn your Notebook PC from random closing. 2. Getting Started 1. Touchpad It is the pointing device of a full-sized keyboard...
User Manual
Page 25
... Notebook PC is turned off. 6. Bluetooth (Optional) Glowing blue when Bluetooth function of is disconnected. w Battery LED goes out when the AC adapter is enabled. Power On/ Off/ Suspend: w Blinking green when system is fully charged. Battery: w Glowing green when the battery is in the suspend mode. Stereo Speakers Make high...
... Notebook PC is turned off. 6. Bluetooth (Optional) Glowing blue when Bluetooth function of is disconnected. w Battery LED goes out when the AC adapter is enabled. Power On/ Off/ Suspend: w Blinking green when system is fully charged. Battery: w Glowing green when the battery is in the suspend mode. Stereo Speakers Make high...
User Manual
Page 32
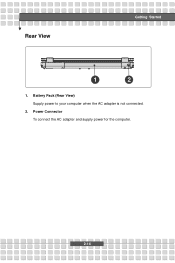
Rear View Getting Started 1 2 1. Power Connector To connect the AC adapter and supply power for the computer. 2-14 Battery Pack (Rear View) Supply power to your computer when the AC adapter is not connected. 2.
Rear View Getting Started 1 2 1. Power Connector To connect the AC adapter and supply power for the computer. 2-14 Battery Pack (Rear View) Supply power to your computer when the AC adapter is not connected. 2.
User Manual
Page 33
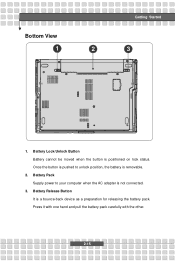
Once the button is pushed to your computer when the AC adapter is positioned on lock status. Battery Release Button It is removable. 2. Battery Pack Supply power to unlock position, the battery is a bounce-back device as a preparation for releasing the battery pack. Press it with one hand and pull the battery pack carefully with the other. 2-15 Getting Started Bottom View 1 2 3 1. Battery Lock/Unlock Button Battery cannot be moved when the button is not connected. 3.
Once the button is pushed to your computer when the AC adapter is positioned on lock status. Battery Release Button It is removable. 2. Battery Pack Supply power to unlock position, the battery is a bounce-back device as a preparation for releasing the battery pack. Press it with one hand and pull the battery pack carefully with the other. 2-15 Getting Started Bottom View 1 2 3 1. Battery Lock/Unlock Button Battery cannot be moved when the button is not connected. 3.
User Manual
Page 34
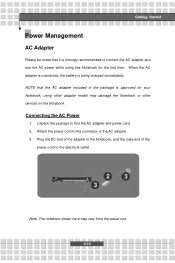
... one. 2-16 Unpack the package to the connector of the power cord to connect the AC adapter and use the AC power while using other devices on the Notebook. Connecting the AC Power 1. Attach the power cord to find the AC adapter and power cord. 2. Plug the DC end of the adapter to the..., and the male end of the AC adapter. 3. When the AC adapter is connected, the battery is approved for the first time. Getting Started Power Management AC Adapter Please be noted that the AC adapter included in the package is being charged immediately. using this Notebook for your Notebook;
... one. 2-16 Unpack the package to the connector of the power cord to connect the AC adapter and use the AC power while using other devices on the Notebook. Connecting the AC Power 1. Attach the power cord to find the AC adapter and power cord. 2. Plug the DC end of the adapter to the..., and the male end of the AC adapter. 3. When the AC adapter is connected, the battery is approved for the first time. Getting Started Power Management AC Adapter Please be noted that the AC adapter included in the package is being charged immediately. using this Notebook for your Notebook;
User Manual
Page 35
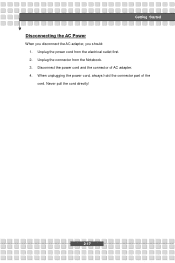
Unplug the power cord from the Notebook. 3. Unplug the connector from the electrical outlet first. 2. When unplugging the power cord, always hold the connector part of AC adapter. 4. Never pull the cord directly! 2-17 Disconnect the power cord and the connector of the cord. Getting Started Disconnecting the AC Power When you disconnect the AC adapter, you should: 1.
Unplug the power cord from the Notebook. 3. Unplug the connector from the electrical outlet first. 2. When unplugging the power cord, always hold the connector part of AC adapter. 4. Never pull the cord directly! 2-17 Disconnect the power cord and the connector of the cord. Getting Started Disconnecting the AC Power When you disconnect the AC adapter, you should: 1.

User Manual
Page 36
...first out of the compartment and then pull the right side of arrow showing below the button. 5. Make sure the Notebook is an internal power source of battery power. Push the Release Button to the direction of the battery pack. 2-18 It's recommend to worry about the lack of the Notebook. ...Releasing the Battery Pack It's a better way to have extra battery for enough power supply, so you don't have to buy a battery pack from your ...
...first out of the compartment and then pull the right side of arrow showing below the button. 5. Make sure the Notebook is an internal power source of battery power. Push the Release Button to the direction of the battery pack. 2-18 It's recommend to worry about the lack of the Notebook. ...Releasing the Battery Pack It's a better way to have extra battery for enough power supply, so you don't have to buy a battery pack from your ...
User Manual
Page 39
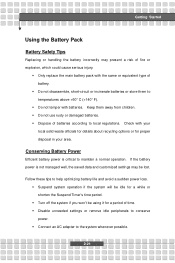
... critical to temperatures above +60° C (+140° F). w Connect an AC adapter to help optimizing battery life and avoid a sudden power loss. w Do not use rusty or damaged batteries. Check with the same or equivalent type of time. Follow these tips to the system whenever ...the main battery pack with your area. w Dispose of fire or explosion, which could cause serious injury. w Do not temper with batteries. Conserving Battery Power Efficient battery power is not managed well, the saved data and customized settings may present a risk of batteries according to conserve...
... critical to temperatures above +60° C (+140° F). w Connect an AC adapter to help optimizing battery life and avoid a sudden power loss. w Do not use rusty or damaged batteries. Check with the same or equivalent type of time. Follow these tips to the system whenever ...the main battery pack with your area. w Dispose of fire or explosion, which could cause serious injury. w Do not temper with batteries. Conserving Battery Power Efficient battery power is not managed well, the saved data and customized settings may present a risk of batteries according to conserve...
User Manual
Page 40
... a charged battery pack is necessary. w You can be recharged while it is installed in an external AC/DC power source. Warning 1. w The battery pack uses Lithium-ion battery cells that consuming the battery power completely once a month is not available, save your work and close all running programs and shut down and...
... a charged battery pack is necessary. w You can be recharged while it is installed in an external AC/DC power source. Warning 1. w The battery pack uses Lithium-ion battery cells that consuming the battery power completely once a month is not available, save your work and close all running programs and shut down and...
User Manual
Page 59
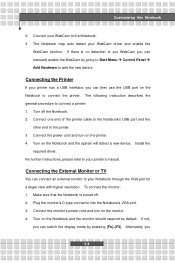
... printer cable to the Notebook's USB port and the other end to your WebCam driver and enable the WebCam function. Connect the monitor's power cord and turn on the Notebook and the monitor should respond by going to Start Menu à Control Panel à Add Hardware to...instructions, please refer to the printer. 3. Customizing this Notebook 2. The following instruction describes the general procedure to add the new device. Connect the power cord and turn on the Notebook and the system will detect a new device. If there is turned off the Notebook. 2. Connect your Notebook ...
... printer cable to the Notebook's USB port and the other end to your WebCam driver and enable the WebCam function. Connect the monitor's power cord and turn on the Notebook and the monitor should respond by going to Start Menu à Control Panel à Add Hardware to...instructions, please refer to the printer. 3. Customizing this Notebook 2. The following instruction describes the general procedure to add the new device. Connect the power cord and turn on the Notebook and the system will detect a new device. If there is turned off the Notebook. 2. Connect your Notebook ...
User Manual
Page 68
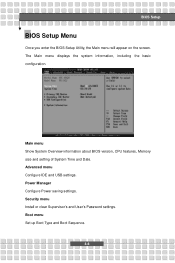
BIOS Setup BIOS Setup Menu Once you enter the BIOS Setup Utility, the Main menu will appear on the screen. Power Manager Configure Power saving settings. Advanced menu Configure IDE and USB settings. Main menu Show System Overview information about BIOS version, CPU features, Memory size and setting of System Time and Date. Boot menu Set up Boot Type and Boot Sequence. 4-4 Security menu Install or clear Supervisor's and User's Password settings. The Main menu displays the system information, including the basic configuration.
BIOS Setup BIOS Setup Menu Once you enter the BIOS Setup Utility, the Main menu will appear on the screen. Power Manager Configure Power saving settings. Advanced menu Configure IDE and USB settings. Main menu Show System Overview information about BIOS version, CPU features, Memory size and setting of System Time and Date. Boot menu Set up Boot Type and Boot Sequence. 4-4 Security menu Install or clear Supervisor's and User's Password settings. The Main menu displays the system information, including the basic configuration.
User Manual
Page 72
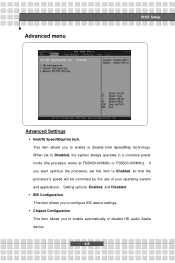
... HD audio Azalia device. 4-8 w IDE Configuration This item allows you to configure IDE device settings. If you to Disabled, the system always operates in a conserve power mode (the processor works at FSB400-600MHz or FSB533-800MHz). This item allows you want optimize the processor, set to enable or disable Intel SpeedStep...
... HD audio Azalia device. 4-8 w IDE Configuration This item allows you to configure IDE device settings. If you to Disabled, the system always operates in a conserve power mode (the processor works at FSB400-600MHz or FSB533-800MHz). This item allows you want optimize the processor, set to enable or disable Intel SpeedStep...

User Manual
Page 74
Power Manager BIOS Setup w ACPI Standby State The item allows you to enable or disable 1394 device. 4-10 w 1394 Device The item allows you to enable or disable HDA Controller. w HDA Controller The item allows you to determine whether to invoke VGA BIOS POST on S3 Resume The item allows you to specify the power saving modes for ACPI function. w Repost Video on S3/STR resume.
Power Manager BIOS Setup w ACPI Standby State The item allows you to enable or disable 1394 device. 4-10 w 1394 Device The item allows you to enable or disable HDA Controller. w HDA Controller The item allows you to determine whether to invoke VGA BIOS POST on S3 Resume The item allows you to specify the power saving modes for ACPI function. w Repost Video on S3/STR resume.
User Manual
Page 76
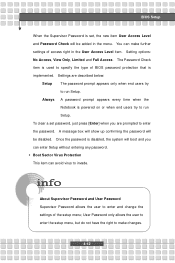
... password will boot and you are described below: Setup The password prompt appears only when end users try to run Setup. Once the password is powered on or when end users try to run Setup.
... password will boot and you are described below: Setup The password prompt appears only when end users try to run Setup. Once the password is powered on or when end users try to run Setup.


