
User Manual
Page 3
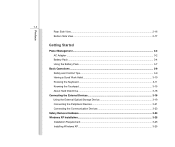
... the External Devices 3-19 Using the External Optical Storage Device 3-19 Connecting the Peripheral Devices 3-21 Connecting the Communication Devices 3-23 Safely Remove Hardware ...3-24 Windows XP Installation...3-25 Installation Requirement...3-25 Installing...
... the External Devices 3-19 Using the External Optical Storage Device 3-19 Connecting the Peripheral Devices 3-21 Connecting the Communication Devices 3-23 Safely Remove Hardware ...3-24 Windows XP Installation...3-25 Installation Requirement...3-25 Installing...
User Manual
Page 52
Enable or disable the touchpad function. Force the computer into suspend mode (depending on the keyboard, which are used to your Windows manual or online help. „ [Fn] Key + + Switch the display output mode between the LCD, external monitor and both. For more ...information of the two keys, please refer to perform Windows-specific functions, such as opening the Start menu and launching the shortcut menu. Decrease the built-in speaker's + volume. Decrease the LCD brightness. + ...
Enable or disable the touchpad function. Force the computer into suspend mode (depending on the keyboard, which are used to your Windows manual or online help. „ [Fn] Key + + Switch the display output mode between the LCD, external monitor and both. For more ...information of the two keys, please refer to perform Windows-specific functions, such as opening the Start menu and launching the shortcut menu. Decrease the built-in speaker's + volume. Decrease the LCD brightness. + ...
User Manual
Page 54
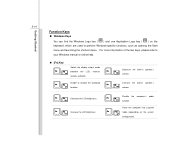
... touchpad or press the left button, so In addition, you want to change the size, shape, moving speed and other advanced features of operating your Windows operating system.
... touchpad or press the left button, so In addition, you want to change the size, shape, moving speed and other advanced features of operating your Windows operating system.
User Manual
Page 60
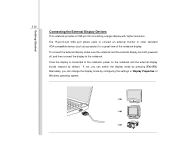
... switch the display mode by pressing [Fn]+[F2]. Getting Started 3-22 Connecting the External Display Devices This notebook provides a VGA port for a great view of Windows operating system. Once the display is connected to the notebook. Alternately, you can change the display mode by default. To connect the external display, make...
... switch the display mode by pressing [Fn]+[F2]. Getting Started 3-22 Connecting the External Display Devices This notebook provides a VGA port for a great view of Windows operating system. Once the display is connected to the notebook. Alternately, you can change the display mode by default. To connect the external display, make...
User Manual
Page 62
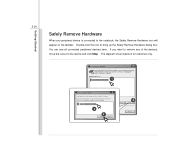
... device Confirm devices to be removed safely. Safely Remove Hardware Select the device you want to unplug or eject, and then click Stop. Windows will appear on the taskbar. After the devices are stopped they may be stopped. The diagram shown below is safe to do so unplug...any peripheral device is connected to the notebook, the Safely Remove Hardware icon will attempt to stop the following devices. Choose OK To continue. When Windows notifies you that it is for reference only. USB Mass Storage Device 3 4 OK Cancel Properties 2 Stop Close Getting Started 3-24 Safely Remove...
... device Confirm devices to be removed safely. Safely Remove Hardware Select the device you want to unplug or eject, and then click Stop. Windows will appear on the taskbar. After the devices are stopped they may be stopped. The diagram shown below is safe to do so unplug...any peripheral device is connected to the notebook, the Safely Remove Hardware icon will attempt to stop the following devices. Choose OK To continue. When Windows notifies you that it is for reference only. USB Mass Storage Device 3 4 OK Cancel Properties 2 Stop Close Getting Started 3-24 Safely Remove...
User Manual
Page 63
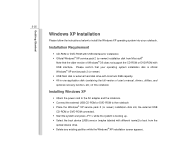
... Installation Please follow the instructions below to boot from Microsoft® Note that your operating system installation disk is official Windows® XP service pack 2 (or newer) Š USB flash disk or external hard disk drive with minimum 2GB capacity. Š All-in-one application disk (... is booting up. Š Select the boot device [USB:xxxxxxx (maybe labeled with USB interface. Please confirm that the older version of this notebook Installing Windows XP Š Attach the power cord to the AC adapter and the notebook. Š Connect the external USB CD-ROM or DVD-ROM to the...
... Installation Please follow the instructions below to boot from Microsoft® Note that your operating system installation disk is official Windows® XP service pack 2 (or newer) Š USB flash disk or external hard disk drive with minimum 2GB capacity. Š All-in-one application disk (... is booting up. Š Select the boot device [USB:xxxxxxx (maybe labeled with USB interface. Please confirm that the older version of this notebook Installing Windows XP Š Attach the power cord to the AC adapter and the notebook. Š Connect the external USB CD-ROM or DVD-ROM to the...
User Manual
Page 64
... CD-ROM or DVD-ROM. Š Follow the Driver Installation Wizard to continue and complete the installation process. Š Restart the system and enter the Windows® XP operating system. Getting Started 3-26 Note that it is strongly recommended to back up the data that stored in -one application disk of...
... CD-ROM or DVD-ROM. Š Follow the Driver Installation Wizard to continue and complete the installation process. Š Restart the system and enter the Windows® XP operating system. Getting Started 3-26 Note that it is strongly recommended to back up the data that stored in -one application disk of...
User Manual
Page 69
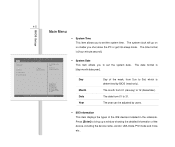
...:08:53] [Wed 02/04/2008] Use [ENTER] to configure system Date. :Select Screen :Select Item Enter: Select +/-: Change Opt. Press [Enter] to bring up a window showing the detailed information of the IDE devices installed in the notebook. Use [+], [-] to select a field. The system clock will go on no matter you...
...:08:53] [Wed 02/04/2008] Use [ENTER] to configure system Date. :Select Screen :Select Item Enter: Select +/-: Change Opt. Press [Enter] to bring up a window showing the detailed information of the IDE devices installed in the notebook. Use [+], [-] to select a field. The system clock will go on no matter you...


