
User Manual
Page 53
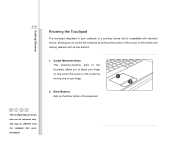
... making selection with standard mouse, allowing you to control the notebook by pointing the location of the cursor on the screen by moving one of the keyboard. 1 2 The touchpad figures shown here are for reference only, and may be different from the notebook that is compatible ...
... making selection with standard mouse, allowing you to control the notebook by pointing the location of the cursor on the screen by moving one of the keyboard. 1 2 The touchpad figures shown here are for reference only, and may be different from the notebook that is compatible ...
User Manual
Page 54
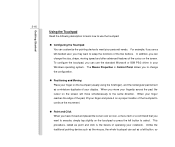
...whole touchpad can change the configuration. „ Positioning and Moving Place your Windows operating system. The Mouse Properties in your finger on the screen. When your finger reaches the edge of the pad, lift your finger and place it on a proper location of the touchpad to continue ... the touchpad, you can customize the pointing device to meet your display. When you may want to execute, simply tap slightly on the screen will act as a miniature duplicate of your personal needs. Getting Started 3-16 Using the Touchpad Read the following description to learn how to...
...whole touchpad can change the configuration. „ Positioning and Moving Place your Windows operating system. The Mouse Properties in your finger on the screen. When your finger reaches the edge of the pad, lift your finger and place it on a proper location of the touchpad to continue ... the touchpad, you can customize the pointing device to meet your display. When you may want to execute, simply tap slightly on the screen will act as a miniature duplicate of your personal needs. Getting Started 3-16 Using the Touchpad Read the following description to learn how to...
User Manual
Page 63
... Windows® XP service pack 2 (or newer) installation disk from the optical device drive. Š Delete any existing partition while the Windows® XP installation screen appears.
... Windows® XP service pack 2 (or newer) installation disk from the optical device drive. Š Delete any existing partition while the Windows® XP installation screen appears.
User Manual
Page 64
... it is strongly recommended to back up the data that stored in -one application disk of Windows® XP operating system. Š Follow the on-screen instructions to install all drivers.
... it is strongly recommended to back up the data that stored in -one application disk of Windows® XP operating system. Š Follow the on-screen instructions to install all drivers.
User Manual
Page 66
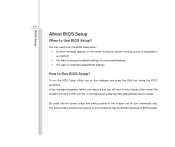
Be noted that the screen snaps and setting options in this chapter are for customized features. Š You want to reload the default BIOS settings. You may be different because ..., or simultaneously pressing [Ctrl]+[Alt]+[Delete] keys to run the BIOS Setup when: Š An error message appears on your references only. The actual setting screens and options on the screen during the POST procedure.
Be noted that the screen snaps and setting options in this chapter are for customized features. Š You want to reload the default BIOS settings. You may be different because ..., or simultaneously pressing [Ctrl]+[Alt]+[Delete] keys to run the BIOS Setup when: Š An error message appears on your references only. The actual setting screens and options on the screen during the POST procedure.
User Manual
Page 67
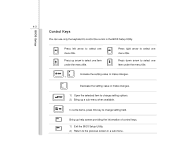
... to change setting field. Increase the setting value or make changes. + Decrease the setting value or make changes. 1) Open the selected item to the previous screen in the BIOS Setup Utility. Press up a sub-menu when available. BIOS Setup 4-3 Control Keys You can use only the keyboard to select one menu...
... to change setting field. Increase the setting value or make changes. + Decrease the setting value or make changes. 1) Open the selected item to the previous screen in the BIOS Setup Utility. Press up a sub-menu when available. BIOS Setup 4-3 Control Keys You can use only the keyboard to select one menu...
User Manual
Page 68
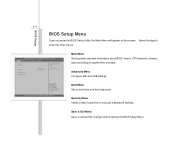
...Name Model Name System Time System Date IDE Infomation System Infomation [18:08:53] [Wed 02/04/2008] Use [ENTER] to configure system Date. :Select Screen :Select Item Enter: Select +/-: Change Opt. Use [+], [-] to select a field. F1: General Help F2: Previous Values F9: Optimized Default F4: Save... IDE and USB settings. BIOS Setup 4-4 BIOS Setup Menu Once you enter the BIOS Setup Utility, the Main Menu will appear on the screen. Select the tags to enter the other menus. Copyright (C) 2007 American Megatrends, Inc. Main Atpio Setup Utility - Security Menu Install or clear...
...Name Model Name System Time System Date IDE Infomation System Infomation [18:08:53] [Wed 02/04/2008] Use [ENTER] to configure system Date. :Select Screen :Select Item Enter: Select +/-: Change Opt. Use [+], [-] to select a field. F1: General Help F2: Previous Values F9: Optimized Default F4: Save... IDE and USB settings. BIOS Setup 4-4 BIOS Setup Menu Once you enter the BIOS Setup Utility, the Main Menu will appear on the screen. Select the tags to enter the other menus. Copyright (C) 2007 American Megatrends, Inc. Main Atpio Setup Utility - Security Menu Install or clear...
User Manual
Page 69
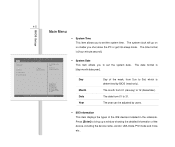
... information of the IDE devices installed in the notebook. The year can be adjusted by BIOS (read-only). Press [Enter] to configure system Date. :Select Screen :Select Item Enter: Select +/-: Change Opt. Advanced Boot Security Save & Exit Market Name Model Name System Time System Date IDE Infomation System Infomation [18:08...
... information of the IDE devices installed in the notebook. The year can be adjusted by BIOS (read-only). Press [Enter] to configure system Date. :Select Screen :Select Item Enter: Select +/-: Change Opt. Advanced Boot Security Save & Exit Market Name Model Name System Time System Date IDE Infomation System Infomation [18:08...
User Manual
Page 71
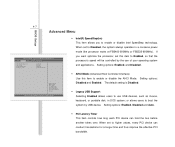
If you to enable or disable Intel SpeedStep technology. Setting options: Enabled, and Disabled. :Select Screen :Select Item Enter: Select +/-: Change Opt. F1: General Help F2: Previous Values F9: Optimized Default F4: Save Version 1.23.1109. Copyright (C) 2007 American Megatrends, Inc. &#...
If you to enable or disable Intel SpeedStep technology. Setting options: Enabled, and Disabled. :Select Screen :Select Item Enter: Select +/-: Change Opt. F1: General Help F2: Previous Values F9: Optimized Default F4: Save Version 1.23.1109. Copyright (C) 2007 American Megatrends, Inc. &#...

User Manual
Page 73
... , and 3rd Boot Option These items allow you to set the sequence of boot devices where BIOS attempts to load the disk operating system. :Select Screen :Select Item Enter: Select +/-: Change Opt. F1: General Help F2: Previous Values F9: Optimized Default F4: Save Version 1.21.1097. Main Atpio Setup Utility - Copyright...
... , and 3rd Boot Option These items allow you to set the sequence of boot devices where BIOS attempts to load the disk operating system. :Select Screen :Select Item Enter: Select +/-: Change Opt. F1: General Help F2: Previous Values F9: Optimized Default F4: Save Version 1.21.1097. Main Atpio Setup Utility - Copyright...
User Manual
Page 74
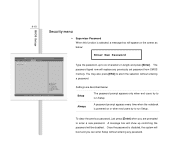
... the password is disabled, the system will be disabled. Always A password prompt appears every time when the notebook is powered on the screen as below : Setup The password prompt appears only when end users try to run Setup. Enter New Password Type the password, up ... password, just press [Enter] when you can enter Setup without entering a password. Advanced Boot Security Save & Exit Supervisor Password User Password :Select Screen :Select Item Enter: Select +/-: Change Opt. You may also press [ESC] to run Setup. BIOS Setup 4-10 Security menu Š Supervisor ...
... the password is disabled, the system will be disabled. Always A password prompt appears every time when the notebook is powered on the screen as below : Setup The password prompt appears only when end users try to run Setup. Enter New Password Type the password, up ... password, just press [Enter] when you can enter Setup without entering a password. Advanced Boot Security Save & Exit Supervisor Password User Password :Select Screen :Select Item Enter: Select +/-: Change Opt. You may also press [ESC] to run Setup. BIOS Setup 4-10 Security menu Š Supervisor ...
User Manual
Page 76
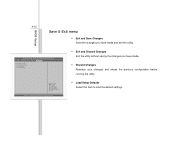
... and Save Changes Save the changes you have made . Š Discard Changes Abandon your changes and reload the previous configuration before running the utility. :Select Screen :Select Item Enter: Select +/-: Change Opt. Copyright (C) 2007 American Megatrends, Inc. Š Load Setup Defaults Select this item to load the default settings. Copyright (C) 2007...
... and Save Changes Save the changes you have made . Š Discard Changes Abandon your changes and reload the previous configuration before running the utility. :Select Screen :Select Item Enter: Select +/-: Change Opt. Copyright (C) 2007 American Megatrends, Inc. Š Load Setup Defaults Select this item to load the default settings. Copyright (C) 2007...


