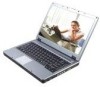
User Manual
Page 5
.... Avoid using the telephone function (other than a cordless type) during a lightning storm. 2. Never touch uninsulated telephone wires or terminals unless the telephone line has been disconnected at the network interface. 4. There may be a remote risk of the leak. To use the telephone function to open the enclosure. In case of any trouble with this manual for wet locations. 3. CD-ROM Drive Notice CAUTION...
.... Avoid using the telephone function (other than a cordless type) during a lightning storm. 2. Never touch uninsulated telephone wires or terminals unless the telephone line has been disconnected at the network interface. 4. There may be a remote risk of the leak. To use the telephone function to open the enclosure. In case of any trouble with this manual for wet locations. 3. CD-ROM Drive Notice CAUTION...
User Manual
Page 6
... unplug the power cord before inserting any of 100~240V before setting it . If any add-on card or module. 9. Use of this User Guide for home and other intellectual property rights. The openings on a stable surface before connecting the equipment to prevent the equipment from humidity and high temperature. 4. Reverse engineering or disassembly is protected by a service personnel: VI Keep...
... unplug the power cord before inserting any of 100~240V before setting it . If any add-on card or module. 9. Use of this User Guide for home and other intellectual property rights. The openings on a stable surface before connecting the equipment to prevent the equipment from humidity and high temperature. 4. Reverse engineering or disassembly is protected by a service personnel: VI Keep...
User Manual
Page 14
... technical staff at: support@msi.com.tw. We take every care in the preparation of this document, but no guarantee is the intellectual property of its contents. S425 Preface Copyright Notice The material in this guide is given as the Notebook specification and equipment, please ask your local vendor for FAQ, technical guide, driver and software updates, and other information...
... technical staff at: support@msi.com.tw. We take every care in the preparation of this document, but no guarantee is the intellectual property of its contents. S425 Preface Copyright Notice The material in this guide is given as the Notebook specification and equipment, please ask your local vendor for FAQ, technical guide, driver and software updates, and other information...

User Manual
Page 17
S425 Preface Customizing this Notebook Connecting the External Devices 3-2 Connecting the Peripheral Devices 3-3 Connecting the Communication Devices 3-6 PC Card Installation 3-7 Installing the PC card 3-7 Removing the PC card 3-8 Express Card Installation (Optional 3-9 Installing the Express card 3-9 Removing the Express card 3-9 Safely Remove Hardware 3-10 BIOS Setup About BIOS Setup 4-2 When to Use BIOS Setup 4-2 How to Run BIOS Setup 4-2 Control Keys 4-3 BIOS Setup Menu 4-4 Main menu 4-5 Advanced menu 4-7 Boot menu 4-9 Security menu 4-10 Exit menu 4-12 XVII
S425 Preface Customizing this Notebook Connecting the External Devices 3-2 Connecting the Peripheral Devices 3-3 Connecting the Communication Devices 3-6 PC Card Installation 3-7 Installing the PC card 3-7 Removing the PC card 3-8 Express Card Installation (Optional 3-9 Installing the Express card 3-9 Removing the Express card 3-9 Safely Remove Hardware 3-10 BIOS Setup About BIOS Setup 4-2 When to Use BIOS Setup 4-2 How to Run BIOS Setup 4-2 Control Keys 4-3 BIOS Setup Menu 4-4 Main menu 4-5 Advanced menu 4-7 Boot menu 4-9 Security menu 4-10 Exit menu 4-12 XVII

User Manual
Page 20
... that this notebook is recommended to read this manual carefully before using notebook. How to Use This Manual This User's Manual provides instructions and illustrations on becoming a new user of this notebook, the finely designed notebook. It is damaged or missing, please contact the vendor where you purchased this notebook. Chapter 2, Getting Started, provides the specification of this notebook, and introduces the function buttons, quick launch buttons, connectors, LEDs and externals of all...
... that this notebook is recommended to read this manual carefully before using notebook. How to Use This Manual This User's Manual provides instructions and illustrations on becoming a new user of this notebook, the finely designed notebook. It is damaged or missing, please contact the vendor where you purchased this notebook. Chapter 2, Getting Started, provides the specification of this notebook, and introduces the function buttons, quick launch buttons, connectors, LEDs and externals of all...

User Manual
Page 21
S425 General Introductions Chapter 3, Customizing this Notebook, gives instructions not only in connecting the mouse, keyboard, webcam, printer, external monitor, IEEE 1394 devices, and communication devices, but also in installing and removing the PC card. Chapter 4, BIOS setup, provides information on BIOS Setup program and allows you to configure the system for optimum use. 1-3
S425 General Introductions Chapter 3, Customizing this Notebook, gives instructions not only in connecting the mouse, keyboard, webcam, printer, external monitor, IEEE 1394 devices, and communication devices, but also in installing and removing the PC card. Chapter 4, BIOS setup, provides information on BIOS Setup program and allows you to configure the system for optimum use. 1-3

User Manual
Page 26
Support on LAN --- Yes Wfm 2.0 support Blue Tooth --- Realtek RTL8101L Wake on S3/S4 (AC mode) state LAN Boot --- Yes (FCC/CTR21/JATE) PCI LAN --- S425 LAN Wireless LAN PCMCIA Controller Slot CardBus Express Card Slot Display LCD Type Brightness Video Controller VRAM LCD CRT Support Getting Started PTT Approval --- MDC interface IEEE 802.11a/b/g O2 OZ711MP1 MMC/SD/MS/MS Pro/MS Dual/XD 6 in one card reader x1 Type II x 1 Support Express Card Slot x 1 14" TFT/200nits Wide Screen Brightness controlled by K/B hot-keys nVidia NV44M-V 32MB 1280 x 768 WXGA 640x480, max. 32bit color 2-4
Support on LAN --- Yes Wfm 2.0 support Blue Tooth --- Realtek RTL8101L Wake on S3/S4 (AC mode) state LAN Boot --- Yes (FCC/CTR21/JATE) PCI LAN --- S425 LAN Wireless LAN PCMCIA Controller Slot CardBus Express Card Slot Display LCD Type Brightness Video Controller VRAM LCD CRT Support Getting Started PTT Approval --- MDC interface IEEE 802.11a/b/g O2 OZ711MP1 MMC/SD/MS/MS Pro/MS Dual/XD 6 in one card reader x1 Type II x 1 Support Express Card Slot x 1 14" TFT/200nits Wide Screen Brightness controlled by K/B hot-keys nVidia NV44M-V 32MB 1280 x 768 WXGA 640x480, max. 32bit color 2-4

User Manual
Page 27
...) Win XP Home and Professional edition (SP2) Yes, USB floppy boot up DOS only Fast Boot Support --- Display to CRT - Display can scan CRT & LCD simultaneously if both are detected and activate. only if no CRT detected; 3. Yes (Win XP) x 1 WHQL --- S425 Getting Started Display Detect Audio Sound Controller Sound Codec chip Internal Speaker SoundBlaster Software & BIOS Support OS USB Flash Boot BIOS Others Kensington Lock Hole Compliance 800x600, max. 32bit color 1024x768, max...
...) Win XP Home and Professional edition (SP2) Yes, USB floppy boot up DOS only Fast Boot Support --- Display to CRT - Display can scan CRT & LCD simultaneously if both are detected and activate. only if no CRT detected; 3. Yes (Win XP) x 1 WHQL --- S425 Getting Started Display Detect Audio Sound Controller Sound Codec chip Internal Speaker SoundBlaster Software & BIOS Support OS USB Flash Boot BIOS Others Kensington Lock Hole Compliance 800x600, max. 32bit color 1024x768, max...

User Manual
Page 29
... LCD screen displays the output of a full-sized 86-key (US-defined) keyboard. 7. Power Button Turn Notebook power ON and OFF. 6. Touchpad It is a bounce-back device to do works more efficient. Cover Latch (Internal View) It is the pointing device of the Notebook. 2-7 It helps you to lock the cover with the deck when closing . 3. Keyboard The built-in common use. Rubber Pads Protect your Notebook from random closing your Notebook. 2. Quick Launch Button Quick Launch Buttons...
... LCD screen displays the output of a full-sized 86-key (US-defined) keyboard. 7. Power Button Turn Notebook power ON and OFF. 6. Touchpad It is a bounce-back device to do works more efficient. Cover Latch (Internal View) It is the pointing device of the Notebook. 2-7 It helps you to lock the cover with the deck when closing . 3. Keyboard The built-in common use. Rubber Pads Protect your Notebook from random closing your Notebook. 2. Quick Launch Button Quick Launch Buttons...

User Manual
Page 31
... Notebook is recommended to replace a new battery. S425 Getting Started 3. Status LED Battery Status: Glowing green when the battery is enabled. When Wireless LAN & Bluetooth function enabled in the same time, green light & blue light blinks in low battery status. Microphone: Used for an external audio device. Glowing orange when the battery is disconnected. Battery LED goes out when recharging is done or when the AC adapter is in turn. 2-9 Headphones: A connector for speakers or headphones. Audio Port Connectors Make high quality sound...
... Notebook is recommended to replace a new battery. S425 Getting Started 3. Status LED Battery Status: Glowing green when the battery is enabled. When Wireless LAN & Bluetooth function enabled in the same time, green light & blue light blinks in low battery status. Microphone: Used for an external audio device. Glowing orange when the battery is disconnected. Battery LED goes out when recharging is done or when the AC adapter is in turn. 2-9 Headphones: A connector for speakers or headphones. Audio Port Connectors Make high quality sound...

User Manual
Page 33
... connect a LAN cable for a great view of the Notebook display. 3. Power Connector To connect the AC adapter and supply power for air circulation. 4. VGA Port The 15-pin-D-sub VGA port allows you to connect a television (NTSC/PAL system) to connect an external monitor or other standard VGA-compatible device (such as a computer display. 5. S-Video Connector By using a Super VHS (S-Video) cable, this connector allows you to use as a projector) for network connection. 2-11 S425...
... connect a LAN cable for a great view of the Notebook display. 3. Power Connector To connect the AC adapter and supply power for air circulation. 4. VGA Port The 15-pin-D-sub VGA port allows you to connect a television (NTSC/PAL system) to connect an external monitor or other standard VGA-compatible device (such as a computer display. 5. S-Video Connector By using a Super VHS (S-Video) cable, this connector allows you to use as a projector) for network connection. 2-11 S425...

User Manual
Page 36
The optical device allows you purchased. Kensington Lock Hole This is available in the Notebook, depending on the Notebook. 4. Optical Storage Device A slim CD-ROM/DVD-ROM/CD-RW/DVD Combo/DVD Dual drive is used to lock the Notebook to use the CD/DVD disc for installing software, accessing data and playing music/movie on the model you to location for security 2-14 S425 Getting Started 3.
The optical device allows you purchased. Kensington Lock Hole This is available in the Notebook, depending on the Notebook. 4. Optical Storage Device A slim CD-ROM/DVD-ROM/CD-RW/DVD Combo/DVD Dual drive is used to lock the Notebook to use the CD/DVD disc for installing software, accessing data and playing music/movie on the model you to location for security 2-14 S425 Getting Started 3.

User Manual
Page 45
... waste officials for details about recycling options or for a period of battery. w Only replace the main battery pack with the same or equivalent type of time. Keep them to conserve power. If the battery power is critical to maintain a normal operation. w Connect an AC adapter to help optimizing battery life and avoid a sudden power loss. w Disable unneeded settings or remove idle peripherals to temperatures above +60...
... waste officials for details about recycling options or for a period of battery. w Only replace the main battery pack with the same or equivalent type of time. Keep them to conserve power. If the battery power is critical to maintain a normal operation. w Connect an AC adapter to help optimizing battery life and avoid a sudden power loss. w Disable unneeded settings or remove idle peripherals to temperatures above +60...
User Manual
Page 53
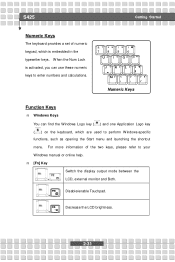
... Num Lock is embedded in the typewriter keys. n [Fn] Key Switch the display output mode between the + LCD, external monitor and Both. Disable/enable Touchpad. + Decrease the LCD brightness. + 2-31 Numeric Keys Function Keys n Windows Keys You can use these numeric keys to enter numbers and calculations. For more information of numeric keypad, which is activated, you can find the Windows Logo key ( ) and one Application Logo key ( ) on the keyboard, which are used to perform Windows-specific functions, such as opening the Start menu...
... Num Lock is embedded in the typewriter keys. n [Fn] Key Switch the display output mode between the + LCD, external monitor and Both. Disable/enable Touchpad. + Decrease the LCD brightness. + 2-31 Numeric Keys Function Keys n Windows Keys You can use these numeric keys to enter numbers and calculations. For more information of numeric keypad, which is activated, you can find the Windows Logo key ( ) and one Application Logo key ( ) on the keyboard, which are used to perform Windows-specific functions, such as opening the Start menu...
User Manual
Page 65
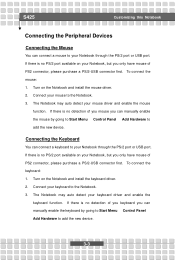
... Notebook through the PS/2 port or USB port. Turn on the Notebook and install the mouse driver. 2. S425 Customizing this Notebook Connecting the Peripheral Devices Connecting the Mouse You can connect a keyboard to your Notebook through the PS/2 port or USB port. If there is no PS/2 port available on your Notebook, but you can manually enable the keyboard by going to Start Menu à Control Panel à Add Hardware to add the new device. 3-3 To connect the mouse: 1. Turn on the Notebook and install the keyboard driver. 2. To connect the keyboard...
... Notebook through the PS/2 port or USB port. Turn on the Notebook and install the mouse driver. 2. S425 Customizing this Notebook Connecting the Peripheral Devices Connecting the Mouse You can connect a keyboard to your Notebook through the PS/2 port or USB port. If there is no PS/2 port available on your Notebook, but you can manually enable the keyboard by going to Start Menu à Control Panel à Add Hardware to add the new device. 3-3 To connect the mouse: 1. Turn on the Notebook and install the keyboard driver. 2. To connect the keyboard...
User Manual
Page 66
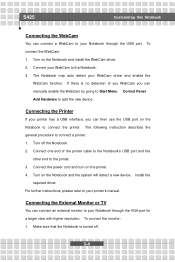
... enable the WebCam function. Connecting the External Monitor or TV You can connect an external monitor to your Notebook through the USB port. Connect the power cord and turn on the Notebook and the system will detect a new device. To connect the monitor: 1. The Notebook may auto detect your printer's manual. The following instruction describes the general procedure to the printer. 3. Connect one end of you WebCam you can then use the USB port on the Notebook and install the WebCam driver. 2. Make...
... enable the WebCam function. Connecting the External Monitor or TV You can connect an external monitor to your Notebook through the USB port. Connect the power cord and turn on the Notebook and the system will detect a new device. To connect the monitor: 1. The Notebook may auto detect your printer's manual. The following instruction describes the general procedure to the printer. 3. Connect one end of you WebCam you can then use the USB port on the Notebook and install the WebCam driver. 2. Make...

User Manual
Page 67
...-generation serial bus that you can switch the display mode by configuring the settings in Display Properties of your Notebook. 3-5 If not, you to connect many high-end peripheral devices and consumer electronic appliances, such as the DV (digital video camera). To connect the IEEE 1394 device, simply connect the cable of the device to 63 devices, allowing you can change the display mode by pressing [Fn]+[F2]. S425 Customizing this Notebook 2. Connect the monitor's power...
...-generation serial bus that you can switch the display mode by configuring the settings in Display Properties of your Notebook. 3-5 If not, you to connect many high-end peripheral devices and consumer electronic appliances, such as the DV (digital video camera). To connect the IEEE 1394 device, simply connect the cable of the device to 63 devices, allowing you can change the display mode by pressing [Fn]+[F2]. S425 Customizing this Notebook 2. Connect the monitor's power...
User Manual
Page 68
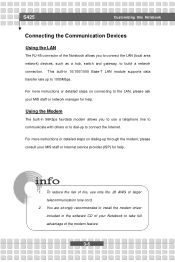
.... 2. You are strongly recommended to install the modem driver included in 10/100/1000 Base-T LAN module supports data transfer rate up to 1000Mbps. S425 Customizing this Notebook Connecting the Communication Devices Using the LAN The RJ-45 connector of fire, use a telephone line to communicate with others or to dial-up to connect the Internet. For more instructions or detailed steps on dialing-up...
.... 2. You are strongly recommended to install the modem driver included in 10/100/1000 Base-T LAN module supports data transfer rate up to 1000Mbps. S425 Customizing this Notebook Connecting the Communication Devices Using the LAN The RJ-45 connector of fire, use a telephone line to communicate with others or to dial-up to connect the Internet. For more instructions or detailed steps on dialing-up...
User Manual
Page 77
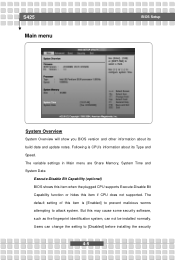
... [Disabled] before installing the security 4-5 Execute-Disable Bit Capability (optional) BIOS shows this item when the plugged CPU supports Execute-Disable Bit Capability function or hides this may cause some security software, such as the fingerprint identification system, can change the setting to attack system. The default setting of this item is CPU's information about its Type and Speed. But this item if CPU does not supported. S425 Main menu BIOS Setup...
... [Disabled] before installing the security 4-5 Execute-Disable Bit Capability (optional) BIOS shows this item when the plugged CPU supports Execute-Disable Bit Capability function or hides this may cause some security software, such as the fingerprint identification system, can change the setting to attack system. The default setting of this item is CPU's information about its Type and Speed. But this item if CPU does not supported. S425 Main menu BIOS Setup...

User Manual
Page 83
... Setup. About Supervisor Password and User Password Supervisor Password allows the user to enter and change the settings of BIOS password protection that is disabled, the system will boot and you are described below: Setup The password prompt appears only when end users try to specify the type of the setup menu; The Password Check item is used to run Setup. Once the password is implemented. S425 BIOS Setup and Password Check will be added in the User Access...
... Setup. About Supervisor Password and User Password Supervisor Password allows the user to enter and change the settings of BIOS password protection that is disabled, the system will boot and you are described below: Setup The password prompt appears only when end users try to specify the type of the setup menu; The Password Check item is used to run Setup. Once the password is implemented. S425 BIOS Setup and Password Check will be added in the User Access...

