
Getting Started Guide
Page 11
... switch Important 1. Mainboard photos shown in this section are correctly inserted. The appearance of your CPU socket pin with the plastic cap covered (shown in BIOS (Chapter 3). 2. Read the CPU status in Figure 1) to fasten the cooler. Press the four hooks down the load lever lightly onto the load plate, and...
... switch Important 1. Mainboard photos shown in this section are correctly inserted. The appearance of your CPU socket pin with the plastic cap covered (shown in BIOS (Chapter 3). 2. Read the CPU status in Figure 1) to fasten the cooler. Press the four hooks down the load lever lightly onto the load plate, and...

Getting Started Guide
Page 18
... is opened, the chassis intrusion mechanism will record this status and show a warning message on the screen. To clear the warning, you must enter the BIOS utility and clear the record. SPDIFO GND JSP1 (2pin, for digital audio transmission. GND L R JCD1 2-13 CINTRU 1 GND 2 JCI1 S/PDIF-Out Connector: JSP1 (2pin, 3pin...
... is opened, the chassis intrusion mechanism will record this status and show a warning message on the screen. To clear the warning, you must enter the BIOS utility and clear the record. SPDIFO GND JSP1 (2pin, for digital audio transmission. GND L R JCD1 2-13 CINTRU 1 GND 2 JCI1 S/PDIF-Out Connector: JSP1 (2pin, 3pin...
Getting Started Guide
Page 24
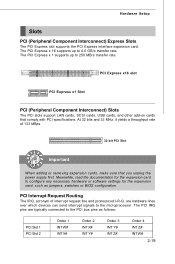
... and 33 MHz, it yields a throughput rate of interrupt request line and pronounced I-R-Q, are typically connected to the PCI bus pins as jumpers, switches or BIOS configuration. PCI Express x16 slot PCI Express x1 Slot PCI (Peripheral Component Interconnect) Slots The PCI slots support LAN cards, SCSI cards, USB cards, and...
... and 33 MHz, it yields a throughput rate of interrupt request line and pronounced I-R-Q, are typically connected to the PCI bus pins as jumpers, switches or BIOS configuration. PCI Express x16 slot PCI Express x1 Slot PCI (Peripheral Component Interconnect) Slots The PCI slots support LAN cards, SCSI cards, USB cards, and...
Getting Started Guide
Page 26
You may need to run SETUP. ² You want to configure the system for customized features. 3-1 Chapter 3 BIOS Setup BIOS Setup This chapter provides information on the screen during the system booting up, and requests you to run the Setup program when: ² An error message appears on the BIOS Setup program and allows you to change the default settings for optimum use.
You may need to run SETUP. ² You want to configure the system for customized features. 3-1 Chapter 3 BIOS Setup BIOS Setup This chapter provides information on the screen during the system booting up, and requests you to run the Setup program when: ² An error message appears on the BIOS Setup program and allows you to change the default settings for optimum use.
Getting Started Guide
Page 27
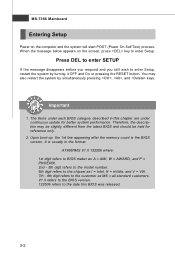
... or pressing the RESET button. Upon boot-up, the 1st line appearing after the memory count is usually in this BIOS was released. 3-2 V1.0 refers to the BIOS version. 122506 refers to enter Setup, restart the system by simultaneously pressing , , and keys. Press DEL to enter... continuous update for reference only. 2. You may be slightly different from the latest BIOS and should be held for better system performance. The items under each BIOS category described in the format: A7366NMS V1.0 122506 where: 1st digit refers to BIOS maker as A = AMI, W = AWARD, and P = PHOENIX. 2nd...
... or pressing the RESET button. Upon boot-up, the 1st line appearing after the memory count is usually in this BIOS was released. 3-2 V1.0 refers to the BIOS version. 122506 refers to enter Setup, restart the system by simultaneously pressing , , and keys. Press DEL to enter... continuous update for reference only. 2. You may be slightly different from the latest BIOS and should be held for better system performance. The items under each BIOS category described in the format: A7366NMS V1.0 122506 where: 1st digit refers to BIOS maker as A = AMI, W = AWARD, and P = PHOENIX. 2nd...

Getting Started Guide
Page 28
You can call up this field. Sub-M enu If you can be launched from this screen from any menu by simply pressing . General Help The BIOS setup program provides a General Help screen. You can use the arrow keys ( -¯ ) to select the item. You can make changes Load Optimized Defaults Load... control keys to enter values and move from field to field within a sub-menu. Press to use and the possible selections for a field parameter. BIOS Setup Control Keys Enter> Move to the previous item Move to the next item Move to the item in the right hand Select the item...
You can call up this field. Sub-M enu If you can be launched from this screen from any menu by simply pressing . General Help The BIOS setup program provides a General Help screen. You can use the arrow keys ( -¯ ) to select the item. You can make changes Load Optimized Defaults Load... control keys to enter values and move from field to field within a sub-menu. Press to use and the possible selections for a field parameter. BIOS Setup Control Keys Enter> Move to the previous item Move to the next item Move to the item in the right hand Select the item...

Getting Started Guide
Page 29
... integrated peripherals. MS-7366 Mainboard The Main Menu Standard CMOS Features Use this menu for stable system performance. 3-4 Advanced BIOS Features Use this menu to load the default values set by the BIOS vendor for basic system configurations, such as time, date etc. PnP/PCI Configurations This entry appears if your system...
... integrated peripherals. MS-7366 Mainboard The Main Menu Standard CMOS Features Use this menu for stable system performance. 3-4 Advanced BIOS Features Use this menu to load the default values set by the BIOS vendor for basic system configurations, such as time, date etc. PnP/PCI Configurations This entry appears if your system...

Getting Started Guide
Page 30
BIOS Setting Password Use this menu to load the default values set the password for optimal performance of the mainboard. BIOS Setup Load Optimized Defaults Use this menu to set by the mainboard manufacturer specifically for BIOS. Exit Without Saving Abandon all changes and exit setup. 3-5 Save & Exit Setup Save changes to CMOS and exit setup.
BIOS Setting Password Use this menu to load the default values set the password for optimal performance of the mainboard. BIOS Setup Load Optimized Defaults Use this menu to set by the mainboard manufacturer specifically for BIOS. Exit Without Saving Abandon all changes and exit setup. 3-5 Save & Exit Setup Save changes to CMOS and exit setup.
Getting Started Guide
Page 31
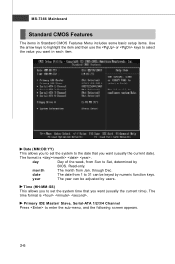
... the item and then use the or keys to select the value you want (usually the current date). year The year can be adjusted by BIOS. day Day of the week, from 1 to 31 can be keyed by numeric function keys. Primary IDE Master/ Slave, Serial-ATA 1/2/3/4 Channel Press to set...
... the item and then use the or keys to select the value you want (usually the current date). year The year can be adjusted by BIOS. day Day of the week, from 1 to 31 can be keyed by numeric function keys. Primary IDE Master/ Slave, Serial-ATA 1/2/3/4 Channel Press to set...
Getting Started Guide
Page 32
BIOS Setup Device/Vendor/Size/LBA Mode/Block Mode/PIO M ode/Async DM A/Ultra DM A/S.M .A.R.T . Important Primary IDE M aster/ Slave, Serial-ATA 1/2/3/4 Channel are appearing when ...
BIOS Setup Device/Vendor/Size/LBA Mode/Block Mode/PIO M ode/Async DM A/Ultra DM A/S.M .A.R.T . Important Primary IDE M aster/ Slave, Serial-ATA 1/2/3/4 Channel are appearing when ...

Getting Started Guide
Page 33
This sub-menu shows the CPU information, BIOS version and memory status of floppy drives installed. MS-7366 Mainboard Floppy Drive A This item allows you to enter the sub-menu, and the following screen appears. System Information Press to set the type of your system (read only). 3-8 Available options: [None], [360 KB, 5.25 in.], [1.2 MB, 5.25 in.], [720 KB, 3.5 in.], [1.44 MB, 3.5 in.], [2.88 MB, 3.5 in.].
This sub-menu shows the CPU information, BIOS version and memory status of floppy drives installed. MS-7366 Mainboard Floppy Drive A This item allows you to enter the sub-menu, and the following screen appears. System Information Press to set the type of your system (read only). 3-8 Available options: [None], [360 KB, 5.25 in.], [1.2 MB, 5.25 in.], [720 KB, 3.5 in.], [1.44 MB, 3.5 in.], [2.88 MB, 3.5 in.].

Getting Started Guide
Page 34
... APIC mode. Settings are: [Enabled] Shows a still image (logo) on the numeric keypad. IOAPIC Function This field is powered on. Advanced BIOS Features BIOS Setup Boot Sector Protection W hen you to show a warning message on . Full Screen Logo Display This item enables you enable this item and ...someone attempt to write data into this area, BIOS will show the company logo on the bootup screen. Quick Boot Setting the item to [Enabled] allows the system to boot within 10 ...
... APIC mode. Settings are: [Enabled] Shows a still image (logo) on the numeric keypad. IOAPIC Function This field is powered on. Advanced BIOS Features BIOS Setup Boot Sector Protection W hen you to show a warning message on . Full Screen Logo Display This item enables you enable this item and ...someone attempt to write data into this area, BIOS will show the company logo on the bootup screen. Quick Boot Setting the item to [Enabled] allows the system to boot within 10 ...
Getting Started Guide
Page 35
... Sequence Press to enter the sub-menu: 1st/ 2nd/ 3rd Boot Device The items allow you to set the first/ second/ third boot device where BIOS attempts to enable/disable the TCG/TPM. 3-10 if the system fails to enter the sub-menu: HPET The HPET (High Precision Event Timers) is...
... Sequence Press to enter the sub-menu: 1st/ 2nd/ 3rd Boot Device The items allow you to set the first/ second/ third boot device where BIOS attempts to enable/disable the TCG/TPM. 3-10 if the system fails to enter the sub-menu: HPET The HPET (High Precision Event Timers) is...
Getting Started Guide
Page 36
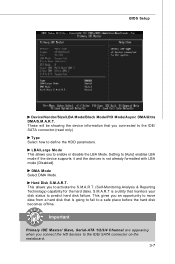
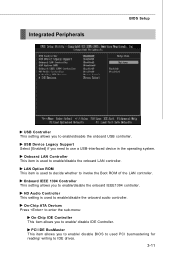
... used to enable/disable the onboard audio controller. PCI IDE BusMaster This item allows you to enable/disable the onboard IEEE1394 controller. Integrated Peripherals BIOS Setup USB Controller This setting allows you to enable/ disable IDE Controller. Onboard LAN Controller This item is used PCI busmastering for reading/ writing to ...
... used to enable/disable the onboard audio controller. PCI IDE BusMaster This item allows you to enable/disable the onboard IEEE1394 controller. Integrated Peripherals BIOS Setup USB Controller This setting allows you to enable/ disable IDE Controller. Onboard LAN Controller This item is used PCI busmastering for reading/ writing to ...
Getting Started Guide
Page 38
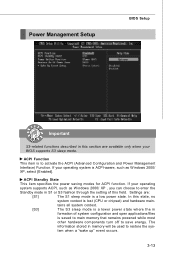
.... The information stored in S1 or S3 fashion through the setting of system configuration and open applications/files is a low power state. Power Management Setup BIOS Setup Important S3-related functions described in formation of this state, no system context is to restore the sys- If your...
.... The information stored in S1 or S3 fashion through the setting of system configuration and open applications/files is a low power state. Power Management Setup BIOS Setup Important S3-related functions described in formation of this state, no system context is to restore the sys- If your...
Getting Started Guide
Page 40
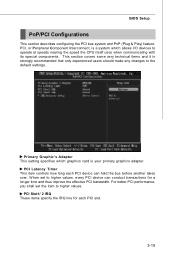
... Slot1/ 2 IRQ These items specify the IRQ line for each PCI device can conduct transactions for a longer time and thus improve the effective PCI bandwidth. BIOS Setup PnP/PCI Configurations This section describes configuring the PCI bus system and PnP (Plug & Play) feature. W hen set the item to operate at speeds...
... Slot1/ 2 IRQ These items specify the IRQ line for each PCI device can conduct transactions for a longer time and thus improve the effective PCI bandwidth. BIOS Setup PnP/PCI Configurations This section describes configuring the PCI bus system and PnP (Plug & Play) feature. W hen set the item to operate at speeds...
Getting Started Guide
Page 41
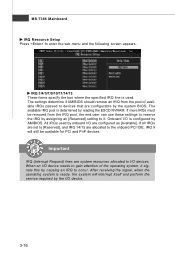
..., when the operating system is determined by the I/O device. 3-16 MS-7366 Mainboard IRQ Resource Setup Press to devices that are configurable by the system BIOS. The settings determine if AMIBIOS should remove an IRQ from the IRQ pool, the end user can use these settings to reserve the IRQ by...
..., when the operating system is determined by the I/O device. 3-16 MS-7366 Mainboard IRQ Resource Setup Press to devices that are configurable by the system BIOS. The settings determine if AMIBIOS should remove an IRQ from the IRQ pool, the end user can use these settings to reserve the IRQ by...
Getting Started Guide
Page 42
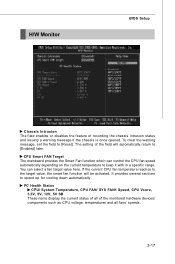
... fan speed automatically depending on the current temperature to keep it with in a specific range. If the current CPU fan temperature reaches to [Reset]. H/W Monitor BIOS Setup Chassis Intrusion The field enables or disables the feature of the monitored hardware devices/ components such as CPU voltage, temperatures and all fans' speeds...
... fan speed automatically depending on the current temperature to keep it with in a specific range. If the current CPU fan temperature reaches to [Reset]. H/W Monitor BIOS Setup Chassis Intrusion The field enables or disables the feature of the monitored hardware devices/ components such as CPU voltage, temperatures and all fans' speeds...

Getting Started Guide
Page 44
...) This field controls the SDRAM command rate. Specifies the active-to cells. Allows sense amplifiers to restore data to -active delay of the active row. BIOS Setup tCL (CAS Latency) W hen the Memory Timings sets to [Manual], the field is adjustable. tWR W hen the Memory Timings sets to [Manual], the field...
...) This field controls the SDRAM command rate. Specifies the active-to cells. Allows sense amplifiers to restore data to -active delay of the active row. BIOS Setup tCL (CAS Latency) W hen the Memory Timings sets to [Manual], the field is adjustable. tWR W hen the Memory Timings sets to [Manual], the field...

Getting Started Guide
Page 46
The Optimized Defaults are the default values set by the BIOS vendor for optimal performance of the BIOS settings to load the BIOS default values for the most stable, minimal system performance. W hen you select Load Optimized Defaults, a message as below appears: Select [OK] and ...press Enter to load the default factory settings for optimal system performance. 3-21 BIOS Setup Load Fail-Safe/ Optimized Defaults The two options on the main menu allow users to restore all of the mainboard. The Fail-Safe Defaults...
The Optimized Defaults are the default values set by the BIOS vendor for optimal performance of the BIOS settings to load the BIOS default values for the most stable, minimal system performance. W hen you select Load Optimized Defaults, a message as below appears: Select [OK] and ...press Enter to load the default factory settings for optimal system performance. 3-21 BIOS Setup Load Fail-Safe/ Optimized Defaults The two options on the main menu allow users to restore all of the mainboard. The Fail-Safe Defaults...


