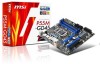
User Guide
Page 2
...Our products are the properties of their respective owners. ■ MSI® is registered trademark of Micro-Star Int'l Co.,Ltd. ■ NVIDIA® is registered ...trademark of NVIDIA Corporation. ■ ATI® is registered trademark of ATI Technologies, Inc. ■ AMD® is registered trademarks of AMD Corporation. ■ Intel® is registered trademarks of Intel... technical guide, BIOS updates, driver updates, and other information: http://www.msi.com/index.php?func=service ◙ Contact our technical staff ...
...Our products are the properties of their respective owners. ■ MSI® is registered trademark of Micro-Star Int'l Co.,Ltd. ■ NVIDIA® is registered ...trademark of NVIDIA Corporation. ■ ATI® is registered trademark of ATI Technologies, Inc. ■ AMD® is registered trademarks of AMD Corporation. ■ Intel® is registered trademarks of Intel... technical guide, BIOS updates, driver updates, and other information: http://www.msi.com/index.php?func=service ◙ Contact our technical staff ...
User Guide
Page 9
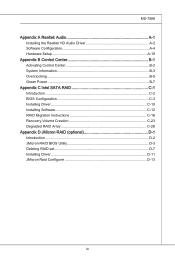
... Configuration A-4 Hardware Setup A-19 Appendix B Control Center B-1 Activating Control Center B-2 System Information B-3 Overclocking B-5 Green Power B-7 Appendix C Intel SATA RAID C-1 Introduction C-2 BIOS Configuration C-3 Installing Driver C-10 Installing Software C-12 RAID Migration Instructions C-16 Recovery Volume Creation C-23 Degraded RAID Array C-26 Appendix D JMicron RAID (optional D-1 Introduction D-2 JMicron RAID BIOS Utility D-3 ...
... Configuration A-4 Hardware Setup A-19 Appendix B Control Center B-1 Activating Control Center B-2 System Information B-3 Overclocking B-5 Green Power B-7 Appendix C Intel SATA RAID C-1 Introduction C-2 BIOS Configuration C-3 Installing Driver C-10 Installing Software C-12 RAID Migration Instructions C-16 Recovery Volume Creation C-23 Degraded RAID Array C-26 Appendix D JMicron RAID (optional D-1 Introduction D-2 JMicron RAID BIOS Utility D-3 ...

User Guide
Page 15
Packing Checklist MS-7588 MSI mainboard MSI Driver/Utility DVD SATA Cable (Optional) Power Cable USB Bracket (Optional) Standard Cable for IDE Devices (optional) Back IO Shield CrossFireX Video Link Cable Multi-GPU Link Card User's Guide * The pictures are for reference only and may vary from the packing contents of the product you purchased. 1-5
Packing Checklist MS-7588 MSI mainboard MSI Driver/Utility DVD SATA Cable (Optional) Power Cable USB Bracket (Optional) Standard Cable for IDE Devices (optional) Back IO Shield CrossFireX Video Link Cable Multi-GPU Link Card User's Guide * The pictures are for reference only and may vary from the packing contents of the product you purchased. 1-5

User Guide
Page 40
... settings, please refer to remove one graphics card and quit the function, make sure the "MultiGPU" function is completed, restart the system and install the driver/utility. A configuration panel will show in the system tray confirming the Multi-GPU has been enabled. ▍ Hardware Setup 2.
... settings, please refer to remove one graphics card and quit the function, make sure the "MultiGPU" function is completed, restart the system and install the driver/utility. A configuration panel will show in the system tray confirming the Multi-GPU has been enabled. ▍ Hardware Setup 2.

User Guide
Page 58
▍ BIOS Setup BIOS Setting Password ▶ U-Key This item is used to enable/ disable USB driver device as a key. ▶ Make U-Key at This item is used to specify the USB driver device as a key. ▶ Change Supervisor Password This item is used to set the supervisor password. ▶ Change User Password This item is used to set the user password. 3-16
▍ BIOS Setup BIOS Setting Password ▶ U-Key This item is used to enable/ disable USB driver device as a key. ▶ Make U-Key at This item is used to specify the USB driver device as a key. ▶ Change Supervisor Password This item is used to set the supervisor password. ▶ Change User Password This item is used to set the user password. 3-16
User Guide
Page 74
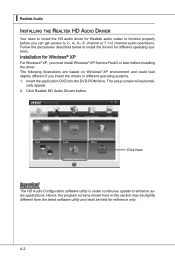
... channel audio operations. The following illustrations are based on Windows® XP environment and could look slightly different if you install the drivers in this section may be slightly different from the latest software utility and shall be held for reference only. cally appear. 2. ... 4-, 6-, 8- Click here Important The HD Audio Configuration software utility is under continuous update to function properly before installing the driver. The setup screen will automati- Insert the application DVD into the DVD-ROM drive. A-2 Follow the procedures described below to install the...
... channel audio operations. The following illustrations are based on Windows® XP environment and could look slightly different if you install the drivers in this section may be slightly different from the latest software utility and shall be held for reference only. cally appear. 2. ... 4-, 6-, 8- Click here Important The HD Audio Configuration software utility is under continuous update to function properly before installing the driver. The setup screen will automati- Insert the application DVD into the DVD-ROM drive. A-2 Follow the procedures described below to install the...

User Guide
Page 75
Click here Select this option Click here Click here A-3 Click Next to restart the system. MS-7588 4. Click Finish to install the Realtek High Definition Audio Driver. 3.
Click here Select this option Click here Click here A-3 Click Next to restart the system. MS-7588 4. Click Finish to install the Realtek High Definition Audio Driver. 3.

User Guide
Page 76
or 8- Click the audio icon from the Control Panel. channel audio feature now. Double click A-4 ▍ Realtek Audio Software Configuration After installing the audio driver, you are able to activate the HD Audio Configuration. It is also available to enable the audio driver by clicking the Realtek HD Audio Manager from the system tray at the lower-right corner of the screen to use the 2-, 4-, 6-
or 8- Click the audio icon from the Control Panel. channel audio feature now. Double click A-4 ▍ Realtek Audio Software Configuration After installing the audio driver, you are able to activate the HD Audio Configuration. It is also available to enable the audio driver by clicking the Realtek HD Audio Manager from the system tray at the lower-right corner of the screen to use the 2-, 4-, 6-

User Guide
Page 90
You may also select the language of . Right-click on and an icon will appear which provides several multimedia features for you to take advantage of this HD Audio Configuration utility, including Audio Driver Version, DirectX Version, Audio Controller & Audio Codec. Also there is a selection Show icon in the system tray. A-18 ▍ Realtek Audio Information In this tab it on the icon and the Audio Accessories dialogue box will show in system tray. Switch it provides some information about this utility by choosing from the Language list.
You may also select the language of . Right-click on and an icon will appear which provides several multimedia features for you to take advantage of this HD Audio Configuration utility, including Audio Driver Version, DirectX Version, Audio Controller & Audio Codec. Also there is a selection Show icon in the system tray. A-18 ▍ Realtek Audio Information In this tab it on the icon and the Audio Accessories dialogue box will show in system tray. Switch it provides some information about this utility by choosing from the Language list.
User Guide
Page 94
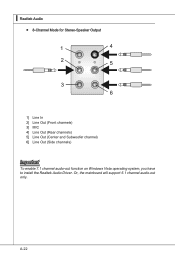
Or, the mainboard will support 5.1 channel audio-out only. ▍ Realtek Audio ■ 8-Channel Mode for Stereo-Speaker Output 1] Line In 2] Line Out (Front channels) 3] MIC 4] Line Out (Rear channels) 5] Line Out (Center and Subwoofer channel) 6] Line Out (Side channels) Important To enable 7.1 channel audio-out function on Windows Vista operating system, you have to install the Realtek Audio Driver. A-22
Or, the mainboard will support 5.1 channel audio-out only. ▍ Realtek Audio ■ 8-Channel Mode for Stereo-Speaker Output 1] Line In 2] Line Out (Front channels) 3] MIC 4] Line Out (Rear channels) 5] Line Out (Center and Subwoofer channel) 6] Line Out (Side channels) Important To enable 7.1 channel audio-out function on Windows Vista operating system, you have to install the Realtek Audio Driver. A-22
User Guide
Page 114
... f6flpy 32 or f6flpy 64 to insert a floppy disk containing the Intel® RAID driver into the DVD-ROM drive. • Click the "Browse DVD" on "Load Driver" button to supply the driver. ▍ Intel SATA RAID Installing Driver Install Driver in Windows Vista / XP ■ New Windows Vista / XP ...in the right place and are ready to install a third party SCSI or RAID driver. 5. The next screen should be prompted to a formatted floppy diskette. • The driver diskette for yourself. • Insert the MSI DVD into the A: drive. If this is done. 4. If this is formatted...
... f6flpy 32 or f6flpy 64 to insert a floppy disk containing the Intel® RAID driver into the DVD-ROM drive. • Click the "Browse DVD" on "Load Driver" button to supply the driver. ▍ Intel SATA RAID Installing Driver Install Driver in Windows Vista / XP ■ New Windows Vista / XP ...in the right place and are ready to install a third party SCSI or RAID driver. 5. The next screen should be prompted to a formatted floppy diskette. • The driver diskette for yourself. • Insert the MSI DVD into the A: drive. If this is done. 4. If this is formatted...

User Guide
Page 115
... "+" in front of the SCSI and RAID Controllers hardware type. Insert the MSI DVD into the DVD-ROM drive. 2. The driver Intel(R) PCH SATA RAID Controller should appear. C-11 Under the Driver tab, click on Intel RAID Drivers. 4. MS-7588 ■ Existing Windows Vista/ XP Driver Installation 1. The DVD will auto-run and the setup screen will...
... "+" in front of the SCSI and RAID Controllers hardware type. Insert the MSI DVD into the DVD-ROM drive. 2. The driver Intel(R) PCH SATA RAID Controller should appear. C-11 Under the Driver tab, click on Intel RAID Drivers. 4. MS-7588 ■ Existing Windows Vista/ XP Driver Installation 1. The DVD will auto-run and the setup screen will...
User Guide
Page 116
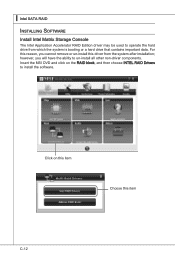
...system is booting or a hard drive that contains important data. Click on the RAID block, and then choose INTEL RAID Drivers to install the software. Insert the MSI DVD and click on this item Choose this reason, you will have the ability to operate the hard drive from... the system after installation; ▍ Intel SATA RAID Installing Software Install Intel Matrix Storage Console The Intel Application Accelerator RAID Edition driver may be used ...
...system is booting or a hard drive that contains important data. Click on the RAID block, and then choose INTEL RAID Drivers to install the software. Insert the MSI DVD and click on this item Choose this reason, you will have the ability to operate the hard drive from... the system after installation; ▍ Intel SATA RAID Installing Software Install Intel Matrix Storage Console The Intel Application Accelerator RAID Edition driver may be used ...
User Guide
Page 120
BIOS must be recovered. Install the Intel Application Accelerator RAID Driver during the migration process, the data on installing the driver during Windows Setup. 3. To create a volume from an existing disk, complete the following steps: Important A "Create from Existing Disk" operation will delete all important data ...
BIOS must be recovered. Install the Intel Application Accelerator RAID Driver during the migration process, the data on installing the driver during Windows Setup. 3. To create a volume from an existing disk, complete the following steps: Important A "Create from Existing Disk" operation will delete all important data ...

User Guide
Page 135
The RAID Utility menu screen will be displayed. Delete RAID Disk Drive - Save And Exit Setup - Hard Disk Driver List The menu shows the model number and capacities of each section is lost. Delete a legacy RAID set . Sovle a mirror conflict. A brief description... of the drives physically attached to the SATAII & PATA ports. Exit Without Saving - D-3 Create a new legacy RAID set . Rebuild Mirror Drive - RAID Disk Driver List The menu shows the current configuration of RAID set RAID mode for the JMicron 36x ATA Controller in BIOS before configuring the JMicron BIOS...
The RAID Utility menu screen will be displayed. Delete RAID Disk Drive - Save And Exit Setup - Hard Disk Driver List The menu shows the model number and capacities of each section is lost. Delete a legacy RAID set . Sovle a mirror conflict. A brief description... of the drives physically attached to the SATAII & PATA ports. Exit Without Saving - D-3 Create a new legacy RAID set . Rebuild Mirror Drive - RAID Disk Driver List The menu shows the current configuration of RAID set RAID mode for the JMicron 36x ATA Controller in BIOS before configuring the JMicron BIOS...

User Guide
Page 139
Press "Y" to delete. MS-7588 2. In the RAID Disk Driver List menu, use key to select the RAID set 1. D-7 Select "Delete RAID Disk Drive". Then press . Then press key. 3. Deleting RAID set you want to accept the deletion when a deletion message is appeared.
Press "Y" to delete. MS-7588 2. In the RAID Disk Driver List menu, use key to select the RAID set 1. D-7 Select "Delete RAID Disk Drive". Then press . Then press key. 3. Deleting RAID set you want to accept the deletion when a deletion message is appeared.

User Guide
Page 140
▍ JMicron RAID Revert HDD to non-RAID Select "Revert HDD to revert then click key. In the Hard Disk Driver List menu use key to select the disks you perform this operation. • Possible reasons to "Revert HDD to non-RAID" could include issues such as incompatible RAID configurations or a failed volume or failed disk. Important • You will lose all data on the RAID drives and any RAID structures from the drives. The following screen appears, press key to remove any internal RAID structures when you want to non-RAID" and press . D-8
▍ JMicron RAID Revert HDD to non-RAID Select "Revert HDD to revert then click key. In the Hard Disk Driver List menu use key to select the disks you perform this operation. • Possible reasons to "Revert HDD to non-RAID" could include issues such as incompatible RAID configurations or a failed volume or failed disk. Important • You will lose all data on the RAID drives and any RAID structures from the drives. The following screen appears, press key to remove any internal RAID structures when you want to non-RAID" and press . D-8
User Guide
Page 141
This option allows you to set as source drive. In the Hard Disk Driver List menu use key to select the disks you want to set the source drive and rebuild the Mirror drive according to begin rebuilding the ...
This option allows you to set as source drive. In the Hard Disk Driver List menu use key to select the disks you want to set the source drive and rebuild the Mirror drive according to begin rebuilding the ...
User Guide
Page 143
...floppy drive until the system reboots itself. Press ENTER again to select "Specify Additional Device". 3. Windows setup will need to supply the driver. D-11 counter a message stating, "Setup could not determine the type of available SCSI Adapters. 6. If this is formatted, and Windows...files. For Windows Vista: After selecting the location to a formatted floppy drive. • The driver diskette for yourself. • Insert the MSI DVD into the A: drive. MS-7588 Installing Driver Install Driver in Windows Vista / XP ■ New Windows Vista / XP Installation The following details the...
...floppy drive until the system reboots itself. Press ENTER again to select "Specify Additional Device". 3. Windows setup will need to supply the driver. D-11 counter a message stating, "Setup could not determine the type of available SCSI Adapters. 6. If this is formatted, and Windows...files. For Windows Vista: After selecting the location to a formatted floppy drive. • The driver diskette for yourself. • Insert the MSI DVD into the A: drive. MS-7588 Installing Driver Install Driver in Windows Vista / XP ■ New Windows Vista / XP Installation The following details the...

User Guide
Page 144
... from My Computer followed by the System icon. 2. Click the "+" in front of the SCSI and RAID Controllers hardware type. Under the Driver tab, click on JMicron JMB362 Drivers. 4. Insert the MSI DVD into the DVD-ROM drive. 2. The DVD will auto-run and the setup screen will be automatically installed. ■ Confirming...
... from My Computer followed by the System icon. 2. Click the "+" in front of the SCSI and RAID Controllers hardware type. Under the Driver tab, click on JMicron JMB362 Drivers. 4. Insert the MSI DVD into the DVD-ROM drive. 2. The DVD will auto-run and the setup screen will be automatically installed. ■ Confirming...


