User Guide
Page 2
...the user's manual, please contact your place of purchase or local distributor. Our products are the properties of their respective owners. ■ MSI® is registered trademark of Micro-Star Int'l Co.,Ltd. ■ NVIDIA® is registered trademark of NVIDIA Corporation. ■..., Inc. ■ AMD® is registered trademarks of AMD Corporation. ■ Intel® is registered trademarks of Intel Corporation. ■ Windows® is registered trademarks of Microsoft Corporation. ■ AMI® is registered trademark of American Megatrends Inc. ■ Award® is a...
...the user's manual, please contact your place of purchase or local distributor. Our products are the properties of their respective owners. ■ MSI® is registered trademark of Micro-Star Int'l Co.,Ltd. ■ NVIDIA® is registered trademark of NVIDIA Corporation. ■..., Inc. ■ AMD® is registered trademarks of AMD Corporation. ■ Intel® is registered trademarks of Intel Corporation. ■ Windows® is registered trademarks of Microsoft Corporation. ■ AMI® is registered trademark of American Megatrends Inc. ■ Award® is a...
User Guide
Page 41
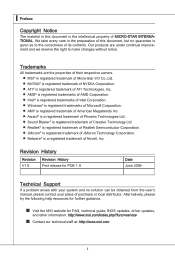
...) Technology ATI CrossFireXTM is required to connect the golden fingers on the top of the graphics card. • Only Windows®XP with Service Pack 2 (SP2)& Windows®XP Professional x64 Edition & Windows®Vista support the CrossFireXTM function. 2-25 With two cards installed, an CrossFireXTM Video Link cable is the ultimate multi...
...) Technology ATI CrossFireXTM is required to connect the golden fingers on the top of the graphics card. • Only Windows®XP with Service Pack 2 (SP2)& Windows®XP Professional x64 Edition & Windows®Vista support the CrossFireXTM function. 2-25 With two cards installed, an CrossFireXTM Video Link cable is the ultimate multi...

User Guide
Page 48
... LED Panel Please refer to the table below to OS Loader (typically INT 19H). Displaying sign-on and first initialize CPU. Enter OS (Vista or Windows® XP). 2-32 Post FF C0, C1, C2 C4, C6 D4, D5 08 2A, 31 37 38 3C 75, 78 87 A4 A7 B1 00...
... LED Panel Please refer to the table below to OS Loader (typically INT 19H). Displaying sign-on and first initialize CPU. Enter OS (Vista or Windows® XP). 2-32 Post FF C0, C1, C2 C4, C6 D4, D5 08 2A, 31 37 38 3C 75, 78 87 A4 A7 B1 00...

User Guide
Page 60
If your operating system is ACPI-aware, such as Windows 2000/ XP, you can choose to enter the Standby mode in S1(POS) or S3(STR) fashion through the setting of system configuration and open ... S3-related functions described in this section are : [S1] The S1 sleep mode is a low power state. If your operating system supports ACPI, such as Windows 98SE/ 2000/ ME/ XP, select [Enabled]. ▶ ACPI Standby State This item specifies the power saving modes for ACPI function. tem's context. [S3] The S3...
If your operating system is ACPI-aware, such as Windows 2000/ XP, you can choose to enter the Standby mode in S1(POS) or S3(STR) fashion through the setting of system configuration and open ... S3-related functions described in this section are : [S1] The S1 sleep mode is a low power state. If your operating system supports ACPI, such as Windows 98SE/ 2000/ ME/ XP, select [Enabled]. ▶ ACPI Standby State This item specifies the power saving modes for ACPI function. tem's context. [S3] The S3...

User Guide
Page 82
The following illustrations are based on Windows® XP environment and could look slightly different if you can get access to 2-, 4-, 6-, 8- Insert the application DVD into the DVD-ROM drive. Hence, the ... systems. 1. The setup screen will automati- Follow the procedures described below to install the drivers for different operating systems. Installation for Windows® XP For Windows® XP, you must install Windows® XP Service Pack3 or later before you install the drivers in this section may be slightly different from the latest...
The following illustrations are based on Windows® XP environment and could look slightly different if you can get access to 2-, 4-, 6-, 8- Insert the application DVD into the DVD-ROM drive. Hence, the ... systems. 1. The setup screen will automati- Follow the procedures described below to install the drivers for different operating systems. Installation for Windows® XP For Windows® XP, you must install Windows® XP Service Pack3 or later before you install the drivers in this section may be slightly different from the latest...

User Guide
Page 89
A-9 Then you are playing the first audio source (for example: use Windows Media Player to play DVD/VCD), the output will come out from the rear panel, which is the default setting. You will find that the second audio source (MP3 music) will be played from the Line-Out audio jack of Front Panel. MS-7581 When you must to select the Realtek HD Audio 2nd output from the scroll list first, and use a different program to play the second audio source (for example: use Winamp to play MP3 files).
A-9 Then you are playing the first audio source (for example: use Windows Media Player to play DVD/VCD), the output will come out from the rear panel, which is the default setting. You will find that the second audio source (MP3 music) will be played from the Line-Out audio jack of Front Panel. MS-7581 When you must to select the Realtek HD Audio 2nd output from the scroll list first, and use a different program to play the second audio source (for example: use Winamp to play MP3 files).

User Guide
Page 102
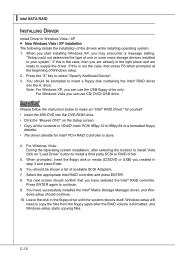
A-22 ▍ Realtek Audio ■ 8-Channel Mode for Stereo-Speaker Output 1] Line In 2] Line Out (Front channels) 3] MIC 4] Line Out (Rear channels) 5] Line Out (Center and Subwoofer channel) 6] Line Out (Side channels) Important To enable 7.1 channel audio-out function on Windows Vista operating system, you have to install the Realtek Audio Driver. Or, the mainboard will support 5.1 channel audio-out only.
A-22 ▍ Realtek Audio ■ 8-Channel Mode for Stereo-Speaker Output 1] Line In 2] Line Out (Front channels) 3] MIC 4] Line Out (Rear channels) 5] Line Out (Center and Subwoofer channel) 6] Line Out (Side channels) Important To enable 7.1 channel audio-out function on Windows Vista operating system, you have to install the Realtek Audio Driver. Or, the mainboard will support 5.1 channel audio-out only.

User Guide
Page 103
Appendix B Control Center Control Center, the most useful and powerful utility that MSI has spent much research and efforts to develop, helps users to monitor or configure the hardware status of MSI Mainboard in windows, such as CPU clock, voltage, fan speed and temperature. B-B-1 Before you install the Control Center, please make sure the system has meet the following requirements: 1. 256MB system memory. 2. Operation system: Windows XP or up. DVD-ROM drive for software installation. 3.
Appendix B Control Center Control Center, the most useful and powerful utility that MSI has spent much research and efforts to develop, helps users to monitor or configure the hardware status of MSI Mainboard in windows, such as CPU clock, voltage, fan speed and temperature. B-B-1 Before you install the Control Center, please make sure the system has meet the following requirements: 1. 256MB system memory. 2. Operation system: Windows XP or up. DVD-ROM drive for software installation. 3.

User Guide
Page 116
C-4 Select option 1 Create RAID Volume" and press key. The following window will appear: ■ Create RAID Volume 1. Then in RAID Level. ▍ Intel SATA RAID After pressing the and keys simultaneously, the following screen appears. Use the arrow keys to select the RAID level best suited to your usage model in the Name field, specify a RAID Volume name and then press the or key to go to the next field. 2.
C-4 Select option 1 Create RAID Volume" and press key. The following window will appear: ■ Create RAID Volume 1. Then in RAID Level. ▍ Intel SATA RAID After pressing the and keys simultaneously, the following screen appears. Use the arrow keys to select the RAID level best suited to your usage model in the Name field, specify a RAID Volume name and then press the or key to go to the next field. 2.

User Guide
Page 119
Then press key to RAID and you can delete the RAID volume, but please be noted that all data on RAID drives will become unbootable. C-7 Important If your system will be lost. MS-7581 ■ Delete RAID Volume Here you delete the RAID volume in the Intel RAID Option ROM, your system currently boots to delete the selected RAID volume. Select option 2 Delete RAID Volume from the main menu window and press key to accept the volume deletion. Press key to select a RAID volume for deletion. The following screen appears.
Then press key to RAID and you can delete the RAID volume, but please be noted that all data on RAID drives will become unbootable. C-7 Important If your system will be lost. MS-7581 ■ Delete RAID Volume Here you delete the RAID volume in the Intel RAID Option ROM, your system currently boots to delete the selected RAID volume. Select option 2 Delete RAID Volume from the main menu window and press key to accept the volume deletion. Press key to select a RAID volume for deletion. The following screen appears.
User Guide
Page 122
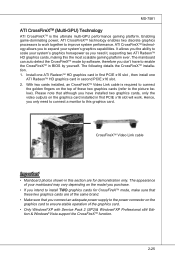
... key to continue. 9. Important Please follow the instruction below to make an "Intel® RAID Driver" for yourself. • Insert the MSI DVD into the A: drive. Select the appropriate Intel RAID controller and press ENTER. 8. Press ENTER again to select "Specify Additional Device". 3. ...driver. 5. C-10 If this is not the case, then press F6 when prompted at the beginning of available SCSI Adapters. 7. For Windows Vista: During the Operating system installation, after the RAID volume is the case, then you have successfully installed the Intel® Matrix ...
... key to continue. 9. Important Please follow the instruction below to make an "Intel® RAID Driver" for yourself. • Insert the MSI DVD into the A: drive. Select the appropriate Intel RAID controller and press ENTER. 8. Press ENTER again to select "Specify Additional Device". 3. ...driver. 5. C-10 If this is not the case, then press F6 when prompted at the beginning of available SCSI Adapters. 7. For Windows Vista: During the Operating system installation, after the RAID volume is the case, then you have successfully installed the Intel® Matrix ...
User Guide
Page 123
Insert the MSI DVD into the DVD-ROM drive. 2. From Windows Vista/ XP, open the Control Panel from My Computer followed by the System icon. 2. Under the Driver tab, click on Intel RAID Drivers. 4. Choose the ... appear. 3. The driver Intel(R) PCH SATA RAID Controller should appear. The DVD will auto-run and the setup screen will be automatically installed. ■ Confirming Windows Vista/ XP Driver Installation 1. MS-7581 ■ Existing...
Insert the MSI DVD into the DVD-ROM drive. 2. From Windows Vista/ XP, open the Control Panel from My Computer followed by the System icon. 2. Under the Driver tab, click on Intel RAID Drivers. 4. Choose the ... appear. 3. The driver Intel(R) PCH SATA RAID Controller should appear. The DVD will auto-run and the setup screen will be automatically installed. ■ Confirming Windows Vista/ XP Driver Installation 1. MS-7581 ■ Existing...

User Guide
Page 125
MS-7581 The InstallShield Wizard will begin automatically for installation showed as following: Click on the Next button to proceed the installation in the welcoming window. C-13
MS-7581 The InstallShield Wizard will begin automatically for installation showed as following: Click on the Next button to proceed the installation in the welcoming window. C-13

User Guide
Page 126
Click Next button to continue. After reading the license agreement in the following window, click Yes button to continue. ▍ Intel SATA RAID The window shows the components to be installed. C-14
Click Next button to continue. After reading the license agreement in the following window, click Yes button to continue. ▍ Intel SATA RAID The window shows the components to be installed. C-14

User Guide
Page 127
It shows the system requirements and installation information. C-15 Once the installation is complete, the following window appears to show the Readme File Information. MS-7581 The following window appears.
It shows the system requirements and installation information. C-15 Once the installation is complete, the following window appears to show the Readme File Information. MS-7581 The following window appears.

User Guide
Page 128
...process will appear: C-16 Install the Intel Application Accelerator RAID Driver during the migration process, the data on the added disk before installing Windows on the Intel Application Accelerator shortcut link (Start --> All Programs --> Intel Matrix Storage Manager --> Intel Matrix Storage Console) and the ...to the system. Refer to backup all existing data from an existing disk. However, during Windows Setup. To create a volume from an existing disk, complete the following window will create a new RAID volume from the added disk and the data cannot be configured ...
...process will appear: C-16 Install the Intel Application Accelerator RAID Driver during the migration process, the data on the added disk before installing Windows on the Intel Application Accelerator shortcut link (Start --> All Programs --> Intel Matrix Storage Manager --> Intel Matrix Storage Console) and the ...to the system. Refer to backup all existing data from an existing disk. However, during Windows Setup. To create a volume from an existing disk, complete the following window will create a new RAID volume from the added disk and the data cannot be configured ...

User Guide
Page 134
A dialogue window will appear stating that the migration process may take considerable time to complete, meanwhile a popup dialogue at the taskbar will also show the migration status. ...
A dialogue window will appear stating that the migration process may take considerable time to complete, meanwhile a popup dialogue at the taskbar will also show the migration status. ...

User Guide
Page 138
... to the current situation. C-26 taneously during the Power-On Self Test (POST). 4. Missing Hard Drive Member 1. Reconnect the hard drive. 3. Reboot the system to Windows; Select the port of its hard drive members fails or is temporarily disconnected, and data mirroring is lost. Reboot the system to Intel RAID Option...
... to the current situation. C-26 taneously during the Power-On Self Test (POST). 4. Missing Hard Drive Member 1. Reconnect the hard drive. 3. Reboot the system to Windows; Select the port of its hard drive members fails or is temporarily disconnected, and data mirroring is lost. Reboot the system to Intel RAID Option...

User Guide
Page 139
C-27 The Intel(R) Storage Utility will be launched which will be launched. MS-7581 5. Exit Intel RAID Option ROM, and then reboot to this Disk'. Right-click the new hard drive and select 'Rebuild to Windows system. 6. When prompted to the new hard drive. The 'Rebuild Wizard' will guide you through the process of rebuilding to rebuild the RAID volume, click 'Yes'. 7.
C-27 The Intel(R) Storage Utility will be launched which will be launched. MS-7581 5. Exit Intel RAID Option ROM, and then reboot to this Disk'. Right-click the new hard drive and select 'Rebuild to Windows system. 6. When prompted to the new hard drive. The 'Rebuild Wizard' will guide you through the process of rebuilding to rebuild the RAID volume, click 'Yes'. 7.

User Guide
Page 144
▍ Driver Booster Manager View SATA Drive Information Click the "Drive Booster Information" button and the information of all hard disks will find SATA drive information. You may click the item "Controller" you will find "Drive Booster Information" button Or you may click the SATA drive item just below the item "Controller" you will display on the right side of the window. D-4
▍ Driver Booster Manager View SATA Drive Information Click the "Drive Booster Information" button and the information of all hard disks will find SATA drive information. You may click the item "Controller" you will find "Drive Booster Information" button Or you may click the SATA drive item just below the item "Controller" you will display on the right side of the window. D-4


