

User Guide
Page 12
MS-9258 Server Button 8 System ID Button 9 Power Button Press this button once to shut down the system, and then once to switch on. 10 System Reset Button Front Bezel LEDs LED Power LAN1/LAN2 Activity Color Blue Blue Off Green Green State On Blink Off On Blink Description Legacy power on/ACPI S0 state Sleep/ACPI S1, S4, S5 state Power off LAN link LAN access activity 1-4
MS-9258 Server Button 8 System ID Button 9 Power Button Press this button once to shut down the system, and then once to switch on. 10 System Reset Button Front Bezel LEDs LED Power LAN1/LAN2 Activity Color Blue Blue Off Green Green State On Blink Off On Blink Description Legacy power on/ACPI S0 state Sleep/ACPI S1, S4, S5 state Power off LAN link LAN access activity 1-4

User Guide
Page 27
JAPP3 Pin Definition PIN SIGNAL PIN 1 Power LED + 2 3 Power LED - 4 5 Power Button + 6 7 PowerButton - 8 9 ID LED + 10 11 ID LED - 12 13 ID Button + 14 15 ID Button - 16 17 HDD LED + 18 19 +5VSB 20 SIGNAL SYS_LED + SYS_LED LAN1_LED + LAN1_LED LAN2_LED + LAN2_LED Reset + Reset HDD LED +5VSB 2-11 Hardware Setup Front Panel ...
JAPP3 Pin Definition PIN SIGNAL PIN 1 Power LED + 2 3 Power LED - 4 5 Power Button + 6 7 PowerButton - 8 9 ID LED + 10 11 ID LED - 12 13 ID Button + 14 15 ID Button - 16 17 HDD LED + 18 19 +5VSB 20 SIGNAL SYS_LED + SYS_LED LAN1_LED + LAN1_LED LAN2_LED + LAN2_LED Reset + Reset HDD LED +5VSB 2-11 Hardware Setup Front Panel ...

User Guide
Page 35
Unscrew the chassis cover. Lift the chassis cover up to remove it from the chassis. 3. Important Before you remove or install any components, make sure the server is not turned on or connected to replace the chassis cover if nec es s ar y. Press the release button and slide the chassis cover backwards to remove it from the chassis. 4. System Assembly Chassis Cover 1. Hardware Setup 2. Follow the above procedures in reverse order to the AC power. 2-19
Unscrew the chassis cover. Lift the chassis cover up to remove it from the chassis. 3. Important Before you remove or install any components, make sure the server is not turned on or connected to replace the chassis cover if nec es s ar y. Press the release button and slide the chassis cover backwards to remove it from the chassis. 4. System Assembly Chassis Cover 1. Hardware Setup 2. Follow the above procedures in reverse order to the AC power. 2-19

User Guide
Page 41
Hard Disk Drive 1. To release the hot-swapping HDD tray, first press the release button. Unscrew and remove the HDD tray. 2-25 Pull the tray lever outwards and gently pull the tray out of the bay. 2 1 3. Hardware Setup 2.
Hard Disk Drive 1. To release the hot-swapping HDD tray, first press the release button. Unscrew and remove the HDD tray. 2-25 Pull the tray lever outwards and gently pull the tray out of the bay. 2 1 3. Hardware Setup 2.

User Guide
Page 50
... should be held for better system performance. Therefore, the description may also restart the system by turning it OFF and On or pressing the RESET button. Upon boot-up, the 1st line appearing after the memory count is usually in this BIOS was released. 3-2 W hen the message below appears on the...
... should be held for better system performance. Therefore, the description may also restart the system by turning it OFF and On or pressing the RESET button. Upon boot-up, the 1st line appearing after the memory count is usually in this BIOS was released. 3-2 W hen the message below appears on the...
User Guide
Page 83
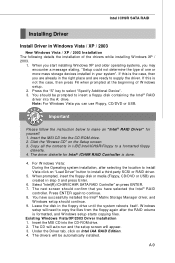
...RAID Edition. 4. Press ENTER again to copy the files from the floppy again after selecting the location to install Vista click on "Load Driver" button to insert a floppy disk containing the Intel® RAID driver into the A: drive. Leave the disk in Windows Vista / XP / 2003 &#...8224; New Windows Vista / XP / 2003 Installation The following details the installation of W indows setup. 2. Insert the MSI CD into the CD-ROM drive. 2. A-9 Note: For W indows Vista you have successfully installed the Intel® Matrix Storage Manager driver, and W indows ...
...RAID Edition. 4. Press ENTER again to copy the files from the floppy again after selecting the location to install Vista click on "Load Driver" button to insert a floppy disk containing the Intel® RAID driver into the A: drive. Leave the disk in Windows Vista / XP / 2003 &#...8224; New Windows Vista / XP / 2003 Installation The following details the installation of W indows setup. 2. Insert the MSI CD into the CD-ROM drive. 2. A-9 Note: For W indows Vista you have successfully installed the Intel® Matrix Storage Manager driver, and W indows ...

User Guide
Page 86
MS-9258 Server The InstallShield Wizard will begin automatically for installation showed as following: Click on the Next button to proceed the installation in the welcoming window. A-12
MS-9258 Server The InstallShield Wizard will begin automatically for installation showed as following: Click on the Next button to proceed the installation in the welcoming window. A-12

User Guide
Page 87
Intel ICH9R SATA RAID The window shows the components to continue. A-13 After reading the license agreement in the following window, click Yes button to be installed. Click Next button to continue.
Intel ICH9R SATA RAID The window shows the components to continue. A-13 After reading the license agreement in the following window, click Yes button to be installed. Click Next button to continue.

User Guide
Page 90
The Create RAID Volume from Existing Hard Drive. Click Next to View --> Basic mode and click it. Note: The "Action" button only appears in advance mode. To enable the advance mode, go to continue. A-16 MS-9258 Server Create RAID Volume from Existing Disk To create a RAID volume from an existing disk, choose Action --> Create RAID Volume from Existing Hard Drive Wizard pops up to lead you for the following procedure.
The Create RAID Volume from Existing Hard Drive. Click Next to View --> Basic mode and click it. Note: The "Action" button only appears in advance mode. To enable the advance mode, go to continue. A-16 MS-9258 Server Create RAID Volume from Existing Disk To create a RAID volume from an existing disk, choose Action --> Create RAID Volume from Existing Hard Drive Wizard pops up to lead you for the following procedure.
