MSI K1 Support and Manuals
Get Help and Manuals for this MSI item

MSI K1 Videos

LG BTY-M52 computer batteries, LG K1 Series MSI GX710 Series Laptop battery
Duration: :24
Total Views: 124
Duration: :24
Total Views: 124
MSI BTY-L71, K1-222DR , MEDION MD95597 Laptop Battery
Duration: :24
Total Views: 30
Duration: :24
Total Views: 30
MSI Global Night - K1
Duration: 2:53
Total Views: 15
Duration: 2:53
Total Views: 15
Popular MSI K1 Manual Pages
User Guide - Page 3
... Corporation. Visit the MSI website for further guidance.
We take every care in this document, but no solution can be obtained from the user's manual, please contact your place... for FAQ, technical guide, BIOS updates, driver updates, and other information: http://www.msi.com.tw/program/service/faq/ faq/esc_faq_list.php
Contact our technical staff at: support@msi.com.tw
iii Copyright...
User Guide - Page 4
... Power Cord before setting it up. 5....instructions carefully. 2. Keep this equipment away from overheating. All cautions and warnings on a reliable flat surface before inserting any add-on the enclosure are for future reference. 3. Replace only with the same or equivalent type recommended by a service...Safety Instructions
1. h The equipment has not work according to
User's Manual.
...
User Guide - Page 5
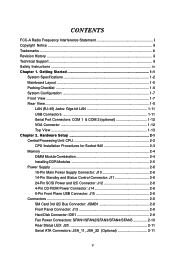
Hardware Setup 2-1 Central Processing Unit: CPU 2-2 CPU Installation Procedures for Socket 940 2-3 Memory ...2-4 DIMM Module Combination 2-4 Installing DDR ... Notice ...iii Trademarks ...iii Revision History ...iii Technical Support ...iii Safety Instructions ...iv Chapter 1. Getting Started 1-1
System Specifications 1-2 Mainboard Layout 1-5 Packing Checklist 1-6 System Configuration 1-7...
User Guide - Page 8
... Server
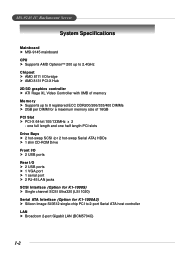
System Specifications
Mainboard h MSI-9145 mainboard
CPU h Supports AMD OpteronTM 200 up to 8 registered ECC DDR200/266/333/400 DIMMs h 2GB per DIMM for K1-1000A2) h Silicon Image SiI3512 single-chip PCI to 2.4GHz
Chipset h AMD 8111 I /O h 2 USB ports h 1 VGA port h 1 serial port h 2 RJ-45 LAN jacks
SCSI Interface (Option for K1-1000S) h Single channel...
User Guide - Page 23

... single-
or double-sided modules to a maximum size of 2GB.
You can install either one or two DIMM modules on Slot 5 ~ 8, CPU2 must be installed. MS-9245 1U Rackmount Server
Memory
The mainboard supports up to eight registered ECC DDR200/266/333/400 DIMMs providing up to meet your own needs. Use Slot...
User Guide - Page 30

... Serial ATA cable
Connect to 2-port Serial ATA host controller.
Hardware Setup
Rear Status LED: J20
The LED shows the error and power status. Error LED (Amber) Power LED (Green)
Serial ATA Connectors: JSA_11, JSA_22 (Optional)
The mainboard provides optional Serial ATA connectors supported by Silicon Image Sil3512 single-chip PCI to JSA_11/JSA_22...
User Guide - Page 32
Hardware Setup
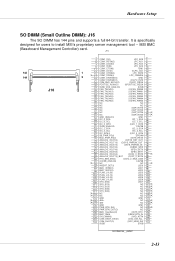
SO DIMM (Small Outline DIMM): J16
The SO DIMM has 144 pins and supports a full 64-bit transfer. It is specifically designed for users to install MSI's proprietary server management tool -- J16
143 144
J16
1
2
3 5 7 9
COM1_DI(I) COM1_RST#(O) COM1_DCD#(I) COM1_RI#(I)
LPC_AD0 LPC_AD1 LPC_AD2 LPC_AD3
4 6 8 10
11 COM1_CTS#(I)
GND 12
1
13 15
COM1_DO(O) COM1_DTR#(O)
(I)...
User Guide - Page 34

One is full length and the other is half length. Hardware Setup
Slots
The motherboard provides two 64-bit PCI-X 100/133MHz slots. The PCI IRQ pins are hardware lines over which devices can send interrupt .... PCI Slots
Two PCI slots allow you unplug the power supply first. When adding or removing expansion cards, make any necessary hardware or software settings for AMD8111)
2-15
User Guide - Page 35
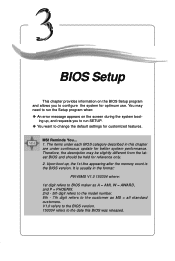
...settings for reference only. 2. MSI Reminds You... 1. It is the BIOS version. You may be slightly different from the latest BIOS and should be held for customized features. The items under continuous update for optimum use. BIOS Setup
BIOS Setup... to the model number. 6th - 7th digit refers to run the Setup program when: ” An error message appears on the BIOS Setup program and ...
User Guide - Page 38
... 551100MMBB
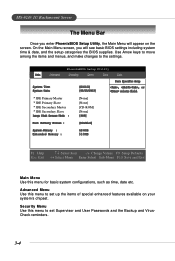
F1 Help
↑↓ Select Item -/+ Change Values F9 Setup Defaults
Esc Exit ↔ Select Menu Enter Sele8ct Sub-Menu F10 Save and Exit
Main Menu Use this menu to the settings.
Advanced Menu Use this menu to set Supervisor and User Passwords and the Backup and VirusCheck reminders.
3-4 MS-9245 1U Rackmount...
User Guide - Page 39

Exit Menu This menu allows you to specify your settings for power management. BIOS Setup Power Menu Use this menu to specify the priority of boot devices. Boot Menu Use this menu to load the BIOS default values or factory default settings into the BIOS and exit the BIOS setup utility with or without changes.
3-5
User Guide - Page 40

... includes none, one or more setup items. Use the Up/Down arrow keys or to highlight the item or field you want to modify and use the or key to switch to the value you can use [Manual] to define your own drive type manually. Note that the specifications of your hard disk drive...
User Guide - Page 44
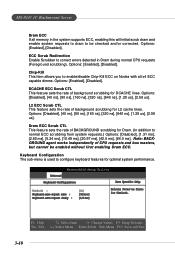
...supports ECC, enabling this will initial scrub dram and enable system requests to dram to correct errors detected in Dram during normal CPU requests (Foreground scrubbing). PhoenixBIOS Setup... Enable Scrubber to be enabled without first enabling Dram ECC. DCACHE ECC Scrub CTL This feature sets the rate of BACKGROUND scrubbing for L2 cache lines.
Chip-Kill This item allows you to ...
User Guide - Page 45
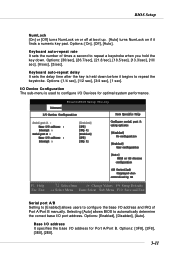
.... Options: [On], [Off], [Auto]. Keyboard auto-repeat rate It sets the number of Port A/Port B manually. Base I/O address It specifies the base I /O address and IRQ of...sec], [6/sec], [2/sec].
I /O Devices for Port A/Port B. PhoenixBIOS Setup Utility AAddvvaanncceedd II//OO DDeevviiccee CCoonnffiigguurraattiioonn
IItteemm SSppeecciiffiicc HHeellpp
SSeerriiaallppoorrttAA :: BBaassee II//OO...
User Guide - Page 49

... Help
↑↓ Select Item -/+ Change Values F9 Setup Defaults
Esc Exit ↔ Select Menu Enter Sele8ct Sub-Menu F10 Save and Exit
IPMI Specification Version It shows the support version of IPMI specification. (read only)
BMC Firmware Version It shows the current BMC firmware version. (read only)
Setting PEF Configuration Select this to view the contents...
MSI K1 Reviews
We have not received any reviews for MSI yet.