User Manual
Page 8
The model you are registered trademarks of the Personal Computer Memory Card International Association. PCMCIA and CardBus are not sure about these information, such as to make changes without notice. If you bought may be slightly different from the illustrations and descriptions in this guide is a ... AMI®is given as the computer specification and equipment, please ask your local vendor for help. Please note that the setting diagrams or values in the preparation of this guide are registered trademarks of their respective owners. Windows®98/ME, 2000/XP are FOR...
The model you are registered trademarks of the Personal Computer Memory Card International Association. PCMCIA and CardBus are not sure about these information, such as to make changes without notice. If you bought may be slightly different from the illustrations and descriptions in this guide is a ... AMI®is given as the computer specification and equipment, please ask your local vendor for help. Please note that the setting diagrams or values in the preparation of this guide are registered trademarks of their respective owners. Windows®98/ME, 2000/XP are FOR...

User Manual
Page 13
The Hard Disk Drive 43 Using the Optical Storage 44 Inserting the CD 45 Removing the CD 46 Releasing the CD Manually 47 Peripheral Device Connecting the External Devices 50 Connecting the Peripheral Devices 50 Connecting the Communication Devices 54 Using the LAN 54 Using the Modem 54 Installing the PC Card 56 Installing the PC card 56 Removing the PC card 57 Safely Remove Hardware 58 XIII
The Hard Disk Drive 43 Using the Optical Storage 44 Inserting the CD 45 Removing the CD 46 Releasing the CD Manually 47 Peripheral Device Connecting the External Devices 50 Connecting the Peripheral Devices 50 Connecting the Communication Devices 54 Using the LAN 54 Using the Modem 54 Installing the PC Card 56 Installing the PC card 56 Removing the PC card 57 Safely Remove Hardware 58 XIII
User Manual
Page 15
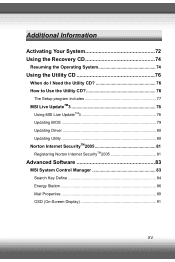
Additional Information Activating Your System 72 Using the Recovery CD 74 Resuming the Operating System 74 Using the Utility CD 76 When do I Need the Utility CD 76 How to Use the Utility CD 76 The Setup program includes 77 MSI Live UpdateTM3 78 Using MSI Live UpdateTM3 78 Updating BIOS 79 Updating Driver 80 Updating Utility 80 Norton Internet SecurityTM2005 81 Registering Norton Internet SecurityTM2005 81 Advanced Software 83 MSI System Control Manager 83 Search Key Define 84 Energy Station 86 Mail Properties 89 OSD (On-Screen Display 91 XV
Additional Information Activating Your System 72 Using the Recovery CD 74 Resuming the Operating System 74 Using the Utility CD 76 When do I Need the Utility CD 76 How to Use the Utility CD 76 The Setup program includes 77 MSI Live UpdateTM3 78 Using MSI Live UpdateTM3 78 Updating BIOS 79 Updating Driver 80 Updating Utility 80 Norton Internet SecurityTM2005 81 Registering Norton Internet SecurityTM2005 81 Advanced Software 83 MSI System Control Manager 83 Search Key Define 84 Energy Station 86 Mail Properties 89 OSD (On-Screen Display 91 XV

User Manual
Page 22
Yes (Win XP) x 1 WHQL --- Display can scan CRT & LCD simultaneously if both are detected and activate. y Audio Sound Controller Sound Codec chip Internal Speaker SoundBlaster Sound Volume y Software & BIOS Support OS USB Flash Boot BIOS y Other Kensington Lock Hole Compliance detected; 3. Embedded in Intel ICH6-M Realtek ALC655 2 Speakers with housing (AMP: TI TPA0202) SoundBlaster compatible (Not support DOS) Adjust by volume button, K/B hot-key & SW Win XP Home and Professional edition Yes, USB floppy boot up DOS only Fast Boot Support --- PC2001 6
Yes (Win XP) x 1 WHQL --- Display can scan CRT & LCD simultaneously if both are detected and activate. y Audio Sound Controller Sound Codec chip Internal Speaker SoundBlaster Sound Volume y Software & BIOS Support OS USB Flash Boot BIOS y Other Kensington Lock Hole Compliance detected; 3. Embedded in Intel ICH6-M Realtek ALC655 2 Speakers with housing (AMP: TI TPA0202) SoundBlaster compatible (Not support DOS) Adjust by volume button, K/B hot-key & SW Win XP Home and Professional edition Yes, USB floppy boot up DOS only Fast Boot Support --- PC2001 6

User Manual
Page 24
.... Quick Launch Buttons: Just one click on the quick launch buttons can fast the starting of the programs in keyboard provides all the functions of CPU/Hard Disk Drive/Memory is a bounce-back device to lock the cover with stereo system and Hi-Fi function supported. Stereo Speakers Make high quality sound blaster with the deck when closing . Quick Launch Buttons and Power Button Power Button: To turn your Notebook PC. Cover Latch (Internal View) It is under the keyboard panel...
.... Quick Launch Buttons: Just one click on the quick launch buttons can fast the starting of the programs in keyboard provides all the functions of CPU/Hard Disk Drive/Memory is a bounce-back device to lock the cover with stereo system and Hi-Fi function supported. Stereo Speakers Make high quality sound blaster with the deck when closing . Quick Launch Buttons and Power Button Power Button: To turn your Notebook PC. Cover Latch (Internal View) It is under the keyboard panel...

User Manual
Page 27
... when the AC Power is activated and blinking Blue when computer is enabled. Wireless LAN: Glowing Blue when wireless LAN function of the computer is getting into sleep mode. Hard Disk In-use: Blinking Blue when computer is activated. Scroll Lock: Glowing Blue when the Scroll Lock function is accessing the hard disk drive. Caps Lock: Glowing Blue when the Caps Lock function is in blue light means the status of being charged and blinking red is activated. Battery Status: Blinking Green when the...
... when the AC Power is activated and blinking Blue when computer is enabled. Wireless LAN: Glowing Blue when wireless LAN function of the computer is getting into sleep mode. Hard Disk In-use: Blinking Blue when computer is activated. Scroll Lock: Glowing Blue when the Scroll Lock function is accessing the hard disk drive. Caps Lock: Glowing Blue when the Caps Lock function is in blue light means the status of being charged and blinking red is activated. Battery Status: Blinking Green when the...

User Manual
Page 29
VGA Port The 15-pin-D-sub VGA port allows you to connect an external monitor or other standard VGA-compatible device (such as a projector) for the computer. 13 Power Connector To connect the AC adapter and supply power for a great view of the computer display.
VGA Port The 15-pin-D-sub VGA port allows you to connect an external monitor or other standard VGA-compatible device (such as a projector) for the computer. 13 Power Connector To connect the AC adapter and supply power for a great view of the computer display.

User Manual
Page 30
.... PC Card Slot The computer provides a PC card slot to use the CD/DVD disc for expansion functions, such as LAN/WLAN card, modem card, memory card, etc. 3 in 1 Card Reader The built-in the computer, depending on the computer. Left-side View Optical Storage Device A slim CD-ROM/DVD-ROM/CD-RW/DVD Combo/DVD Dual drive is reversely configured. USB Port This USB port is available in card reader supports MMC (multi-media card), SD (secure digital) and MS (memory stick) cards. 14...
.... PC Card Slot The computer provides a PC card slot to use the CD/DVD disc for expansion functions, such as LAN/WLAN card, modem card, memory card, etc. 3 in 1 Card Reader The built-in the computer, depending on the computer. Left-side View Optical Storage Device A slim CD-ROM/DVD-ROM/CD-RW/DVD Combo/DVD Dual drive is reversely configured. USB Port This USB port is available in card reader supports MMC (multi-media card), SD (secure digital) and MS (memory stick) cards. 14...

User Manual
Page 43
... operating system (such as Microsoft Windows XP in this manual) should start working with your Notebook PC. 27 You can start . TURNING ON THE NOTEBOOK PC Now, when the AC adapter is connected, the Notebook PC is called Power-On Self Test (POST). Adjust the top cover to the AC power. 2. Turning On the Computer 1. Press the power button ( ). When the computer is turned on, it will light glittering White to indicate...
... operating system (such as Microsoft Windows XP in this manual) should start working with your Notebook PC. 27 You can start . TURNING ON THE NOTEBOOK PC Now, when the AC adapter is connected, the Notebook PC is called Power-On Self Test (POST). Adjust the top cover to the AC power. 2. Turning On the Computer 1. Press the power button ( ). When the computer is turned on, it will light glittering White to indicate...

User Manual
Page 58
To configure the touchpad, you can use the standard Microsoft or IBM PS/2 driver in Control Panel allows you to change the size, shape, moving speed and other advanced features of the two buttons. In addition, you may want to meet your Windows operating system. The Mouse Properties in your personal needs. Mouse Properties Window 42 Configuring the Touchpad You can change the configuration. For example, if you are a left-hand user, you can customize the pointing device to swap the functions of the cursor on the screen.
To configure the touchpad, you can use the standard Microsoft or IBM PS/2 driver in Control Panel allows you to change the size, shape, moving speed and other advanced features of the two buttons. In addition, you may want to meet your Windows operating system. The Mouse Properties in your personal needs. Mouse Properties Window 42 Configuring the Touchpad You can change the configuration. For example, if you are a left-hand user, you can customize the pointing device to swap the functions of the cursor on the screen.

User Manual
Page 67
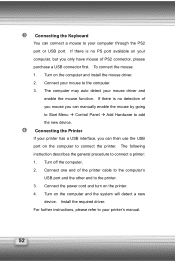
Connecting the Mouse You can connect a WebCam to your computer through the PS2 port or USB port. Turn on the computer and install the mouse driver. 2. To connect the WebCam: 1. Connect your mouse to add the new device. 51 If there is no detection of you WebCam you can manually enable the mouse by going to Start Menu Æ Control Panel Æ Add Hardware to the computer. 3. Connect your WebCam to add the new device. If there is no detection of...
Connecting the Mouse You can connect a WebCam to your computer through the PS2 port or USB port. Turn on the computer and install the mouse driver. 2. To connect the WebCam: 1. Connect your mouse to add the new device. 51 If there is no detection of you WebCam you can manually enable the mouse by going to Start Menu Æ Control Panel Æ Add Hardware to the computer. 3. Connect your WebCam to add the new device. If there is no detection of...
User Manual
Page 68
... can then use the USB port on the computer and the system will detect a new device. Turn off the computer. 2. Connect the power cord and turn on the computer and install the mouse driver. 2. Connect one end of you mouse you can manually enable the mouse by going to Start Menu Æ Control Panel Æ Add Hardware to add the new device. If there is no detection of the printer cable to the computer's USB port and...
... can then use the USB port on the computer and the system will detect a new device. Turn off the computer. 2. Connect the power cord and turn on the computer and install the mouse driver. 2. Connect one end of you mouse you can manually enable the mouse by going to Start Menu Æ Control Panel Æ Add Hardware to add the new device. If there is no detection of the printer cable to the computer's USB port and...

User Manual
Page 69
..., you can connect and remove the IEEE 1394 devices without turning off . 2. Alternately, you can connect an external monitor to the IEEE 1394 port of your computer through the VGA port for a larger view with higher resolution. To connect the IEEE 1394 device, simply connect the cable of the device to your computer. 53 Connecting the External Monitor You can switch the display mode by configuring the settings in Display Properties of Windows operating system.
..., you can connect and remove the IEEE 1394 devices without turning off . 2. Alternately, you can connect an external monitor to the IEEE 1394 port of your computer through the VGA port for a larger view with higher resolution. To connect the IEEE 1394 device, simply connect the cable of the device to your computer. 53 Connecting the External Monitor You can switch the display mode by configuring the settings in Display Properties of Windows operating system.
User Manual
Page 71
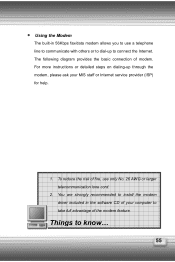
... more instructions or detailed steps on dialing-up to connect the Internet. You are strongly recommended to install the modem driver included in 56Kbps fax/data modem allows you to use only No. 26 AWG or larger telecommunication lone cord. 2. The following diagram provides the basic connection of the modem feature. Using the Modem The built-in the software CD...
... more instructions or detailed steps on dialing-up to connect the Internet. You are strongly recommended to install the modem driver included in 56Kbps fax/data modem allows you to use only No. 26 AWG or larger telecommunication lone cord. 2. The following diagram provides the basic connection of the modem feature. Using the Modem The built-in the software CD...

User Manual
Page 84
... run Setup. You can enter Setup without entering any password. To clear a set , the new item User Access Level and Password Check will be added in the User Access Level item. Once the password is set password, just press [Enter] when you can make changes. The Password Check item is used to specify the type of BIOS password protection that is powered on or when end users try to run Setup. User Password only allows the user to enter the setup menu, but...
... run Setup. You can enter Setup without entering any password. To clear a set , the new item User Access Level and Password Check will be added in the User Access Level item. Once the password is set password, just press [Enter] when you can make changes. The Password Check item is used to specify the type of BIOS password protection that is powered on or when end users try to run Setup. User Password only allows the user to enter the setup menu, but...

User Manual
Page 90
... instruction). Press the [Del] key on -screen instructions to complete the procedures. In the BIOS Setup Utility, set the CD/DVDVD-ROM drive as the first boot device (See Boot Menu in its original state. Insert the Recovery CD into the CD/DVD-ROM drive. Then, follow the on the keyboard to its original state. When the operating system of operating system and important data and can use the Recovery CD to restore the operating...
... instruction). Press the [Del] key on -screen instructions to complete the procedures. In the BIOS Setup Utility, set the CD/DVDVD-ROM drive as the first boot device (See Boot Menu in its original state. Insert the Recovery CD into the CD/DVD-ROM drive. Then, follow the on the keyboard to its original state. When the operating system of operating system and important data and can use the Recovery CD to restore the operating...
User Manual
Page 93
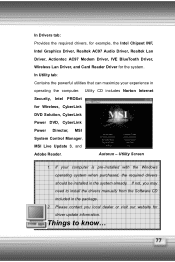
... Graphics Driver, Realtek AC97 Audio Driver, Realtek Lan Driver, Actiontec AC97 Modem Driver, IVE BlueTooth Driver, Wireless Lan Driver, and Card Reader Driver for driver update information. In Utility tab: Contains the powerful utilities that can maximize your computer is pre-installed with the Windows operating system when purchased, the required drivers should be installed in operating the computer. If not, you local dealer or visit our website for the system. Utility Screen 1. Utility CD includes Norton Internet Security...
... Graphics Driver, Realtek AC97 Audio Driver, Realtek Lan Driver, Actiontec AC97 Modem Driver, IVE BlueTooth Driver, Wireless Lan Driver, and Card Reader Driver for driver update information. In Utility tab: Contains the powerful utilities that can maximize your computer is pre-installed with the Windows operating system when purchased, the required drivers should be installed in operating the computer. If not, you local dealer or visit our website for the system. Utility Screen 1. Utility CD includes Norton Internet Security...
User Manual
Page 96
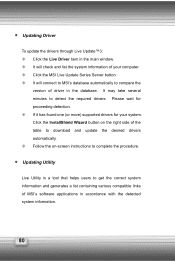
... and list the system information of MSI's software applications in the database. Click the InstallShield Wizard button on -screen instructions to download and update the desired drivers automatically. Please wait for your computer. If it has found one (or more) supported drivers for proceeding detection. Click the MSI Live Update Series Server button. Updating Driver To update the drivers through Live Update™3: Click the Live Driver item in the main window...
... and list the system information of MSI's software applications in the database. Click the InstallShield Wizard button on -screen instructions to download and update the desired drivers automatically. Please wait for your computer. If it has found one (or more) supported drivers for proceeding detection. Click the MSI Live Update Series Server button. Updating Driver To update the drivers through Live Update™3: Click the Live Driver item in the main window...

User Manual
Page 99
... your working. The three major functions of MSI System Control Manager --Search Key Define, Mail Properties and OSD (On-Screen Display) Function will be more interactive displays for Function Keys integrated. MSI System Control Manager is pre-installed in the Notebook PC when you buy it will provide you. When you turn on the right button of your Notebook PC. Advanced Software MSI System Control Manager It is a new generation and powerful tool of screen control with MSI SearchKey...
... your working. The three major functions of MSI System Control Manager --Search Key Define, Mail Properties and OSD (On-Screen Display) Function will be more interactive displays for Function Keys integrated. MSI System Control Manager is pre-installed in the Notebook PC when you buy it will provide you. When you turn on the right button of your Notebook PC. Advanced Software MSI System Control Manager It is a new generation and powerful tool of screen control with MSI SearchKey...

User Manual
Page 100
... After Search Key Defined installed, you can also click the Search Key button ( ) on the keyboard panel to use Search Key Define, you the status of Search Key on your keyboard panel. At the beginning, there is the first time to activate the Search Key Define. Without any search key defined, the default screen of clicking Search Key button will show the same as opening the function of Search Key Define...
... After Search Key Defined installed, you can also click the Search Key button ( ) on the keyboard panel to use Search Key Define, you the status of Search Key on your keyboard panel. At the beginning, there is the first time to activate the Search Key Define. Without any search key defined, the default screen of clicking Search Key button will show the same as opening the function of Search Key Define...


