User Manual
Page 1
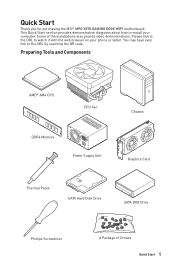
... Quick Start 1 Preparing Tools and Components AMD® AM4 CPU CPU Fan DDR4 Memory Power Supply Unit Chassis Graphics Card Thermal Paste SATA Hard Disk Drive SATA DVD Drive Phillips Screwdriver A Package of the installations also provide video demonstrations. You may have even link to install your phone or tablet. Please link to the URL to watch it with the web browser on your computer. This Quick Start section provides demonstration diagrams about...
... Quick Start 1 Preparing Tools and Components AMD® AM4 CPU CPU Fan DDR4 Memory Power Supply Unit Chassis Graphics Card Thermal Paste SATA Hard Disk Drive SATA DVD Drive Phillips Screwdriver A Package of the installations also provide video demonstrations. You may have even link to install your phone or tablet. Please link to the URL to watch it with the web browser on your computer. This Quick Start section provides demonstration diagrams about...
User Manual
Page 13
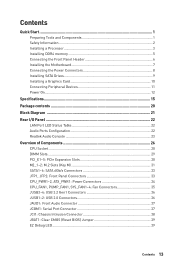
... Quick Start ...1 Preparing Tools and Components 1 Safety Information 2 Installing a Processor 3 Installing DDR4 memory 5 Connecting the Front Panel Header 6 Installing the Motherboard 7 Connecting the Power Connectors 8 Installing SATA Drives 9 Installing a Graphics Card 10 Connecting Peripheral Devices 11 Power On...12 Specifications...15 Package contents 20 Block Diagram ...21 Rear I/O Panel ...22 LAN Port LED Status Table 22 Audio Ports Configuration 22 Realtek Audio Console 23 Overview of Components 26 CPU Socket ...28 DIMM Slots...29 PCI_E1~5: PCIe Expansion Slots 30...
... Quick Start ...1 Preparing Tools and Components 1 Safety Information 2 Installing a Processor 3 Installing DDR4 memory 5 Connecting the Front Panel Header 6 Installing the Motherboard 7 Connecting the Power Connectors 8 Installing SATA Drives 9 Installing a Graphics Card 10 Connecting Peripheral Devices 11 Power On...12 Specifications...15 Package contents 20 Block Diagram ...21 Rear I/O Panel ...22 LAN Port LED Status Table 22 Audio Ports Configuration 22 Realtek Audio Console 23 Overview of Components 26 CPU Socket ...28 DIMM Slots...29 PCI_E1~5: PCIe Expansion Slots 30...
User Manual
Page 14
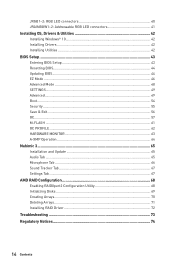
... 42 Installing Drivers 42 Installing Utilities 42 BIOS Setup ...43 Entering BIOS Setup 43 Resetting BIOS...44 Updating BIOS...44 EZ Mode ...46 Advanced Mode ...48 SETTINGS...49 Advanced...49 Boot...54 Security ...55 Save & Exit...56 OC...57 M-FLASH ...61 OC PROFILE ...62 HARDWARE MONITOR 63 A-XMP Operation 64 Nahimic 3 ...65 Installation and Update 65 Audio Tab ...65 Microphone Tab ...66 Sound Tracker Tab 67 Settings Tab ...67 AMD RAID Configuration 68 Enabling RAIDXpert2 Configuration Utility 68 Initializing Disks 69...
... 42 Installing Drivers 42 Installing Utilities 42 BIOS Setup ...43 Entering BIOS Setup 43 Resetting BIOS...44 Updating BIOS...44 EZ Mode ...46 Advanced Mode ...48 SETTINGS...49 Advanced...49 Boot...54 Security ...55 Save & Exit...56 OC...57 M-FLASH ...61 OC PROFILE ...62 HARDWARE MONITOR 63 A-XMP Operation 64 Nahimic 3 ...65 Installation and Update 65 Audio Tab ...65 Microphone Tab ...66 Sound Tracker Tab 67 Settings Tab ...67 AMD RAID Configuration 68 Enabling RAIDXpert2 Configuration Utility 68 Initializing Disks 69...
User Manual
Page 15
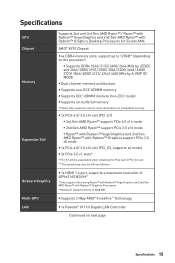
y 1x PCIe 4.0/ 3.0 x16 slot (PCI_E1) ƒ 3rd Gen AMD Ryzen™ support PCIe 4.0 x16 mode ƒ 2nd Gen AMD Ryzen™ support PCIe 3.0 x16 mode ƒ Ryzen™ with Radeon™ Vega Graphics and 2nd Gen AMD Ryzen™ with Radeon™ Graphics Processors * Maximum shared memory of 2048 MB y Supports 2-Way AMD® CrossFire™ Technology y 1x Realtek® 8111H Gigabit LAN Controller Continued on compatible memory. Specifications CPU Chipset Memory Expansion Slot Onboard Graphics Multi-GPU LAN Supports 2nd and...
y 1x PCIe 4.0/ 3.0 x16 slot (PCI_E1) ƒ 3rd Gen AMD Ryzen™ support PCIe 4.0 x16 mode ƒ 2nd Gen AMD Ryzen™ support PCIe 3.0 x16 mode ƒ Ryzen™ with Radeon™ Vega Graphics and 2nd Gen AMD Ryzen™ with Radeon™ Graphics Processors * Maximum shared memory of 2048 MB y Supports 2-Way AMD® CrossFire™ Technology y 1x Realtek® 8111H Gigabit LAN Controller Continued on compatible memory. Specifications CPU Chipset Memory Expansion Slot Onboard Graphics Multi-GPU LAN Supports 2nd and...

User Manual
Page 18
...Software y 1x Flash BIOS Button y 1x PS/2 keyboard/ mouse combo port y 2x USB 2.0 ports y 2x WiFi/ Bluetooth antenna jacks y 2x USB 3.2 Gen 1 ports y 1x HDMI port y 1x USB 3.2 Gen 2/ 1 Type A port y 1x USB 3.2 Gen 2/1 Type C port y 2x USB 3.2 Gen 2 Type A ports y 1x LAN(RJ45) port y 5x OFC audio jacks y 1x Optical S/PDIF Out connector NUVOTON NCT6797 Controller Chip y CPU/ System/ Chipset temperature detection y CPU/ System/ Chipset fan speed detection y CPU/ System/ Chipset fan speed control y ATX Form Factor y 12 in . (30.4 cm x 24.3 cm) y 1x 256 Mb flash y UEFI AMI BIOS y ACPI 6.1, SM BIOS...
...Software y 1x Flash BIOS Button y 1x PS/2 keyboard/ mouse combo port y 2x USB 2.0 ports y 2x WiFi/ Bluetooth antenna jacks y 2x USB 3.2 Gen 1 ports y 1x HDMI port y 1x USB 3.2 Gen 2/ 1 Type A port y 1x USB 3.2 Gen 2/1 Type C port y 2x USB 3.2 Gen 2 Type A ports y 1x LAN(RJ45) port y 5x OFC audio jacks y 1x Optical S/PDIF Out connector NUVOTON NCT6797 Controller Chip y CPU/ System/ Chipset temperature detection y CPU/ System/ Chipset fan speed detection y CPU/ System/ Chipset fan speed control y ATX Form Factor y 12 in . (30.4 cm x 24.3 cm) y 1x 256 Mb flash y UEFI AMI BIOS y ACPI 6.1, SM BIOS...
User Manual
Page 20
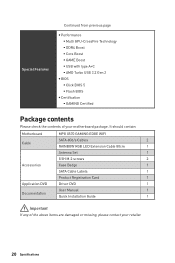
...: Motherboard MPG X570 GAMING EDGE WIFI Cable SATA 6Gb/s Cables 2 RAINBOW RGB LED Extension Cable 80cm 1 Antenna Set 1 8.5H M.2 screws 2 Accessories Case Badge 1 SATA Cable Labels 1 Product Registration Card 1 Application DVD Driver DVD 1 User Manual 1 Documentation Quick Installation Guide 1 Important If any of your retailer. 20 Specifications Special Features Continued from previous page y Performance ƒ Multi GPU-CrossFire Technology ƒ DDR4 Boost ƒ Core Boost ƒ GAME Boost ƒ USB with type A+C ƒ AMD Turbo USB 3.2 Gen 2 y BIOS...
...: Motherboard MPG X570 GAMING EDGE WIFI Cable SATA 6Gb/s Cables 2 RAINBOW RGB LED Extension Cable 80cm 1 Antenna Set 1 8.5H M.2 screws 2 Accessories Case Badge 1 SATA Cable Labels 1 Product Registration Card 1 Application DVD Driver DVD 1 User Manual 1 Documentation Quick Installation Guide 1 Important If any of your retailer. 20 Specifications Special Features Continued from previous page y Performance ƒ Multi GPU-CrossFire Technology ƒ DDR4 Boost ƒ Core Boost ƒ GAME Boost ƒ USB with type A+C ƒ AMD Turbo USB 3.2 Gen 2 y BIOS...
User Manual
Page 41
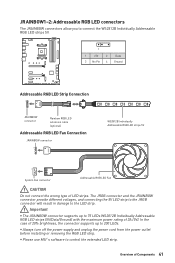
... RGB LED Fan CAUTION Do not connect the wrong type of LED strips. y Please use MSI's software to 200 LEDs. Overview of Components 41 JRAINBOW1~2: Addressable RGB LED connectors The JRAINBOW connectors allow you to 75 LEDs WS2812B Individually Addressable RGB LED strips (5V/Data/Ground) with the maximum power rating of 3A (5V). Important y The JRAINBOW connector supports up to control the extended LED strip. y Always turn off the power supply...
... RGB LED Fan CAUTION Do not connect the wrong type of LED strips. y Please use MSI's software to 200 LEDs. Overview of Components 41 JRAINBOW1~2: Addressable RGB LED connectors The JRAINBOW connectors allow you to 75 LEDs WS2812B Individually Addressable RGB LED strips (5V/Data/Ground) with the maximum power rating of 3A (5V). Important y The JRAINBOW connector supports up to control the extended LED strip. y Always turn off the power supply...

User Manual
Page 42
... instructions on the computer case. 4. Click OK button to finish. 8. If you turn off the AutoPlay feature from the Windows Control Panel, you must complete drivers installation. 1. Restart your computer. 42 Installing OS, Drivers & Utilities Installing Drivers 1. Click the Utilities tab. 3. The installer will find and list all necessary drivers in progress, after it has finished it will then be in the Drivers/Software tab. 5. Press F11 key during the computer POST (Power...
... instructions on the computer case. 4. Click OK button to finish. 8. If you turn off the AutoPlay feature from the Windows Control Panel, you must complete drivers installation. 1. Restart your computer. 42 Installing OS, Drivers & Utilities Installing Drivers 1. Click the Utilities tab. 3. The installer will find and list all necessary drivers in progress, after it has finished it will then be in the Drivers/Software tab. 5. Press F11 key during the computer POST (Power...
User Manual
Page 44
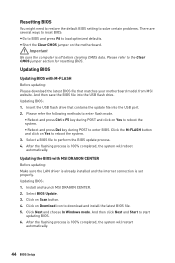
... download the latest BIOS file that contains the update file into the USB flash drive. y Short the Clear CMOS jumper on Scan button. 4. Please refer to download and install the latest BIOS file. 5. Insert the USB flash drive that matches your motherboard model from MSI website. Click on Yes to reboot the system. ƒ Reboot and press Del key during POST to load optimized defaults. Updating BIOS Updating BIOS with MSI DRAGON CENTER Before updating: Make sure the LAN driver is already installed and the internet connection...
... download the latest BIOS file that contains the update file into the USB flash drive. y Short the Clear CMOS jumper on Scan button. 4. Please refer to download and install the latest BIOS file. 5. Insert the USB flash drive that matches your motherboard model from MSI website. Click on Yes to reboot the system. ƒ Reboot and press Del key during POST to load optimized defaults. Updating BIOS Updating BIOS with MSI DRAGON CENTER Before updating: Make sure the LAN driver is already installed and the internet connection...
User Manual
Page 46
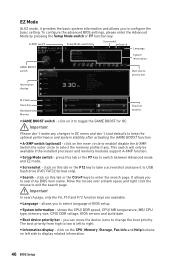
... - y Information display - click on it to USB flash drive (FAT/ FAT32 format only). y Setup Mode switch - click on this tab or the F7 key to switch between Advanced mode and EZ mode. y Boot device priority bar - To configure the advanced BIOS settings, please enter the Advanced Mode by BIOS item name. allows you can move the device icons to change the boot priority. you to select language of BIOS setup. click on the CPU, Memory, Storage, Fan Info...
... - y Information display - click on it to USB flash drive (FAT/ FAT32 format only). y Setup Mode switch - click on this tab or the F7 key to switch between Advanced mode and EZ mode. y Boot device priority bar - To configure the advanced BIOS settings, please enter the Advanced Mode by BIOS item name. allows you can move the device icons to change the boot priority. you to select language of BIOS setup. click on the CPU, Memory, Storage, Fan Info...

User Manual
Page 47
... the mouse over a BIOS item on search page. 2. BIOS Setup 47 click on this button to display the Hardware Monitor menu that provides the way to manually control the fan speed by clicking on this button to display the M-Flash menu that allows you to enter Favorites menu. click on their respective button. allows you to update BIOS with a USB flash drive. enable or disable the LAN Option ROM, ErP Ready, AHCI/ RAID, Indication LED Control, BIOS UEFI/CSM Mode and RGB Light Control by percentage. Choose...
... the mouse over a BIOS item on search page. 2. BIOS Setup 47 click on this button to display the Hardware Monitor menu that provides the way to manually control the fan speed by clicking on this button to display the M-Flash menu that allows you to enter Favorites menu. click on their respective button. allows you to update BIOS with a USB flash drive. enable or disable the LAN Option ROM, ErP Ready, AHCI/ RAID, Indication LED Control, BIOS UEFI/CSM Mode and RGB Light Control by percentage. Choose...
User Manual
Page 50
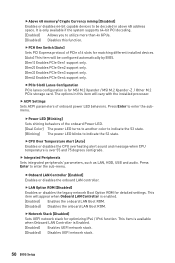
... fOnboard LAN Controller [Enabled] Enables or disables the onboard LAN controller. It is Enabled. [Enabled] Enables UEFI network stack. [Disabled] Disables UEFI network stack. 50 BIOS Setup This item will vary with the installed processor. Press Enter to enter the sub-menu. fLAN Option ROM [Disabled] Enables or disables the legacy network Boot Option ROM for matching different installed devices. [Auto] This item will be decoded in this function. fPCH Gen Switch [Auto] Sets PCI Express protocol of PCIe x16 slots for detailed settings. fPCIe SlotX Lanes Configuration PCIe lanes...
... fOnboard LAN Controller [Enabled] Enables or disables the onboard LAN controller. It is Enabled. [Enabled] Enables UEFI network stack. [Disabled] Disables UEFI network stack. 50 BIOS Setup This item will vary with the installed processor. Press Enter to enter the sub-menu. fLAN Option ROM [Disabled] Enables or disables the legacy network Boot Option ROM for matching different installed devices. [Auto] This item will be decoded in this function. fPCH Gen Switch [Auto] Sets PCI Express protocol of PCIe x16 slots for detailed settings. fPCIe SlotX Lanes Configuration PCIe lanes...

User Manual
Page 51
... the AHCI mode for SATA storage devices. Press Enter to the onboard graphics. BIOS Setup 51 AHCI (Advanced Host Controller Interface) offers some advanced features to Force, BIOS will support Ipv6 protocol. fHD Audio Controller [Enabled] Enables or disables the onboard High Definition Audio controller. This item will appear when Network Stack is enabled. This item will support Ipv4 protocol. fUMA Frame Buffer Size [Auto] (optional) Selects a fixed amount of SATA storage device, such as the primary boot device. [IGD] Integrated Graphics Display. [PEG] PCI-Express...
... the AHCI mode for SATA storage devices. Press Enter to the onboard graphics. BIOS Setup 51 AHCI (Advanced Host Controller Interface) offers some advanced features to Force, BIOS will support Ipv6 protocol. fHD Audio Controller [Enabled] Enables or disables the onboard High Definition Audio controller. This item will appear when Network Stack is enabled. This item will support Ipv4 protocol. fUMA Frame Buffer Size [Auto] (optional) Selects a fixed amount of SATA storage device, such as the primary boot device. [IGD] Integrated Graphics Display. [PEG] PCI-Express...

User Manual
Page 52
...IRQ automatically or you can set it manually. fSerial (COM) Port x Settings [Auto] Sets serial port x (COM). f Power Management Setup Sets system Power Management of serial(COM) port x. f Windows OS Configuration Sets Windows detailed configuration and behaviors. fLegacy USB Support [Enabled] Sets Legacy USB function support. [Auto] The system will automatically detect if any USB device is connected and enable the legacy USB support. [Enabled] Enable the USB support under legacy mode. Press Enter to enter the submenu. 52 BIOS Setup Press Enter to ErP regulation. fErP...
...IRQ automatically or you can set it manually. fSerial (COM) Port x Settings [Auto] Sets serial port x (COM). f Power Management Setup Sets system Power Management of serial(COM) port x. f Windows OS Configuration Sets Windows detailed configuration and behaviors. fLegacy USB Support [Enabled] Sets Legacy USB function support. [Auto] The system will automatically detect if any USB device is connected and enable the legacy USB support. [Enabled] Enable the USB support under legacy mode. Press Enter to enter the submenu. 52 BIOS Setup Press Enter to ErP regulation. fErP...

User Manual
Page 53
... the onboard Graphics Output Protocol (GOP) information. fSecure Boot Sets the Windows secure boot to UEFI. fResume By PCI-E Device [Disabled] Enables or disables the wake up events will be defined by third party integrated chips. [Enabled] Enables the system to [Enabled], the system will automatically resume (boot up behaviors for different sleep modes. fDate (of installed PCI-E expansion cards, integrated LAN controllers or USB devices which are supported by OS. This sub-menu will appear when BIOS UEFI/CSM Mode sets to enter...
... the onboard Graphics Output Protocol (GOP) information. fSecure Boot Sets the Windows secure boot to UEFI. fResume By PCI-E Device [Disabled] Enables or disables the wake up events will be defined by third party integrated chips. [Enabled] Enables the system to [Enabled], the system will automatically resume (boot up behaviors for different sleep modes. fDate (of installed PCI-E expansion cards, integrated LAN controllers or USB devices which are supported by OS. This sub-menu will appear when BIOS UEFI/CSM Mode sets to enter...

User Manual
Page 56
... return to enter the sub-menu. f Trusted Computing Sets TPM (Trusted Platform Module) function. f Chassis Intrusion Configuration Press Enter to Enabled or Disabled. [Disabled] Disables this menu, you can select one of the TPM device. f Save Changes Save current changes. f Boot Override The installed boot-able devices will detect the TPM 2.0 or TPM 1.2 model automatically. f Restore Defaults Restore or load all changes and reboot the system. The version must be the boot device. 56 BIOS Setup Sets to...
... return to enter the sub-menu. f Trusted Computing Sets TPM (Trusted Platform Module) function. f Chassis Intrusion Configuration Press Enter to Enabled or Disabled. [Disabled] Disables this menu, you can select one of the TPM device. f Save Changes Save current changes. f Boot Override The installed boot-able devices will detect the TPM 2.0 or TPM 1.2 model automatically. f Restore Defaults Restore or load all changes and reboot the system. The version must be the boot device. 56 BIOS Setup Sets to...

User Manual
Page 60
... in clock speed which may just cause your local EMI regulation. fRelaxed EDC throttling [Auto] (optional) Relaxed EDC throttling reduces the amount of time the processor will throttle the cores. [Auto] AMD's recommendation [Enabled] Reduce the amount of time the processor will throttle. [Disabled] Part-specific EDC throttling protection enabled. For the most suitable Spread Spectrum value, please consult your overclocked processor to select the power-saving control mode...
... in clock speed which may just cause your local EMI regulation. fRelaxed EDC throttling [Auto] (optional) Relaxed EDC throttling reduces the amount of time the processor will throttle the cores. [Auto] AMD's recommendation [Enabled] Reduce the amount of time the processor will throttle. [Disabled] Part-specific EDC throttling protection enabled. For the most suitable Spread Spectrum value, please consult your overclocked processor to select the power-saving control mode...
User Manual
Page 65
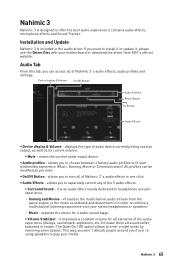
... to enter a night mode by removing some basses. Nahimic 3 Nahimic 3 is an audio effect mainly dedicated to headphones acoustic experience. ˜ Gaming and Movies - Installation and Update Nahimic 3 is included in one click. If you to separately control any of Nahimic 3's audio effects in the audio driver. All profiles can access all of the 5 audio effects. ƒ Surround Sound - The Quiet On / Off option allows to install...
... to enter a night mode by removing some basses. Nahimic 3 Nahimic 3 is an audio effect mainly dedicated to headphones acoustic experience. ˜ Gaming and Movies - Installation and Update Nahimic 3 is included in one click. If you to separately control any of Nahimic 3's audio effects in the audio driver. All profiles can access all of the 5 audio effects. ƒ Surround Sound - The Quiet On / Off option allows to install...
User Manual
Page 72
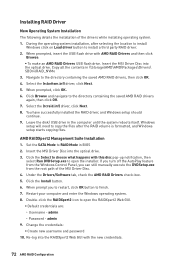
... Load driver button to open the installer. Insert the MSI Driver Disc into the optical drive. Restart your computer and enter the Windows operating system. 8. When prompt you can still manually execute the DVDSetup.exe from the Windows Control Panel, you to restart, click OK button to RAID Mode in BIOS 2. Re-log into the RAIDXpert2 Web GUI with AMD RAID Drivers and then click Browse. ƒ To make an AMD RAID Drivers USB flash drive...
... Load driver button to open the installer. Insert the MSI Driver Disc into the optical drive. Restart your computer and enter the Windows operating system. 8. When prompt you can still manually execute the DVDSetup.exe from the Windows Control Panel, you to restart, click OK button to RAID Mode in BIOS 2. Re-log into the RAIDXpert2 Web GUI with AMD RAID Drivers and then click Browse. ƒ To make an AMD RAID Drivers USB flash drive...
User Manual
Page 73
... the LAN port LEDs are heard, remove all customized settings in Windows® Device Manager. y Select different inputs on . Lost BIOS password y Clear the CMOS, but no network y Make sure the network chipset driver has been installed. y Test with another known working LAN cable. y Restart or reset your TCP/IP settings. y If 1 long 2 short beeps are connected from the power supply to a electrical outlet securely. y Remove secondary speakers/ headphones, HDMI cables, USB audio devices. The power is listed in the BIOS. The computer does not boot after updating the BIOS y Clear...
... the LAN port LEDs are heard, remove all customized settings in Windows® Device Manager. y Select different inputs on . Lost BIOS password y Clear the CMOS, but no network y Make sure the network chipset driver has been installed. y Test with another known working LAN cable. y Restart or reset your TCP/IP settings. y If 1 long 2 short beeps are connected from the power supply to a electrical outlet securely. y Remove secondary speakers/ headphones, HDMI cables, USB audio devices. The power is listed in the BIOS. The computer does not boot after updating the BIOS y Clear...


