User Manual
Page 1
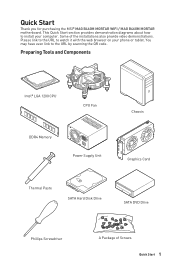
... diagrams about how to install your phone or tablet. Please link to the URL to the URL by scanning the QR code. You may have even link to watch it with the web browser on your computer. Some of Screws Quick Start 1 Preparing Tools and Components Intel® LGA 1200 CPU CPU Fan DDR4 Memory Power Supply Unit Chassis Graphics Card Thermal Paste SATA Hard Disk Drive SATA DVD Drive...
... diagrams about how to install your phone or tablet. Please link to the URL to the URL by scanning the QR code. You may have even link to watch it with the web browser on your computer. Some of Screws Quick Start 1 Preparing Tools and Components Intel® LGA 1200 CPU CPU Fan DDR4 Memory Power Supply Unit Chassis Graphics Card Thermal Paste SATA Hard Disk Drive SATA DVD Drive...

User Manual
Page 12
... Information 2 Installing a Processor 3 Installing DDR4 memory 4 Connecting the Front Panel Header 5 Installing the Motherboard 6 Connecting the Power Connectors 7 Installing SATA Drives 8 Installing a Graphics Card 9 Connecting Peripheral Devices 10 Power On...11 Specifications...14 Package contents 19 Block Diagram ...20 Rear I/O Panel...21 LAN Port LED Status Table 21 Audio Ports Configuration 21 Realtek Audio Console 22 Overview of Components 25 CPU Socket...27 DIMM Slots...28 PCI_E1~3: PCIe Expansion Slots 29 SATA1~6: SATA 6Gb/s Connectors 29 M2_1~2: M.2 Slots (Key M 30...
... Information 2 Installing a Processor 3 Installing DDR4 memory 4 Connecting the Front Panel Header 5 Installing the Motherboard 6 Connecting the Power Connectors 7 Installing SATA Drives 8 Installing a Graphics Card 9 Connecting Peripheral Devices 10 Power On...11 Specifications...14 Package contents 19 Block Diagram ...20 Rear I/O Panel...21 LAN Port LED Status Table 21 Audio Ports Configuration 21 Realtek Audio Console 22 Overview of Components 25 CPU Socket...27 DIMM Slots...28 PCI_E1~3: PCIe Expansion Slots 29 SATA1~6: SATA 6Gb/s Connectors 29 M2_1~2: M.2 Slots (Key M 30...

User Manual
Page 13
... Windows® 10 43 Installing Drivers 43 Installing Utilities 43 UEFI BIOS...44 BIOS Setup...45 Entering BIOS Setup 45 Resetting BIOS...46 Updating BIOS...46 EZ Mode...48 Advanced Mode ...51 SETTINGS Menu...52 OC Menu...54 M-FLASH Menu...58 OC PROFILE Menu 59 HARDWARE MONITOR Menu 60 RAID Configuration 62 Enabling Intel® Rapid Storage Technology 62 Creating RAID Volume 63 Removing a RAID Volume 64 Resetting Disks to Non-RAID 65 Rebuilding RAID Array 66 Installing RAID Driver 67 Installing Intel® Rapid Storage Technology Software 67 Intel® Optane™ Memory...
... Windows® 10 43 Installing Drivers 43 Installing Utilities 43 UEFI BIOS...44 BIOS Setup...45 Entering BIOS Setup 45 Resetting BIOS...46 Updating BIOS...46 EZ Mode...48 Advanced Mode ...51 SETTINGS Menu...52 OC Menu...54 M-FLASH Menu...58 OC PROFILE Menu 59 HARDWARE MONITOR Menu 60 RAID Configuration 62 Enabling Intel® Rapid Storage Technology 62 Creating RAID Volume 63 Removing a RAID Volume 64 Resetting Disks to Non-RAID 65 Rebuilding RAID Array 66 Installing RAID Driver 67 Installing Intel® Rapid Storage Technology Software 67 Intel® Optane™ Memory...
User Manual
Page 14
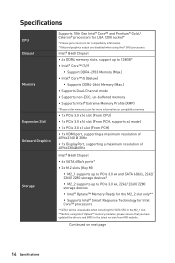
... BIOS to the latest version from MSI website. Intel® B460 Chipset ∙∙4x DDR4 memory slots, support up to PCIe 3.0 x4, 2242/ 2260/ 2280 storage devices ▪▪Intel® Optane™ Memory Ready for the M2_2 slot only** ▪▪Supports Intel® Smart Response Technology for Intel Core™ processors * SATA1 will be unavailable when installing M.2 SATA SSD in the M2_1 slot. ** Before using the F SKU processors. Specifications CPU Chipset Memory Expansion Slot Onboard Graphics Storage Supports...
... BIOS to the latest version from MSI website. Intel® B460 Chipset ∙∙4x DDR4 memory slots, support up to PCIe 3.0 x4, 2242/ 2260/ 2280 storage devices ▪▪Intel® Optane™ Memory Ready for the M2_2 slot only** ▪▪Supports Intel® Smart Response Technology for Intel Core™ processors * SATA1 will be unavailable when installing M.2 SATA SSD in the M2_1 slot. ** Before using the F SKU processors. Specifications CPU Chipset Memory Expansion Slot Onboard Graphics Storage Supports...
User Manual
Page 15
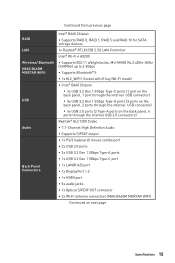
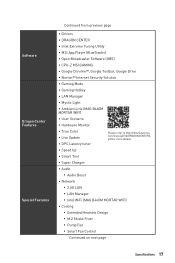
... RAID 10 for SATA storage devices LAN 1x Realtek® RTL8125B 2.5G LAN Controller Intel® Wi-Fi 6 AX200 Wireless/ Bluetooth (MAG B460M MORTAR WIFI) ∙∙Supports 802.11 a/b/g/n/ac/ax, MU-MIMO Rx,2.4GHz-5GHz (160MHz) up to 2.4Gbps ∙∙Supports Bluetooth® 5 ∙∙1x M.2_WIFI1 Socket with E key (Wi-Fi mode) ∙∙Intel® B460 Chipset ▪▪2x USB 3.2 Gen 1 5Gbps Type-C ports (1 port...
... RAID 10 for SATA storage devices LAN 1x Realtek® RTL8125B 2.5G LAN Controller Intel® Wi-Fi 6 AX200 Wireless/ Bluetooth (MAG B460M MORTAR WIFI) ∙∙Supports 802.11 a/b/g/n/ac/ax, MU-MIMO Rx,2.4GHz-5GHz (160MHz) up to 2.4Gbps ∙∙Supports Bluetooth® 5 ∙∙1x M.2_WIFI1 Socket with E key (Wi-Fi mode) ∙∙Intel® B460 Chipset ▪▪2x USB 3.2 Gen 1 5Gbps Type-C ports (1 port...
User Manual
Page 17
...;∙User Scenario ∙∙Hardware Monitor ∙∙True Color ∙∙Live Update ∙∙DPC Latency tuner Please refer to http://download.msi. pdf for more details. ∙∙Speed Up ∙∙Smart Tool ∙∙Super Charger ∙∙ Audio ▪▪Audio Boost ∙∙ Network ▪▪2.5G LAN ▪▪LAN Manager ▪▪Intel WiFi (MAG B460M MORTAR WIFI...
...;∙User Scenario ∙∙Hardware Monitor ∙∙True Color ∙∙Live Update ∙∙DPC Latency tuner Please refer to http://download.msi. pdf for more details. ∙∙Speed Up ∙∙Smart Tool ∙∙Super Charger ∙∙ Audio ▪▪Audio Boost ∙∙ Network ▪▪2.5G LAN ▪▪LAN Manager ▪▪Intel WiFi (MAG B460M MORTAR WIFI...

User Manual
Page 39
... Data) 5 Reserved 6 SPI Clock 7 Ground 8 SPI Reset 9 Reserved 10 No Pin 11 Reserved 12 Interrupt Request JBAT1: Clear CMOS (Reset BIOS) Jumper There is CMOS memory onboard that is for about 5-10 seconds. 3. Use a jumper cap to save system configuration data. Remove the jumper cap from a battery located on the computer. Power off the computer and unplug the power cord. 2. Plug the power cord and Power on the motherboard to short JBAT1 for TPM (Trusted...
... Data) 5 Reserved 6 SPI Clock 7 Ground 8 SPI Reset 9 Reserved 10 No Pin 11 Reserved 12 Interrupt Request JBAT1: Clear CMOS (Reset BIOS) Jumper There is CMOS memory onboard that is for about 5-10 seconds. 3. Use a jumper cap to save system configuration data. Remove the jumper cap from a battery located on the computer. Power off the computer and unplug the power cord. 2. Plug the power cord and Power on the motherboard to short JBAT1 for TPM (Trusted...

User Manual
Page 41
... connector and the JRAINBOW connector provide different voltages, and connecting the 5V LED strip to the JRGB connector will result in damage to the LED strip. ⚠⚠Important ∙∙The JRAINBOW connector supports up to 200 LEDs. ∙∙Always turn off the power supply and unplug the power cord from the power outlet before installing or removing the RGB LED strip. ∙∙Please use MSI's software to control...
... connector and the JRAINBOW connector provide different voltages, and connecting the 5V LED strip to the JRGB connector will result in damage to the LED strip. ⚠⚠Important ∙∙The JRAINBOW connector supports up to 200 LEDs. ∙∙Always turn off the power supply and unplug the power cord from the power outlet before installing or removing the RGB LED strip. ∙∙Please use MSI's software to control...

User Manual
Page 43
... key during the computer POST (Power-On Self Test) to install. 4. Click the Install button in progress, after it has finished it will find and list all necessary drivers in Windows® 10. 2. Installing Utilities Before you install utilities, you want to get into the USB port. 3. Select the utilities you must complete drivers installation. 1. The utilities installation will then be in the lower-right corner of the window. 6. Insert MSI® USB Drive...
... key during the computer POST (Power-On Self Test) to install. 4. Click the Install button in progress, after it has finished it will find and list all necessary drivers in Windows® 10. 2. Installing Utilities Before you install utilities, you want to get into the USB port. 3. Select the utilities you must complete drivers installation. 1. The utilities installation will then be in the lower-right corner of the window. 6. Insert MSI® USB Drive...
User Manual
Page 46
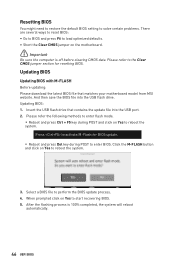
... the USB flash drive that matches your motherboard model from MSI website. Click the M-FLASH button and click on Yes to perform the BIOS update process. 4. Select a BIOS file to reboot the system. 3. After the flashing process is off before clearing CMOS data. When prompted click on Yes to load optimized defaults. ∙∙Short the Clear CMOS jumper on Yes to the Clear CMOS jumper section for resetting BIOS. Resetting BIOS You might need to restore the default BIOS setting...
... the USB flash drive that matches your motherboard model from MSI website. Click the M-FLASH button and click on Yes to perform the BIOS update process. 4. Select a BIOS file to reboot the system. 3. After the flashing process is off before clearing CMOS data. When prompted click on Yes to load optimized defaults. ∙∙Short the Clear CMOS jumper on Yes to the Clear CMOS jumper section for resetting BIOS. Resetting BIOS You might need to restore the default BIOS setting...

User Manual
Page 49
shows the CPU/ DDR speed, CPU/ MB temperature, MB/ CPU type, memory size, CPU/ DDR voltage, BIOS version and build date. ∙∙ Boot device priority bar - click on this button to enter the Hardware Monitor menu that allows you to manually control the fan speed by clicking on this button to enter the M-Flash menu that provides the way to update BIOS with the motherboard you to show the Favorites window. ∙∙ Language - you can move the device icons to...
shows the CPU/ DDR speed, CPU/ MB temperature, MB/ CPU type, memory size, CPU/ DDR voltage, BIOS version and build date. ∙∙ Boot device priority bar - click on this button to enter the Hardware Monitor menu that allows you to manually control the fan speed by clicking on this button to enter the M-Flash menu that provides the way to update BIOS with the motherboard you to show the Favorites window. ∙∙ Language - you can move the device icons to...

User Manual
Page 51
... specify the parameters for chipset and boot devices. ▪▪OC - allows you to update BIOS with a USB flash drive. ▪▪OC PROFILE - provides the information of system. ▪▪BOARD EXPLORER - BIOS menu selection BIOS menu selection Menu display ∙∙ BIOS menu selection - the following options are available: ▪▪SETTINGS - provides the way to set the speeds of fans and monitor voltages of installed devices on this motherboard. ∙∙ Menu display - UEFI BIOS 51 allows you...
... specify the parameters for chipset and boot devices. ▪▪OC - allows you to update BIOS with a USB flash drive. ▪▪OC PROFILE - provides the information of system. ▪▪BOARD EXPLORER - BIOS menu selection BIOS menu selection Menu display ∙∙ BIOS menu selection - the following options are available: ▪▪SETTINGS - provides the way to set the speeds of fans and monitor voltages of installed devices on this motherboard. ∙∙ Menu display - UEFI BIOS 51 allows you...

User Manual
Page 52
... SATA/ M.2 cable and power cable connections of the device and motherboard. ▶▶System Information Shows detailed system information, including CPU type, BIOS version, and Memory (read only). ▶▶DMI Information Shows system information, desktop Board Information and chassis Information. (Read only). ▶▶Advanced sub-menu The Advanced sub-menu allows you to set the parameters and behaviors of PCIe, ACPI, integrated peripherals, integrated graphics, USB, power management and Windows . ▶▶PCIe/PCI...
... SATA/ M.2 cable and power cable connections of the device and motherboard. ▶▶System Information Shows detailed system information, including CPU type, BIOS version, and Memory (read only). ▶▶DMI Information Shows system information, desktop Board Information and chassis Information. (Read only). ▶▶Advanced sub-menu The Advanced sub-menu allows you to set the parameters and behaviors of PCIe, ACPI, integrated peripherals, integrated graphics, USB, power management and Windows . ▶▶PCIe/PCI...

User Manual
Page 53
...;Integrated Graphics Configuration sub-menu Adjusts integrated graphics settings for system security. You can enter the setup and OS without authorization. ▶▶Save & Exit This menu allows you are prompted to load the BIOS default values or factory default settings into the BIOS and exit the BIOS setup utility with or without changes. This sub-menu is only available when using the Intel Thunderbolt device. ▶▶USB Configuration sub-menu Sets the onboard USB controller and device...
...;Integrated Graphics Configuration sub-menu Adjusts integrated graphics settings for system security. You can enter the setup and OS without authorization. ▶▶Save & Exit This menu allows you are prompted to load the BIOS default values or factory default settings into the BIOS and exit the BIOS setup utility with or without changes. This sub-menu is only available when using the Intel Thunderbolt device. ▶▶USB Configuration sub-menu Sets the onboard USB controller and device...

User Manual
Page 55
... integrated graphics frequency. This item will be available when the memory modules that supports this adjustment is the overclocking technology by choosing optimized memory preset. CPU ratio will be changed dynamically according to Turbo Ratio Offset. ▶▶CPU Ratio Mode [Dynamic Mode]* Selects the CPU Ratio operating mode. Read-only. ▶▶Extreme Memory Profile (XMP) [Disabled] XMP (Extreme Memory Profile) is installed. ▶▶DRAM Frequency [Auto] Sets the DRAM frequency. Please enable...
... integrated graphics frequency. This item will be available when the memory modules that supports this adjustment is the overclocking technology by choosing optimized memory preset. CPU ratio will be changed dynamically according to Turbo Ratio Offset. ▶▶CPU Ratio Mode [Dynamic Mode]* Selects the CPU Ratio operating mode. Read-only. ▶▶Extreme Memory Profile (XMP) [Disabled] XMP (Extreme Memory Profile) is installed. ▶▶DRAM Frequency [Auto] Sets the DRAM frequency. Please enable...

User Manual
Page 56
... UEFI BIOS This sub-menu displays the information of installed memory. Disables this information menu at any time by pressing [F4]. You can setup some protecting conditions about voltage/ current/ temputure for memory. So the memory will be configured automatically by BIOS. If it manually. ▶▶DRAM Voltages control [Auto] These options allow you to set it manually. ▶▶CPU Memory Changed Detect [Enabled]* Enables or disables the system to issue a warning message during boot when the CPU...
... UEFI BIOS This sub-menu displays the information of installed memory. Disables this information menu at any time by pressing [F4]. You can setup some protecting conditions about voltage/ current/ temputure for memory. So the memory will be configured automatically by BIOS. If it manually. ▶▶DRAM Voltages control [Auto] These options allow you to set it manually. ▶▶CPU Memory Changed Detect [Enabled]* Enables or disables the system to issue a warning message during boot when the CPU...

User Manual
Page 58
... BIOS update process. 5. Insert the USB flash drive that matches your USB flash drive. Select a BIOS file to update BIOS. 1. Please download the latest BIOS file that contains the update file into your motherboard model from MSI website, save the BIOS file into the computer. 2. Click on Yes to update BIOS with a USB flash drive. After the flashing process is 100% completed, the system will appear after rebooting. 4. The system will enter the flash mode and a file selection menu will reboot automatically. 58 UEFI BIOS...
... BIOS update process. 5. Insert the USB flash drive that matches your USB flash drive. Select a BIOS file to update BIOS. 1. Please download the latest BIOS file that contains the update file into your motherboard model from MSI website, save the BIOS file into the computer. 2. Click on Yes to update BIOS with a USB flash drive. After the flashing process is 100% completed, the system will appear after rebooting. 4. The system will enter the flash mode and a file selection menu will reboot automatically. 58 UEFI BIOS...

User Manual
Page 67
... the DVDSetup. Installing RAID Driver New Operating System Installation The following details the installation of the MSI USB Drive. 4. Windows setup will need to copy the files after selecting the location to install Windows click on Load driver button to open the Intel® Rapid Storage Technology software. exe from the Windows Control Panel, you to restart, click OK button to open the installer. Double-click the Intel® Rapid Storage Technology icon to finish. 7. RAID Configuration 67 Copy...
... the DVDSetup. Installing RAID Driver New Operating System Installation The following details the installation of the MSI USB Drive. 4. Windows setup will need to copy the files after selecting the location to install Windows click on Load driver button to open the Intel® Rapid Storage Technology software. exe from the Windows Control Panel, you to restart, click OK button to open the installer. Double-click the Intel® Rapid Storage Technology icon to finish. 7. RAID Configuration 67 Copy...
User Manual
Page 68
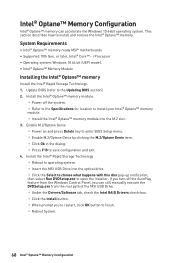
...;▫Power on and press Delete key to enter BIOS Setup menu. ▫▫Enable M.2/Optane Genie by clicking the M.2/Optane Genie item. ▫▫Click Ok in the dialog. ▫▫Press F10 to install and remove the Intel® Optane™ memory. Intel® Optane™ Memory Configuration Intel® Optane™ memory can still manually execute the DVDSetup.exe from the Windows Control Panel...
...;▫Power on and press Delete key to enter BIOS Setup menu. ▫▫Enable M.2/Optane Genie by clicking the M.2/Optane Genie item. ▫▫Click Ok in the dialog. ▫▫Press F10 to install and remove the Intel® Optane™ memory. Intel® Optane™ Memory Configuration Intel® Optane™ memory can still manually execute the DVDSetup.exe from the Windows Control Panel...

User Manual
Page 71
... RMA repair, try to other USB port on the motherboard rear IO panel. Troubleshooting Before sending the motherboard for motherboard with another known working LAN cable. Lost BIOS password ∙∙Clear the CMOS, but no network ∙∙Make sure the network chipset driver has been installed. ∙∙Verify if the network cable is properly connected and make sure the button is turned on. ∙∙Check if the power switch cable is connected to JFP1 pin header properly...
... RMA repair, try to other USB port on the motherboard rear IO panel. Troubleshooting Before sending the motherboard for motherboard with another known working LAN cable. Lost BIOS password ∙∙Clear the CMOS, but no network ∙∙Make sure the network chipset driver has been installed. ∙∙Verify if the network cable is properly connected and make sure the button is turned on. ∙∙Check if the power switch cable is connected to JFP1 pin header properly...

