
User Manual
Page 6
... high temperature. 4. Safety Instructions 1. patents and other limited viewing uses only unless otherwise authorized by U.S. Make sure that people are used for possible use later. 3. VI Reverse engineering or disassembly is protected by Macrovision. If any add-on card or module. 9. Always unplug the power cord before setting it . Read the safety instructions carefully and thoroughly. 2. Do not cover the openings. 6. All cautions...
... high temperature. 4. Safety Instructions 1. patents and other limited viewing uses only unless otherwise authorized by U.S. Make sure that people are used for possible use later. 3. VI Reverse engineering or disassembly is protected by Macrovision. If any add-on card or module. 9. Always unplug the power cord before setting it . Read the safety instructions carefully and thoroughly. 2. Do not cover the openings. 6. All cautions...
User Manual
Page 13
...-side View 2-13 Rear View 2-14 Bottom View 2-15 Power Management 2-16 AC Adapter 2-16 Battery Pack 2-17 Using the Battery Pack 2-20 Basic Operations 2-22 Safety and Comfort Tips 2-22 Have a Good Work Habit 2-23 Knowing the Keyboard 2-24 Knowing the Touchpad 2-30 About Hard Disk Drive 2-34 Using the Optical Device Drive 2-35 Customizing this Notebook Connecting the External Devices 3-2 Connecting the Peripheral Devices 3-3 Connecting the Communication Devices 3-6 PC Card Installation 3-7 Installing the PC card 3-7 XIII
...-side View 2-13 Rear View 2-14 Bottom View 2-15 Power Management 2-16 AC Adapter 2-16 Battery Pack 2-17 Using the Battery Pack 2-20 Basic Operations 2-22 Safety and Comfort Tips 2-22 Have a Good Work Habit 2-23 Knowing the Keyboard 2-24 Knowing the Touchpad 2-30 About Hard Disk Drive 2-34 Using the Optical Device Drive 2-35 Customizing this Notebook Connecting the External Devices 3-2 Connecting the Peripheral Devices 3-3 Connecting the Communication Devices 3-6 PC Card Installation 3-7 Installing the PC card 3-7 XIII
User Manual
Page 16
... Use This Manual This User's Manual provides instructions and illustrations on how to operate this notebook. Also, this chapter instructs the correct procedure of all the accessories included when you purchased this notebook. It is damaged or missing, please contact the vendor where you open the packing box. Chapter 2, Getting Started, provides the specification of this notebook, and introduces the function buttons, quick launch buttons, connectors, LEDs and externals...
... Use This Manual This User's Manual provides instructions and illustrations on how to operate this notebook. Also, this chapter instructs the correct procedure of all the accessories included when you purchased this notebook. It is damaged or missing, please contact the vendor where you open the packing box. Chapter 2, Getting Started, provides the specification of this notebook, and introduces the function buttons, quick launch buttons, connectors, LEDs and externals...
User Manual
Page 17
Chapter 4, BIOS setup, provides information on BIOS Setup program and allows you to configure the system for optimum use. 1-3 General Introductions Chapter 3, Customizing this Notebook, gives instructions not only in connecting the mouse, keyboard, webcam, printer, external monitor, IEEE 1394 devices, and communication devices, but also in installing and removing the PC card.
Chapter 4, BIOS setup, provides information on BIOS Setup program and allows you to configure the system for optimum use. 1-3 General Introductions Chapter 3, Customizing this Notebook, gives instructions not only in connecting the mouse, keyboard, webcam, printer, external monitor, IEEE 1394 devices, and communication devices, but also in installing and removing the PC card.
User Manual
Page 18
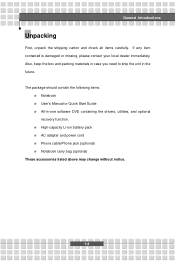
... the shipping carton and check all items carefully. The package should contain the following items: w Notebook w User's Manual or Quick Start Guide w All-in the future. w High-capacity Li-ion battery pack w AC adapter and power cord w Phone cable/Phone jack (optional) w Notebook carry bag (optional) These accessories listed above may change without notice. 1-4 If any item contained is damaged or missing, please contact your local...
... the shipping carton and check all items carefully. The package should contain the following items: w Notebook w User's Manual or Quick Start Guide w All-in the future. w High-capacity Li-ion battery pack w AC adapter and power cord w Phone cable/Phone jack (optional) w Notebook carry bag (optional) These accessories listed above may change without notice. 1-4 If any item contained is damaged or missing, please contact your local...

User Manual
Page 23
Getting Started Camera CMOS Audio Sound Controller Sound Codec chip Internal Speaker Internal Microphone HW Wave Table MIDI Sound Volume Software & BIOS Support OS USB Flash Boot BIOS Others Kensington Lock Hole Compliance Series with 87-key keyboard: Yes Series with 103-key keyboar: Optional ICH7 Realtek 882 2 Speakers with housing yes S/W wave table K/B hot-key (Fn+F7 / Fn+F8) Win XP Home and Professional edition Yes, USB floppy boot up DOS only Fast Boot Support --- Yes (Win XP) x 1 WHQL --- PC2001 2-5
Getting Started Camera CMOS Audio Sound Controller Sound Codec chip Internal Speaker Internal Microphone HW Wave Table MIDI Sound Volume Software & BIOS Support OS USB Flash Boot BIOS Others Kensington Lock Hole Compliance Series with 87-key keyboard: Yes Series with 103-key keyboar: Optional ICH7 Realtek 882 2 Speakers with housing yes S/W wave table K/B hot-key (Fn+F7 / Fn+F8) Win XP Home and Professional edition Yes, USB floppy boot up DOS only Fast Boot Support --- Yes (Win XP) x 1 WHQL --- PC2001 2-5
User Manual
Page 26
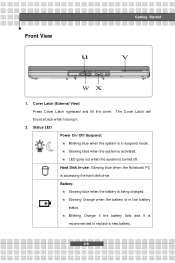
...-use: Glowing blue when the Notebook PC is recommended to replace a new battery. 2-8 w Glowing Orange when the battery is turned off. w Blinking Orange if the battery fails and it . 2. Front View u Getting Started v wx 1. Cover Latch (External View) Press Cover Latch rightward and lift the cover. The Cover Latch will bounce back when loosing it is accessing the hard disk drive. w LED goes out when the system is in suspend mode...
...-use: Glowing blue when the Notebook PC is recommended to replace a new battery. 2-8 w Glowing Orange when the battery is turned off. w Blinking Orange if the battery fails and it . 2. Front View u Getting Started v wx 1. Cover Latch (External View) Press Cover Latch rightward and lift the cover. The Cover Latch will bounce back when loosing it is accessing the hard disk drive. w LED goes out when the system is in suspend mode...

User Manual
Page 29
... you to connect high-end digital devices such as a computer display. 4. Right-side View u vw Getting Started x yz 1. USB Port The USB 2.0 port allows you to connect USB-interface peripheral devices, such as LAN/WLAN card, modem card, memory card, etc. 2. S-Video Connector By using a Super VHS (S-Video) cable, this connector allows you to connect a television (NTSC/PAL system) to support one Type-II PC card for expansion functions, such as the mouse, keyboard, modem, portable hard disk module, printer...
... you to connect high-end digital devices such as a computer display. 4. Right-side View u vw Getting Started x yz 1. USB Port The USB 2.0 port allows you to connect USB-interface peripheral devices, such as LAN/WLAN card, modem card, memory card, etc. 2. S-Video Connector By using a Super VHS (S-Video) cable, this connector allows you to connect a television (NTSC/PAL system) to support one Type-II PC card for expansion functions, such as the mouse, keyboard, modem, portable hard disk module, printer...

User Manual
Page 30
VGA Port The 15-pin-D-sub VGA port allows you to connect an external monitor or other standard VGA-compatible device (such as a projector) for the computer. 2-12 Getting Started 5. Power Connector To connect the AC adapter and supply power for a great view of the computer display. 6.
VGA Port The 15-pin-D-sub VGA port allows you to connect an external monitor or other standard VGA-compatible device (such as a projector) for the computer. 2-12 Getting Started 5. Power Connector To connect the AC adapter and supply power for a great view of the computer display. 6.

User Manual
Page 31
... to connect a LAN cable for installing software, accessing data and playing music/movie on the disks. 2-13 RJ-45 Connector The 10/100/1000 Ethernet connector is used to lock the computer to location for security. 2. Lightscribe function allows users to use the CD/DVD disc for network connection. 4. Left-side View uv Getting Started wx y 1. USB Port 5. The optical device allows you purchased. Optical Storage Device A slim DVD Combo or DVD Dual or...
... to connect a LAN cable for installing software, accessing data and playing music/movie on the disks. 2-13 RJ-45 Connector The 10/100/1000 Ethernet connector is used to lock the computer to location for security. 2. Lightscribe function allows users to use the CD/DVD disc for network connection. 4. Left-side View uv Getting Started wx y 1. USB Port 5. The optical device allows you purchased. Optical Storage Device A slim DVD Combo or DVD Dual or...
User Manual
Page 46
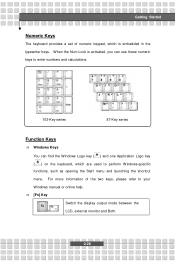
...-Key series 87-Key series Function Keys n Windows Keys You can find the Windows Logo key ( ) and one Application Logo key ( ) on the keyboard, which are used to your Windows manual or online help. n [Fn] Key Switch the display output mode between the + LCD, external monitor and Both. 2-28 When the Num Lock is embedded in the typewriter keys. Getting Started Numeric Keys The keyboard provides a set of the two keys, please refer to perform Windows-specific functions, such as opening the Start menu and...
...-Key series 87-Key series Function Keys n Windows Keys You can find the Windows Logo key ( ) and one Application Logo key ( ) on the keyboard, which are used to your Windows manual or online help. n [Fn] Key Switch the display output mode between the + LCD, external monitor and Both. 2-28 When the Num Lock is embedded in the typewriter keys. Getting Started Numeric Keys The keyboard provides a set of the two keys, please refer to perform Windows-specific functions, such as opening the Start menu and...

User Manual
Page 47
Getting Started Enable or disable the touchpad function. + Decrease the LCD brightness. + Increase the LCD brightness. + Decrease the built-in speaker's volume. + Increase the built-in speaker's volume. + Disable the computer's audio function. + Force the computer into suspend mode + (depending on the system configuration). 2-29
Getting Started Enable or disable the touchpad function. + Decrease the LCD brightness. + Increase the LCD brightness. + Decrease the built-in speaker's volume. + Increase the built-in speaker's volume. + Disable the computer's audio function. + Force the computer into suspend mode + (depending on the system configuration). 2-29

User Manual
Page 51
Getting Started n Configuring the Touchpad You can customize the pointing device to meet your Windows operating system. In addition, you can use the standard Microsoft or IBM PS/2 driver in Control Panel allows you may want to change the size, shape, moving speed and other advanced features of the two buttons. To configure the touchpad, you can change the configuration. The Mouse Properties in your personal needs. For example, if you are a left-hand user, you to swap the functions of the cursor on the screen. Mouse Properties Window 2-33
Getting Started n Configuring the Touchpad You can customize the pointing device to meet your Windows operating system. In addition, you can use the standard Microsoft or IBM PS/2 driver in Control Panel allows you may want to change the size, shape, moving speed and other advanced features of the two buttons. To configure the touchpad, you can change the configuration. The Mouse Properties in your personal needs. For example, if you are a left-hand user, you to swap the functions of the cursor on the screen. Mouse Properties Window 2-33

User Manual
Page 57
Modem LAN Monitor Web Cam IEEE 1394 Device Mouse/ Keyboard Microphone Television Printer Speakers/ Earphones Note: The notebook shown here may vary from the actual one. 3-2 All devices listed here are for reference only. Customizing this Notebook Connecting the External Devices The I/O (input/output) ports on the Notebook allow you to connect peripheral devices.
Modem LAN Monitor Web Cam IEEE 1394 Device Mouse/ Keyboard Microphone Television Printer Speakers/ Earphones Note: The notebook shown here may vary from the actual one. 3-2 All devices listed here are for reference only. Customizing this Notebook Connecting the External Devices The I/O (input/output) ports on the Notebook allow you to connect peripheral devices.
User Manual
Page 58
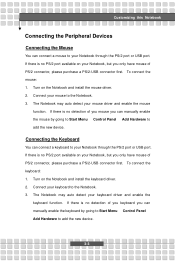
... your mouse driver and enable the mouse function. Connecting the Keyboard You can connect a keyboard to your Notebook through the PS/2 port or USB port. If there is no PS/2 port available on your Notebook, but you can manually enable the mouse by going to Start Menu à Control Panel à Add Hardware to add the new device. Turn on the Notebook and install the keyboard driver. 2. To connect the mouse: 1. The Notebook may auto detect your keyboard driver and enable the keyboard function. Turn on the Notebook and install the mouse driver...
... your mouse driver and enable the mouse function. Connecting the Keyboard You can connect a keyboard to your Notebook through the PS/2 port or USB port. If there is no PS/2 port available on your Notebook, but you can manually enable the mouse by going to Start Menu à Control Panel à Add Hardware to add the new device. Turn on the Notebook and install the keyboard driver. 2. To connect the mouse: 1. The Notebook may auto detect your keyboard driver and enable the keyboard function. Turn on the Notebook and install the mouse driver...

User Manual
Page 59
... external monitor to your WebCam driver and enable the WebCam function. The Notebook may auto detect your Notebook through the USB port. Turn off . 3-4 To connect the monitor: 1. Make sure that the Notebook is no detection of the printer cable to the Notebook's USB port and the other end to connect a printer: 1. To connect the WebCam: 1. Connecting the Printer If your WebCam to the Notebook. 3. Connect your printer has a USB interface, you can manually enable the WebCam by going to Start Menu à Control Panel...
... external monitor to your WebCam driver and enable the WebCam function. The Notebook may auto detect your Notebook through the USB port. Turn off . 3-4 To connect the monitor: 1. Make sure that the Notebook is no detection of the printer cable to the Notebook's USB port and the other end to connect a printer: 1. To connect the WebCam: 1. Connecting the Printer If your WebCam to the Notebook. 3. Connect your printer has a USB interface, you can manually enable the WebCam by going to Start Menu à Control Panel...
User Manual
Page 60
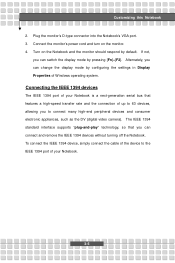
... monitor's D-type connector into the Notebook's VGA port. 3. Connect the monitor's power cord and turn on the Notebook and the monitor should respond by default. To connect the IEEE 1394 device, simply connect the cable of the device to the IEEE 1394 port of Windows operating system. Customizing this Notebook 2. Turn on the monitor. 4. Alternately, you can connect and remove the IEEE 1394 devices without turning off the Notebook. If not, you to 63 devices, allowing you can change...
... monitor's D-type connector into the Notebook's VGA port. 3. Connect the monitor's power cord and turn on the Notebook and the monitor should respond by default. To connect the IEEE 1394 device, simply connect the cable of the device to the IEEE 1394 port of Windows operating system. Customizing this Notebook 2. Turn on the monitor. 4. Alternately, you can connect and remove the IEEE 1394 devices without turning off the Notebook. If not, you to 63 devices, allowing you can change...
User Manual
Page 61
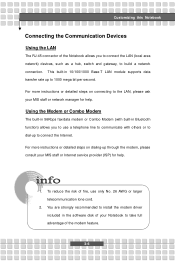
... communicate with built-in the software disk of your MIS staff or network manager for help . You are strongly recommended to install the modem driver included in Bluetooth function) allows you to connect the LAN (local area network) devices, such as a hub, switch and gateway, to 1000 mega bit per second. This built-in 10/100/1000 Base-T LAN module supports data transfer rate up to...
... communicate with built-in the software disk of your MIS staff or network manager for help . You are strongly recommended to install the modem driver included in Bluetooth function) allows you to connect the LAN (local area network) devices, such as a hub, switch and gateway, to 1000 mega bit per second. This built-in 10/100/1000 Base-T LAN module supports data transfer rate up to...

User Manual
Page 72
BIOS Setup mode (the processor works at FSB400-600MHz or FSB533-800MHz). If you want optimize the processor, set this item to Enabled, so that the processor's speed will be controlled by the use of your operating system and applications. Setting options: Enabled, and Disabled. 4-8
BIOS Setup mode (the processor works at FSB400-600MHz or FSB533-800MHz). If you want optimize the processor, set this item to Enabled, so that the processor's speed will be controlled by the use of your operating system and applications. Setting options: Enabled, and Disabled. 4-8

User Manual
Page 75
... Password and User Password Supervisor Password allows the user to enter and change the settings of BIOS password protection that is implemented. To clear a set , the new item User Access Level and Password Check will be disabled. User Password only allows the user to enter the setup menu, but do not have the right to run Setup. The Password Check item is used to specify the type of the setup menu; A message box will show up confirming the password will boot...
... Password and User Password Supervisor Password allows the user to enter and change the settings of BIOS password protection that is implemented. To clear a set , the new item User Access Level and Password Check will be disabled. User Password only allows the user to enter the setup menu, but do not have the right to run Setup. The Password Check item is used to specify the type of the setup menu; A message box will show up confirming the password will boot...

